02/26/2022 2,859 Cylinder block
Author: Victor
A malfunction of the cylinder head will lead to incorrect operation of the car engine as a whole. This unit consists of many elements, but most often car owners are faced with the need to change the seal. In the article we will look at in what cases the cylinder head gasket of a VAZ 2114 is replaced and how to change this product yourself.
[Hide]
Where is the cylinder head gasket located on a VAZ 2114?
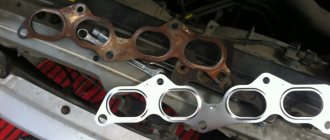
In a VAZ 2114 car, an injector with an engine of 8 or 16 valves, the seal is installed at the junction of the cylinder head with the block itself. Structurally, this element consists of several layers. High-quality sealing is ensured thanks to sheet steel, fiber, cardboard and other materials that are pressed together and covered with one layer of sealant.
Damaged cylinder head gasket VAZ 2114
conclusions
Replacing the head gasket on a VAZ-2114 is quite difficult, since you need to know the design features of this engine, as well as have experience in performing such operations on similar engines.
The choice of gasket should be approached seriously and carefully, since the normal operation of many components depends on its condition. If the process described in the article seems quite complicated and the motorist is not able to carry out the operation on his own, then it is recommended to contact a car service center, where they will help and do everything quickly and efficiently.
Source
When should you change?
It is necessary to check the performance of the seal if the first signs of malfunction appear.
Symptoms that the cylinder head gasket has burned out:
- Bubbles appear in the antifreeze in the radiator unit, as well as in the expansion tank of the cooling system. This indicates a lack of tightness. The seal is checked first.
- Exhaust gases exit through the sealing product of the cylinder head 2114. This usually happens after repairing the cylinder head, if the car owner has tightly tightened the bolts securing the device.
- The appearance of white smoke from the muffler, resembling steam. Its presence indicates that coolant has entered the cylinders of the power unit, penetrating the lubrication system through a breakdown in the head gasket.
- The appearance of a white foamy emulsion on the dipstick for monitoring the engine fluid level. This is due to a lack of tightness in the lubrication system and refrigerant getting into the oil. This problem may indicate the presence of cracks in the cylinder block of the power unit.
- Decrease in car engine power, increase in fuel consumption. When pressing the gas pedal, the driver may feel dips; the engine takes more time to gain speed. When driving uphill, the engine will randomly stall, and the speed of the power unit may fluctuate. If the gasket is severely damaged, the power unit stops spontaneously at traffic lights or when neutral gear is activated.
- Presence of traces of motor fluid in antifreeze. If you open the expansion tank cap, you will see oil stains in the refrigerant.
- Spark plugs filled with coolant. If you disconnect the high-voltage wires from the devices one by one and unscrew them from their seats, you will see that they are filled with coolant. It is difficult to determine visually. Touch the liquid remaining on the candles with your finger, then taste one drop of the substance, but do not swallow it. If a sweetish taste remains on the tongue, then the candles are filled with antifreeze.
You can learn how to correctly determine the need to repair the power unit in the “four” from the video filmed by the “Engine Repair” channel! And interesting!”
Symptoms of a problem
So, when all the points have been considered, it remains to list the signs of cylinder head gasket failure:
- A large amount of white smoke comes out of the muffler.
White smoke from the muffler is a sign of a faulty cylinder head gasket
- Sufficient amount of emulsion on the filler cap.
Emulsion on the filler cap
- Antifreeze has an oil effect.
- The oil level in the pan has increased.
- The smell of antifreeze or exhaust gases can be traced in gasoline.
This is interesting: How to completely disable the alarm on a car: disabling a car alarm with or without your own hands with or without a key fob
Gasket selection
The product must meet the following properties:
- elastic deformation, which will not allow the gasket to wear out quickly;
- impermeability of liquids - water and engine oil;
- resistance to gases;
- maintaining its characteristics over time;
- resistance to various chemical influences.
In case of burnout, in accordance with the technical manual, to ensure the working condition of the mechanism, only original gaskets must be used.
The article number for this product is 21083-1003020. The dimensions of this gasket are optimally designed for installation in the seats on the VAZ 2114 head. The product is manufactured at the AvtoVAZ plant. You can use analogues from manufacturers Patron, Rains, Master-Sport, Trialli, etc. The cost of some similar products can be 2-3 times higher than the original.
An overview of the faulty gasket and the procedure for solving the problem is shown in the video published by the KV Avtoservis channel.
Correct operation of a torque wrench
A tool such as a torque wrench, which allows you to tighten bolts with equal force, requires great care in operation and certain skills.
An approximate sequence for tightening bolts with this wrench is as follows:
- set the holder to the “zero” position;
- begin smooth rotation of the instrument, while simultaneously monitoring its readings;
- if the tool rotates (especially at the initial stage of tightening) without changing the torque on the indicator, this may indicate a slight internal stretch of the fasteners. This phenomenon is absolutely normal and the rotation of the tool should be continued;
- When the tightening torque corresponding to the required one is reached, the movement of the tool should be stopped.
We change it with our own hands
Replacing a gasket correctly with your own hands without experience is not so easy. But if checking the injection engine showed that the reason is a broken seal, then you can try to do everything yourself. To do this, follow the instructions below.
Required Tools
What you will need to complete the task:
- set of wrenches;
- socket wrenches;
- set of hex keys;
- two screwdrivers - with a Phillips and a flat tip;
- new seal for the cylinder head of the VAZ 2114;
- a bucket or cut-off bottle into which the used refrigerant will be drained;
- clean rags;
- torque wrench for tightening the cylinder head bolts.
The Jecos Presents channel published a video showing an overview of a damaged cylinder head gasket on a VAZ 2114.
Algorithm of actions
Instructions for replacing the gasket yourself:
- Drive the car into a garage with a pit. Work on the overpass is allowed.
- Turn off the voltage in the vehicle's on-board network. Open the hood, loosen the bolt on the negative terminal of the battery and disconnect it.
- The piston of cylinder 1 must be fixed in the top dead center position. To do this, set the gearbox selector in the passenger compartment to the neutral position. Place bricks or wheel chocks under the wheels. Unscrew the bolts securing the right wheel of the car and remove it. Unscrew the screws securing the engine compartment mudguard and remove the product. Then unscrew the screws securing the front camshaft drive belt cover, and then disconnect it. The engine crankshaft is rotated by the screw that secures the generator set pulley to it. The device is rotated until the marks on the camshaft pulley coincide with the marks on the rear cover. Remove the plug from the service hole on the clutch housing, make sure that the marks on the flywheel match.
- Open the coolant drain plug by placing a bucket or cut-off bottle underneath it. Wait until the refrigerant has completely drained from the system.
- Relieve pressure in the vehicle fuel lines.
- Loosen the clamp and disconnect the exhaust system intake line from the exhaust manifold.
- Dismantle the cylinder head cover; to do this, you need to disconnect the throttle, as well as the receiver and the intake and exhaust manifolds.
- Using a screwdriver, loosen the clamp that secures the air supply line to the throttle. Remove it from the assembly with the air flow intake pipe and the cleaning device housing.
- To the left of the cylinder head of your car you will see several ground wires, that is, ground. They must be disconnected and the fuel rail and other system components removed.
- Unscrew the bolts securing the front cover, and then remove the timing belt. The crankshaft must be secured against turning.
- Loosen the bolt securing the tension roller and remove it. Also remove the spacer washer. Unscrew the screw securing the camshaft toothed disk and remove it.
- Remove the back cover. To do this, unscrew the nut that secures it, and then unscrew the other screws that secure the device. Using a Phillips head screwdriver, unscrew the bolts and loosen the clamps, disconnecting all lines from the cylinder head exhaust hose one by one. We are talking about the inlet pipe of the radiator unit, thermostat lines and hoses of the throttle and heating system. Check their integrity and replace if necessary. After unscrewing the nuts, disconnect the fuel drain and fuel supply lines.
- Using a hex wrench, remove the ten retaining screws. When unscrewing, we recommend turning them alternately by half a turn, first the middle bolts, and then the side ones. This will reduce the pressure and prevent the possibility of cylinder head deformation. The bolts are removed from their seats with washers.
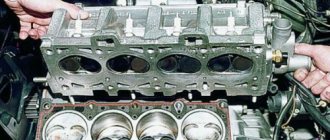
- Remove the cylinder head with the sealing gasket.
- Clean the surfaces of the head and block from remnants of the old gasket and dirt, as well as metal dust. Make sure there is no engine fluid in the threaded holes. Otherwise, it must be removed. Clean carefully so as not to damage the surfaces.
- Install a new gasket. When installing, take into account the position of the two centering sleeves. The installation must be done so that the hole with copper edging is located between cylinders 3 and 4. This hole is used for the passage of engine fluid through the lubrication system. Before installing the head, make sure that the valves on the first cylinder are closed.
- Install the cylinder head. During installation, the bolts are placed in the technological holes. All screws are tightened in accordance with the diagram below - first the central ones, then the side ones. As for tightening, first tighten the bolts with a torque wrench with a force of 20 Nm. After this, observing the tightening sequence, the bolts are tightened to 69.4 - 85.7 Nm. All elements must be tightened with the same force. Then the screws are tightened 90 degrees, and at the final stage the bolts are turned another 90 degrees.
- After installing the cylinder head, all previously disconnected components are installed in the reverse order. The disconnected pipes, as well as the wires with the controller plugs, are reconnected. At the final stage, perform diagnostics and adjust the clearances in the valve drive. Reinstall the timing belt. Make sure it is intact and well tensioned.
- Fill the cooling system with fresh antifreeze. Start the engine, warm it up and make sure there are no coolant leaks.
Photo gallery
Photos of the replacement are shown below.
1. Use a Phillips screwdriver to loosen the pipe clamps
2. Unscrew the bolts securing the cylinder head
3. Install the new gasket in place
4. Tighten the cylinder head mounting bolts, observing the order
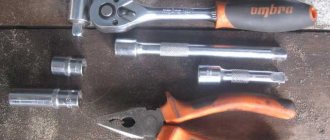
Necessary tool
Engine repairs involving gasket replacement, although labor-intensive, can be done independently if you have the necessary equipment at hand.
Everything you need to perform the operation is listed below:
- sets of open-end and socket wrenches (you will especially need keys for “10”, “13”, “17” and “19”);
- a set of heads of the same dimensions, as well as a special “Torh” head;
- torque wrench;
- screwdrivers;
- pliers;
- containers for draining technical fluids;
- rags;
- sealant;
Consequences of untimely replacement
If the replacement is not done on time, it will lead to serious problems. Due to a broken gasket, engine oil will begin to enter the cooling system, which will disrupt its overall operation. Antifreeze will not be able to properly cool the power unit. The stove will work poorly, the engine power will decrease, and problems will arise in its operation. The engine will stall, in some cases it will be impossible to start it, and dips may be felt when you press the gas pedal.
Due to antifreeze entering the lubrication system, the oil will lose its properties. Lubrication of rubbing components and parts will be less effective, which will lead to their accelerated wear and damage. The engine will run rough and may overheat due to the loss of antifreeze properties. In the winter season, difficulties will arise with starting the engine. If you do not change the gasket and continue to use the car this way, this may lead to breakdown of the power unit and the need for major repairs.
Assembly Features
Before assembly, you should check the bolts securing the head to the hood; their length should not be more than 13.5 cm; if they are longer, they can no longer be used.
You should also check the flatness of the head. If it was overheated, it is possible that it was warped and will require repair in the form of trimming the plane.
During assembly, the head bolts are tightened in a certain sequence and with a strictly defined tightening torque. Next, everything is assembled in the reverse order of disassembly.
Disassembly is also carried out in the same sequence if the power plant is being modified.
Video “How the gasket replacement process occurs”
The PADuCT channel published a video in which the procedure for replacing the cylinder head seal in a VAZ 2114 car is shown in accelerated mode.
Do you have any questions? Specialists and readers of the AUTODVIG website will help you ask a question
Was this article helpful?
Thank you for your opinion!
The article was useful. Please share the information with your friends.
Yes (80.00%)
No (20.00%)
X
Please write what is wrong and leave recommendations on the article
Cancel reply
Rate this article: ( 5 votes, average: 4.80 out of 5)
Discuss the article: