Troubleshooting the heated rear window of a VAZ
Almost all VAZ models have heated rear windows, which makes driving the car much easier in special conditions.
Most often, heating is needed in bad, cloudy weather, when the rear window fogs up from the condensation that forms, as well as in winter, when the glass becomes covered with ice. The operating principle of the heater is quite simple:
- a conductive thread of a certain resistance is applied to the rear window, which heats up when current passes through it;
- supply voltage is provided by the following components: wiring, relay, fuse and power button;
This scheme is used on all VAZ cars (as well as on most foreign cars), from the “classics” to the latest models.
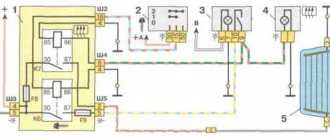
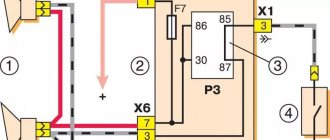
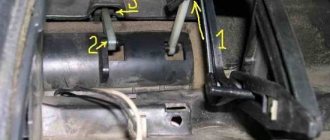
Rear window heating malfunctions and solutions Diagram:
1 - mounting block;
2 – switching relay;
3 – ignition switch;
4 – power button (backlit);
5 – warning light on the instrument panel;
6 – heating thread (element) of the rear window;
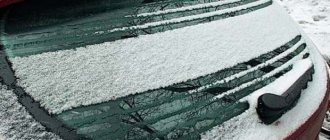
The inoperability of the rear window heater is detected immediately; when the heating is working, the fogged glass begins to clear up literally in the first minutes after switching on. If the heating is not working, this does not happen and the glass remains foggy.
Heating may not work for the following reasons:
- the glass does not thaw at all, the signal light (power button) does not light up: most likely, the control for turning on the heating relay does not work. It is necessary to check: control voltage and ground (85 and 86 on the relay, 1 and 9; and 2 and 4 on the block), fuse F7, button 4.
- the heating does not work, the indicator lamp on the instrument panel (or on the power button) lights up: there is probably no supply voltage. It is necessary to check: supply voltage (pin 5, 30 on the relay, 19 on the block), fuse F4, voltage and ground on the heating element, integrity of the element itself;
- the glass becomes partially clear (in stripes). Some heating threads have failed. Restoration is possible: it is necessary to find the damage (open circuit) and restore it using conductive varnish (glue) or using a special repair kit.
- everything works, but the glass does not thaw. This is possible in winter, or during the cold season, when the glass is heavily icy. The heating element of the heater is not enough and the glass cannot thaw. To avoid this, you need to clear the glass of ice.
If you find an error, please select a piece of text and press Ctrl+Enter.
Heater device
First of all, let's carefully study the structure of the object in question. On the rear window of a car there are conductive threads that heat up due to the fact that current passes through them. They create heating. Its voltage is maintained by elements such as relays, wiring and fuse. This elementary circuit ends, of course, with a power button.
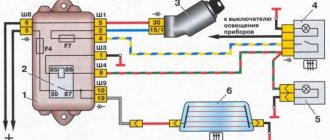
The diagram below describes in detail the structure of the heater of the VAZ 2107 car:
- mounting block or so-called “block”;
- on/off relay;
- egnition lock;
- on/off button;
- warning light on the dashboard;
- heating filaments on the rear window.
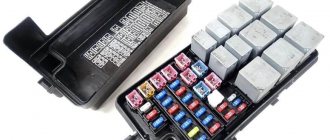
VAZ 2107 fuses and relays, electrical diagrams
Often when operating a VAZ 2107 we encounter electrical problems. At one point, one of the electrical appliances, such as a stove or low beam headlights, refuses to work. Dimensions, cigarette lighter, turn signals and other components of the vehicle's electrical circuit may also stop working without warning.
To find the cause of the malfunction, you first need to understand whether voltage is supplied to a particular device and check the fuses and relays of the VAZ 2107. The most important thing in the circuit is the fuse. It protects the device from overloads and failure. If there is any short circuit or if the current in the circuit increases significantly, the fuse will blow. Therefore, first of all, let's open the hood of the car and check the fuses.
VAZ-2107 fuses
F1 (10 A) - lamps in the reversing lights, heater (heater electric motor), heated rear window . If your reverse light does not work, check this fuse, then the lamp itself, and it may also be the reverse light switch (on the rocker or gearbox). If the heater does not work, but this fuse is intact, the fault may be in the wiring or in the heater motor itself, as well as in the switch on the panel.
F2 (10 A) - electric motors for windshield wipers, headlight cleaners, windshield washer pumps and headlights . If the wipers or washer do not work, check this fuse and connector 1 for the relay. A relay or jumper must be installed in it. It could also be the wiring or the wiper motor itself.
If the windshield washer does not work, check the fluid level in the washer reservoir. In winter, poor-quality or untimely replaced fluid can freeze in the washer system pipes. The washer nozzles may also become clogged. Or the issue may be in the pump itself (located in the washer reservoir), if, for example, it has already served its purpose or was often turned on without windshield wiper fluid.
F3 (10 A) - reserve
F4 (10 A) - reserve
F5 (20 A) - rear window heating element and relay contacts for its activation . If the rear window heating does not work, also check relay R1. If the relay and fuse are working, check the tightness of the connection on the contacts of the heater and the integrity of its elements (no breaks).
F6 (10 A) - cigarette lighter, clock . If the cigarette lighter does not work and this fuse is intact, the problem may be in the contacts of the connector itself. Disassemble the panel with the connector to access the contacts and check their condition.
F7 (20 A) - sound signals and their relays, cooling fan . If the sound signal does not work and this fuse is intact, check the signal device itself. The problem may be in its windings or contacts. Also check the condition of the contacts on the steering wheel (in the signal switch). Another reason may be hidden in the relay. Check connector 2. It should have a working relay installed or, if it is missing, a jumper.
Fuse and relay block VAZ 2107
When diagnosing electrical faults, it is very convenient to use a multimeter. Using it, you can ring any connections and devices to check their functionality. If you know how to use it and have at least minimal knowledge of electrical engineering, I think it will not be difficult for you.
Owners of cars with a heated rear window enjoy a huge advantage over drivers of cars that do not have a heated rear window or it does not work.
Scheme for heating the rear window of a VAZ 2107 car
“Seven” is still popular, they are bought, then sold, then bought again. This is the most advanced model of the classic Lada.
The rear window heating schemes for each car brand are different, but for models of the same family they are approximately the same. The VAZ 2107 heater circuit is simple. You should look for the reason for the intermittent or completely non-functioning glass heater in the electrical circuit diagram. Heated glass does an excellent job of preventing fogging, but it happens that the heater is working, the heating is working, but the glass in the car still sweats.
How to improve your windshield
As you know, in VAZ 2107 cars the manufacturer did not provide such a function as a heated windshield. There is only its airflow, which allows you to remove the effect of “foggy glass”. If you want to improve your car, then you can become the owner of a heated windshield. This athermal glass can be installed independently without any problems, since all the necessary components are included with it.
This type of glass is ideal for the VAZ 2107, so a snowy, frosty morning will no longer be able to ruin your mood. Of course, heated glass is quite expensive compared to its simple counterpart. But you definitely won’t regret this windshield improvement.
How to fix the heated rear window of a VAZ2107 with your own hands
To eliminate the causes of malfunctions, you will need the following devices:
- multimeter or voltmeter;
- foil.
Identifying the cause throughout the entire circuit
The most common failure of a defroster is a blown fuse. Until some kind of breakdown occurs, for example, failure due to a blown cigarette lighter fuse, the location of the unit and the fuses themselves are not known.
- Step No. 1 - in VAZ 2107 cars, the fuse that is responsible for heating the rear window is located in the fuse block under the designation F5.
- Step No. 2 - if the fuse is working, then the next step is to check the heater terminals on the glass and for ground.
- Step No. 3 - check the control unit connector (relay and toggle switch (on/off button)).
- Step No. 4 - checking the heating filaments with a tester.
- If the above steps do not reveal the cause, then Step #5 is to check the ignition switch contacts or fuse block board.
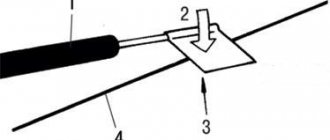
Step-by-step guide to diagnosing defroster filaments:
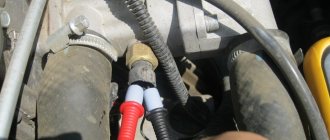
- To ensure that the heating filaments are not damaged by the sharp tips of the probes, it is necessary to wrap pieces of foil around the probes of the measuring device (voltmeter or multimeter in position “B”).
- Turn the ignition key and turn on the heated rear window switch.
- One probe of the measuring device must be connected to the positive wire, the second - to the middle of the wire (see figure).
- The value in volts should be 6. If it shows 6 V, then the heater filaments are working.
- If the value on the device displays 12 V, then the thread is broken between these two points.
- If 10 V is visible on the screen, then the thread is broken from the midpoint to the negative point.
- Next, you need to move the probes to the right, from the middle point to the right vertical stripe (minus), from the “plus” to the middle. If in this section the meter shows from 0 to 5 V, then this section of the circuit has a break.
Diagnostics of heater filaments with a voltmeter
Before repairing threads, you need to buy a repair kit in advance, and then do the repairs in this order:
- Clean the torn section of thread with alcohol.
- Along the length of the thread, above and below it, we evenly glue electrical tape (you can use adhesive tape, but electrical tape is more convenient). The width between the two strips of electrical tape is equal to the width of the heater filament.
- We apply a special solution with a brush (called a kit for repairing rear window defroster filaments) along the entire length between the electrical tapes. It would be more effective to trim the brush, remove the side sticking hairs, so as not to smudge the electrical tape and avoid overspending.
- We wait until the solution dries naturally, that is, we do not turn on the heater. Natural drying time is about 1 day.
Which car lamps are the most popular? Lamps H8 and H11 have some differences, but are interchangeable.
Recommendation for choosing a special regenerating agent for the glass heater:
- the color of the solution should be red-cinnamon (in practice, gray color did not work);
- the cost of a good working special tool is about 350-400 rubles (bought for 150 rubles, I could not restore the thread).
Wires for connecting electrical appliances
| Connection type | Section, mm2 | Insulation color |
| Negative terminal of the battery - vehicle ground (body, engine) | 16 | Black |
| Starter positive terminal - battery | 16 | Red |
| Positive contact of the generator - plus battery | 6 | Black |
| Generator - black connector | 6 | Black |
| Terminal on the generator “30” – white MB block | 4 | Pink |
| Starter connector “50” – starter relay | 4 | Red |
| Starter Start Relay - Black Connector | 4 | Brown |
| Ignition switch relay - black connector | 4 | Blue |
| Ignition switch output “50” – blue connector | 4 | Red |
| Ignition switch connector “30” – green connector | 4 | Pink |
| Right headlight plug - ground | 2,5 | Black |
| Left headlight plug - blue connector | 2,5 | Green, gray |
| Generator output “15” – yellow connector | 2,5 | Orange |
| Right headlight connector - ground | 2,5 | Black |
| Left headlight connector - white connector | 2,5 | Green |
| Radiator fan - ground | 2,5 | Black |
| Radiator Fan - Red Connector | 2,5 | Blue |
| Ignition switch output “30/1” – ignition switch relay | 2,5 | Brown |
| Ignition switch contact “15” – single-pin connector | 2,5 | Blue |
| Right headlight - black connector | 2,5 | Grey |
| Ignition switch connector “INT” – black connector | 2,5 | Black |
| Six-pin block of the steering column switch - “ground” | 2,5 | Black |
| Two-pin block of the steering column switch - glove box illumination lamp | 1,5 | Black |
| Glove compartment light - cigarette lighter | 1,5 | Black |
| Cigarette lighter - blue block connector | 1,5 | Blue, red |
| Rear window defroster - white connector | 1,5 | Grey |
Useful: VAZ 2110 diagram