Relay-timer for limiting the operating time of the heated rear window (mirrors)
Relay-timer for limiting the operating time of the heated rear window (mirrors) LTR-30 – turns off the heating after a set time. Switches current up to 30 A. Installation and installation are very simple: simply replace the standard relay. No additional connections or modifications are required.
Can be used on any cars.
Problem
Whether in winter or rain, heated rear windows and mirrors are very necessary. But, having turned it on, we forget to turn it off and the heating works continuously throughout the entire trip. It would be logical for the heaters to turn off after a certain time , for example, after 20 minutes. During this time, the snow and ice have time to thaw and the water to dry, and then the need for a heater disappears.
It is equally important that the heaters only operate when the engine is running to prevent the battery from draining.
Connection
The LTR-30 relay is installed instead of the standard relay 904.3747.10 or 904.3747-11 to turn on the rear window heater and/or mirrors.
| Relay options LTR-30 |
When voltage is applied to the relay winding contacts 85-86, contacts 30-87 close. When connecting, it does not matter: contact “30” of the relay can be connected to the +12V on-board power supply of the car, and contact “87” - to the load (heater), the second end of which is connected to ground, and it is possible to connect vice versa, i.e. e. “87” – to +12V, and “30” – to the load. The control voltage can also be supplied to contacts “85” and “86” in any polarity.
| Relay diagram LTR-30 (simplified) |
Since the standard circuit for turning on the heated rear window, as a rule, does not have circuits for monitoring the ignition on via the power circuit (only the relay winding is turned off), the LTR-30 timer relay (replaced by relay K7 in the above circuit) has an on-board voltage control circuit for this purpose and turns on the heating only when the engine is running, and also turns it off when the ignition is turned off, even if the timer has not expired - so as not to drain the battery.
If everything is connected correctly, the relay is immediately ready for operation.
Operating principle of the LTR-30 relay
The relay has two operating modes:
1. When the relay is turned on briefly (up to 1 second) - voltage is applied to the relay “winding” - the relay operates in trigger mode. those. the first time - it turns on and the shutdown timer starts, the second short turn on - the load is turned off. This mode is convenient when using a non-locking button for turning on the heaters.
2. When the relay is turned on for a time of more than 1 second - voltage is applied to the “coil” of the relay for a time of more than 1 second - the load is turned on and the shutdown timer begins to work. After the set time has elapsed, the relay will open. The relay will also open if the voltage is removed from the relay “coil”.
When the relay is turned on (power is supplied to the relay winding), the power switch connecting contacts 30 and 87 closes and the LED indicating the relay status turns on.
After a set time (for example, 20 minutes), the relay will open contacts 30-87 and turn off the load until the voltage from the contacts of the relay winding is disconnected, while the LED reduces its brightness by half. If you remove the voltage from contacts 85-86 and apply it again, the time countdown will resume.
When the vehicle's on-board network voltage drops below 12.6V (can be changed), the relay turns off the load, continuing the timer countdown, and when the on-board network voltage increases again, the relay turns on the load - this ensures that the heaters operate only when the engine is running.
The shutdown delay time can be changed (see Relay programming).
In winter, you can use option “2” for daily heating of the rear window of the car: the heater switch is left in the “ON” position and every time you start the engine, the LTR-30 timer relay, withstand a 30-60 second delay to turn on for the engine to turn on operating mode will turn on the heated rear window for a specified time (for example, 20 minutes) and turn it off after this time or when the ignition is turned off. This mode will allow you not to touch the heating switch throughout the winter, making full use of the capabilities of the LTR-30.
| Diagram of the rear window heating system 1 – mounting block; 2 – ignition switch; 3 – rear window heating switch; 4 – control lamp for turning on the heating; 5 – rear window heating element; KB – additional relay; K7 – relay for turning on the heated rear window; A – to power supplies. |
| Relay LTR-30 with cover removed |
Control is carried out by a processor from Microchip (USA).
Relay programming
To enter the shutdown delay time programming mode, it is necessary to turn the relay on and off 20 times with a frequency of approximately 2 on/off per second. If there is a break for more than 2 seconds, the countdown must be resumed. It is more convenient to program by installing the LTR-30 relay in place of the high beam relay - you can enter the programming mode by pressing and releasing the flashing lever of the high beam headlights. Entering the programming mode is indicated by a long (1.5 sec) ignition of the LED and high beam headlights, if the LTR-30 relay controls their inclusion.
Next, the counting of the positions of 5-minute time intervals begins: 1st – one blink (flash) of the LED and headlights, 2nd – two, third – three, etc. until twelve. After this, a long interval of indication lighting (2 seconds) is switched on, during which the “off timer” mode is set. The cycle is then repeated one more time. In the right place, i.e. At the desired position, you need to briefly press the switch lever (turn on the relay) of the headlights. The larger the position number, the longer the delay time. Programmable shutdown delay time - from 5 to 60 minutes, evenly distributed over 12 time interval positions. That is, for example, to set the shutdown delay time to 20 minutes (approximately), set position 4 (press the lever after the fourth series of four flashes).
What affects traffic safety?
Almost all heating systems are electrical appliances and they are not particularly reliable. But if the heated seats or steering wheel does not work, then such malfunctions only affect comfort, and you can completely do without them.
But the lack of heated rear window and side mirrors can become a serious problem, since in this case there is already a negative impact on traffic safety.
With the rear window and side mirrors frozen, the driver is completely deprived of visibility of what is happening behind the car, and in such conditions it is not far from an accident.
Also, any reversing without a normal view from behind is an unpleasant and, in winter, a dangerous procedure, since to assess the situation the driver needs to lean out of the window and control the movement in this not very comfortable position.
What causes interior glass to sweat?
Why do the windows on a VAZ 2110 fog up? This is a question that baffles half of car owners. I’ll say right away that this most likely happens in cold weather due to increased humidity in the car interior, from which I’ll now explain:
- The most common reason is if the driver has a hangover, the windows sweat from fumes
- The second most common reason is that the interior heating radiator is leaking quietly, the liquid collects under the rugs, while the leak is small, it is almost unnoticeable, so it is worth checking the condition of this radiator
- Another reason for glass fogging may be the wrong direction of the stream of warm air from the stove; if the glass is blown, it dries, when it is not blown, it may begin to “sweat”, this, by the way, is the main reason why the windshield on a VAZ 2110 sweats
Purpose and design
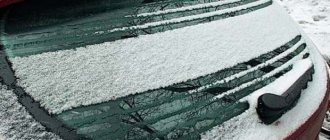
The purpose of the rear window heater can be judged by the very name of the system - by heating it fights condensation that settles on the surface, the cause of which is the difference in temperature in the cabin and outside.
In the autumn-spring period, this condensation causes “fogging” (a water film is formed, which greatly limits visibility), and in winter it turns into ice and frost, through which it is generally impossible to see what is happening behind.
As for the side mirrors, they are located outside and should not “fog up” or freeze, since there is no temperature difference as such. But there are other reasons why a water film and frost form on the surface of the mirror, reducing visibility.
The design of any heater is very simple, and on all cars they are built according to the same principle. If we consider only the rear window, its heating system includes:
- Conductive threads and busbars applied to a transparent surface (from the inside);
- Heater power cables (powered from the on-board network);
- Protective elements (relay, fuse);
- Controls (power key with signal diode installed on the front panel).
The main working element in this chain is the threads running along the surface. They have a fairly high resistance, which ensures their heating when electric current passes through them.
The threads are connected to tires laid along the edges of the glass, together with them they form a grid corresponding to the size of the heated area. One of the buses is connected to the power circuit, and the second is connected to ground.
Operating principle of heating
The principle of operation of the heater is very simple - a conductive thread of strictly defined resistance is applied to the rear window, it heats up from the current passing through it. In this case, the supply voltage is provided by such components as wiring, a heater relay, a power button and a fuse (see VAZ 2110: how to replace fuses) A similar scheme is used on all VAZ cars (and on the vast majority of foreign cars), starting with the “classics” and ends with the latest models.
Power supply diagram and operating principle
The heated rear window is powered not directly from the energy source, but through the ignition switch, and there is a logical explanation for this.
Like any heating element, it consumes a large amount of electricity during operation, so to prevent the battery from discharging (if the driver forgot to turn off the heating), it was powered through the ignition switch.
In general, the power supply circuit is as follows: the electric current after the lock passes through the fuse and is supplied simultaneously to the output of the heating switch and one power contact of the relay (the second contact is connected by wiring to the “positive” bus of the grille).
Using the Hyundai Accent as an example, it looks like this.
When turned on, the key closes the circuit and the voltage from it is supplied to the relay winding, as a result of which the relay closes its power contacts and the current is supplied to the “positive” bus and moves along the conductive threads (which causes them to heat up) to the “minus” bus.
The circuit diagram is shown below.
Design of the rear window heating system
The system that helps clear the rear window of ice, snow or fog is not very complicated in design. The electrical circuit in general terms can be depicted as follows:
- C - generator.
- E230 - OZS system switch.
- J519 - on-board electrical network control unit.
- Z1 - heating element of the OZS system.
Although there may be some differences in different car models, nevertheless, if we consider it in detail, then in principle it includes the following main elements.
- Mounting block.
- Ignition switch.
- Heating switch ZS.
- Indicator lamp signaling the activation of the OZS.
- Heating element of the OZS system.
K6 - additional relay. K7 - OZS switching relay. A - connection to power systems.
In addition, the system has fuses, terminals and wires that connect all elements into a single whole.
When the ignition key is turned, the OZS is turned on by pressing a button, to which power is supplied through an additional relay K6. At the same time, the rear window heating relay K7 is activated, the heating element is connected and at the same time the control light comes on.
The design of the heating element on the rear window may also vary. In the standard version, it is a mesh of thin metal nickel threads, which are connected by two conductive busbars located on opposite sides. On one side, a 12V current is supplied to the bus, and on the other, the bus is shorted to ground. Such devices are attached to the glass using special glue.
On some car models, the heating element is applied to the glass using spraying, for example, aluminum. A thin film with good light transmission is attached on top of this coating using glue that conducts current.
Malfunctions
Despite the design simplicity of the rear window heating circuit, it breaks quite often. The most common system malfunction is a blown fuse.
But there are a number of other breakdowns that can occur with the device:
- Damage to conductive threads;
- Oxidation of contacts;
- Broken power supply;
- Relay burnout.
Some of these faults lead to a complete failure of the system, others lead to a decrease in its efficiency or uneven heating of the surface (unthawed areas remain on it).
Circuit elements
A blown fuse is a common failure because the system consumes a large amount of energy during operation. The operation of glass heating under heavy load leads to the fact that the protective element fails.
Also, the relay through which the threads are powered often fails.
Conductive threads
The second common problem is damage to the threads. The thickness of the conductive path is insignificant and it is very easy to break it. Most often, the threads are damaged by the drivers themselves.
Ice forms on the interior side and many, trying to get rid of it quickly, without waiting for the heater to do it, remove it manually - using scrapers. But even the softest scraper can easily damage conductive tracks.
In this case, the system as a whole remains operational, but the broken thread will not heat up, and unheated areas will appear on the glass, reducing visibility.
One broken thread will not particularly affect the view, but several damaged paths can seriously complicate the driver's ability to assess what is happening behind the car.
The car owner has the opportunity to restore damaged threads, but this procedure is complicated by the fact that it is not always possible to visually detect the location of the break, and this is necessary to carry out repair work.
But electrical measuring instruments - voltmeters, ohmmeters or multimeters - help with this.
For example, if you have a voltmeter, the diagnostic technology is as follows:
- We connect the “negative” probe of the device to “ground”, and wrap the “positive” probe with foil (so that during the test the sharp end of the probe does not cause additional damage to the threads);
- We start the engine and turn on the window heater;
- We run a “positive” probe along a thread that does not heat up and look at the readings of the device.
The standard voltage in threads is 5 V, this is the value that a voltmeter should show when the “positive” probe touches the track. At the location of the break, a power surge will certainly occur, after which all that remains is to mark the area with the damage.
Approximately the same technology is used to check threads using an ohmmeter, with the only difference being that a break is determined by a jump in resistance.
Other problems
Other malfunctions of the rear window heating - broken wiring, oxidation of wires and broken relays - are determined and eliminated in the same ways as other electrical appliances - by testing the wires, replacing parts with known-good elements, cleaning contacts, etc.
Methods for recovering conductive strips
Of all the malfunctions, the most unpleasant is the breakage of current-carrying threads. In this case, the system seems to remain working, but it does not function fully.
The difficulty is caused by the fact that the strips attached to the rear glass cannot be replaced, and it is not possible to install new ones, but it is quite possible to restore them. Repairing conductive threads is a simple operation and can be done by any car enthusiast.
A number of methods are used to restore stripes.
Conductive pastes, varnishes, paints
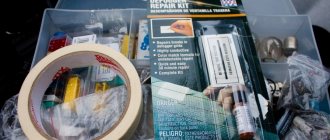
In auto accessory stores you can purchase repair kits for restoring conductive glass heating strips, the main components of which are the specified varnishes and pastes.
The essence of the repair with their help is very simple: tape is glued to the sides of the damaged strip (so that only the thread remains uncovered), the break area is cleaned and degreased.
After this, all that remains is to apply the paste or varnish, allow time to dry (usually 24 hours), remove the tape and check the functionality of the heater.
Metal powder, varnish, glue
The use of steel metal powder and a binder - varnish or glue. This method is good because all the components are at hand and you don’t need to buy anything.
The repair technology is as follows: we attach a magnet to the outside of the glass at the break site, and cover the break site with tape on the sides.
Using a file from any metal part, rub the powder, which we apply to the tear site (the magnet will hold it), then coat it with varnish or glue, and after drying, remove the tape.
The essence of the method is that metal powder, held by a magnet, will connect the strips of the heating system to each other, eliminating the gap, and simply fix the resulting bridge with varnish or glue.
Application of non-ferrous metal chips
Application of shavings from non-ferrous metals (copper, brass) and binders. This method is characterized by high repair speed and ease of implementation.
The technology is as follows: we cover the break area with tape. Mix the components - shavings and glue (varnish) in even proportions. Heat must be turned on before application.
And then we simply apply the mixture with a brush, while the current passing through the strip will ensure that the applied layer dries quickly.
All of these methods make it possible to restore the rear window heating equally well.
Methods for repairing heating element filaments
There are several ways to restore the functionality of a heating filament at home.
Using conductive pastes and adhesives
The easiest and most effective way is to use special repair kits, such as DONE DEAL DD6590, designed to repair rear window defroster threads and contacts by both amateurs and professionals. The good thing about this method is that it does not require tools or materials. It is enough to apply a little conductive paste from a syringe to the site of the thread break according to the attached instructions, wait until the paste hardens and the repair is completed. But this set costs more than $15.
The second method is similar to the previous one. But instead of a proprietary set, they use purchased conductive adhesives, for example, Elekont, a Moscow manufacturer. Glue is applied to the place where the thread breaks, overlapping the entire part of the thread by a centimeter on each side. To obtain a neat look, use a stencil made of electrical tape or adhesive tape. For reliability, the glue is applied twice. It is advisable to lay a piece of tinned copper wire with a diameter of 0.3-0.5 mm between the layers of conductive glue.
There is an opinion that conductive paste or glue for repairing glass heater filaments can be made independently by mixing paint or glue with brass filings in a one-to-one ratio. The resulting composition is applied in a thin layer through a stencil to the place where the thread breaks in several layers. But the reliability of this technology has not been confirmed by practice.
Electroplated copper deposition
Another method is galvanic copper deposition. The heater filament repair method seems attractive. But from personal experience I can say that the reliability of such coatings at home is low. So I was hesitant to use this technology.
Using soft soldering
A mechanical method of restoring the integrity of the rear window heater filaments, using soft soldering, has become widespread. I tested the reliability of this method when repairing rear window heating filaments in my own car. The step-by-step instructions below, written based on my experience, will allow you to easily repair the heater filament yourself in just a few minutes, with virtually no financial costs.
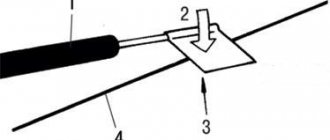
On the advice of theorists on the Internet, I made a big mistake and tried to clean the thread with sandpaper. As a result, instead of a break in the thread 1 mm wide, there was a break larger than 1 cm. The thread strip is very thin, only a couple of tens of microns, and can be erased instantly even with the finest-grained sandpaper. The heater threads are already not covered with anything, and it is enough to degrease the soldering area using a rag soaked in alcohol or acetone.
If the width of the thread break is less than 1 mm, then you can do without soldering an additional conductor. In my case, the width of the gap was large, and I had to first prepare a piece of copper wire for the jumper. A current of about 1 A flows through one heater thread. Based on this, we select a wire with a cross section of 0.17 mm 2 from the wire cross-section table, which corresponds to a diameter of 0.45 mm. The length of the copper jumper must be equal to the width of the thread break plus 2 cm. Before soldering, the jumper must be tinned with a thick layer of POS-61 tin-lead solder. There is no need to tin the heater thread.
In order for the solder to reliably adhere to the heater thread, before soldering the jumper, you need to lubricate the thread in the soldering zone with a thin layer of zinc chloride flux using a brush.
Next, the jumper is pressed against the heating thread and heated for one second with a 12 W soldering iron. The hand is moved to the side. The jumper should be held on by a thread. Trying to tug it to check the quality of soldering is unacceptable; it will fall off and also tear off a piece of the heater thread. Unfortunately, this has been verified empirically. As a result of experiments, I eventually had to solder a jumper 5 cm long.
After soldering one end of the jumper, the second is pressed tightly to the thread and is also heated with a soldering iron. After soldering is completed, in order to remove residual acid flux, the glass is thoroughly washed with water.
To top it off for reliability, although this is not necessary, I covered the soldered jumper on top with transparent “Moment” superglue based on cyanoacrylates, the heat resistance of which is about 70°C. The heater does not heat up above this temperature.
As a result, the time to repair a broken thread with your own hands, taking into account all the preparatory work, was no more than ten minutes. The repaired threads have been in service for more than three years.
Repair kits and thread restoration products
When carrying out repair work, it is recommended to use repair kits designed for this purpose, especially since they are not particularly expensive, and they include everything necessary.
For example, a popular kit for repairing conductive threads of the glass heating system PERMATEX PER-09117 consists of:
- Degreasing wipe;
- Sandpaper for stripping threads;
- Adhesive compound;
- Activator;
- Conductive glue;
- Self-adhesive template.
But in addition to repair kits, you can also purchase simply conductive adhesives or pastes.
In general, the choice of means for repairing rear window heating is very extensive and allows you to find a suitable option for any car owner.
Below is just a small list of adhesives and kits for such work:
- Set PERMATEX PER-21351;
- Glue for repairing threads “Kontaktol”;
- Conductive glue “Astrokhim”;
- Matrix glue;
- Conductive paint "Pro Glass";
- Glue "AVS Crystal".
And there are many such means. But at the same time, it is important to understand that very cheap glues and varnishes are not always of high quality and allow you to properly eliminate breaks.
Method number 2
This method involves the use of non-ferrous metal shavings as a conductive element. Also, to repair the thread, we will need a transparent varnish (it is advisable to use a thick one, like for nails).
Mix the shavings with a brush and apply to a strip previously sealed with tape, as in the previous case. After an hour, the varnish will completely dry. The method is quite old. It is not always possible to connect damaged contacts as needed. Therefore, if it is possible to buy conductive glue, it is better to use the first method. It will be much faster, easier and more reliable. The cost of a 10-gram tube with this composition is 78 rubles. This volume is more than enough to repair several damaged heating threads.
Features of the mirror heater device
Heated side mirrors are another system that affects driving safety, although not to such a significant extent as the counterpart for the rear window. Therefore, it is still considered an optional equipment, which is not found on all cars.
Note that this is not a separate system, but an additional one. In fact, it consists only of conductive strips applied to a special substrate, which is fixed to the inside of the mirror.
The subsystem is connected to the power supply circuit of the glass heating and they are switched on together.
The presence of a mirror heater makes it somewhat easier to identify the cause of the malfunction. Everything is very simple - if both devices do not work at the same time, the breakdown should be looked for in the fuses, relays and control key.
But when only one of the heaters does not work, the wiring to them and its connection points and conductive strips are checked.
Signs of breakdown
You can understand that there are problems with heating by the following signs:
- The glass begins to sweat when the warning light does not work. The first thing you need to do is check what voltage and serviceability of the fuses
- The glass does not heat up when the control lamp is on. The reason may be due to lack of voltage
- Condensation appears in some places; this may be due to a broken thread. Can be restored through repairs, special varnishes
- Defrosting does not occur even though the system is working properly. This can happen if the glass is heavily iced and there is not enough voltage; you need to clean the ice yourself.
There can be many reasons for the breakdown, ranging from the switch to the wiring itself, which can only be repaired by disassembling the entire dashboard.
If the reason is a broken thread, you can try to restore it. There are many different ways to solve this problem, which look like this:
- To eliminate a break, up to one millimeter, you need to prepare a special adhesive composition, for example (Kontaktol, Elekont), a syringe, or a glass cleaner. Special glue is applied to the area where there is a break, and insulating tape is tightly applied on both sides.
- You can use soft soldering or resort to the option of galvanic application of the material. But this procedure is labor-intensive and difficult to carry out in garage conditions.
- If the width of the gap exceeds two millimeters, you need to use a tinned copper core with a cross-section of 0.2 millimeters. It is better to perform soldering with POS-61 solder, but do not tinning the thread.
This is interesting: Air filters for cars: how to change them yourself
Seat heaters
Heated seats are another system that is becoming more common on cars. Although it is completely separate, it is built on the same principle as the heated rear window.
Therefore, their reasons are similar:
- Damage to conductive strips (laid in the seat);
- Broken wiring;
- Fuse blown;
- Control key malfunction;
- Relay burnout.
And since the general principle of constructing heaters is the same, the repair methods are similar. It is only important to know where the circuit components are located and how the wiring is routed.
How to find the location of a broken glass heating filament
Now let's talk about how to check where the rear window heating thread has broken. To do this, you will need a voltmeter or ohmmeter of your choice. Do the following:
- Inspect the rear window - sometimes the break is visible to the naked eye: the thread is interrupted and resumes after a few millimeters.
- Turn on the heating and see where the water drops have not dried. Take a magnifying glass and look at this area more closely.
- Let the heating function remain active. One metal rod of the voltmeter needs to be connected to the positive heating terminal, and the second should be drawn along the thread from the side of the clamp with the “-” sign. Keep an eye on the indicators: the break will be where 0 volts is displayed.
- Take an ohmmeter and attach one probe to the common wire (the negative of the battery is connected to it), and carefully lean the other one against the center of each thread in turn. The break is where the resistance jumps to 4-6 ohms.
Fuses and relays, where to look for them?
Since most often the cause of non-working heating is a fuse and relay, before performing diagnostics and repairs, you should first find out where these elements are located, and each car has different locations.
VAZ-2107
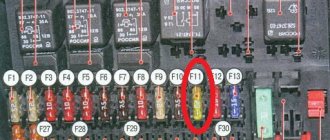
On the VAZ-2107, the relay and fuse responsible for the rear window heating are located in one mounting block, installed in the engine compartment on the right near the engine shield.
In the electrical diagram, the relay is marked “R1”, but it can be visually identified by its location - it is on the far left.
As for the fuse, its marking is “F5”, and in the block it is located third from the left in the second row of fuses.
VAZ-2114
On the VAZ-2114, these elements are also installed in a mounting block installed near the engine shield, but they are located slightly differently.
The relay responsible for the operation of the glass heating on this car in the diagram is designated “K7”, and it is located in the second row of relays in the center.
The fuse is marked with the index “F4” and it is installed in the left row of fuses, fourth from the top.
Lada Priora"
On the Lada Priora, the relay and fuse should also be found in the mounting block, but it is located in the cabin, under the dashboard on the left side (closed with a decorative cover).
In the diagram of this car, the rear window heating relay is designated as “K1” and it is installed in the top row, second from the left.
As for the fuse, its marking is “F2” and you need to look for it in the top row of fuses, where it is installed second from the left.
Lada "Kalina", "Granta"
In the Lada Kalina, the required components are placed in a mounting block, which, like the Priora, is installed on the left side of the dashboard and closed with a lid.
The required relay in this car is designated by the index “K10” and it is installed in the second row of relays in the middle (it is located a little separately from the others).
The fuse in the diagram is designated as “F8” and it is installed in the top row, eighth from the left (approximately in the middle).
In the Lada "Grant", the placement and designation of the components of the heating system circuit does not differ from the "Kalina".
Reno Logan
But in Reno Logan, the designers did something quite interesting, but inconvenient for car owners. Two fuses are responsible for heating the rear window (“F01” is the power circuit, which also powers the windshield wipers, and “F32” is the relay winding circuit) and they are both installed in the mounting block.
To get to the unit, open the driver's door and remove the cover installed at the end of the front panel.
Fuse “F01” is the top one on the left, and “F32” is at the bottom of the block in the middle row (there is only one there).
As for the relay, its designers moved it outside the mounting blocks and installed it separately. You should look for it under the front panel on the left side (driver's side).
Chevrolet Lacetti
The Chevrolet Lacetti also uses a split circuit with two fuses. The first of them, marked “F6,” is located in the interior mounting block (sixth in the left row). The block itself is located at the end of the front panel on the left.
This protective element is responsible for powering the relay windings of a number of equipment - heated glass, air conditioning compressor, headlights, power windows.
Scheme for switching on heated glass and mirrors.
Another fuse – “Ef7”, responsible for powering the circuit, is located in the mounting block installed in the engine compartment (behind the battery). The same block also contains a relay, designated “K10” in the diagram (the middle one in the lowest row of relays).
Ford Focus
In a Ford Focus, the power supply circuit for heating the vehicle elements includes two relays and one fuse. But one of the relays only partially relates to the heated glass - the so-called ignition relay, from which a number of control units and relay windings are also powered, including the one responsible for powering the heated rear window.
It is located in a mounting block installed in the engine compartment and is designated by the index “K8”.
As for the fuse and the relay itself, they are installed in the interior mounting block located under the storage compartment. The fuse in the circuit is marked with the index “F105”, and the relay – “K19”.
Daewoo Matiz
On Daewoo Matiz, the elements of the rear window heating power circuit are located in the mounting block installed in the engine compartment, on the right near the engine panel.
The fuse is designated “Ef7”, and you need to look for it in a horizontal row (standing on the side of the car near the fender), it is the seventh in a row.
The relay marking is “K3”, and it is on the far right in the top row of relays.
Since these circuit elements are considered irreparable and if they burn out they need to be replaced.
For replacement, you should select parts that have the same operating parameters as those that have failed. And knowing their location will greatly simplify the work. Also read how to diagnose a car using a laptop.
Sources of the problem
When the rear window heating malfunctions, you should pay attention to the main points:
- relay;
- wiring;
- circuit breakers;
- threads
You don't need any special skills to replace them. If you study the instructions and know where the heated relay for the car rear window or front structure is located, the wiring diagram, the fuse mechanism, then you can completely do without the help of a specialist.
System fuse
The element may burn out under certain circumstances, increasing the risk of shorting. As a result, the heating will not turn on because there is no power being supplied to it, because the fuse is a protective mechanism for the heating. To understand the location of the elements, you should refer to the vehicle's owner's manual. Algorithm of actions when the location of the fuse is found:
- Remove the device.
- Inspect for integrity.
- Carry out a performance check separately from the entire device.
- Determine the cause of the malfunction.
- Replace individual spare parts or the entire mechanism.
If necessary, the fragment is replaced with a new part, since it is unlikely that anyone will undertake to restore it - it is inexpensive.
Wiring
After diagnosing the fuse or replacing it, further searches for the malfunction of the rear window defroster (if it still does not function) must be looked for in the wiring. Cause:
- bummer;
- break on the fastening;
- fracture;
- burnout.
As a result, no current flows to the heating poles and the system does not work. You can perform simple diagnostic steps using a multimeter. To do this, you need to turn on the heating, and then measure the voltage at the heater terminals. They are usually located at the bottom of the glass or on the sides.
It is worth examining the entire length of the wiring for integrity and then, if there is a break anywhere, it will be found. Instructions:
- disconnect the terminals;
- clean connection contacts;
- replace wires.
Assembly is carried out after re-checking the operation with a multimeter.
Threads
If one or more thread strips are broken, then no current flows through them. Therefore, ice will appear in some areas, which impairs visibility and reduces driving safety. Complete disassembly of the heating equipment will help verify the break. The solution to the problem is to replace faulty elements with new ones.
Heating relay
The relay is responsible for heating the windshield. If the start key does not turn on the device, you should check the relay. It turns off the heating when the car engine is turned off. The element is located in the mounting block. The exact location is specified in the vehicle manual.
Controls
If the device does not start, the reason may lie not in the relay, but in the dysfunction of the power button itself. It is equipped with an indicator light, and if the sensor does not light up, it means that the device is faulty. The problem must be looked for in the contacts of the toggle switch, to which the threads do not conduct current. Solution: replacing the element.