We also recommend reading our expert’s article on how to choose a car window defogger.
You may also be interested in our specialist’s article on how to repair a car air conditioner.
Heating system design
To understand how to restore the heated rear window, it is worth first studying the principle of operation of this system. Its purpose is to eliminate fogging and prevent drying out the air in the cabin. In winter, this function is indispensable, since the icing is evenly removed from the glass and at the moment when you already need to drive, the view is 100% free.
The principle of operation of such a system in the case of a windshield is the efficiency of directed air flows of heat.
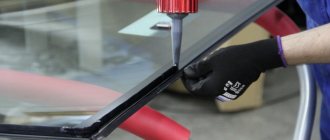
When it comes to the rear window, compact heating elements come into play, the source of which is the electrical network. Metal tracks are fixed on the glass surface from the interior side. These are numerous thin ribbons through which electricity passes, activating the process of heat generation. As a result, due to the heating of the glass, water evaporates and the surface becomes transparent within a couple of minutes.
Additionally, we recommend reading the article by our specialist, in which he talks about how a heated windshield works.
In what cases is it useless to repair heating elements?
If there is a significant area of damage, when almost all the threads are broken and over a large area, it is unlikely that it will be possible to restore the mesh to nominal efficiency. There is no hope for the reliability of the result. This glass must be replaced together with the heating element.
As a last resort, you can use an external heater installed under the glass, but this is a temporary measure, it works slowly, unevenly, consumes a lot of energy, and if the glass is very frozen, it can cause cracks and even spillage of tempered glass.
Scheme of work
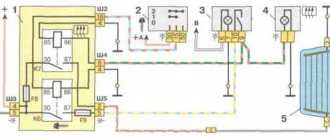
To know how to restore the heated rear window of a car and approach the repair with a high level of professionalism, study the principle of operation and the electrical wiring diagram. From the + terminal of the battery, power is sent to the ignition switch, then to the fuses and, lastly, to the controller. After this path it follows to the power contact of the relay. The vehicle body is connected to the negative terminal of the battery. Activation of the heater supplies voltage to the relay winding, then the power contacts are closed, and the relay terminals are also connected. The current flows through parallel-connected heater strips and then reaches the negative terminal through the body of the machine.
Remember, activation of the heater is only possible with the ignition key activated.
In some cases, a running motor acts as a factor predisposing to activation. This feature is due to the fact that the battery should not be discharged prematurely, and taking into account the characteristics of each car brand, the consumption volume of this system can be 10-25 A.
Signs of breakdown
The main manifestations of why the rear window heating does not work include:
- complete shutdown of heating;
- Not all strips work;
- periodic performance of elements.
Experienced drivers will immediately notice when the heating is not performing its function sufficiently. In winter, the first sign of incorrect operation is fogged up windows when the heater is running for a long period of time. If the rear window heating refuses to turn on or functions intermittently, it means there is a break in the electrical circuit. All components of the heating device should be checked.
Sources of the problem
Since many drivers prefer to restore the heated rear window with their own hands, you need to know about repair options taking into account the source of the problem. There will be no obstacles to independently checking the functional components of the car if you have minimal skills in repairing automotive equipment.
System fuse
The safety element is the first thing that should attract your attention when a breakdown is detected, since the system will not work if it is burned out. The location of this element varies depending on the car model, so at this stage you will have to turn to the vehicle service book for help. Next, remove the fuse and make sure it is working. Repair of the rear window heating will be limited to replacing the burnt out element.
A breakdown of the system relay can also lead to the heating stopping. In such a situation, installing a fresh element will also be sufficient.
Wiring
If replacing the fuse does not correct the situation, proceed to diagnosing the power supply wires. Burnout, broken fastening or fracture help stop the flow of current to the heating poles. To detect this circumstance, turn on the heating button and measure the terminal voltage with a tester. The terminals can be found at the bottom of the glass or on its sides. The lack of voltage on the wires should alert you.
Examine the entire wiring path for integrity, clean the contacts of the terminals and connections. Oxidation in these areas often leads to blocking the voltage supply. If you were unable to cope with this task yourself, an auto electrician will help you.
Threads
If the heating tapes are damaged, it may also be necessary to restore the heated rear window. To know how to do this, you must first study the peculiarities of the work process in this zone. The heating element receives voltage and then the energy follows the threads. In relation to the base, they are connected in parallel and act as current conductors. Their heating is due to a certain amount of resistance; despite the insignificant heating temperature, this is sufficient for its purpose. If one or more threads are damaged, no current flows through them, therefore, these areas do not heat up. The features of repair work in such a situation are described below.
Controls
If all the elements that you checked earlier are working properly, you should pay attention to the power button. You can determine the operation of the system by the light indicator that lights up, which makes itself known after pressing the button. If everything is activated and the corresponding indicators make themselves felt, but the glass is not heated, the working contacts of the toggle switch are likely to wear out or burn, so energy is not supplied. Repairing a heated rear window of a car only requires replacing the button.
Imported cars
In the case of imported cars, do-it-yourself rear window heating repair will not be limited to diagnosing the standard heating system, since the rear view mirrors are also equipped with heating. Activation of the heated glass of the stern leads to parallel activation of the heated mirrors. If the system does not work on both zones, it is most likely that you are dealing with the cause discussed in the first paragraph - a fuse or relay.
It is important to determine which fuses are associated with the glass, because there are several of them. It would be a good idea to diagnose the electronic board, which often wears out due to soldered contacts and broken tracks.
Conclusion
As you can see, there are many options for repairs and you can easily choose the right one depending on the size of the damaged area, the ability to wait a day or two for the composition to dry, your own skills and the availability of the necessary consumables.
In cold weather or just rainy weather, when you turn on the heated rear window, you may find that it simply does not work - either completely, fogging does not go away, or one or more filaments do not heat. This reduces the view from the rear window – which can have a negative impact on driving safety! It needs to be restored. BUT how, what to do? It turns out everything is quite simple, read on...
THE CONTENT OF THE ARTICLE
Actually, the reason has long been known to everyone, on our VAZs, these threads were constantly “burning”, so we drove around with 1 – 2 – 3 threads that did not heat up, it’s terribly inconvenient! But now it turns out that for a long time there have been tools and repair kits that allow you to restore the whole thing, and quite effectively.
Phased renovation
The first thing you need to do is diagnose it and purchase a repair kit. There may be several options for a repair kit, and the repair technology in each case is discussed below.
Finding a Cliff
In addition to visual diagnostics of the condition of the threads, there are several more methods that are more reliable and effective:
- Visual diagnostics require activating the heater when the rear window is foggy. Where the threads are broken, the surface will warm up almost instantly, while in other areas visibility will be problematic.
- Using a voltmeter requires activating the ignition and then turning on the heating system. One probe should lie on the vehicle ground, and the second near the center of the heating tape. First wrap the second probe with foil. The break will be localized in the area where the voltage rises to 12 V or drops to zero. Ideally, this parameter should not exceed 5 V.
- The second method of using a voltmeter involves fixing one probe to the positive terminal of the heater, and the second one must be moved along the negative terminal strip. The problem area will be where the voltage is zero.
- Using the ohmmeter requires activation of the kilo mode. The device must be analog, with an arrow. The probes should be located near the system terminals, which are located in opposite directions from each other. Use distilled water to wet the cotton wool, which must be smoothly passed over the tape. As soon as the needle of the device moves, you will be able to detect the cliff area.
Repair with conductive glue
Repair of the rear window heating threads can be carried out using conductive adhesive. It is designed for temperatures from -60 to +100 degrees. You should not choose kits with glue, which cost 150-200 rubles. Often they do not last long or may not be effective at all. A cost of 300-400 rubles would be optimal for such a set.
Work order:
- Please read the instructions included with the kit. You should have a clear understanding of the options for applying the composition and the speed of its complete drying.
- Prepare the problem surface. Soak a rag in the alcohol solution and wipe the area.
- Lightly sand the edges in the break area with grade-grade sandpaper. It is enough to simply remove plaque and carbon deposits in two movements.
- Use tape to cover the strips along the thickness of the sides. It should not overlap the thread, but also avoid going too far away from the tape. Focus specifically on the width of the thread.
- Proceed to apply conductive glue to the prepared area using a brush or syringe. The instructions will tell you how many layers to apply. The overlap on the working areas of the tape should be 1 cm to the left and right.
- Remove the tape and wait until the composition dries completely. This will not happen before 24 hours.
- Check the functionality of the system after drying.
Repair thread kit
Among the popular and reliable manufacturers of repair kits, which include threads, it is worth highlighting Quick and Permatex. Such options are suitable for repairing even large areas, even spruce we are talking about 10 cm. The equipment includes heating tapes, polymer resin in the form of a spray can and stencils.
Heater repair involves the following steps:
- determine the rupture zone and prepare a thread of the appropriate size;
- remove the protective film and use resin to fix the thread in the required area;
- After complete drying, repeat the manipulations and check the result after 2 days.
Alternative method
Traditional methods are also suitable for restoring threads. The only difference between them is the material used:
- Wood shavings combined with paint. The first material can be obtained from a bar of copper and brass, which must be processed with files. Choose a paint that matches the color of the heating tapes. Mix the ingredients in equal proportions until you reach the consistency of a soft dough. Use masking tape or tape to create a stencil. Paste the stencil and activate the heating. Contact can be determined by a characteristic hissing sound. Apply the mixture using a stencil. This method eliminates the need to wait a day. You can operate the car immediately after the manipulations.
- Soldering of the broken area is carried out using zinc chloride. Give preference to solder with a minimum tin content - POSS-4-6 or POS-18. A copper or silver core is suitable for repairing a large section of tape.
- The shavings can be used in combination with glue, which replaces the paint mentioned in the first method. A suitable option would be BF-2.
Doesn't work, what's the reason?
Actually, there are only two main reasons, and both of them lie in the power system:
- Fuse. YES it can really burn out. This happens for various reasons, maybe it’s just a minor short circuit and that’s all. Thus, your heating will not work completely. You need to find the fuse and check it . This is the first and mandatory step.
- If it is intact, then we need to check the voltage on the wires that go to the main “buses” (wide side strips). As a rule, they have ordinary metal contacts. We just take a multimeter and measure it, if there is voltage and it’s about 12 Volts, that means the power is suitable here, everything is fine.
- The thin lines themselves. To be honest, they can’t all burn out at once. As a rule, from one to three, or at most four, “threads” burn out. Therefore, if part of your window comes off (from fogging or ice), but part does not. It is the non-working threads that need to be looked at.
- Examine this thin strip and you will see the break point. This will be the burnt part, there may be a little black around it (although the thread is originally brown). Also, the thread will seem to open, this place needs to be connected in order to restore functionality.
On my own behalf, I would like to add that the fuse rarely lights up, mostly it is a break in the “threads” of the glass; they need to be restored.
Operating principle of the rear window defroster
The system works quite simply.
From the positive and negative poles of the battery through the ignition switch, fuses, and special relays, electricity flows to 2 corresponding vertical tracks. Between them there are 20-40 transparent horizontal strips 2-3 mm wide, which provide heated glass behind the second row of passenger seats.
The tracks heat up the glass surface, removing snow, ice and remaining moisture, preventing further fogging. The electrical circuit must pass through the ignition switch, since the heating strips consume a large amount of energy.
The heater power supply circuit is common to almost all cars:
- After turning on the ignition, the electric current passes through the fuse, and then simultaneously flows to one of the power contacts of the relay and the output of the rear window heating switch.
- After pressing it, the relay contacts close.
- Thanks to this, electricity flows to the positive bus.
- It is then distributed over all conductive threads and follows towards the negative vertical track.
- When current passes through the horizontal strips, they release heat, heating the glass surface.
As a result, ice and snow melt from the outside, and all traces of fogging are removed from the inside.
Reasons for failure
You need to start looking for the reasons for the lack of heating by checking the fuse, which for various reasons can fail.
To find it, it is useful to use the operating instructions for a specific car. If this element fails, it must be replaced immediately, and then, if necessary, continue diagnostics.
Another reason for the loss of functionality of the entire system may be the failure of the relay.
In this case, this part simply needs to be replaced, since it cannot be repaired.
Next, you should check the voltage at the contacts of the main vertical buses with the heating button on. It should correspond to a value of 12 Volts.
Otherwise, it is recommended to clean the terminal contacts and other connection points that may oxidize and therefore not allow electricity to pass through. If after such procedures the voltmeter does not show anything, then this indicates an open circuit.
The specific location of damage can be detected visually or using a multi-function tester. From one to three strips can be damaged at the same time.
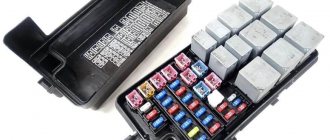
Replacing the fuse box on a VAZ 2107
VAZ 2107 fuses (injector and carburetor) are installed in standard interchangeable blocks, so replacing them is not difficult. The power supply unit can only be replaced with a unit of a similar type (old or new). This is done like this:
- disconnect the ground from the battery;
- remove the air filter housing;
- unplug the wiring harness connected to the fuse box, which is located at the bottom of the power supply unit;
- dismantle the shelf located in the cabin under the “torpedo”;
- remove the glove compartment housing;
- disconnect the second wiring harness from the power supply unit;
- unscrew the power supply bolts (the right bolt is hidden, it is not immediately visible);
- remove the fuse box;
- install a new fuse box;
- tighten the fastening bolts;
- connect the harness coming from the passenger compartment;
- install the “glove compartment” housing and the shelf under the “dashboard”;
- connect the wiring harness under the hood to the power supply unit;
- install the air filter housing;
- connect ground to the battery.
Possible malfunctions with heated seats
The heating device must have a fuse. On the VAZ-2114, two such elements are responsible for the stable operation of the heating. One fuse is located in the mounting block (F16), the other is located under the dashboard.
If you notice that the control lamps do not light up when the heating is turned on, the problem most likely lies in the fuses.
Relay problems:
- The system is turned on in an electromagnetic relay, which is located under the dashboard.
- After the unit is triggered, check the voltage at terminal 87 with a multimeter.
- If operation does not occur, then you need to examine the relay winding at terminals 86 and 87 with an ohmmeter.
- If the problem lies in the relay, it needs to be replaced.
Another problem may be the usual lack of nutrition. To check this, do the following:
- It is necessary to check the power with the power off at the connectors under the seats.
- The black wire is the ground of the car, the second is the power supply, which should have 12 volts.
- Use an ohmmeter to check the resistance of the heater windings. As practice shows, the problem most often lies here. The windings burn or break.
Depending on the situation, the problem with heated seats can be solved independently. However, this requires disassembling the chairs.
To summarize the article, we note that we have not considered all the possible reasons why heated seats may not work. But using the information above, you will know which direction to go to identify the problem.
Replacing the fog light fuse
If the fog lights stop lighting, you should check the fuse installed in the passenger compartment. To replace it you need a screwdriver. The replacement procedure is as follows:
- remove two switches from the console (the place where the radio is installed) using a flat-head screwdriver;
- use a screwdriver to press out the two latches and pull out the plastic insert from the console;
- pull out the fog light fuse housing;
- open the case and replace the fuse;
- Replace the insert and switches.