“Seven” is still popular, they are bought, then sold, then bought again. This is the most advanced model of the classic Lada.
The rear window heating schemes for each car brand are different, but for models of the same family they are approximately the same. The VAZ 2107 heater circuit is simple. You should look for the reason for the intermittent or completely non-functioning glass heater in the electrical circuit diagram. Heated glass does an excellent job of preventing fogging, but it happens that the heater is working, the heating is working, but the glass in the car still sweats.
What does computer diagnostics of the heater control unit reveal?
Carrying out this diagnostic procedure allows you to find out the status of all sensors. Check the software installed in the heater ECU. Find out the performance of the micromotor reducer of the Priora heater. And adjust the units. This operation, adjustment, allows the computer to more accurately produce the temperature closest to that set by the driver. That is, by manipulating the damper, the ECU combines the sensor resistance data into a single system.
How and with what to carry out this operation
Computer diagnostics of the Priora heater control unit is done by pairing the vehicle equipment with a diagnostic device through a special diagnostic connector. It is located quite cleverly, behind the glove box, in common parlance the glove compartment. To access it, you need to pull out this drawer, located on the passenger side, all the way. On its back wall, at the bottom left side, there is a connector.
This type of diagnosis requires professional equipment. This is either a full-fledged motor tester, or a professional scanner such as “Auto-AS” and others. Only they have this function included.
How to do it
Connect the connectors and turn on the ignition. Wait for a connection signal from the equipment. Exit to the work menu. Find the option “SAUO heater” and turn it on. Then everything is the same as when diagnosing the engine ECU. First of all, check for errors. Then check the operation of the mechanisms using the “IM control” function.
Each diagnostic device has its own instructions. Before connecting the device, be sure to study them! Video on the topic of diagnostics "Priors". Checking the electrical package. The same algorithm for checking the heater:
Adjusting the heater damper
Sometimes the reason that the car interior remains cold is that the heater damper does not open, despite the fact that the gear motor is trying to turn it to the desired position. In most cases, the damper regulator, which is responsible for setting it to the desired position, is to blame.
This is possible on the heater dampers both with and without air conditioning due to a clogged cabin filter, which needs to be changed in a timely manner. Dust and leaves prevent the damper mechanism from opening normally.
Another reason is that the thin plastic of the damper simply warps at high temperatures in the heating line, and it stops reaching the desired position. As a result, the stove does not switch to different modes or the flows are distributed unevenly. Most often, the damper regulator remains in the “in the face” position, but the glass does not blow.
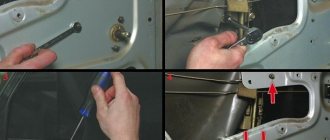
If the damper does not switch, you can remove the panel between the driver and passenger seats; it is located directly behind the central heater grilles. Sometimes you just need to change the seal to which it is pressed, or remove debris that has accumulated in it. After this, you need to check the heater damper in operation and you can assemble the panel.
If there are problems with the damper switching mechanism, you need to remove the plastic on the dashboard near the driver’s right foot. If the plastic damper is deformed, it can be replaced, but it is better to do this under warranty. In this case, repair of the stove damper on Priora is limited to treating the mechanism with VD aerosol lubricant. This can be done blindly, without removing the remaining parts of the dashboard, by feeling the switching mechanism with your hand.
After this, the damper is adjusted by simply switching it to different positions and controlling the movement with your hand under the plastic. In the vast majority of cases, this is enough for the stove to work normally again. After this, install the plastic dashboard in place and secure it with self-tapping screws.
Video: Priora stove. Diagnosis of heater malfunction
Delivery by transport company (cash on delivery, no prepayment)
Advantages:
- the cost of delivery of heavy and large-sized orders is much cheaper than that of Russian Post;
- There are practically no restrictions on the weight and dimensions of cargo;
- There is a wooden crate service - this is an additional guarantee of the integrity of the order.
Disadvantages: unfortunately, there are branches only in cities.
The estimated cost of delivery for an order up to 30 kg is 450 rubles.
List of transport companies with which we cooperate:
- TC "PEK" (cash on delivery service available);
- TC "Business Lines";
- TC "Energia";
- TC "KASHALOT" (KIT) (cash on delivery service available);
- TC "SDEK" (cash on delivery service available);
- TC "DPD";
- TC "ZhelDorExpedition";
- TC "VOZOVOZ";
- TC "Baikal-Service".
To send your order by transport company:
- Place an order in our online store by phone or on the website (registration is not necessary);
- After we receive it, our manager will contact you by phone to clarify the cost, delivery time and your wishes. Next, we will pack your order carefully and then send it to you;
- You will receive a shipment tracking number from us via SMS or email (if available). You can monitor the status of the order coming to you using our tracking service, as well as independently, on the transport company’s website using the track number. After the order reaches your locality and the manager of the transport company contacts you, you need to receive the order at their office or order home delivery;
- Upon receipt from the transport company, you pay the cost of delivery and order.
The cost of delivery is calculated based on the volume, weight of the selected product and the distance from the city of Tolyatti.
To send an order you must:
- indicate full name recipient;
- Your locality and region;
- series, number of passport or driver's license;
- Your phone number (contact).
TC "Business Lines" - Urgent delivery of goods from 1 kg throughout Russia. The exact cost can be found on the official website of the delivery service - https://www.dellin.ru TC "PEK" - Guaranteed safety of cargo for the entire duration of cargo transportation, clear information support, delivery of goods throughout almost the entire territory of Russia, Belarus and Kazakhstan in optimal time and accurately calculated cost of services. The exact cost can be found on the official website of the delivery service https://pecom.ru/ru/calc TC "SDEK" - Low tariffs compared to foreign courier companies, while the quality of the services provided meets modern international logistics requirements. Developed network of own representative offices. The exact cost can be found on the official website of the delivery service https://www.cdek.ru/calculator.html TC “ZhelDorExpedition” - Serves only large cities and towns. The exact cost can be found on the official website of the delivery service - https://www.jde.ru/branch TC "Energia" - Cargo transportation in Russia, the CIS and China. The exact cost can be found on the official website of the delivery service https://nrg-tk.ru TC "KASHALOT" (KIT) - Delivery of cargo from 1 kg to 20 tons throughout Russia and Kazakhstan. The exact cost can be found on the official website of the delivery service https://tk-kit.ru/calculate TC "Baikal-Service" - Transportation and delivery of groupage cargo by road in Russia. The exact cost can be found on the official website of the delivery service https://www.baikalsr.ru TC “DPD” - Transportation and delivery of groupage cargo by road in Russia. The exact cost can be found on the official website of the delivery service https://www.dpd.ru TC "VOZOVOZ" - Transportation of groupage cargo by regular delivery routes between Russian cities.
The exact cost can be found on the official website of the delivery service https://vozovoz.ru The filaments glued to the glass have some resistance, when an electric current is applied to them, they begin to heat up due to the resistance, thereby heating the glass and melting it ice. On one side, a plus “+” is supplied to the filament, and the other end of the filament is connected to a minus “-”.
Lada Priora in any configuration is equipped with a heated rear window and heated mirrors. The heated mirrors turn on when the heated rear window is turned on. The design of heating mirrors is based on the same system as with heating glass; filaments are glued to the mirrors, which warm the mirror and help it to sweat.
Operating principle of the air conditioner
In a sealed air conditioning system, a refrigerant, freon, continuously circulates, which is mixed with a special lubricant that is resistant to freezing. A compressor is responsible for moving freon through the system, which builds up pressure in the heat pipes. After turning on the air conditioner, freon ends up in the heat exchanger located under the dashboard of the car. The internal structure of this device resembles a honeycomb. Once there, the refrigerant begins to take heat from the hot interior. At the same time, it quickly heats up and turns from a liquid into steam. Since the compressor continuously pumps up pressure in the system, the steam goes into the blown radiator, where it cools, again becoming a liquid, which again ends up in the heat exchanger.
Is it possible to install air conditioning on a Priora?
The Priora initially provides the design possibility of installing an air conditioner. A car owner who decides to install this device on his car will not have to make any modifications. All the necessary holes and buttons are already on the dashboard, and space for heat pipes and electrical wiring is also provided. Thus, installing an air conditioner on a Lada Priora is completely legal, and government officials will not have any questions for the driver.
Installing fog lights on a Priora
Fog lights are necessary in poor visibility conditions: fog, heavy rain. Their main feature is the distribution of light flux over the road and along the edges, which significantly improves visibility in bad weather. The basic configuration of the Priora does not include fog lights. They should be installed to increase traffic safety on the road. Fog lights improve visibility not only for the driver on whose car they are installed, but also for all other road users.
One thought on “Electrical diagram of Lada Priora in detail”
These materials present in an extremely simple and accessible form a description of the maintenance and repair of VAZ Lada Priora cars in a step-by-step manner using ready-made spare parts in a garage workshop. Possible malfunctions have been studied and methods for eliminating them have been considered.
The relay and fuse box is also called the mounting block or black box. In the event of a car breakdown related to electrical equipment, the fuses and relays are first checked. If a fuse is blown, you must first determine the cause of its blown before replacing it.
How to disarm the electrical package unit of LADA PRIORA
What to do if Priora is not removed from the standard alarm!
The hazard warning light blinks, the car does not respond to the ignition key buttons. As a rule, several units are involved here that are synchronized with each other.
- Ignition
- Radio channel module (Located in the driver's door)
- Electrical package block (Comfort block)
- Engine ECU
New blocks come with non-activated codes inside and can be installed on any car without problems, but once you register (train) the keys, a special code is written into all these blocks, which is synchronized with each other and serves as a standard alarm system. (Immobilizer) As soon as you turn the ignition key, within five seconds there is a poll between the key and the units, if the code matches everywhere, then the engine ECU gives permission to start, if the code of at least one device is not recognized, the engine ECU is blocked and the car does not start.
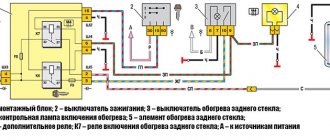
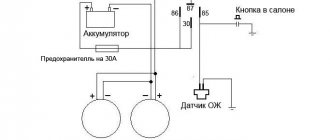
Design of the rear window heating system
The system that helps clear the rear window of ice, snow or fog is not very complicated in design. The electrical circuit in general terms can be depicted as follows:
- C - generator.
- E230 - OZS system switch.
- J519 - on-board electrical network control unit.
- Z1 - heating element of the OZS system.
Although there may be some differences in different car models, nevertheless, if we consider it in detail, then in principle it includes the following main elements.
- Mounting block.
- Ignition switch.
- Heating switch ZS.
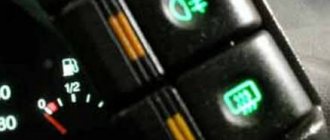
- Indicator lamp signaling the activation of the OZS.
- Heating element of the OZS system.
K6 - additional relay. K7 - OZS switching relay. A - connection to power systems.
In addition, the system has fuses, terminals and wires that connect all elements into a single whole.
When the ignition key is turned, the OZS is turned on by pressing a button, to which power is supplied through an additional relay K6. At the same time, the rear window heating relay K7 is activated, the heating element is connected and at the same time the control light comes on.
The design of the heating element on the rear window may also vary. In the standard version, it is a mesh of thin metal nickel threads, which are connected by two conductive busbars located on opposite sides. On one side, a 12V current is supplied to the bus, and on the other, the bus is shorted to ground. Such devices are attached to the glass using special glue.
On some car models, the heating element is applied to the glass using spraying, for example, aluminum. A thin film with good light transmission is attached on top of this coating using glue that conducts current.
Interpretation of the symbols for the rear wiring harness of the VAZ Priora
The rear part of the electrical wiring chain is responsible for the vehicle's lighting and peripheral systems. This includes lights, locks and windows. The pinout of tips and terminals looks like this:
- 1 – dashboard response;
- 2 – power supply for the door behind the driver;
- 3/28 – power supply for the front passenger panel equipment;
- 4 – maintenance of power windows and door locks;
- 5-6 turn signals;
- 7 – interior lighting;
- 8 – handbrake indication switch;
- 9-10 – aft dimensions;
- 11 – temperature inside the car;
- 12-15 – circuit breakers for lighting the interior of the machine;
- 16/17 – power supply to the devices of the aft right and front left doors, respectively;
- 18/19 – voltage to the rear right and left speakers, respectively;
- 20 – cigarette lighter power core;
- 21 – EBN;
- 22 – contact group of the cargo compartment lighting circuit breaker;
- 23 – heated rear windshield;
- 24 – luggage compartment lighting lamp;
- 25 – additional stop;
- 26 – power line to the electric lock of the luggage compartment lid;
- 27 – power supply for rear number plate illumination;
- A1-4 – mass;
- ХР1/3 – electrical package power controller.
Pinout for rear license plate illumination of VAZ 2170
The small harness, located in the luggage compartment, has only three terminals:
- 1 – power supply to the stern license plate lights;
- 2-3 – license plate lighting lamps;
- 4 – trunk lid lock motor.
Fuse box in the passenger compartment of VAZ-2170, -2171, -2172
The fuse box in Priora is located at the bottom of the dashboard, on the left side of the steering wheel. To get to it, you need to open the cover, which is held on by three latches. Rotate each locking knob 90 degrees and pull the lid down and it will snap open.
Fuses in the interior mounting block
F1 (25 A) - radiator cooling fan . If your fan does not work, check its motor by applying 12 V directly to it from the battery. If the engine is working properly, then most likely the problem is in the wiring or connectors. Check the serviceability of relay K1.
The fan in the Priora usually turns on at a temperature of 105-110 degrees. Do not allow the engine to overheat, watch the arrow of the temperature sensor.
If the fan runs constantly and does not turn off, check the coolant temperature sensor located on the thermostat. If you remove the connector from the working sensor, the fan should turn on. Check the wiring to this temperature sensor, as well as the contacts of relay K1, move this relay, clean the contacts. If this is the case, replace it with a new relay.
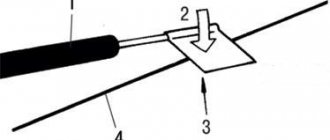
F2 (25 A) - heated rear window . Check together with fuse F11 and relay K2. If the rear window does not fog up, the heating element threads may have broken. Inspect all the threads and if you find a break, seal it with special glue or varnish, which can be bought at car dealerships for 200-300 rubles. Check the connection contacts at the terminals to the heating elements at the edges of the glass, as well as the switch on the dashboard and the wiring from it to the rear window.
F3 (10 A) - high beam, right headlight . F4 (10 A) - high beam, left headlight . If the headlights do not shine on high beam, check the K7 relay and the headlight bulbs. The steering column switch, wiring or connectors may also be faulty.
F5 (10 A) - sound signal.
If the signal does not work when you press the steering wheel button, check relay K8. The signal itself is located under the radiator grille; you can get to it by removing the plastic casing from above. Check it by connecting the voltage to 12 V. If it doesn’t work, try turning the adjusting screw, or replace it with a new one.
F6 (7.5 A) - low beam, left headlight . F7 (7.5 A) - low beam, right headlight . When replacing lamps, be careful; there are separate lamps for the low and high beams, so they can be easily confused. It is better not to install lamps in high-power headlights; the reflectors may melt and the desired effect will not be achieved. Most low beam headlight problems that cannot be corrected by conventional means can be related to the light control module (LCM). The low beam relay is only available in cars equipped with a light sensor, it is located in the place of relay K1; on most cars this relay is not in the mounting block; the low beam circuit goes through the MUS block. It happens that the tracks in the block burn out; if there are problems, it is better to replace it with a new one. If the windshield wipers turn on spontaneously when the low beam is not working correctly, the problem is most likely in the windshield wiper control unit, located in the center of the dashboard, the topmost block, next to the radio, is best reached from the glove compartment, or by hand through the removed console covers at the feet.
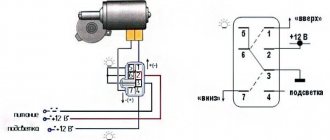
Window lifters
As for the power windows, the electrical circuit on the Priora differs from other models. Control is carried out using a controller. Raising and lowering the windows is done by briefly pressing the button.
In Lada Priora hatchback cars, the electrical circuit has the peculiarity of supplying power directly to the electric window drive. The wire supplies power to the mirror control, heating, and also to the solenoid designed to lock the doors. The control is carried out by the controller.
Device
Almost all stern window heater systems are identical and do not differ much from each other.
The entire system consists of several elements that ensure normal and safe operation of the heater:
- heating threads (their number may vary depending on the device model);
- electrical wires supplying current to the work area;
- device safety relay;
- power button equipped with a signal LED;
- fuse.
The failure of one of the component elements of the heating device or a break in its electrical circuit may prompt the question of why the rear window heating does not work.
The damper drive does not work
It is impossible to check whether the Priora recirculation valve is working (on cars with the Panasonic climate system) by viewing errors in the operation of the system - the corresponding codes are simply not provided. Therefore, it is necessary to perform the following actions in accordance with the algorithm described in the diagnostic card:
- use a multimeter to measure the voltage level between ground and contact No. 1 going to the mode switch,
- if the obtained value corresponds to the on-board network voltage, there is an open circuit in the recirculation switch section,
- otherwise, you need to measure the voltage between ground and contact No. 2 of the recirculation button when it is pressed,
- if the measured value is equal to the on-board network voltage, the switch itself is faulty, and then it must be replaced,
- otherwise, use a multimeter to measure the state of the recirculation key,
- if the value is equal to the on-board network voltage, there is an open circuit in the area between the mode activation key and the SAUKU heater controller,
- if not, proceed to measuring the voltage in the area between ground and contact No. 1 of the damper solenoid valve (the recirculation mode button must be pressed),
- if the obtained value corresponds to the on-board network voltage, there is a break in the electrical circuit in this area,
- otherwise, there will be an open circuit in the ground circuit of the damper drive valve.
The pinout of the Priora recirculation button is described in detail in the circuit diagram of the Panasonic climate control system. If the recirculation malfunction is caused not by an open circuit or a breakdown of the solenoid valve itself, but by a malfunction of the damper, replacing it can be quite difficult for an unprepared car owner.
If you go to a car service center, it will cost a pretty penny (about 10 thousand rubles), since the technicians will tell you that you need to remove the entire stove, drain the antifreeze, and also remove freon from the air conditioning system. You can do this yourself, and without draining the antifreeze and pumping out the refrigerant. Therefore, it makes sense to describe the procedure for replacing the vacuum drive if the Priora interior air recirculation damper does not work:
- To begin with, you will need an L-shaped screwdriver - it is not sold in stores, but it is not difficult to make by bending any existing one made of a fairly soft metal. We use it to unscrew the bottom screw, which is located very inconveniently - there is a hole there large enough to stick your hand through and perform the necessary manipulations,
- the top screw is hidden behind the plastic of the stove body - it needs to be drilled exactly opposite the screw,
- disconnect the damper rod, for which you need to pull it to the left with a little effort,
- now the drive is free, all that remains is to pull it out (pull it a little to the left and press in the direction of the engine compartment - it should fall down), you need to pull it out carefully, since it can cling to surrounding parts,
- the procedure for inserting a new vacuum drive is also quite tedious - first we try to insert the valve into its normal place,
- the second step is to get the drive tube into the hole located in the lower part of the heater,
- put the hose on the valve itself,
- we tighten the screws in the reverse order (you will have to tinker with the bottom one, so you don’t have to tighten it - the valve will be held quite securely even without the bottom screw).