Even 25 years ago, the rear window heater was considered almost a space technology, and its appearance on fives and sevens in export versions caused frantic delight among the wild owners of Soviet cars. Today, only lazy manufacturers do not install heating filaments on the rear window, and this is no longer an option, but standard equipment for all cars.
Heating threads are located on the rear window of the car; on some models there is local heating of the windshield and rear side windows. The task of the device is to create a positive temperature on the surface of the glass, regardless of what the outside temperature is. This will eliminate fogging and icing and provide decent visibility in all conditions.
As standard, the rear window heating system consists of several elements. The composition depends on the model, but, for example, for Renault Logan the components are as follows:
- conductive threads
- warning lamp on the instrument panel
- fuse in common block
- power button
- contacts
- heater relay
The principle of operation is simple - the terminal from the conductive threads is connected to the on-board electrical system on one side, and connected to ground on the other. When current is applied to the filaments, they generate heat, heating the entire area of the glass.
Malfunctions in the system are visible immediately after starting the engine - if the glass warms up unevenly, as indicated by uneven release of fog or ice, then you need to look for a problem. Most often, a non-working thread causes incomplete heating, but if the entire system refuses to work, then you need to look for the reason:
- in violation of the contacts connecting the block of threads to the electrical system of the car
- control relay failure
- in a fuse in the electrical system circuit
This is interesting: Preliminary wing straightening
A non-working fuse is the easiest to identify - you can ring it with a tester, or install one that is known to be working. If the heater does not start even now, consider the option with a relay. No one will disassemble and tinker with the relay; it’s easier to immediately try to connect a working one. In case of a fiasco, we are preparing to restore the threads or replace the rear view glass completely.
It is not advisable to replace all the glass because of one burnt thread. The services do not repair threads, but offer complete glass replacement, so such an action cannot be called rational. The procedure for restoring a heater is not complicated, does not take much time, and with the right approach will save a lot of money.
What does the rear window defroster consist of?
The principle according to which heating systems work in cars is almost the same; it begins to perform its function after the ignition starts working. The current moves through the relay, then the heating device is turned on, which is a mesh made of nickel threads attached with adhesives to the tires. Electrical energy is supplied to them.
In addition to this device, heating involves:
- indicator lamp:
- switches – systems and ignition;
- special block.
A spray coating is applied to the glass of some cars, a mesh is glued to it, and a film is placed on top, which does not allow light to pass through.
Why do heating elements break?
A break can occur for mechanical or electrical reasons:
- the metal of the thread gradually oxidizes, the cross-section decreases, and the released power increases; severe overheating causes the thread to evaporate and the contact to disappear;
- when cleaning glass, a thin strip of sprayed metal can easily be damaged with the same consequences;
- even minor thermal deformations lead to a weakening of the structure of the conductive strip, which ends in the appearance of microcracks and loss of electrical contact.
Most often, one or more threads break; the entire mesh rarely fails completely. This can usually occur due to a power system failure, a blown fuse, or a failed relay or switch.
Sometimes switching is complicated by the introduction of an automatic electronic relay with timer shutdown, which does not add reliability.
How to make a car window heater with your own hands
Since there is nothing special in the proposed schemes, having purchased the necessary blanks, some car owners make a car rear window heater with their own hands. For this you buy:
- wire – blue and red;
- metal threads;
- switches;
- relay;
- contacts and terminals;
- pads.
Care is needed when working with mesh, since the elements (threads) from which it is made are very thin.
Watch a video about repairing the heated rear window.
The entire creation process includes the following steps:
- Collection of blanks;
- Heating installation;
- Connecting and insulating wires;
- Power connection;
- Checking the work.
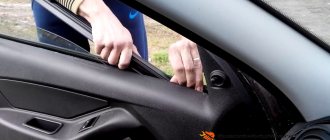
First, the pads and panel are removed. Then they are put in place. The battery terminals are temporarily removed, otherwise a short circuit may occur. The wire with a minus sign from the relay is connected to a 16A fuse, with a plus sign - 8, and then fixed in a bundle with others, not forgetting to insulate it. Then the block is connected to the panel and the switch is installed. The terminal is glued or soldered with rosin.
To find out how correctly the job was done, turn on the ignition and heat it up after a couple of minutes. Using a multimeter or ohmmeter, determine if everything is in order.
You can solve the problem that occurs in rain or snow by ordering a rear window heater with suction cups that are powered by a 12V cigarette lighter. The kit includes wire, bolts, and double-sided tape. After switching on, the ice clears quickly enough, no fogging is observed.
Stores selling auto parts sell blocks of buttons and time relays, which are suitable for heating windows for different types of cars.
You can buy sets of threads and glue, switches. All this will be useful for equipping a system that you install or repair yourself.
Troubleshooting
A heating malfunction is noticed if the system does not turn on or the glass fogs up for a long time. In the first case, it is possible that the button has failed or the fuse has blown. In the second case, most likely, the threads glued to the glass break, since they are easily damaged when transporting large items. The problem is determined by a voltage indicator, voltmeter, tester.
To restore the mesh, you can purchase a kit, which is a conductive paste. It is applied with a syringe to the site where the thread breaks. They are also sealed using solder. The work to eliminate such malfunctions takes no more than ten minutes.
Source
Heated rear window - a necessary function at any time of the year
Each car is equipped with a rear window heating device, which allows the driver in bad weather to have a complete picture of what is happening behind his car. But sometimes it happens that this device fails, which significantly reduces driving safety. How to repair the heated rear window, how to do this procedure yourself? Find out below.
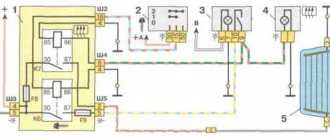
Operating principle of heating
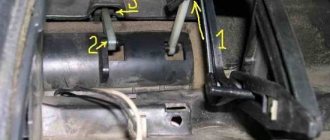
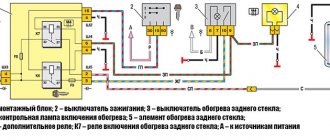
The principle of operation of the heater is very simple - a conductive thread of strictly defined resistance is applied to the rear window, it heats up from the current passing through it. In this case, the supply voltage is provided by such components as wiring, a heater relay, a power button and a fuse (see VAZ 2110: how to replace fuses) A similar scheme is used on all VAZ cars (and on the vast majority of foreign cars), starting with the “classics” and ends with the latest models.
Description of the rear window defroster
First of all, you need to understand what conductive heating of a car is, how incandescent film filaments work and what malfunctions are typical for it.
Device
Heating the windshield or rear window copes well not only with thawing ice in the winter season, but also with fogging in dry weather. Thanks to the filament film filaments, the glass can be evenly cleared of ice while the car is warming up. When the air flow of the heater just begins to become warm, heating the windshield or rear window will already make it completely transparent. A heater is the only effective method to combat fogging.
Possible malfunctions and their symptoms
If the heated rear window does not work, then car enthusiasts usually find out about it when it starts to sweat or a coating forms on it. When you turn on the heater function, you can wait for a very long time, in the end there will be no results or the glass will be partially heated. You don’t need to be a great specialist here to understand that the device requires repair.
Depending on the connection diagram, the car's windshield or rear window defroster may turn on either with or without the ignition on, but usually still works when it is on. Depending on the vehicle, the windshield or threads installed on the adhesive on the rear window may only operate after the engine is started. This allows you to prevent accelerated battery discharge (the author of the video is BortJournal Renault Megan).
It should also be noted that the device can operate at a current of 10 to 25 amperes, it all depends on the specific car.
So, if the rear window heating does not work, then there may be several types of faults:
- The system does not turn on. If the lamp located on the button does not light up when the system is turned on, most likely the problem lies either in the button or in the fuse. If the lamp is on, but the threads attached to the glue do not heat up, you need to check the relay. In some cases, the problem lies in the connectors connecting the device to the vehicle's electrical circuit, so you need to check these elements as well. Diagnostics are carried out in accordance with the service documentation for the car.
- If the rear or windshield fogs up slowly, especially during winter cold, then the essence of the problem may lie in poor contact of one of the connectors; this needs to be checked. As a result, the resistance of the contacts will increase, and the voltage will be less powerful; accordingly, the threads attached to the glue , will take longer to warm up. In order to check this, you need to use a multimeter and measure the voltage at the terminals of the device. If there are differences in the readings obtained, they should be no more than one volt. Otherwise, the heated rear window of the car will need to be restored.
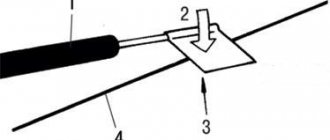
- Horizontal traces of fogging remain on the car glass - another type of malfunction. One of the most common problems in this case is the breakage of filaments in certain places. Usually, such a breakdown can be checked and identified without special instruments, just by eye, since at the point of the break the auto glass will not be thawed or fogged up. It should be noted that even with a slight mechanical impact, the tracks are destroyed, so when cleaning auto glass you must carefully use a scraper. If you carry large cargo, make sure that it does not rest against the rear window.
List of irreparable damages
There is a list of damages in which thread restoration is useless. The motorist will only waste time, but there will be no results. Here is a list of conditions:
- Lots of breaks. You can try to connect the tracks, but this is not practical if most of them are faulty.
- Major damage. If there are no threads for 5–10 cm, any attempt at repair will be unsuccessful.
- You need to remove the tint. There is no guarantee that the film will not drag all the threads with it. This is usually what happens.
These are just recommendations. There is nothing stopping you from spending time and achieving results. Especially when heating is needed right now, and there are no service centers nearby.
Diagnostics and repair
Ways to find a problematic thread
It is not so difficult to make repairs and diagnostics with your own hands.
There are several options for checking it yourself:
- First of all, this is a visual check. If the car window fogs up, turn on the system. In the place where the break occurred, it will sweat almost immediately. At the same time, the rest of the surface will not heat up. This DIY diagnostic method is the easiest.
- Another option for checking it yourself is using a voltmeter. You need to activate the car’s ignition and, accordingly, the heating system with your own hands. One voltmeter probe must be placed on the ground of the vehicle, and the second is wrapped in food foil, after which it must be brought to the heating filament. When performing this procedure with your own hands, you will notice that the voltage level is no more than 5 volts. If this indicator drops to 0 or increases to 12, a break occurred at this point.
- Another do-it-yourself diagnostic option is with the same voltmeter. One voltmeter probe is connected to the positive side of the system, and the second must be moved along the filament, from the negative side. Where the break occurred, the voltage level will drop to zero, in which case repairs will be required.
- The last option for do-it-yourself diagnostics is using an ohmmeter. The probes of the device are connected to the minus and plus of the system. You need to take a piece of cotton wool and moisten it in distilled water, and then run it along the thread. When the ohmmeter needle starts moving, this will indicate a break.
DIY repair options
Applying restorative paste
How to repair a heated rear window at home? There are several ways:
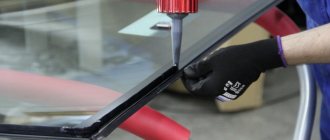
- Using a repair kit. In practice, repair kits usually have the same characteristics - they usually allow you to restore up to 10 cm of damaged thread. Such repair kits include the threads themselves, as well as a can or tube with a special polymer resin. To repair, you need to accurately identify the location of the break, and then turn off the heating system. Next, you need to remove the protective film and apply a new thread to the damaged area. Using a brush, apply the polymer resin, repeat the application procedure after complete drying. Before using the system again, you must wait a day.
- For repairs, you can use conductive paste - a layer of the substance must be applied to the breakage site. It should be noted that when applying it is necessary to grab a few centimeters on each side and wait about a day after application. To make the paste dry faster, you can blow it with a hair dryer.
Danger!
Let's be clear: High resistance wire is applied primarily through paint onto glass. It is very easy to scratch or tear off, and will not work if the scratch breaks the integrity of the wire. This means that any heavy object (box, furniture) that someone placed in the car could scratch the wire. Even a credit card can rip it off. Don't pack the trunk with stuff or allow cargo to slide back in your minivan so that it touches the glass. If the glass has a defroster grill, the only thing that should touch the glass is a soft cloth dampened with glass cleaner. If you need to clean the rear window, rub gently and in the direction of the grille, not across it.
You don't need to replace the glass to make a repair. A complex rear window curve costs several thousand rubles, and a large illuminated glass on a hatchback, say, a Chevrolet Camaro, can easily add several thousand more. Add the cost of installation at the service - your insurance will definitely not cover all the costs.
Heating element for Zhiguli: test of Soviet gadgets for defrosting glass
Not a single car is produced without such a basic option as heated rear window. And windshields that can defrost themselves are gradually appearing on the list of accessories even on the most inexpensive cars. Progress is obvious, but once upon a time, heated glass was a luxury not available to everyone, and car enthusiasts used various tricks to get rid of the ice crust on the outside of the window and fogging from the inside!
"Shoemakers without boots"
It’s a paradox, but in the USSR, in one of the “winter” countries in the world, for a long time insufficient attention was paid to heating car windows... While foreign manufacturers were already beginning to experiment with electrically heated windshields, USSR cars were not always equipped with heated rear windows. And the heating systems of Zhiguli, Moskvich, ZAZ, GAZ and UAZ cars were clearly not designed for domestic frosts - used Japanese cars, the first waves of which surged in the 80s, pleasantly shocked Russian owners with their “nuclear” stoves. It would seem that the latitudes are still somewhat more southern, but what a difference!
On VAZ cars, rear window heating appeared in 1976 on the 2106 model. And the “barn” received this function (plus a rear wiper) only on the VAZ 2104 model in 1984. Its predecessor, the VAZ 2102 station wagon, did not have it... On Muscovites it’s about the same story: the 412 did not have heated glass; “warm” glass was received in 1976 only by its successor - 2140. GAZ introduced heating on 2410 in 1985 - however, in a relatively progressive form for its time - with two heating positions: strong and weak due to the sequential and parallel inclusion of two groups of threads heating