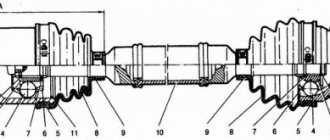
The manufacturing plant does not install fog lights on all VAZ 2114 vehicles, but only on those that have the LUX complex. But a place for their installation in the general electrical system is provided on all cars without exception. The mounting block also has sockets for their fuses. So the car owner can order the installation of PTF at a car service center, at a car dealership during the purchase, or do it himself if he has the skills to work with electrical equipment. It happens that the fog lights already installed on the VAZ 2114 do not light up. In this article, the reader will get acquainted with the PTF connection diagram and find out the reasons for non-working PTF
Question about glass color for fog lights
On old cars, the glass of the fog lights was yellow, so many people think that it should be like this now, it is more correct and more efficient.
In reality, everything is different. Today, auto industry leaders use exclusively clear glass for fog lights, which are superior to yellow ones in many components.
The current fog lights on the VAZ 2110 are available in two versions - transparent and corrugated. Most people choose transparent glass, although in fact, corrugated glass is better. They provide a clear directional beam that can show its best side during fog or rain.
Performance diagnostics
After you have found out where the VAZ 2114 reverse sensor is located, you can begin diagnostics. To do this, you may need light bulbs with wires or a tester. However, there are ways to do without their participation.
The verification procedure itself should proceed as follows:
- The hood must be opened and the cover removed from the fuse console.
- Then check 15A, who is directly responsible for its operation. If the white light does not come on after replacing the fuse, the diagnosis continues.
- The ignition must be turned on to record electrical voltage on the console. If it is not there (and its indicator should be 12 V), then it is likely that the contacts have oxidized. If there is, the check is carried out further.
- And then you need to crawl under the car. The protection is removed from the electric motor, the ignition and the corresponding gear are turned on. Now you can see whether voltage has appeared at the sensor connector or not.
- As mentioned above, if there is no tester with an arrow, you can use a test light. Its glow should make it clear about the existing voltage.
- Then comes the key point: it is necessary to short-circuit the conductors of the sensor in question. When the light appears, all that remains is to state the fact that the VAZ 2114 reverse sensor needs to be replaced.
After completing the diagnostics, you can begin the replacement procedure.
VAZ-2115 fuses and relays, electrical diagrams
Lada 2105 Bright White 15 R Logbook Installation of steering column switches for Chevrolet Niva ignition switch for VAZ 2110
VAZ-2115 fuses and relays, electrical diagrams
VAZ 2115 is a fairly common car model that can often be found on the streets of Russian cities. When something breaks down and an electrical device stops working, it causes inconvenience to the driver and passengers. In case of serious malfunctions, movement may become impossible or dangerous. For example, if the headlights stop working at night or the car stops starting.
Most of the causes of such problems lie in the fuse box. It is necessary to periodically check the fuses and relays of the VAZ-2115, clean and replace parts that have become unusable. This article will discuss which fuses are responsible for what in the “fifteenth” and how to solve many electrical problems.
Relay mounting block
The mounting block is located under the hood, near the windshield.
K1 – headlight cleaner relay. If the headlight cleaners do not turn on, check fuses F1 and F7. Inspect the wiper mechanism; dust may have gotten into it or a stone has flown in, damaging or jamming its operation.
K2 – relay-breaker for turn signals and hazard lights. If your turn signals or hazard lights stop working, check fuses F2 and F16, this is the relay. If the hazard lights work but the turn signals do not, check the power handle, its contacts and connector. If only the emergency lights do not work, check the power button, contacts and wiring. Don't forget to check the turn signal bulbs. There may be a short circuit in one of the headlights. Carefully inspect the connectors and wiring for insulation damage.
If the turn signals work unstably or intermittently, this may be caused by poor contacts in the mounting block, as well as burnout or damage to its tracks. Contact may disappear not only in the block, but also in the headlights themselves, as well as on the way to them. If the wiring has been changed or something has been done to the wires, check them first.
K3 – windshield wiper relay.
If your wipers stop working, first check the relays and contacts. The steering column switch could also stop working or its contacts could oxidize. Inspect the wiper mechanism; due to poor tightening, the nuts securing the mechanism slats may have become loose, or a foreign object may have gotten in, interfering with their normal operation.
The motor could burn out, you can check its performance by applying voltage directly to it from the 12 V battery. Near the motor there is another fuse that protects it from overheating. It is located either on the trapezoid bracket or in the motor itself, depending on its type.
K4 – lamp performance monitoring relay.
K5 – power window relay. If your window does not go up or down with the power window, check fuse F6 and this relay. If the window lifting mechanism is of a cable type, it lowers normally but rises with difficulty, it is necessary to lubricate the cables and glass guides with silicone grease. To do this, you need to remove the door trim and get to the mechanism. The motor may have stopped working, in which case it needs to be replaced.
Sometimes it helps to close the glass by hitting the door to temporarily revive the motor. To disassemble the window lifter mechanism, you need to unscrew the bolts securing the brackets and disconnect the glass itself from the mechanism.
If only one window regulator does not work, the problem may be in the power button and its contacts.
K6 – sound signal relay. If your “horn” stops working, check fuse F5, relay. The signal may not work due to a lack of contact in the steering wheel. Remove the steering column housing and look at the serviceability of the plates and contacts. Turn the steering wheel left and right; when turning, the mechanism may jam or the contacts may move. One bolt on the casing secures the position of the switch mounting bracket, the second secures the casing.
For the signal to work, you need to securely fix them, setting them in such a way that the contacts close when the switch is pressed. The contacts are located above the steering shaft. The design of the contacts in the steering wheel could also be damaged. Inspect the mechanism; the 3 screws and springs should reliably open and close the circuit.
Ideas for tuning and modifying the shield
As for tuning, you have several options for improving the shield:
- The easiest option is to put a new trim on top of the tidy. This method is the easiest to implement, but it will improve the external part of the tidy, because you just glue the trim on top. If the existing trim is worn out and has damage, it can be re-sheathed.
- New scales can be installed on the sensors - speedometer, tachometer, fuel and antifreeze. You can purchase such overlays either in a store or download them from the Internet. If you want the scales to be original, you can make them yourself using a graphic editor. Tuning is more complicated, since you will need to not only dismantle the device itself, but also partially disassemble it and disconnect the arrows from the indicators. Moreover, subsequently the arrows themselves must be installed correctly, otherwise the sensors may not work correctly.
- You can also install an instrument panel from a Lada Priora car in the “Ten”. In general, these devices are suitable for installation in the “Ten”, but depending on the design features of the car, it may be necessary to redo some connectors. If you decide to connect an electronic device, you may have to additionally reflash the control unit.
- One of the most effective and simple improvement options is to install LED lamps in a combination. To do this, you will need to remove the standard lighting sources and simply install LEDs instead. To make the tidy shine more brightly, you can install an LED strip instead of light bulbs, in which case it will have to be soldered to the combination. If the lamp burns out, it will be enough to replace it. In the case of tape, everything is more complicated - it will have to be desoldered and soldered again, although it usually has a long service life.
- Additionally, when installing diode light sources, instrument scales can be painted with fluorescent paint. You can also paint the controller arrows. The essence of this tuning is that by combining LED lighting with the coloring of the hands and scales, you can achieve a fairly colorful and effective result. Especially if you combine the colors correctly. For example, white and blue LED lighting combines perfectly with bright green or red instrument scales.
VAZ 2114 where is the rear fog light relay located?
Lada 2106 new life Logbook Ground wire from battery body
Dear visitors of the “Cars” website! We will be very grateful for your comments on the video clip “VAZ 2114 where is the rear fog light relay located”, registration is not required for this. We also ask you to let us know if you have any problems playing the video.
Thanks, I'll put this tape on tomorrow. all that's left to do is find him
It will be unlucky for someone who follows the trail in a traffic jam and will burn their eyes.
Thanks for the idea with aluminum tape. I'll use it when the opportunity arises. I consider paralleling lamps to be a useless exercise; a bright additional stop—a light on the rear window—would be more effective. You can see better further, and not only to the back of the head, and closer to the driver’s main line of sight, and therefore more informative.
Well done, handsome guy, he did everything well, cheaply and cheerfully. I’ll do the same too, otherwise these fogs will be of no use.
and when the fogs are turned on, the stop lights will be constantly on.
At first I thought he was giving nonsense advice, but it’s not bad, but how can I do it on 10k?
people, I will answer any question about repairing a vase, I am a specialist
Don't the cops give a damn about this? Previously, it was impossible to pass inspection with such tuning.
I did this on 14, only I changed the light control relay 2 times because it was on and then the rear fog lights disappeared
I don’t know what to do, but at first it was fun, so I don’t recommend paralleling it, the switch is on
I don’t know if I’ll do this for myself or not, but I don’t understand people’s arguments about whether fog lights will burn your eyes out. You put 2109 and a couple of foreign cars, turn on the 2109 fog lights and just a bunch of foreign cars. It’s just that the feet of foreign cars are much brighter than the PTF of the VAZ 2109. So nothing bad will happen in this situation.
It was necessary to make a jumper through the diode with the fog lamp. so that when the fog lamp is turned on, the brake light does not light up. and whoever says that your eyes will be blinded in a traffic jam, they are mistaken; modern cars with diode lamps are very blinding compared to conventional incandescent lamps
good video, made it on nine, it turned out well
Is it possible to make sure that all 4 lights are on, and when braking, so that they light up even brighter?
I have a VAZ 21099, I soldered a jumper, I turn on the brake light, my headlights immediately turn on, why is that???
HAS NO ONE GIVEN YOU PUSSY FOR THIS???
Deprivation of rights
thanks for the advice
You need to put a diode on the jumper and the fogs will work separately from the stoplights. and when you press the brake, both the stops and fogs will work
It is prohibited to use fog lights as a brake light. You will not pass the official inspection
Installation process
Ready-made kits usually contain an installation diagram for the VAZ 2110. However, you should understand that adjustments may need to be made during the process. Before starting installation work, you need to make sure there is space for them.
If it is not provided for in your model, then you should think about it and decide on it yourself. It is recommended to do this through the front bumper.
The installation procedure is as follows:
- At the very beginning we lay out the wiring for the fog lights. It is laid in the same way as the main wiring - along the wing, through the left side (under the hood).
- After this, you need to supply power to the button, which will need to be placed on the dashboard. According to the standard, power is supplied from the fuse on the right dimensions. However, you can go the other way by connecting power to the light switch. You can take power from the output to the dimensions, but this method should be used last, since the battery may discharge prematurely if you forget to turn off the PTF.
- We connect the plug together with the headlights. If the lights do not light up, then there was some error in the circuit. Each component of the network should be carefully checked. Often the problem is in the relay. To identify it, you need to make sure there is a click; if there is none, the relay should be completely changed.
It is quite simple to check that the headlights are set correctly and are working correctly: drive out onto the road and turn on the headlights. If the light is directed slightly downward, but illuminates both the road surface and the side of the road equally well, everything is installed correctly.
- vmiredorog.ru
- carfrance.ru
- automotocity.com
We recommend that you familiarize yourself with the new taxi application in Russia - DiDi
How to install and connect PTF
Lada 2110 Logbook Replacing the thermoelement of the VAZ 2110 thermostat
Installation and connection of fog lights is done in 3 stages:
- installation of PTF in the bumper;
- connecting wiring to the mounting block via a relay;
- installing a button in the panel.
Wiring diagram for fog lights
Well, I think everything is clear here! The diagram is not complete: the mass of the PTFs themselves on the body is not indicated, which must be done without fail. You need to secure the mass in a safe place, naturally on metal! Before fastening, be sure to clean the metal from dirt and tighten the mass well so that there is no loss of tension. Otherwise, the PTF will burn dimly and unevenly.
Installing fog lights in the bumper
As stated above, you have two options - either install a new bumper with ready-made cutouts for the PTF, or cut it yourself with a jigsaw. To do this, remove the bumper, mark the mounting holes, and cut with a jigsaw.
Next, we install the “glasses” - they cover the cutout on the outside of the bumper, they consist of two parts: a decorative one - outer and inner - attaches the glasses to the bumper using side latches and holds the PTF. (How to remove the bumper?)
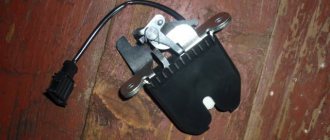
Connecting wiring to the mounting block via a relay
Relay with wire set
- First of all, open the hood, find the mounting block and unscrew its two fastenings to the body on the sides, remove the cover from the mounting block.
- From the bottom of the mounting block, unfasten the two outer wire blocks marked “7” and “8”.
- Take the installation kit: put the wires from the kit on the relay.
- We add the other ends of the wires to the block of wires “7” and “8” according to the diagram.
- We plug the wire blocks back into the mounting block and fasten it back to its original place
- Next, we attach the relay to the car body in any place you like: for example, next to the same mounting block.
- We run a length of wire from the mounting block blocks (which we have already installed) to the fog lights and connect them. We also attach a lot of foglights to the car body.
Installing a button in a panel
To install the button (which comes with the mounting kit), you need to partially disassemble the front panel.
Fortunately, the factory came to the rescue and installed wiring for the PTF in all Samar configurations, so all we have to do is remove the center console and find a block in the wiring for connecting the button.
To disassemble the panel, use the article: How to remove the instrument panel and remove only the center console:
Removing the center console
Next, find the wiring block - install the button, assemble the panel.
Next, we check the headlights for functionality.
Do not forget that the fog lights turn on only after the side lights are turned on!
After installing the PTFs, they need to be configured and adjusted!
Unexpected reasons for non-working PTFs on the VAZ-2110
The most common cause is a blown fuse.
But we will return to it later. There is still a lot that is still unknown in the design of foglights, relays, switches and lamps. For example, a possible reason for the failure of fog lights could be a completely unexpected breakdown.
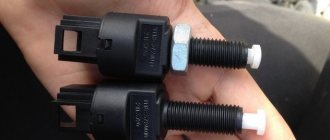
First of all, we check the bulbs themselves; you can get to the left one through the hood.
On some versions of the VAZ-2110, a PTF from the Avtosvet plant (Kirzhach) was installed with a socket for the H1 lamp. Stock lamps are not the best quality and they do not like sudden changes in temperature.
It is quite difficult to get to the right fog lamp through the hood; it is easier to remove the headlight itself by unscrewing the screws.
During sudden cooling, when leaving the garage in winter, for example, or after turning off the headlights, the contact leg of the lamp bulb simply fell off the conductor . At the same time, visually the halogen lamp looked absolutely intact. It was enough to apply a plus directly to the leg itself, and the lamp would light up. The fault was due to poor-quality resistance welding, and it is almost impossible to detect the cause without a detailed examination of the lamp itself and its dismantling.
Of course, it is impossible to provide for all failure options, but we will consider the most common ones.
One fog light on VAZ-2110 does not light up
There may be plenty of options here. Apart from damage to the lamp itself or its filament, the picture is as follows:
- Fuse . When correctly installing PTF on the ten, as a rule, they use the scheme presented above. F4 or F14, is responsible for the operation of each lamp . They are located in the mounting block, which is located in the niche of the front panel to the left of the driver. When replacing a fuse, we do not use bugs or jumpers, but only new fuses.
The front right fog light is fuse F4, the left one is F14, both are 10A.
We find the wires with blocks coming from the headlights and check their condition.
Two fog lights do not light up at once
If this happens, it is impossible to allow two lamps or two fuses to burn out at once. Most likely, the reason should be looked for elsewhere:
- Oxidation of contacts on connector Ш1 in the mounting block . We remove the connector and evaluate the condition of the contacts. Just in case, check fuses F1, F14, F4.
The connectors are located on the reverse side of the mounting block.
Logical conclusion
If you are not looking for simple ways, you can try to disassemble the relay itself and check what is wrong with it. Perhaps the movable plate has become sour or the contact has come loose. Since the part is small, you need to be very careful not to bend anything. Using a small soldering iron and some fine-grit sandpaper, you can bring the relay back to life and gain valuable repair experience in the process.
Replacing the VAZ-2110 turn relay is quite simple and quick. There is absolutely nothing complicated, so it makes sense to do such work yourself. It does not require you to have any knowledge of electrical engineering. The relay itself may “fail” if its time is approaching. When the first signs of a malfunction appear, such as intermittent relay failure, altered click frequency, etc., it is better to stock up on a spare part in advance. This way, if necessary, you can immediately replace the VAZ-2110 turn signal relay.
In order to maintain the temperature regime of the engines, a fan is used for cooling; it is usually equipped with an electric drive. The options to turn on and turn off such a fan are controlled automatically. On cars with carburetor engines, the TM 108 sensor is used for this; on cars that have an injection engine, control is carried out using a controller.
Fan control from temperature switching sensors largely depends on the temperature settings of the sensors, which are indicated on the case. As the temperature rises until the sensors are triggered, the fans do not turn on, which requires checking that the sensor is working properly. To check, you should simply close the contacts on the sensors; if this happens, then the sensor should be replaced with a new one. If the fan does not work after shorting the terminals, then it is worth checking the integrity of the supply wires according to the diagrams.
The cooling fans of the VAZ 2110 with injection engines can be turned on by an electronic controller. The response temperature is built into the controller program and can range from 100 to 105 degrees. A malfunction of the temperature sensor is automatically recorded in the fan error code when the engine is running.
There are also malfunctions that make it impossible for the controller to recognize malfunctions; in this case, the fan cannot turn on. To check circuits and sensors, it is worth removing the connectors from the temperature sensors at a time when the engine is at full speed. In the event that the malfunction of the circuits can be checked by the integrity of the fuses, it is also worth checking the serviceability of the wires and relays according to the exact circuits.
Many tens are set to reduce the effort during maneuvers and turns.
For an accurate and quick test, it is worth bridging the output to approximately 87 relays. If after this the fan works, then connect the relay without removing it from the block using a test lamp, the relay will work and the fan will turn on immediately. In this case, the faulty controller or drive will need to be repaired.
If you don’t hear a click after turning it on, then you just need to change the relay. When installing jumpers between pins 87 and 30, the fan does not turn on. If there is power at this pin, this indicates that there may be some kind of malfunction of the engine fans.
Hello everyone, guys. In general, the rear PTFs do not light up. What could be the problem?
Comments 22
Mine didn't burn either. It turned out that the old owner took out the light bulb. Apparently they were needed a lot. It happens
Very funny) Based on the fact that I turned to the people for help, you can understand that I checked everything on my own! There are light bulbs and they work!
Dadada, there's a block under the panel on the ZPTF
I've looked all over, no(
They turn on when the low/high beam is on, this is me, by the way, since several of my friends put up with non-working PTFs until I told about the low beam, thereby making a colossal discovery for them)))
Both fog lights stopped working
Sometimes it's better to live.
The fog lights stopped lighting along with the tidy. Moreover, the mileage display works. The tidy backlight (brighter - dimmer) also does not work((((Sadness((
I have already burned out 10-15 fuses (((The one under the steering wheel is on. I put it on the more powerful one, it burns out under the hood due to the dimensions.
I turned off the fog lights and the dash lights are still on.
Did you get into the wiring? Additional gavnetol sensors?
No, they didn’t do anything like that. Yesterday during the rain I think it went out, or after it.
Nothing has been installed on the car for “a hundred years.” The fuse for the fog lights is on. Accordingly, the following happens: I start it, turn on the dimensions - everything is ok, well, almost)) the tidy does not work (tidy lights), I turn on the fogs and the fuse blows. Near and far are working!
The fogs seem to be original.
The fuse blows when I turn on the headlights. but the dimensions are on fire. Those. It's not even a matter of fogs. and in the tidy.
Correctly, the fog lights are made through the dimensions precisely through the snout, the fog lamps have their own fuse, and the dimensions have their own relays, and at the moment the dimensions are turned on, when the fuse burns out, are the fog lamps turned on or off? those. — turned on the lights, everything is fine, the fuse for the fog lights works, then you turn on the fog lights, does the fuse burn out? or so - you just turn on the headlights, the fog lights are turned off, and the fog light fuse still burns out?
what about the fuse? which I voiced - which is used to illuminate the tidy and often some other lighting in the cabin.
Many opinions and topics have been voiced on many forums regarding short circuits in the instrument panel (a lot of lyrics.
Fog lights do not light up: causes and solutions
Fog lights are car lighting devices, the difference of which is the light they emit (it can be white or yellow). The peculiarity of the lanterns is that the outgoing beam does not rest on the fog, but spreads along the road, providing sufficient visibility to the car owner. How to adjust these headlights? Why don't the fog lights light up? How to fix the problem? Let's consider these points in detail.
Basic Rules
To ensure good visibility in heavy fog, it is important to follow the following rules:
- Adjust the edge of the light beam so that the light beam is above the horizontal plane.
- Install the lamp at a minimum distance from the road. This is necessary in order to simplify the adjustment of the light beam boundary.
If the headlights are well adjusted, they guarantee excellent visibility on the road, even in difficult road conditions.
To prevent deterioration in the quality of the glow, it is important to monitor the condition of the lampshade. If necessary, polish the surface and remove scratches, as they impair the performance of the flashlight
Adjusting the fog lights
Causes of breakdowns and solutions
Now let's look at why fog lights don't work, and what are the possible causes of such problems. As a rule, malfunctions of fog lights are caused by corrosive and oxidative processes. In addition, the reasons for PTF failure include:
- Fuse blown.
- No contact in the relay.
- Deterioration of contact to the “minus” of the body.
- Burnout of lamps.
- Oxidation of contacts.
- Incorrect connection.
- Deterioration of contact on fog lights.
To diagnose and fix the problem, you need a set of tools and a multimeter. The first thing to check is the integrity of the fuses that power the fog lights. If they are burnt out, replace them.
If the circuit fuses are good, check that the headlight bulbs are working. The simplest reason why the fog lights do not light up is that the lamps have burned out due to a short circuit or natural wear and tear. To check lamp integrity, use a known good light source
It is important that the lamp base is of the same type and dimensions as the failed part. After purchasing the required light bulb, replace it (this can be done without removing the headlight)
If all the work considered is completed, but there is no result, pay attention to the power button. Perhaps the reason why the fog lights do not work is hidden in it
If the button is defective, replace it. If the contacts become oxidized, clean them. In a situation where problems with the PTF appeared after self-connection, the causes of the malfunction may lie in incorrect connection of the circuit.
To repair the fog lamp, you may need to perform the following work:
- Glass replacement.
- Installing a new light bulb.
- Replacing the fog lamp frame after removing the bracket. Such work may be required if the cladding is damaged.
Wiring diagram for fog lights on VAZ 2110, 2111, 2112
Before carrying out repairs, it is advisable to remove the fog lamp, for which you need to unscrew the screws securing it to the bracket. After this, disassemble the PTF to repair or install a new lamp.
An extreme case is to replace the fog lamp. It has to be resorted to in a situation where the unit does not work completely or the quality of the light beam has significantly deteriorated. During the replacement process, it may be necessary to remove the car's bumper, because it is in it that the headlight plug is located. As soon as you have access to the place where the light is installed on the bracket, use a special tool to unscrew the fastener, and then discard the plug and remove the headlight. If the fog lights do not light up and the unit is completely faulty, then install a new part.
Video: How to find and replace a burnt out fog light on a VAZ 2110, 2111, 2112
Useful video
If all of the above reasons have been checked, and none of them have been identified, then the problem is in the wiring itself. In this case, you should ring all the wires used in the fog lamp connection circuit, and also check the correctness of the connection itself.
This can be done using the diagram given at the beginning. In this case, special attention should be paid to the correct connection (to the required connectors) of the button and relay.
Published May 04, 2018 Sources used:
- https://vaz-2114-lada.ru/2014/12/ne-rabotayut-protivotumanki-ptf-chto-delat/
- https://vaz-2114.info/vaz-2114-ne-goryat-protivotumannye-fary/
- https://carfrance.ru/pochemu-ne-goryat-protivotumanki-vaz-2114-prichiny/
- https://remontvazov.com/ne-goryat-protivotumanki-na-vaz-2114
Replacement example
Since all fuses are located in a common block, the replacement principle is the same for all. Therefore, we can consider an example of only one element that needs replacement. Let this be the cigarette lighter. It is designated F6 and F18 (see table).
The first priority before replacing a fuse is to check its functionality. Many people immediately change the element without even considering whether the problem of the unit failure really lies in it.
To check the fuse, you should perform several step-by-step operations:
- Start the car by turning the key in the ignition;
- Make sure that the cigarette lighter is inside its socket, where it should be;
- Wait about 20 seconds;
- Take out the cigarette lighter and check if it is warm. If the temperature remains the same, that is, the element is cold, then the fuse needs to be changed.
How to do it? Pretty easy.
- Get to the panel on which the board with the relays and cigarette lighters is located. The mounting block is located, as you remember, to the left of the steering wheel, at the bottom of the dashboard.
- By pressing the special latches, the cover will move away from its seat. Be careful not to break the latches.
- The mounting block has now opened in front of you.
- If you look at it carefully, you will see special tweezers on the edge. It is provided by the factory in order to carefully remove fuses and insert new elements in their place.
- Remove the affected fuse. In this particular situation, we are talking about the cigarette lighter fuse, so you need an element designated F6 or F18.
- This component burns out due to the fact that modern motorists need additional electrical equipment, such as vacuum cleaners and electric pumps. All this is connected to the fuse and overloads it. Hence the frequent breakdowns.
- Using the same tweezers, insert a new fuse with the same parameters indicated on the mounting block.
If for some reason you don't have tweezers inside your black box, small pliers can serve as an alternative to this tool. Never try to remove the elements with your fingers. The nests are quite fragile, and with your hands you can only loosen it and damage it.
Replacing relays and fuses is a simple and inexpensive repair. But if you damage the block itself, then you will have to spend more, and you will definitely have to work hard.
Are fuses repairable? No. These are fusible elements that simply become deformed when burned. Therefore, repair is possible only in one option - replacing blown fuses.
The car is equipped with lighting devices, which are necessary for safe movement on the road and driving in the dark. Turn signals are one of the most important light signals. Serves to indicate when changing lanes, as well as to turn on the hazard warning lights. Quite often the VAZ-2110 fails. This happens for various reasons, which we will discuss in this article.
Identifying problems with fog lights
The car owner can begin the check in the order that is most convenient for him. But as practice shows, it is better to check the fuse first - a rather vulnerable part of any electrical circuit.
Fuse
Each of the installed “foglights” is served by its own fuse, rated 7.5A, marked F8 and F9, and which is located in the central unit. Initially, its integrity is visually assessed, then it can be checked with a multimeter. It often happens that the car was purchased second-hand, and there are simply no fuses in the block. In this case, you should look for them in the engine compartment, and most often they are located next to the headlights themselves. When both fog lights do not light up at once, you should not waste time on fuses, since there are few cases when both fuses light up at once.
Lamps in headlights
If low-quality lamps are used or the voltage in the on-board electrical network fluctuates, and the car owner knows about this, then it is not surprising that both lamps burn out at once. To check them you will have to tinker a little, disassembling the headlight
Be careful when doing this as it is quite fragile. After that, all that remains is to replace them with working ones
Fuse box and wiring for Lifan Smiley
Watch the video to see how the replacement is carried out:
Relay
If the fog lights were installed at the factory, the relay is located in the mounting block; if it is installed independently, it can be anywhere. The easiest way to check it is to replace it with a known working one. One of the motorists “repairs” it by tapping it. When you turn on even non-working headlights with the button, the relay should make a click. If this is not the case, then it is either not working or there is no power.
Ready-made PTF kits
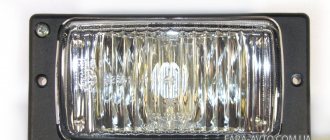
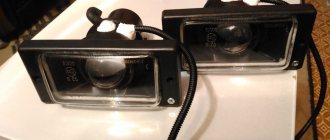
Today you can find 2 types of foglights on sale, in which the light spot is formed:
- Due to scratches on the glass (classic headlight with reflector);
- Due to the lens (so-called lensed).
A complete set of lensed headlights - wiring, relays and PTF with an adjustment system and plugs.
Which of them to choose depends not only on your desire, but also on the configuration of the set.
In particular, to install PTF you will need:
- Full compliance of the kit with your car model (in this case, VAZ 2110);
- The adjustment system is easy to use (meaning, without removing the bumper or partially disassembling the headlight itself);
- Visual instructions on how to connect fog lights on a VAZ 2110.
Each “correct” kit contains a wiring diagram for VAZ 2110 fog lights
The famous “Kirzhachi” are produced at the Avtosvet Plant.
So, we found out that cars of the 2110 family may differ in the way they install PTF due to the technical features of the instrument panel and front bumper.
Everything else (installation of headlights and their integration into the electrical circuit) will not create problems, because:
- The automaker has prepared the vehicle as much as possible for the installation of PTF;
- Independent work will take only 1.5-2 hours of pure time.
Materials and tools
You can easily buy a ready-made PTF kit with all the wires, and then you won’t have to figure out where the fog light relay is located on a VAZ 2110. However, if you purchase spare parts separately, this will diversify the installation options, plus it will allow you to save money.
Connection kit
Therefore, you need to purchase the following:
- Two sets of headlights;
- Plastic pads;
- Headlight frames;
- A key with a yellow indicator for it;
- Relay;
- Wiring. Choose an option with two copper conductors and double insulation, for example ShVVP2. A cross section of 0.5 mm is suitable, but if the lamps are powerful, 0.75 mm is better;
- Ground terminals;
- Female/male terminals - wide and narrow terminals.
Location
Since AvtoVAZ engineers tried to do everything so that car owners would not have problems replacing relays and fuses, it would be stupid to come up with a clever arrangement. Therefore, finding them is not difficult.
- The main unit is located to the left of the steering wheel;
- You will find the first additional block in the dashboard inside the niche, directly behind the main mounting block;
- The second additional block is located in the same place, only on the opposite side.
We will get acquainted with each block separately so that you do not have any confusion when searching for one or another fuse.
On injection engines with 16 and 8 valves, the location of the MB is identical, so the instructions are equally relevant for owners of both versions of the dozen.
Main MB
Relays and fuses are located here. Let's look at their descriptions in more detail and separately.
Let's start with the relay.
| Designation | What is he responsible for? |
| Car lamp operation | |
| Electric windshield wipers | |
| Special relay that interrupts the turning lights when the hazard warning lights are activated | |
| Turning on the low beam | |
| Turning on the high beam | |
| Area for installation of additional device | |
| Rear window heating operation |
Each fuse is indicated with a current rating and designation. This allows you to use a new fuse with parameters that meet the requirements of the equipment connected to it.
| Designation | Rated current | What is he responsible for? |
| Lamps for license plate illumination, instrument panel illumination, indicator lights on the instrument panel, left side position lights, luggage compartment illumination | ||
| Low beam left headlight | ||
| Left high beam | ||
| Right front fog lamp | ||
| Electric door windows | ||
| Carrying lamp, cigarette lighter | ||
| Radiator fan, horn (horn) | ||
| Heated rear window | ||
| Windshield wipers and washer | ||
| Backup fuse | ||
| Right dimensions | ||
| Low beams in the right headlight | ||
| High beams in the right headlight | ||
| Left fog lamp | ||
| Heated seats in the cabin | ||
| Hazard signal, turn signals | ||
| Stop signal, ignition switch illumination, interior lighting | ||
| Interior heater, glove compartment light, cigarette lighter | ||
| Reversing light, brake light monitoring | ||
| Rear fog lights |
First additional block
Inside the central panel there is the first of two additional blocks provided for the VAZ 2110. You can find it at the bottom left on the front passenger side.
This block provides three fuses. Each of them has the same power rating - 15A.
- The first fuse is responsible for your vehicle's ignition and controller module.
- The second protects the mass air flow sensor, heating sensor, speed sensor and purge valve.
- The third is necessary to ensure protection of the injectors, as well as the fuel pump. So if problems arise with the fuel pump, the first thing we recommend is to check the condition of the fuse responsible for it.
Plus, the same block includes three relays:
- Relay number 4 is responsible for the electric fan;
- Relay number five is the electric fuel pump;
- The third relay is part of the ignition protection group on your VAZ 2110.
Second additional block
The second additional block should be looked for already in the driver’s feet, on the right. Behind the protective cover on the console you will find the required board.
There are three more components on it. They are responsible for:
- Immobilizer operation;
- Additional optics (mostly fog lights);
- For the operation of the car's central locking control.
How to check the fuse?
New model mounting block VAZ-2113, 2114, 2115. Location of fuses and relays.
Relay Description:
K1–relay for turning on headlight cleaners; K2–relay-interrupter for direction indicators and hazard warning lights; K3 – windshield wiper relay; K4 – lamp health monitoring relay; K5 – power window relay; K6 – relay for turning on sound signals; K7 – rear window heating relay; K8 – headlight high beam relay; K9 – relay for turning on low beam headlights; F1–F20—fuses; X11 – terminals of the wiring harness block Table of circuits protected by fuses on the VAZ 2114
| Fuse number | Current strength, A | Circuits protected by a fuse |
| F1 | 20 | Rear fog lamp switching relay. Rear fog lamp lamps. Rear fog lamp switching indicator |
| F2 | 10 | Direction indicators, relay-interrupter of direction indicators and hazard warning lights (in hazard warning mode) Hazard warning lamp |
| F3 | 7.5 | Front interior lamp. Central interior lamp. Luggage compartment lighting. Illumination lamp for the ignition switch. Lamp for monitoring the engine management system. Brake light bulbs. Trip computer (if installed) |
| F4 | 20 | Socket for connecting a portable lamp. Relay for turning on the heated rear window (contacts). Rear window heating element |
| F5 | 20 | Sound signal. Horn relay. Cooling fan electric motor. Fan fuse. |
| F6 | 30 | Electric windows. Power window relay (contacts) |
| F7 | 30 | Heater electric motor. Heater fuse for VAZ 2114, VAZ 2115. Electric motor for windshield washer. Headlight wiper motors (in operating mode) Cigarette lighter fuse. Glove box lighting lamp. Rear window heating relay (winding) |
| F8 | 7.5 | Fuse for fog lamps VAZ 2114, 2115 - Right fog lamp |
| F9 | 7.5 | Fuse for fog lamps VAZ 2114, 2115 - Left fog lamp |
| F10 | 7.5 | Side light lamps on the left side. Indicator lamp for turning on the side light. License plate lamps. Engine compartment lamp Instrument lighting switch. Fuse for backlight lamps of switches, instruments, cigarette lighter, ashtray, heater control levers |
| F11 | 7,5 | Side light lamps on starboard side |
| F12 | 7,5 | Right headlight (low beam) |
| F13 | 7,5 | Left headlight (low beam) |
| F14 | 7,5 | Left headlight (high beam). High beam indicator lamp |
| F15 | 7,5 | Right headlight (high beam) |
| F16 | 15 | Direction indicators, relay-interrupter for direction indicators and hazard warning lights (in turn indication mode). Reversing lamps. Relay for monitoring the health of lamps. On-board control system display unit. Instrument cluster. Insufficient oil pressure indicator lamp. Parking brake indicator lamp (brake light fuse). Brake fluid level indicator lamp. Low battery indicator lamp. Trip computer (if installed). Generator excitation winding (in engine starting mode). Front windshield wiper. Seat heating control. |
Diagram of the VAZ-2113, 2114, 2115 mounting block Option No. 1.
Relay Description:
K1-relay for turning on headlight cleaners; K2-relay-breaker for direction indicators and hazard warning lights; K3 windshield wiper relay; K4 relay for monitoring lamp health; K5-power window relay; K6-relay for turning on sound signals; K7-relay for turning on the electric heating of the rear window; K8-relay for turning on the high beam headlights; K9 relay for low beam headlights;
Diagram of the VAZ-2113, 2114, 2115 mounting block Option No. 2.
Date added: 07/14/2014
It's no secret that the VAZ 2114 fuse box is the main component of the vehicle's wiring system. This device has a specific circuit and allows you to protect all kinds of car system devices, such as the cigarette lighter, stove, fuel pump and others from malfunctions and overvoltage. In this article we will provide you with basic information regarding the location and replacement of components.
Why are fog lights needed?
The very name “fog” lights already speaks about their essence. Their light penetrates fog, a wall of rain, and contributes to more efficient illumination of the road.
The presence of PTF provides three important advantages.
- PTF or fog lights are characterized by a flatter luminous flux, which literally spreads above the ground, spreading more in width than in height. This was done on purpose, since the temperature of the road surface is higher than the temperature of the air and fog, so it does not fall to the ground itself. Consequently, fog lights provide a certain range of illumination compared to conventional headlights. You will see approximately 10 meters further than with low beam.
- The width of the PTF light beam allows you to see the markings and the side of the road, which will allow you to make a maneuver in time and not end up outside the road surface. Unfortunately, this is a common occurrence in foggy conditions. Moreover, those who do not have fog lights suffer much more often. It is a fact.
- PTF does not blind oncoming cars, but allows them to see you. Only if the headlights are adjusted correctly, of course. Therefore, fog lights on your car have a big impact on safety by signaling oncoming cars that you are approaching.
Features of PTF operation
These lighting fixtures differ in the light they emit. They can glow with yellow or white light, their main feature is that they do not illuminate the fog ahead, resting the beam on it, but create a flat, wide beam that spreads along the road.
Road lighting
To ensure good visibility in bad weather conditions, the following two rules must be observed:
- Adjust precisely the boundary of the light beam emitted by the optics. The beam should not shine above the specified horizontal plane.
- The lamp must be at a minimum distance from the road surface. Under such conditions, it is easier to precisely adjust the boundary of the light beam.
Adjusting foglights on a car
It becomes clear that these lighting sources are necessary to ensure good visibility on the road in difficult weather conditions.
Why PTF fog lights don't work
12/24/2014 Fog lights
As I think, you have already seen that on the VAZ 2114 and other Samaras the headlights leave much to be desired, and in cloudy and rainy weather you feel like a hedgehog in the fog. Therefore, fog lights significantly improve the situation and illuminate the roadside.
But it happens that at a certain moment the PTFs stop working, and you need to urgently look for the cause of the malfunction. In this article we will look at the main possible causes of malfunction of fog lights (FTL) and methods for eliminating them.
The most basic and common cause of malfunction is oxidation and corrosion, which appear during long-term operation and in the Russian climate. But still, we will touch on specific problems, and start from the simplest to the most complex.
Fuse
VAZ 2114 fuses
Each PTF has a separate fuse F8 and F9 in the fuse block with a rating of 7.5 A. Check its integrity - replace it. If you did not find a fuse in the mounting block, then most likely, in your case, the PTFs were installed by the previous owner, and the fuses on them are located either next to the fog lights themselves or next to the relay. If both PTFs do not work for you, then most likely the problem with the fuses disappears - because It is not possible for both fuses to blow at the same time, although everything happens in our lives.
Burnt out lamps in PTF
In this case, all that remains is to check and replace. When you remove the lamp and look, the filament of the lamp may visually remain intact, so it is better to check with a known working lamp. Again, if both fog lights have failed, then most likely this is not your case.
Relay
The relay is either located in the mounting block or installed in another location if the PTF was not installed at the factory. The easiest option is to replace and check with a relay that is known to work, or you can also try knocking on it. When you turn on the PTF button, the relay should click. If the relay does not click, either replace the relay, or there is simply no power going to it.
Malfunction of the lights themselves
If during the check from the fuse box to the limit switch no problems are found, then you should move on. Now you should test the wiring from the second limit switch connector to the stop connectors with a tester. If it is working, then you need to check the board. The printed circuit board on which the taillights are mounted is not ideal, and is one of the biggest problems of all VAZ cars.
Its tracks often burn out or peel off, causing the lights to stop working. This problem can be solved in two ways - either re-solder the tracks (which can be done with a regular soldering iron, although not in road conditions) or replace the board with a new one (most motorists choose the second option).
READ Replacing the front wheel bearing of Chevrolet Aveo T250
Another reason why the VAZ 2114 brake lights do not work may be oxidation of the lamp sockets. In order to eliminate this problem, it is enough to clean all contacts from oxides that have appeared on them.
This is best done in one of the following ways:
- small grit sandpaper;
- WD-40 solution;
- kerosene;
- purified gasoline (“galosh”).
You should absolutely not use gasoline or other solvents to clean contacts.
The last option for faulty stops is the light bulbs themselves. It makes no sense to give any detailed advice here - you just need to replace the burnt out light bulbs with new ones.
By following all the tips listed above, the car enthusiast gets the opportunity to check the entire electrical circuit of the brake lights, starting from the fuse box and ending with the bulbs in the lamps. Thanks to this, the guarantee that the fault will be accurately detected and eliminated is 100%.