Hello everyone, today I want to look at the main reasons why the windshield wipers on the Lada Kalina do not work. So, let's go.
The first reason is the fuse. If you turn on the wipers on Kalina and they do not turn on, then the first thing you need to do is check the fuse. Fuse F4 is responsible for the operation of the wipers on the Lada Kalina car. And if necessary, you need to replace it.
The second reason is that the electric motor of the wiper mechanism itself needs to be checked and, if necessary, replaced.
The third reason is that the contacts under the steering switch itself need to be checked and, if necessary, replaced with a new one.
The fourth reason why the wipers on Kalina do not work is the loosened nuts. If you turn on and hear the sound of the wiper motor and they do not run, then perhaps you just need to tighten these nuts.
And also check the nut on the wiper mechanism itself; it can also be unscrewed.
Well, that’s all, if you had other reasons why the wipers on your Lada Kalina car do not work, then write in the comments. Bye everyone.
Windshield wipers work slowly, trapeze repair
In a previous article I wrote about replacing the trapezoid and motor, and did this along with one necessary repair.
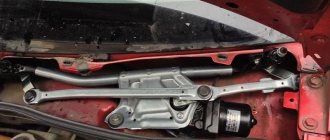
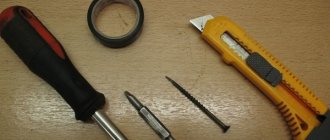
Last night, when I turned on the wipers on my Kalina, I noticed that they practically did not move. In short, they were barely crawling on the glass, although a couple of days ago everything was fine! At first I thought that the problem was in the wiper blades, but when I bent the arms a little, I realized that the blades had nothing to do with it. It was decided to remove this entire structure from the car and see what was the matter. So, the first thing you need to do is remove the Kalina wiper trapeze. Then, having disconnected it from the motor, try how easily its levers move by hand. In my case, one side (the driver's wiper) moved normally, but the other side moved with such force that I was even surprised how the motor was even able to move this lever. In order to solve the problem with the slow operation of the wipers, it is necessary to remove the shaft with the splines that is difficult to move. In general, to do all this, you will need:
- Pliers
- Penetrating lubricant
- Litol lubricant or similar
- Hammer
- Thin screwdriver
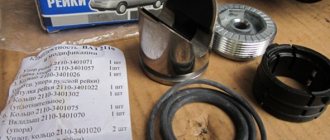
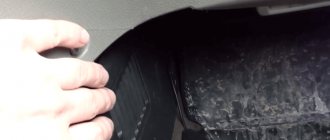
So, the first thing you need to do is use pliers or your hands, if possible, to remove the rubber band from the shaft, as shown clearly below:
Then use a thin screwdriver to pry up and remove the retaining ring, as shown in the photo:
And we take out all the washers that are mounted on the shaft, there are several of them:
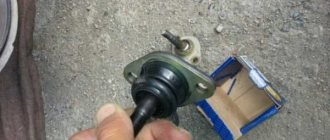
To begin with, now you can simply try spraying penetrating lubricant on the shaft, perhaps it will penetrate inside the hole and help ease the movement:
If this does not help, as was the case in my case, then it is necessary to knock the shaft out of the seat of the trapezoid body. To do this, screw a nut onto the shaft thread and gently hit it with a hammer, thereby knocking it out:
As a result, we get the following picture:
As you can see, a strange coating has formed on it, which must be removed with fine sandpaper, as I did:
And lubricate the shaft with thick lubricant, I personally used lithol:
And after this has been done, you can insert the shaft back into the trapezoid body and try how easily it can move there. Personally, in my case, everything immediately went like clockwork. After installation, the wipers began to work perfectly, even better than in the last few months.
Let's sum it up
Such an important process as replacing wipers, or when changing the windshield wiper trapezoid on a LADA Kalina car, is a very simple undertaking. There is no need for special devices or fancy tools. The brushes are removed by opening the locks.
Repairing or replacing a part such as a windshield wiper trapezium appears as a more responsible job, but it is not capable of causing difficulties for an inexperienced owner of a Lada Kalina. In such situations, do not hesitate to take action.
Possible causes of the malfunction and ways to eliminate them
When the windshield wiper is on, the electric drive does not work:
Fuse blown:
- remove the cover located to the left of the driver, under the steering column, under it there is a mounting block;
- on the cover of the mounting block there is a diagram of the location of the relays and fuses of the car, we find the required fuse and change it if necessary;
Relay fault:
Lada Kalina Hatchback MyLittleFriend Kalinich Logbook Floating speed or Replacing the idle speed control
If the wipers on the Lada Kalina do not work
in intermittent mode, it is necessary to change the relay located in the mounting block, next to the fuses.
Wiper motor malfunction:
- we check the ground terminal of the electric motor, screwed to the car body next to the rack;
- we clean it and the attachment point;
- install in place;
VAZ 1117 If this does not have a result, disconnect the connector for the electric drive of the windshield wiper, located under the windshield frame.
Using a tester or any other continuity test, we check whether power is coming to the connector. If power comes in, then it is necessary to change the wiper motor.
Disconnect the terminals from the battery. Remove the decorative caps from the leashes. Unscrew the nuts securing the leads and remove them. Remove the plastic grille under the windshield frame by unscrewing the bolts that secure it. Having unscrewed the trapezoid fastening (two bolts and one nut), remove the electric motor from the box and disconnect it from the trapezoid. We install a new one, repeating the procedure in reverse order.
If power does not come to the connector
, the steering column switch needs to be replaced. Disconnect the battery terminals. Remove the plastic steering column cover. Disconnect the switch block and, pressing the latches on both sides, remove the steering column wiper switch. Install a new one by repeating the process in reverse order. Assembling the casing.
When turned on, the wipers on Kalina do not work, but the electric drive rotates
It is necessary to check the condition of the gearbox and wiper trapezoid.
Unscrew the plastic grill under the windshield frame. First remove the wiper arms and unscrew the nuts that secure them. We check whether the gearbox axis of the electric windshield wiper drive rotates.
If the axis rotates and the trapezoid is stationary
, check the spline connection of the gearbox and trapezoid, if necessary, tighten the fastening nut. If the connection is severely worn, it is necessary to replace this unit.
If your windshield wipers do not work on your Lada Kalina
, this is not a reason to despair. As a rule, the cause is a minor malfunction. Such as a blown fuse or a loose nut on the spline connection between the gearbox and the windshield wiper drive, which can simply be tightened.
The windshield wiper electric drive system is quite reliable and does not require special maintenance. It is enough to follow basic operating rules. If during the winter period the wipers are frozen to the windshield, then before turning on the windshield wiper, it is necessary to free them from ice. And they will serve you without causing any problems.
How to troubleshoot purifier malfunctions yourself?
When the owner of LADA Kalina turns on the windshield wiper drive, the motor works, but the wipers refuse to move, then the bushings will have to be replaced. For this purpose, the trapezoid of the wipers is dismantled, which is covered by a decorative plastic panel. The location of the unit (trapezium) is directly under the windshield. Repair of the windshield wiper is carried out using the windshield wiper trapezoid repair kit in the following order:
- unscrew the fasteners of the brushes and remove them together with the leads;
- then we dismantle the decorative protection panel, for which we stock up on a Torx T20 wrench;
- we move on to removing the trapezoid itself, which is held on the frontal body element by means of a nut and a pair of bolts, using, if necessary, a repair kit for the windshield wiper trapezoid;
- Next, you will need to disconnect the supply lines of the unit from the battery;
- Now you can remove the assembly.
Replacing wipers on Kalina Avto-Gid
Lada Kalina Hatchback UltraViolet Logbook -062- How to drain antifreeze
Car wipers (we are talking about the windshield wipers themselves, not the blades) are usually durable parts. They are almost not affected by aggressive factors - except moisture. For this reason, they can easily serve without replacement for the entire time that the car is in use. However, occasionally they still have to be dismantled. In particular, this must be done if, for example, you plan to replace the windshield. The procedure for removing wipers is not at all complicated, but car services will charge you money for it, which may be useful for other purposes. In this article we will tell you how to remove windshield wipers in the correct way using the example of a 1st generation Lada Kalina car.
Tools and materials:
To remove the windshield wiper you will need:
- Head or key 13, new front wiper arms, if you change them (articles: 11180-5205065-00 on the driver’s side and 11180-5205066-00 on the passenger’s side) - for front wipers;
- A wrench for 10, a new rear wiper arm, if you change it (article: 11170-6313150-00 or 11190-6313150-00 depending on the body type - station wagon or hatchback) - for the rear wiper.
Replacing front wipers on Kalina
Before you start dismantling the wipers, remember that it is better to do this on the driver’s side with the head, and on the passenger side with the key, otherwise there is a risk of scratching the hood. However, if you are careful, the hood will not be damaged regardless of the tool used.
1) First of all, remove the plugs from the plastic. You will see nuts under them.
2) Take the head (wrench) and unscrew the nut. There will be a washer under it, pull it out immediately, otherwise it may get lost during the process of removing the wiper.
3) Then remove the windshield wiper. That's all.
4) It should be noted that before removal it is worth remembering, or even better, photographing exactly how the wipers were located on the glass. When you put them back, this information will be useful to you. If you put them in the wrong position, they can hit the pad below during operation, scratching it and damaging the brushes.
5) Install the windshield wipers in the reverse order.
Replacing rear wipers on Kalina
This procedure is only relevant for owners of a Lada Kalina hatchback or station wagon, since sedans were not equipped with a rear wiper. Remembering the location of the wiper will be useful here too, so take the time to take a photo of it before removing it.
1) First, lift up the metal cap that covers the nut.
2) Take a 10mm wrench and unscrew the nut. Just like on the front, there will be a washer under the nut, don't forget to remove it. Rock the wiper back and forth and pull it towards you, it will come off quite easily.
3) Reinstallation is carried out as usual, in the reverse order of removal.
The entire list of manipulations will take no more than 1 hour
In cases where the central bushing breaks, the entire mechanism will have to be replaced. This work is not capable of creating difficulties, so we unscrew the previously indicated list of fasteners and dismantle the assembly, and install a new mechanism in its place. Such a replacement will be more expensive compared to the usual replacement of bushings, but this option is more reliable. The owners of LADA Kalina assure that after replacing the bushings, the mechanism is able to provide a service life of at least two years. Here the choice remains with the owner, which method to lean towards in a given situation.
I did it myself. The windshield wipers don't work. I did it myself.
Lada Kalina Hatchback Colombia Logbook Miracle trade-in
09 Sep
Hello!
With the purchase of Kalina, the problem of non-working wipers arose. More precisely, a floating problem, sometimes they work, sometimes they don’t. I started to blame the mass that was not tightened, I found current in 2 places, I cleaned them and tightened them: It turned out that the masses were not tightened, the pin and the area around it were well painted.
Tightening the available masses certainly did not help. Well, okay, let's act. I decided to remove the trapezoid, lubricate it and lay a separate wire to the gearmotor.
To remove the trapezoid you must:
- Unscrew the wiper arms. To do this, remove the caps by simply prying them off with a screwdriver. We unscrew the nut with a size 13 wrench and remove the leash by shaking it. It is highly advisable to mark the position, for example, with a thin marker or nail:
- Then, using the star wrench, unscrew the 4 screws and remove the decorative trim under the windshield:
- Remove the trapeze. It is secured with 2 nuts and one bolt, here we need a 10mm wrench:
- Next, it is advisable to mark the position of the motor axis relative to the trapezoid. Otherwise it will be excruciatingly painful. Remove the black protective caps and lock washer from the trapezoid, and pull out the axle. I smeared it with lithol.
Reassemble in reverse order. During assembly, I screwed on the additional mass and threw it onto the body. The wipers run and make you happy. I also changed the windshield washer nozzles. They didn’t fit quite tightly, so I made gaskets from tin to make them stand tightly. Now the wipers are fast and 4 streams wash the glass.
Good luck!
Advertisements on NN.RU - Auto
Re-equip, lengthen the frame, truck: Valdai Gas 33104, 33106; Valdai farmer 331043, 331063; Lawn Gas 3307, 3309;.
A certified truck conversion organization invites you to: lengthen, re-extend and convert, p.
With us you can not only extend the frame to fit a body of 5.1 m, 6.2 m, 7.5 m, 9 m for Maz Zubrenok, Maz, Kamaz, Ural, Zil, Mitsubishi, Nissan.
Lengthen Kamaz under a body 7.5 m Lengthen Maz Zubrenok, Maz under a body 9 m Re-equipment of the chassis of an extended truck.
Nizhny Novgorod residents were silent for a long time about the Siberian forest fires, but then there was a reaction in our city: people decided to pay attention to it. Imagine, you wake up in the morning, open the curtains, bright sunlight bursts into the apartment, and outside the window there is a stunningly beautiful landscape
Imagine, you wake up in the morning, open the curtains, bright sunlight bursts into your apartment, and outside the window is a stunningly beautiful landscape.
Airborne Forces Day in Nizhny Novgorod went well, fun and peacefully, contrary to firmly rooted stereotypes. Our paratroopers in quiet times, like...
August 2 is the very day when the heads of the strong are covered with blue berets. The holiday in honor of the airborne troops is exciting.
How brand engine additives work
How to register the replacement of a car's power unit this year? How to register the replacement of a car's power unit this year?
Procedure for dealing with paperwork.
How to adjust the valve mechanism on the engine of a GAZ 3110 Volga? How to adjust the valve mechanism on the engine of a GAZ 3110 Volga?
Why do you need to adjust the valves on the engine?
Adjustment of the valve mechanism YaMZ 238 Adjustment of the valve mechanism YaMZ 238
Precise valve adjustment on diesel YaMZ 238:
Organizational diagram for changing the front door window regulator on the "seven" Organization diagram for changing the front door window regulator on the "seven"
Design and procedure for replacing a window regulator
Chevrolet-Niva heating system: changing the interior heater heat exchanger Chevrolet-Niva heating system: changing the interior heater heat exchanger
Recommendations for replacing the interior heater radiator
Standards for the use of fuels and lubricants at the disposal of the Ministry of Transport of the Russian Federation Standards for the use of fuels and lubricants at the disposal of the Ministry of Transport of the Russian Federation
What basic fuel standards does the Ministry of Transport offer?
Factory and actual fuel consumption for Lada Priora, reasons for overconsumption Factory and actual fuel consumption for Lada Priora, reasons for overconsumption
Declared and measured fuel consumption per
Why wipers work slowly on Lada Priora and how to speed them up
March 30, 2016 LadaOnline 37 906 3
Many Priora owners notice that over time the wipers begin to work slowly. The speed has decreased several times and does not rise even when cleaning the wet windshield. Let's look at the main reasons for slow wipers, as well as ways to solve this problem.
The main reason for slow Priora wipers is the lack of lubrication:
- in the windshield wiper motor;
- on the hinges of the windshield wiper trapezoid.
Try to use a lubricant that does not thicken at low temperatures. The trapezoid with the motor can be removed, like on a VAZ 2110.
If lubrication of the motor and trapezoid does not help, we recommend using the modification. The Priora windshield wiper circuit consists of a large number of connections and contacts, each of which creates additional resistance. As a result, the power of the motor decreases, and the Priora's wipers work slowly. This problem can be eliminated with the help of modifications that will minimize current losses.
Required:
- 5-pin connector, like on the windshield wiper motor;
- 5-pin relay with socket - 3 pieces;
- wires 25 mm2;
- round terminals.
We assemble and connect the structure according to the diagram. That is, the resulting block of three relays is installed in the gap in the windshield wiper motor connector without interfering with the standard wiring
We recommend that you pay special attention to the insulation of the wires, and it is better to close the assembled structure in a box to prevent the ingress of moisture and dirt
circuit of three relays for accelerating windshield wipers Lada Priora windshield wiper motor connector Lada Priora installed circuit of three relays for accelerating windshield wipers Lada Priora
As a result, the windshield wiper blades will work faster than before. You can compare the speed of the wipers using the video clip (1 - before modification, 2 - after modification):
Have you encountered a problem when the windshield wipers started working slowly on a Priora? How did you manage to increase their speed? Let us remind you that on the website you can also find instructions in case the windshield wiper blades do not work at all. Did you know that you can increase the cleaning area of your windshield by installing larger blades.
Photo source: straiker9 logbook
Keywords: Lada Priora windshield wipers | Lada Priora glass
For Lada Granta, Kalina, Priora
The resistor shown in the photo is responsible for the number of strokes. Our task is to replace (using a soldering iron) it with a resistor with lower resistance. To get two sweeps of the wipers after washing the windshield, it is enough to solder a resistor with a resistance of 47 to 68 kOhm (0.25 W). To make three swings - from 70 kOhm. The result of the modernization on video:
It is worth noting that on sale you can find a wiper relay with advanced capabilities:
- There is a pause adjustment, that is, you can set any time between sweeps of the wipers;
- Three strokes after the washer, instead of four (there is no problem with the wipers squeaking on the glass);
- After the washer, the first stroke is delayed.
However, replacing a resistor in a relay yourself will cost only 5 rubles, and a functional relay will be 70-100 times more expensive.
Repair of windshield wiper motor gearbox Lada Granta
To disassemble the gearmotor, unscrew the screws securing the gearbox cover 6 and remove it together with the limit switch panel 4.
Then unscrew the screws securing the gearbox housing 11 to the electric motor housing 8 and disconnect them.
Remove armature 9 of the electric motor.
To remove gear 3 of the gearbox, unscrew the crank nut, remove the retaining ring from the axle and remove the axle with gear and washers from the housing.
After disassembly, blow out the internal cavities of the electric motor with compressed air to remove carbon dust deposits and check the condition of the brushes and commutator.
The brushes must move freely in the brush holders without jamming, and the springs must be intact and have sufficient elasticity.
Clean the commutator with fine-grained sandpaper and then wipe with a clean rag lightly greased with petroleum jelly.
If the collector is severely burnt or worn out, it is better to replace the gearmotor with a new one. Check for signs of jamming on the armature shaft journals.
If necessary, sand them with fine-grained sandpaper.
When assembling, move the brushes away from the commutator so as not to break them or damage their edges, and insert the armature into the body with extreme caution, avoiding hitting the armature on the poles so as not to break them. After assembly, to align the bearings, tap the gear motor housing with a wooden hammer, and then check it on the stand
After assembly, to align the bearings, tap the gear motor housing with a wooden hammer, and then check it on a stand.
When installing the crank, position it so that in its final position it is parallel to the short wiper rod and pointed towards the electric motor.
Data for checking the gearmotor
Rotation speed of the gearmotor shaft at a supply voltage of 14 V, a load torque of 1.47 Nm (0.15 kgf m) and an ambient temperature of 25±10 °C, min -1:
— first (small) 30–40
— second (large) 55–70
Current consumption at the above load torque, A, no more than:
— at first speed 3.5
— at second speed 5
If the brush springs are damaged or have lost their elasticity, replace them.
Check the ease of movement of the brushes in the brush holder.
They should move freely without jamming.
Replace worn or chipped brushes.
When replacing, solder the leads of the new brushes to the brush holder.
Clean the collector with fine sandpaper if it is dirty or has marks, scratches, etc.
If the commutator is badly worn or burnt, replace the armature or gearbox with electric motor assembly.
If you find traces of jamming on the armature journals, clean the journals with fine sandpaper.
Replace a gear that has severely worn or broken teeth.
Clean burnt or oxidized contacts of the self-stop mechanism with fine sandpaper.