Print this article Font size 16
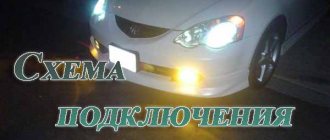
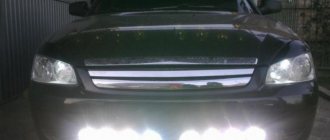
If you install fog lights on a VAZ 2110, you can kill two birds with one stone. Namely, to transform the appearance of the car, and increase the level of your own safety, and add comfort to driving at night.
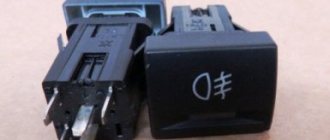
Kirzhach with lamp H1
Therefore, today we will talk about how to connect fog lights on a VAZ 2110, what is required for this and what result you will ultimately be able to achieve.
Installation Features
In 90% of cases, fog lights are installed near conventional headlights, in the front of the car. Installing headlights at the rear, firstly, is of little functionality, and secondly, requires additional financial costs. Most foreign cars produced in 2005 and later have a specially adapted connector in the front, while to install fog units in the rear of the car you will need to purchase the necessary console.
The fastest way to install fog lights on a car is to attach them to a special connector - a compartment on the bumper designed exclusively for this feature. If you choose original headlight models manufactured at the vehicle manufacturer's plant, installing fog lights will take only 15 minutes.
If there is no corresponding connector on the bumper, you will need to purchase additional fasteners. In particular, it is not necessary to install headlights exclusively from below: light elements can be located at the top of the car, which will not in any way affect their direct functions and is not prohibited by law.
Into the standard opening
How to properly install fog lights in the standard opening:
Raise the car 15-20 cm using a lifting mechanism.
Release (remove) the protection on the bumper.
Remove the protective clips on the bumper plugs.
Place the headlight in accordance with the guide lines, fasten with self-tapping screws.
Connect the electrical wiring.
If the headlights are original, the process takes no more than 15 minutes. If you use unsuitable mounts or headlights, such as Chinese equivalents, it will take more time to ensure compatibility of the parts.
Using a console (bracket)
A bracket (or console) is an element for installing various parts on a horizontal surface. For example, a fog light on a car's bumper or upper body.
Typically, the bracket is used on cars that do not have a special recess for installing fog lights. Thus, additional lighting can be installed not only on the sides (the classic installation usually used by most companies at the factory), but also in the central part of the bumper.
How to install fog lights using additional structures:
Attach the brackets using self-tapping screws or bolts. Typically, the bumper has many holes that can be used to accommodate additional structures, including a console.
Screw the fog lights to the bracket. It is better to use bolts for this.
Connect the wiring.
Depending on the complexity of the design, installing fog lights using a console takes about 20-30 minutes. Here the main role is played by the choice of fastening element: it is recommended to choose a material and color of the console that suits the style of the car. In this case, the selected element must be quite strong: when driving at a speed of 80 km/h and above, loosely secured brackets can become loose, which will subsequently lead to the possible loss of the fog light or damage to individual elements.
With bumper reconstruction
The most radical and most expensive way to install fog lights involves replacing the bumper. In fact, this is a full-fledged restyling of the car, since replacing the bumper with the simultaneous installation of fog lights changes not only the appearance of the car, but also the technical characteristics (improves visibility, maneuverability, etc.).
Instructions - how to install fog lights by removing the old bumper:
Remove the old bumper.
Measure the distance at which the new lighting will be located.
Draw a layout of the recess for the fog lights.
Drill holes and file the edges of the bumper. The smallest elements of the bumper are removed using a regular stationery knife (for paper).
Drill holes for fasteners (bolts, screws).
Insert the fog lights into the specially made recesses. Secure them with bolts or self-tapping screws.
Install the protective cover that comes with the headlights and is located in the upper part. Does not require new holes.
Adjust the headlight. The key for screwing in the element and its adjustment is included in the standard factory set of fog lights.
Set up electrical wiring.
Install the bumper on the car.
The installation time for fog lights this way is usually about 2 hours. The longest stage is associated with creating holes for the headlights, as well as dismantling and installing the bumper itself on the car. If you have certain repair skills, you can install the entire structure in an hour.
Selection options
How to choose the best universal fog lights:
First, decide on the cost you can afford. You must understand that the lower the price of the optics, the more likely it is that it will not work correctly. More expensive options usually have an increased service life and function much more efficiently. Also decide on the manufacturer. As practice shows, currently the highest quality goods are produced not by Chinese, but by European manufacturers. For example, brands such as Osram or Philips have long shown their superiority and won the trust of domestic consumers. Evaluate the quality of optical protection, that is, protective glass
It is important that the headlight is equipped with glass rather than plastic, since the latter has a short service life and is more susceptible to damage. For example, a crack in the plastic may appear as a result of an accidental hit of a pebble from under the wheels of another car on the headlight.
You cannot drive with a cracked or damaged headlight plastic, since in bad weather this can lead to moisture getting into the headlight itself. Therefore, the plastic will have to be changed in any case. Also pay attention to the fog light housing. It is desirable that it be metal and not plastic, since again, we are talking about the service life of the devices and their possible damage. The material from which the case is made must be as resistant to mechanical as well as temperature influences. If you still prefer cheaper Chinese analogues, then make sure that all wire connections are reliable and the wiring itself is thicker. If thinner wires are used, they can quickly fail due to overvoltage.
Fog lights should be purchased taking into account the mounting locations provided for their installation in the bumper. As mentioned above, PTFs can be oval, round, rectangular or square in shape. So, the shape of the headlights should be chosen taking into account the places provided for their installation. You also need to understand what color of glow you want to see. If the headlights are yellow, then it may make sense to install headlights with halogen bulbs so as not to disturb the exterior of the car. If the color of the lighting is white or blue, then it makes sense to think about installing LED or xenon PTFs. It is desirable that the body shape be aerodynamic, this will make it possible to avoid possible noise when using the flashlights. If you purchase lensed flashlights for gas-discharge lighting sources, then you need to devote time and attention to their adjustment. Otherwise, there is a chance that you will blind drivers of other cars. Sooner or later you will need to change the light sources in your headlights. Therefore, when purchasing, choose optics that will allow you to replace failed light bulbs with minimal physical and time costs. It is important that the optics have reliable fastenings and allow adjustment of the lighting flux. And not only vertically, but also horizontally. It is better that the design of the purchased products succinctly fits into the exterior of the vehicle. Fog lights should not stand out. If you buy PTF with light bulbs, then remember that their too high power can negatively affect the operation of the generator device, as well as electrical circuits. It is better to give preference to light bulbs with a power of no more than 55 W (video published by the user Avtolyubitel).
Fog lights VAZ 2110 wiring diagram
Wiring diagram for fog lights.
connection option 1
1) Open the fuse box, then unscrew the screw, pull it out and turn the fuse box over. Wires marked in green do not come from the factory and must be added.
Reverse side of the fuse box.
2) From the bundle of wires included in the kit, cut off two wires, 15 centimeters each. At the ends of both wires we attach female connectors.
The red wire, marked 1 in Figure 2, is positive, you can even check it with a test light. We stretch it to the leg number thirty on the back of the relay.
We connect the first positive wire.
3) The wire labeled number 4 in the figure as 2 is the pole running from pin 87 back to the fuse box.
We connect the second positive wire.
4) We connect the red positive wires to the fuses in Figure 5 (they are intended for PTF), after which they separate one at a time to the right and left headlights.
Fuses for PTF (10 amps each) installed from the factory.
5) We mount the wires as shown in Figure 7. We attach thirty-centimeter wires with “mothers” at the ends to the double-female connector.
We create a convenient installation connection.
6) We insert the wires with single “mothers” into the white plug, in the places marked with circles on the fuse block.
Connection points for single females on the fuse block.
7) We remove the double female connector from the fuse block and connect it to the double male connector, which is located behind the trunk release button.
We connect our connector to the connector behind the trunk release button.
The black wire numbered 3 comes from pin 86 located on the relay and is a minus. It is best to draw the negative from the top of the fuse block. There are already factory black wires there, inserted under the 10 nut. The wire marked with the number 4 is responsible for turning the PTF on and off.
Negative and PTF switching wire.
Several options for where to run the PTF control wire.
1) From the side lights directly, when the side lights are turned on, the PTF turns on.
2) From dimensions with an additional button. Then turning on the dimensions only supplies power to the button, and the button itself turns on the PTF.
3. We run the wire from the ignition switch through the button, as in method 2. This is the most convenient option.
In photo No. 11, number 1 indicates the PTF turn-on relay, and number 2 indicates the place for the electric lift relay. We take two wires from it, extend them and connect them to the headlight switch button
One of them (pink thin in our case) when you turn on the ignition, a “plus” will appear, and the black wire will be a “minus”. To correctly connect the PTF, it is important to know that the left output is located near the radiator, under the left headlight, and is easily secured with a clamp to the car body. The right exit is located symmetrically under the right headlight.
Buying what you need
You can, in principle, buy a ready-made set along with wires, but many believe that if you buy everything separately, the number of installation options increases, and it will all cost less. So, we buy:
- Set of headlights (2 pieces);
- Plastic pads;
- Headlight frames;
- A key and a yellow indicator for it;
- Relay;
- Wires. It is better to purchase ones from an electrical equipment store, so that there are two copper conductors with double insulation (ShVVP-2 is suitable). A cross section of 0.5 mm will also be normal, but if you want to install lamps of higher power, take 0.75 mm;
- Terminal for installation to ground;
- Wide as well as narrow terminals, called mother/father. When purchasing them, it is advisable not to take them complete with wires. Installation will be more convenient if these terminals are crimped with pliers already on the connections of the installed wires.
Connection diagram for fog lights via relay
Before starting installation, you need to decide on the connection diagram:
Autonomous, the fog lights will turn on independently, although then the headlights can drain the battery completely, which is fraught with problems. Connection occurs to the positive dimensions or ignition wire +ACC
Watch the video below to see how to properly connect the relay.
With the ignition, in this case, the fog lights cannot be turned on without the engine running, usually the plus from the ignition switch or IGN2 is used, which is best looked for using a voltmeter, since if you use a lamp probe, there is a possibility of damage to the car's electronics.
To connect the fog lights via a relay, it is not necessary to disassemble half of the body. The main part of the work is carried out in the cabin, where it is necessary to provide access to the car's electrical system by removing part of the front panel.
The role of the relay
The relay is necessary to reduce the current in the wires feeding the fog lights to prevent them from melting. It has 4 contacts, two switching and two control, sometimes a five-pin device is used. The excitation winding must have a resistance of at least 70 Ohms; with a lower value, the current may exceed and the fuse may fail. The relay current is 30 A, it is possible to use 70. The contacts are connected according to the following diagram:
- 1st switching - fuse block;
- 2nd switching – fog lights;
- 1st manager - on/off button;
- 2nd manager – mass.
Circuit breakers
After connecting the wires to the relay using terminal blocks, you should install fuses that serve to protect the circuit from short circuits. A 15 A fuse must be installed in the fuse block and power the circuit from the battery through it. If such installation is not possible, the fuse should be installed separately, as close as possible to the battery.
How to connect the power button?
The on/off button must be powered by any 12 V wire. Depending on preference, this can be not only the control wires from the ignition, but also any other source. Most often it is attached to the side lights.
Connecting the headlights themselves is not difficult. The red wire is positive, connects to the relay, and the black wire is ground, to the car body.
After checking that the fog lights are connected correctly through the relay, you can finish installing the fog lights.
Published: February 23, 2017
Fog lights. Are they necessary?
From an aesthetic point of view, of course, extra light sources on a car always look more impressive, especially if they are bright. But how urgent is the need for fog lights, what lamps are best to use in them, how to connect them and where to install them? And what color should the glass be? A lot of questions, but they all break down into one single “I want.” In principle, fog lights are needed if they correspond to their name and purpose. Fog lights are more than just additional headlights. This is a light that is designed specifically for driving in poor visibility conditions, namely in fog.
That's why they install a yellow filter in fog lights.
In this case, it doesn’t matter at all what kind of lamp is in the headlight - halogen, a regular incandescent lamp or diode fog lights. The main thing is the color of the light flux
And that's why. Fog is a water suspension consisting of microscopic particles of moisture. When hitting the surface of each drop, white light is refracted and scattered, turning into an impenetrable veil. It turns out to be a solid wall of white light, a cloud through which it is difficult to see anything. The yellow spectrum is able to penetrate suspension without scattering as much, therefore visibility in general is better when using a yellow filter.
Color meaning
Some people, in the old fashioned way, believe that it is better when the fog glass is yellow. But this is not true. Most leading manufacturers today produce transparent white fog lights, and they are not only as good as yellow ones, but often superior to them.
On the VAZ 2110 you can install corrugated or transparent glass. The latter are for some reason more fashionable, although less useful, since they shine in spots, while the corrugated ones give a more directed beam, which really increases visibility in bad weather.
How to connect fog lights with your own hands
Before directly installing the headlights, their location is determined. In the case of the VAZ 2115 car, the bumper already has standard holes for installing additional lighting fixtures. Similar ones can be cut in the bumpers of VAZ 2113 and VAZ 2114.
There is no need to spoil the appearance of the bumper - fog lights are easily installed on special brackets. Many PTF kits contain special decorative plugs that add attractiveness and neatness to the installed headlights and facilitate the installation process.
Installation and connection algorithm
- Installation of a power button in the car interior. In the case of the VAZ-2114, the place for the button is on the left side of the driver on the front panel. However, its placement can be arbitrary - the main thing is that it is convenient for the driver to drive the car. Often, PTF power buttons are installed instead of plugs on the control panel.
- The grille with the speaker is removed from the standard front panel. Behind it there are two connectors - one is for turning on the headlights, the second is for indicating the operation of lighting fixtures and illuminating the key itself.
- The button is placed in a convenient place, and chips are connected to it. The speaker grill can be returned to its place.
- Under the hood there should be a mounting block that combines fuses and relays. The PTF relay will be mounted in the same place, so the block must be removed: to do this, unscrew the nuts that secure it and lift it.
- On the bottom panel of the mounting block there are two blocks - 7 and 8. Each of the blocks is signed during production at the factory, so it is impossible to make mistakes at this stage.
- The PTF set contains a wiring harness with four contacts. The mentioned wires are pulled to the fuse block from the fog light relay.
- The relay is mounted in the engine compartment of the car.
- The wires coming from the PTF relay are connected to connectors 7 and 8 of the mounting block: in connector 7, terminal 8 is connected to terminal 30 from the relay, terminal 87 is connected to connector 1, terminal 85 is connected to connector 17 on terminal 7, terminal 86 is connected to ground . From block 8, terminals 2 and 3 are directed to the left and right fog lights, respectively.
- The ground wires are connected to the fog lights: they are usually attached to the nuts of the headlights.
Wiring diagram for connectors and terminals of fog lights
The functionality of the entire connection can be checked by turning on the side lights - only then will the fog lights work.
Fog lights only function when the side lights are on
After completing the installation of the PTFs on the car, they only need to be adjusted correctly. The flow of light should not blind drivers in the oncoming lane.
Video: instructions for installing and connecting fog lights
Fog lights are essential lighting equipment on any car, making it easier to travel in conditions of minimal visibility. If there is no PTF on a certain car model, you can install them yourself. The installation procedure does not require special knowledge and can be carried out by the driver without the involvement of third parties.
Self-installation
Electrical connection
Having purchased a ready-made PTF kit, you can begin to integrate it into the standard VAZ electrical wiring system:
- Disconnect the battery (remove “+”);
- Open the fuse box and use a screwdriver to unscrew 1 screw and remove the block into the passenger compartment;
- We unfold the block and find the terminals of two fuses F4 and F14. The first is responsible for protecting the right headlight, the second – the left;
- The block also contains fuse F20, which is responsible for the operation of the rear PTFs;
Note! The connection diagram for the rear fog lights of the VAZ 2110 is initially present on all models, and consists of two-filament lamps in the side light unit.
- We insert the copper wire connectors from the kit according to the attached diagram;
- Separately, we bring out the wire for the button into the instrument panel and install it;
- We lay the wires through the partition into the engine compartment;
- Putting the fuse block back together.
Bumper installation
- Remove the plastic plug and insert the wiring with the connector into the hole;
- We connect it to the base and install the fog lamp for the VAZ 2110 in the bumper;
- Take a Phillips screwdriver and screw the headlight with 2 self-tapping screws;
- We pre-adjust its position;
- We secure the wiring in the engine compartment, leaving some slack for replacement (for example, a burnt-out lamp);
- We connect the battery and check the quality of the work performed.
All that remains is to adjust the correct direction of the light flux. You will find information about this procedure in other articles on our website dedicated to AvtoVAZ models.
Which ones are better?
Typically, standard optics have halogen elements; replacing them with the same ones, but more powerful, makes no sense. It is better to install LED lamps in fog lights; a good option is to replace the fog lamp with xenon (author of the video - Learning to drive a car. All the secrets for beginners.).
LEDs can be installed in PTF without restrictions, unlike xenon. Replacing a light bulb in a fog lamp does not require special equipment or specific knowledge, so you can replace it yourself. It is better to buy products from trusted brands, since cheap Chinese samples are often of poor quality and quickly fail.
When purchasing LEDs, you need to select a lamp with a base similar to the halogen counterpart. An important parameter for fog lights is brightness, measured in Lumens (Lm). Anti-fog lights must have a brightness of at least 1000 lm.
Installation Guide
On a VAZ 2110 or even - a completely reasonable solution, because these optics can perfectly cope with the problem of illuminating the road in fog. If the car owner has never encountered such a problem before, then he will probably be interested in learning how to connect the fog lights on his own. We will tell you more about this below.
Tools and materials
To install or xenon in PTF, you will need:
- The headlights themselves, which can be purchased at any store. Domestic stores can supply headlights in two variations - for old-style center consoles it is optimal to use PTF for “ten”, but if your car is equipped with a new torpedo, then you will need optics for the VAZ 2115. In this case, the difference lies in the buttons for turning on the optics.
- Multimeter for measuring voltage.
- Indicator light with wire.
- Heat shrink packaging.
If you decide to use xenon in fog lights, then you will also need an additional xenon kit.
Connection diagram
How to properly connect fog lights to your car:
- First you need to open the fuse box and unscrew one screw, after which the device itself needs to be unfolded. The wires that will need to be connected additionally are marked in green in the photo. The number 1 marks the cable that transmits a positive charge, which can be checked using a test lamp. The connection of this wire is made from the relay to connector 20, as for the wire numbered 2, this is also a plus and it needs to be connected to the relay on pin 87.
- Next, you need to connect wires to the safety elements, which will subsequently split into the left and right lights. The wiring is installed, and the corresponding wire (also with a female output at both ends) is connected to the output with a double “female” contact, the length of which should be 30 cm.
- After these steps, you need to insert the cable with single female contacts into the white connector on the block. As for the double female connector, it must be removed from the block and connected to the male output, which is located behind the trunk opening button.
- Next, the black cable, which is marked with the number 3 and comes from output 87, should be routed from the top of the power supply; this wire is a minus. Here you can see the wires that were installed at the factory; they are connected under a nut that can be opened with a 10 key. The cable, which is marked with the number 4, ensures activation and deactivation of the optics.
There are several options where you can lay the foglight control cable:
As an option - from the side lights directly, without using a switch. In this case, the fog lights will automatically turn on along with the side lights.
- Another option is from the same side lights in a sequential manner, but using a switch. In this case, voltage will be supplied to the fog lamp switching regulator. However, the optics will only turn on if the button is pressed.
- Another option is from the ignition system via a switch. That is, when the driver turns on the ignition, there will be a plus on the optics switch. As in the previous case, the lights will turn on only after the switches are activated.
- In the engine compartment, disconnect the wires that are connected to the fluid control regulator and the washer expansion tank. To do this, unscrew the washer fixing nut and remove the block with wires, which is located under the left side member.
- For the Ш-1 connector you will need three cables - one yellow and two black-yellow.
- After this, you will need to cut two pieces from the yellow cable - they should be pulled into the vehicle interior. The wiring is thoroughly cleaned and male terminals are connected to it. Having completed these steps, the connectors must be connected to the block in such a way that the marked cable is connected to the black and yellow wire. Next, the block must be connected and two yellow cables attached to the harness. Having done this, the washer reservoir can be installed in place.
- After this, you will need two more pieces of wire, each should be 0.5 m long. You need to connect a ground terminal to these wires, and then fix it to the stud along with the ground cable from the optics.
- The cable from the PTF must be pulled from the front side member and brought out to where the lamp itself will be fixed. A ground terminal must be connected to each cable.
- After these steps, the brackets are mounted on the bumper itself, and the terminal blocks are connected to the wires. The final stage will be the installation of light bulbs in the lanterns (the author of the video is the proVAZ-2110 channel).
Basic Setup Aspects
Setting up and adjusting lighting includes several steps:
- First you need to make sure that the headlights are working normally and do not turn on at the same time as the low beams. If this is the case, then you will not be able to adjust the light correctly.
- After this, you need to check how securely the headlights are fixed. If the optics are loose, then, of course, the adjustment will be useless. In addition, it is also necessary to check the tire pressure - this indicator should be the same, and the car should be parked on a flat surface.
- To make the adjustment, you will need not only a flat surface, but also a place with a solid fence or wall in front of it. Having found such a place, it is necessary to measure the distance from the ground to the axis of the PTF installation, and this distance must be marked on the wall in front of the car.
- The machine is placed at a distance of five meters from a wall or fence, at which point the preparation procedure can be considered almost complete. For more accurate indicators, some weight should be placed on the driver's seat in accordance with the driver's weight. On average, the weight of the load should be about 75 kg. First you need to adjust the distance between the light streams; it should be about 57.7 cm from the central vertical axis. Each headlight must be adjusted separately, but when adjusting one lamp, the second should be covered with a piece of paper or cardboard; any opaque material will do.
- Once the distance has been set, you can adjust the height of the optics. In this case, the adjustment is also carried out on each lamp separately, and the center of the light must correspond to the location of the lighting components. The adjustment itself is made using a special bolt located on the side. To do this, you can find a corresponding hole in the frame into which a screwdriver is inserted.
Basic tips regarding adjusting fog lights are given in the video below (the author of the video is the Test Lab channel, Autolamp tests).
Installing fog lights is not just a step towards improving the appearance of the VAZ 2110, but also taking care of your own convenience and safety. That is why you should know how the fog lights are connected to the VAZ 2110 and ensure the best conditions for driving in bad weather.
Legal requirements
When purchasing headlights, an auto parts store offers a huge variety of fog components in different formats and sizes. GOST 8769-75 forces VAZ-2110 drivers to control themselves and install headlights that meet certain legal requirements:
- You cannot install just one fog light; fixation involves installing a kit consisting of 2 parts.
- If you measure the distance from the side marker, the headlight is in 400 mm increments, and the measurements are taken along the outside of the diffuser.
- The step from the road surface to the bottom edge to the dissipative product cannot be less than 150 mm.
- It is not permissible to install headlights higher than the headlight.
Tools and materials required for installation
To install the PTF, you must purchase in advance the entire set of materials and tools:
- A set of fog lights, note that the VAZ-2110 dashboard is an older model, so the headlights for Euro models should be put aside.
- Lamp for monitoring the procedure.
- A multimeter that allows you to test the correctness of individual stages of work.
- Double connectors, among experts they are also called “mother and father”, 1 set is enough.
- 8 pieces of female connectors.
- Insulating tape.
- Packaging material for heat shrinking.
To correctly install fog lights on a VAZ-2110, you need to start from the electrical diagram; it can be taken from KGPTF.
What does the market offer?
Such products will have to be installed with your own hands in every sense - drilling, cutting, fastening and adjusting their functionality.
Today, two types of lighting devices are available for free sale:
- Built-in optics in standard places of the front bumper;
- Fog lamp VAZ 2110, mounted on brackets.
Therefore, we will highlight only the main 4 manufacturers whose products deserve attention:
- from the Vladimir region, which has been producing lighting devices for the domestic automotive industry for more than 70 years. Among motorists, Kirzhach fog lights on the VAZ 2110 have long proven themselves to be the best;
Branded PTF packaging produced by Avtosvet with factory index 3743010
The company's instructions require you to verify the authenticity of the product (protection against counterfeiting)
- The Automotive Lighting company from Ryazan offers products manufactured under Bosch license. In fact, this Russian enterprise is a division of a German and Italian association, having mastered the technology of manufacturing reflectors from synthetic material with a free surface.
The company from Ryazan is a supplier to many domestic automobile companies
- The Luch enterprise, also located in Ryazan. A special feature of this production is its own development of foglights for domestic car models.
The price of Luch products is one of the lowest on the Russian market with fairly high quality
- German automaker Bosch. This brand of products is well known in many countries around the world. For cars of the tenth family, the produced PTFs are ideal - no modifications are required in the bumper or in the standard VAZ wiring. Bosch headlights are considered the best, leaving all competitors behind. But the same cannot be said about their cost.
- Products from Southeast Asia under the common ProSport brand; Xenon ProSport also deserves attention from car owners
- Hella fog lights for the VAZ 2110 are often offered in a version with a bracket. But this is a really high-quality product that can improve the illumination of the roadway and roadside in dense fog. (See also the article Which fog lights are better on the VAZ 2110: features.)
The high quality of the products is confirmed by high-quality packaging
How to assemble an electrical circuit
Let's start with the fact that according to GOST, fog lights must turn on simultaneously with the side lights. But this does not mean at all that the latter cannot be turned on without PTF. That is, when the side lights are turned off, the fog lights will not light up.
circuit diagram First, we install the relay. The location for this can be chosen anywhere, for example, behind the dashboard. We connect the wire from pin 86 to the nearest negative wire, suitable for all devices on the panel, or we place it on the body. After this, we will stretch the wire that will be connected to 85 to the installation location of the PTF disable and enable button and make a connection to its contacts. From the second contact of this switch the wire goes to the +12 V contact on the ignition switch.
The wire from relay contact 87 is pulled through the plug to the fuse contact, while its second contact is connected to the positive terminal of the battery. It is best to place the fuse as close to the battery as possible. The wires going to the terminal of the anti-decoys connected in a parallel circuit are connected to the 30th contact of the relay. The second terminal of the PTF is connected to ground or the negative wire of the main headlights located nearby.
After this, all elements of the assembled circuit are carefully checked to ensure the quality of the connections made and the absence of even the theoretical possibility of a short circuit. After this, you should check the functionality of the circuit by connecting headlights that have not yet been installed to it. Only after this can you proceed to the next stage - connecting the fog lights.
Methods for connecting fog lights
Connecting PTF can be done in several ways. The simplest one is if the car is equipped with fog lights from the factory, that is, the electrical circuit consists of all the necessary components: connectors, switch, connecting wires, fuse, relay.
Installation, in this case, consists of installing the headlights and connecting them to the power supply. This method can be used when the car is fully equipped, if you need to replace installed fog lights or to improve the lighting system.
If the basic configuration of the car does not include foglights, you will have to install the wiring yourself. To do this, you need to purchase the necessary components: a set of wires, a relay, a switch, etc. You can purchase a ready-made kit for installing fog lights. Know how fog lights are included in a car's electrical circuit (video author Morgan One).
Some drivers doubt whether it is possible to connect fog lights to headlights. This cannot be done, since the switch and wiring in the side lights are not designed for the current consumed by the headlights.
Having purchased a universal kit for connecting fog lights, you can connect the fog lights yourself using the following algorithm:
Laying the wires must begin by dismantling the dashboard and connecting the relay. First you need to find the wire going to the instrument lighting. Following these wires, you can find a block that has a free connector to connect the fog light relay into. The second step is to connect the switch. If there is a free button on the dashboard, connect the headlights to it. If there is a free button, then you need to install a new one. The next step is to connect the relay to the battery. The wire from the battery must be connected to pin 87 of the relay
It is more convenient to run the wire under the pedals. It is important to include a fuse in the electrical circuit when installing. This will protect the lamps from burning out and will save you from a fire in the event of a short circuit
The fuse rating is calculated based on the power of the headlights. If you take 60 W bulbs, then the current to power the headlights will be: 2 * 60 W / 12 V = 10 A. The fuse must be selected with a high rating. In this case, it is necessary to use a fuse with a rating of 15 A. Now we mount the PTF in the bumper. Before installing the fog lights, you need to mark the locations for the headlights according to the requirements. It is better to install PTF on a removed bumper. After installation, the headlights must be securely fixed using the fasteners that come with the mounting kit. The negative wire must be shorted to ground (car body), the positive wire must be connected to the 30th contact of the relay. At the final stage, the relay is installed in its seat and secured. The instrument panel returns to its original location.
Photo gallery
1. PTF installation kit
2. Set of wires for connection
3. The process of pulling the wire to connect
4. Installation of the power button After installing the PTFs, you need to check their operation and adjust them. If your headlights are raised too much, they will lose their effectiveness when driving in bad weather conditions.
Ready-made PTF kits
Today you can find 2 types of foglights on sale, in which the light spot is formed:
- Due to scratches on the glass (classic headlight with reflector);
- Due to the lens (so-called lensed).
Tip: Making stickers for your headlights will protect your lenses from damage.
Which of them to choose depends not only on your desire, but also on the configuration of the set.
In particular, to install PTF you will need:
- Full compliance of the kit with your car model (in this case, VAZ 2110);
- The adjustment system is easy to use (meaning, without removing the bumper or partially disassembling the headlight itself);
- Visual instructions on how to connect fog lights on a VAZ 2110.
Note! Only fog lights specially designed for the VAZ 2110 can be installed on a car without any body work. Manufacturers whose products are as easy to install as possible include the German Bosch and the domestic Avtosvet Plant, the price of whose products is significantly cheaper.
So, we found out that cars of the 2110 family may differ in the way they install PTF due to the technical features of the instrument panel and front bumper.
Everything else (installation of headlights and their integration into the electrical circuit) will not create problems, because:
- The automaker has prepared the vehicle as much as possible for the installation of PTF;
- Independent work will take only 1.5-2 hours of pure time.
The third diagram for connecting headlights
It consists of 3 images, where you can see the connection features of the VAZ-2110 fog lights, the relay block, connectors Ш1 and Ш2, which makes up the PTF.
- Taking the headlight block, run the pink wire directly to the black box, where it needs to be added to the relay block numbered 85 (see picture).
- Provide power to contact number 3 of the block, designated Ш1, from terminal No. 30, located on the relay block.
- During installation of lighting devices, terminal 87 must be connected to contact 5 from block Ш1.
- Armed with a connector, connect to each other the black cable located on relay block No. 86 and on contact No. 4, taken from block Ш2.
- Check if the key backlight is working.
- The fog light on indicator implies exactly the same check.