Some motorists, for various reasons, prefer to repair their car themselves. In these cases, it is important to know the procedure for disassembling and assembling the engine. To begin with, it is worth understanding that it will not be possible to do without costs. Even if you do not plan to replace parts, you will have to install new gaskets during assembly (except in cases where the gaskets are not damaged or pressed through).
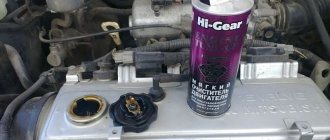
You may also need engine sealant that can be used instead of gaskets, a torque wrench (needed during assembly), and a set of wrenches of different sizes. Moreover, you will need not only open-end and ring wrenches, but also socket wrenches (preferably with interchangeable heads, long and short wrenches). In addition, you will need a lot of free time, since disassembly takes from several hours to two to three days, depending on the make and condition of the car. Let's look at the procedure for disassembling and assembling the motor in more detail.
Engine care, driver actions to extend the “life” of the engine
To extend the life of the engine, it is necessary to create the most gentle operating conditions for it, try to maintain optimal engine speeds and use only technical fluids recommended by the manufacturer, in particular, high-quality oil and fuel.
Timely oil change: the most important procedure
In addition, regularly carry out various preventive measures and do not forget to take good care of your car.
Compression test, troubleshooting
One of the main reasons for engine repair is decompression. Actually, the troubleshooting itself must be done every 30 thousand km, combining it with valve adjustment.
Signs of the need for early technical inspection of the engine are:
- power surges;
- increase in fuel consumption;
- engine tripping.
Compression measurement
If you experience similar symptoms, you need to do the following:
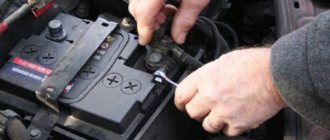
- Check the starter and charge the battery.
- Find a compression gauge and warm up the car.
- Remove the spark plugs and fuel supply hose.
- Insert the compression gauge into the spark plug socket of the first cylinder and depress the accelerator.
IMPORTANT! The normal pressure in the VAZ 2114 engine is 1.0 MPa in the standard configuration and 1.4 MPa on an eight-valve engine.
- We turn the key in the ignition and turn the starter for 10 seconds, watching the device, it must be interpreted as follows: a. if the pressure stops at 0.8 mPa and then stops growing or does so slowly, then the cylinder head is broken or there is a leak in the valve; b. if it just grows slowly, it means that the rings have exhausted their service life (by the way, this fact can be checked by adding oil and measuring again, if the pressure returns to normal - the rings are 100% to blame).
After the procedure is repeated for all cylinders, it is necessary to analyze the records. So, in a working engine, compression should not fall below 1 MPa and should not have a spread between the cylinders of more than 0.2 MPa. Otherwise, you will have to repair the engine.
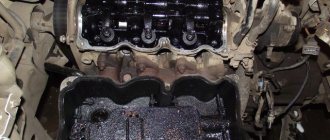
Major overhaul, which indicates the need for a major overhaul of the engine
The cylinder parts can tell you that your vehicle's engine needs a major overhaul. This is noticeable by the car’s greater need for oil - consumption is more than one liter per thousand kilometers.
What does the color of the exhaust gases mean?
A clear sign of engine trouble is the presence of characteristic bluish smoke from the exhaust pipe. However, when these symptoms appear, you should not rush to conclusions.
Oil leak
For example, high oil consumption may indicate that the valve stem seals have lost their elasticity.
Check out our article on replacing valve stem seals. 3drive has created complete and most understandable instructions about this procedure.
We believe that even inexperienced motorists can roughly understand what this can lead to:
- increased oil consumption (it simply burns along with the fuel mixture);
- inefficiency of the engine (oil + fuel + air does not provide the efficiency expected from the engine);
- destruction of the cylinder-piston group (and it’s good, if the matter is resolved by rupture of the rings, the pistons can often burn out and then the costs will be tens of times higher than preventive ones).
Due to the high temperature (and the engine heats up to very high temperatures during operation), the rubber from which the oil seals are made hardens, the part loses its elasticity, becomes rigid and no longer fits tightly around the valve stems. Because of this, oil gets inside.
The crank mechanism should be highlighted - a characteristic knock is possible, indicating complex damage to the bearings, crankshaft liners and other sliding components. You can diagnose a knock using a stethoscope, and a pressure gauge can help determine the pressure in the cylinders. Serious signs that a major engine overhaul will be needed in the near future include the following symptoms: increased fuel consumption, loss of power, increased engine noise.
If you find most of the signs listed above in your car, then most likely you cannot avoid capital damage. However, to be more certain whether a major overhaul of the engine is required or not, it is better to contact a special service station, where they will check the degree of wear of all engine elements. For this check, special devices are used at stations - bore gauges, dial indicators, micrometers, measuring clamps. Using these devices, you can accurately determine the need for engine repair.
Differences between demolition and dismantling
Any building can be dismantled either by demolition or dismantling - the difference is that in the first case the building is completely demolished using explosives, construction equipment and labor, in the second case of dismantling work reconstruction is possible, since they try to leave some of the structures intact – they will become part of the new building. Each dismantled part is marked to leave the possibility of reassembling the structure.
If it is necessary to maintain high speed and safety of destruction, demolition is chosen, and dismantling is more applicable when dismantling temporary structures.
Trust the professionals, or do the repairs yourself
Many drivers think that doing major engine repairs on their own is much cheaper than contacting specialists at a service station. However, this is not always a correct statement. For example, in some situations, it is necessary to grind and polish the cylinder mirrors or replace the piston rings. It is very difficult to carry out such operations at home. In addition, it is necessary to have special devices, which, as a rule, are quite expensive. Therefore, in this case, it is advisable to seek the help of professionals.
It is better to entrust engine work to professionals
In addition, at service stations, during major repairs, they carry out diagnostics of the starter, generator and distributor of your vehicle. If they are faulty, they will be replaced.
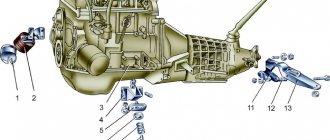
Clutch housing
To ensure exact alignment of the gearbox axis with the crankshaft axis, the hole in the clutch housing is finalized as an assembly with the cylinder block, so it should not be removed from the block unless necessary.
To remove the clutch housing, you need to do the following:
- remove the cylinder block with the clutch housing from the stand using a lifting device, freeing it from the clamping brackets of the stand;
- install the block on stands or a workbench;
- Use a spanner to unscrew the bolts securing the clutch housing to the cylinder block and remove the clutch housing as an assembly with the clutch drive parts.
Spare parts for engine overhaul
To overhaul the engine you will need the following spare parts:
- Water pump.
- Oil pump.
- Fuel pump.
- Guide bushings and valves.
- Sets of gaskets and seals.
- Asterisks.
- Piston rings.
- Bushing inserts.
- Chain.
- Belts.
And this is not a complete list of all the parts you will need.
It is advisable to first disassemble the motor and pay attention to the elements that actually require replacement. And only after that start purchasing the necessary spare parts. If you decide to contact a car service, then after diagnostics the specialists will tell you what elements need to be purchased for subsequent replacement.
Gas distribution mechanism
Comprises:
— camshaft;
- intake and exhaust valves.
Camshaft
As a rule (in modern cars) it is located in the upper part of the cylinder head.
An integral part of the camshaft are its cams. There are exactly as many of them as there are intake and exhaust valves. These cams, pressing on the valve pusher lever, open it, and “running away” from the lever, the valve closes under the action of the return spring.
camshafts
Engine disassembly, DIY repair and diagnostic manual, step-by-step instructions
There are no standard instructions on how to overhaul an engine. It all depends on the specific make and model of your vehicle and the wear and tear of various engine components.
In any case, for major repairs it is necessary to completely disassemble the engine. This process is long and labor-intensive, which cannot always be done at home.
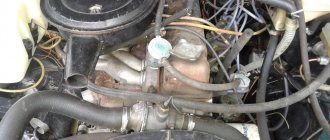
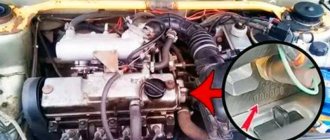
Removing the power unit
For those who are not afraid of difficulties, we have prepared a short guide to engine overhaul:
- First, we remove the engine from the vehicle. To make your car's engine a little lighter, you need to dismantle some units - we start with the carburetor, then remove the cylinder head cover, dismantle the generator, disconnect the gearbox, dismantle the manifold, and then remove the flywheel and clutch. Now you can unscrew the cushions and remove the engine.
- To gain access to the crankshaft and pistons, you need to remove the crankcase cover. Then we unscrew the connecting rods. We take out the pistons and remove the pins from them. Now you need to remove the crankshaft and its bearings.
- Pay special attention to wear on the crankshaft liner and journal. If necessary, bore them. In addition, do not forget to purchase piston rings, pins and new liners.
Expert commentary
Victor Lelikov,
employee :
Spare parts for VAZ engines are in good demand. This is why there is such a high proportion of substandard spare parts on sale. Such parts come from three sources. The first is cooperative spare parts: their use is especially dangerous. For example, the service life of timing belts can be only a few tens of engine hours. The second source is still encountered defects from the official supplier. This is a spare part that did not pass VAZ technical control, but went on sale. Such parts and components destroy buyers’ faith in the reliability of VAZ cars. Finally, the third source is remanufactured engine parts. But these are becoming less and less common.
Engine assembly, step-by-step instructions
Assembling the motor involves the following steps:
- You should start from the moment where you finished disassembling the engine. Before installing the crankshaft back, it is necessary to replace the old bearings and thoroughly treat the new ones with oil. Don't confuse them.
- Then you need to heat the connecting rods in oil and carefully insert new pins into the pistons. Next, we put on new rings - put on the oil scraper ring first, then the second compression ring, then the first compression ring. You should put the rings on as carefully as possible so as not to damage them. Be especially careful when putting on the second compression ring because it is made of cast iron.
- Now we install the finished pistons into the cylinder block. For this you need a mandrel. If you don't have one, you can make your own mandrel. To do this, take a tin strip to wrap it around the piston head and clamp the mandrel with pliers. After this, we adjust the optimal position of the connecting rod and slowly mount the piston in place.
- We return the crankcase cover to its place and install the engine in the vehicle. We tighten the cushions, install the flywheel and clutch, and mount the gearbox. We return the manifold, cylinder block cover, generator and carburetor to the car.
- We turn the crankshaft several times and, if the battery is fully charged, start the engine.
Extraction from the top
If you have a good winch or 3-4 reliable assistants, then there is no better solution on how to remove the engine from the VAZ 2114 through the top. This method differs from removal through the bottom in that it eliminates the possibility of damaging the engine itself or the car. The most important factor in the success of this operation will be your accuracy.
Removing the engine from the top
The procedure for removing the engine from the top must be carried out as carefully as possible. It is important to take into account everything that can affect the engine falling off its mounts. Moreover, if you do everything correctly, this method will be the least labor-intensive. At its core, this procedure is no different except for removal from removing an engine without a gearbox.
Running in the engine, advice from professionals
After repairs, you should not subject the vehicle to high loads. First you need to warm up the engine well. Then start the engine and let it idle for about ten minutes. After this, the engine must be turned off and cooled. These manipulations should be done several times. The engine should now idle for about ten hours. Only after the above operations can you begin operating the vehicle.
For the first fifty kilometers of driving, you should not accelerate the vehicle more than forty kilometers per hour. Then it can be accelerated to 60 km/h. Then, every hundred kilometers of driving, it is necessary to increase the speed of the car by 10 km/hour. Notice the increase in compression level. If it is missing, send the vehicle for re-diagnosis. Try not to accelerate or brake suddenly.
How to put THIS back together?
After dismantling and repair, the engine installation naturally follows. And this is another series of tasks, and their solution is an argument in favor of entrusting operations to the specialists of a distributor or service company.
Installation must be carried out together with checking how the engine will work after repair. It is logical that this is more convenient for those who repaired it. If they weren't the ones who removed the unit from the excavator, this will only complicate their task. And for the owner, this means more downtime for the equipment. And that's why.
When dismantling, service specialists pay attention to the engine body kit. Sleeves, wires - they often become unusable in the process: they crack, tear. Very often it is not possible to immediately unhook the radiator of the cooling system so as not to damage its pipes. All work on the body kit is included in additional troubleshooting. But if the customer dismantled the engine himself, he might not have warned the service technicians about additional damage. The technicians come to install the repaired unit, but it cannot be connected back. And you have to wait a few more days until new pipes or hoses are delivered. This means not only costs due to unnecessary equipment downtime, but also additional payment for another visit by service specialists.
Okay, we'll contact the distributor. How to do it?
Call the Rebuild Center or leave a request for service using the form on the website
The person in charge of the enterprise (for example, the chief mechanic) sends a request for dismantling, repair and installation of the engine. Upon request, the distributor submits a proposal for these types of work. Next is approval and payment of the invoice or approval and signature of the specification. Specialists arrive and work begins.
Before the specialists arrive to pick up the engine, the client needs to find a transport company to deliver the cargo or suitable equipment (if he will transport the engine himself on a carriage), as well as a suitable crane.
Return delivery is organized by the specialists themselves, the client only has to pay for it.
How to calculate the cost of specialist work?
- Go to the KOMEK website and calculate the cost of work and specialist visits.
- Call a KOMEK specialist or customer service and get advice.
- If the company is already working with a distributor, then simply call your service specialist.
Each visit, each repair case is individual. For example, you can seriously save on the cost of visiting specialists if a team of KOMEK MACHINERY service engineers is already working on site in your region. And there were cases when a client sent a request and it turned out that the service engineers were literally working at his neighbor’s place at that time.
vote
Article rating