Due to the known quality of fuel at domestic gas stations, there is a need to change fuel filters more often, change or clean the fuel pump screens. No matter how high-quality filters you equip your car with, they really clean gasoline and diesel from dirt and dust efficiently, but they have to be changed much more often than specified in the manufacturer’s regulations.
Let's figure out how to clean the fuel pump and coarse mesh yourself, how often this needs to be done, and what symptoms indicate the need for this operation.
Replacing the fuel filter VAZ 2114 video instructions
Probably everyone knows that proper care of the VAZ-2114 1.6 car, inspection of its technical condition and timely replacement of worn parts reduce the likelihood of breakdowns.
In vehicles, all parts and systems are important, but the fuel system is considered the most capricious, since any malfunction can damage the entire operation of the engine. Its main component is the filter. Its purpose is to eliminate any impurities or rust that may be observed in low-quality fuel. Cleaning is carried out thanks to the presence of special filter paper; as a result, high-quality gasoline that does not contain any impurities enters the car engine. For normal operation of the high-pressure fuel pump, only clean fuel is required so that it does not fail for a long time.
Due to prolonged use, an important component can become heavily contaminated, so a quick replacement of the VAZ-2114 fuel filter will be required. It is worth noting that an injector requires higher quality gasoline than a carburetor, so the fuel filters of an injection engine must be changed more often.
What may indicate a clogged element?
Since cleaning paper allows many impurities to pass through, its cells become clogged over time, which will certainly affect the operation of the motor. A car enthusiast will be able to understand for himself when it is necessary to replace the fuel filter based on the following signs:
- the car began to consume more oil;
- the engine starts to stall if idle speed is selected;
- interruptions in engine operation are observed if the speed increases;
- Difficulties arise when starting the engine;
- engine power is greatly reduced;
- the car may start to slow down even if the brake pedal is not pressed;
- When driving uphill, the engine starts to stall.
The above signs are the main ones, so if they are detected, you should replace the clogged fuel filter as quickly as possible. This process is not very difficult, so the car enthusiast can make the replacement himself.
What tools need to be prepared for this operation?
To replace the filter in the VAZ-2114 yourself, you should prepare the following tools:
- New high quality gasoline filter.
- O-rings that fit the fuel pipes.
- Keys for 19, 10 and 17.
- Containers in duplicate; they will be needed to drain fuel and water.
The first container that will be used to drain gasoline must be clean and completely dry.
Step-by-step replacement of fuel purifier
Replacing a clogged filter is quite simple if you do the manipulations step by step, following the recommendations of specialists:
- all terminals from the car battery are removed to completely cut off the power to the vehicle;
- on the latches of the bolts fixing the bracket, the fixation should be slightly loosened;
- the mount holding the filter should be carefully treated with a special lubricant to simplify the process of removing the part;
- Using two keys, the fitting element is removed. To do this, you need to use a number 19 key to secure the cleaner itself, and use number 17 to unscrew the fitting element related to the fuel supply line. Slowly, so as not to spill, drain any remaining fuel that may remain in the gas line into a dry container;
- the same manipulation must be carried out on the other side of the fuel purifier;
- the fuel wire tubes are disconnected from the base;
- using a 10mm wrench, slightly unscrew the clamp;
- carefully remove the fuel filter. You should not rush through this process so as not to damage other elements of the car’s fuel system.
Assembling the parts is carried out in the reverse order; it is recommended to replace all ring-shaped seals when installing a new filter. If gasoline drops are visible on the new part, they should be carefully removed with a clean rag. Otherwise, the service life of the updated element can be shortened.
https://youtube.com/watch?v=ZBUeKu7vg6E
snag
In the snag areas of reservoirs you can find pike almost throughout the year, both in open water and in winter (photo 7). This is due to the fact that snags of various shapes and sizes perfectly camouflage the toothy predator during its hunt for small fish from ambush. By the way, in those reservoirs where I have to catch pike with winter baits, in snags the best bait is perch.
In my opinion, this is due to the fact that the striped robber is the most numerous here - in contrast to roach, bream and other fish, which are quite rare here. But further I would like to note one pattern that I was able to derive from two (I will emphasize here) low-flow suburban reservoirs. In the first half and middle of winter, the toothy predator was always present in the snags, often delighting me with its confident bites.
In the second half of winter, there was practically no pike bite here. This did not happen every year, but only in frosty, severe winters with almost complete absence of thaws. I believe this is due to the fact that even with the minimum positive values of water temperature inherent in the winter period, processes of rotting and decomposition still occur in the aquatic environment. And under a thick layer of ice in the snags, numerous woody remains rot, and as a result, the amount of oxygen dissolved in the water is significantly reduced.
Of course, during this period, pike and other fish leave these places unsuitable for life to areas of the reservoir with a more acceptable oxygen regime.
Hunting for pike in snags is fraught with certain difficulties and requires making some changes to the equipment of the trap. When fishing for toothy fish in such places, I use exclusively tees of relatively small size (I like Kamasan Pike No. 6 and 8 according to the Japanese classification), while catching the bait on the back. This allows you to immediately make a hook after the pike bites, when the fishing line is just starting to come off the reel. This practically eliminates the possibility of the predator getting the entire rig into a pile of snags at the bottom and then breaking it off on a dead hook.
Also, when fishing in snags, I try to be in close proximity to the placed girders in order to make a timely hook when a bite occurs and begin timely fishing.
Replacing the fuel pump and coarse filter on VAZ 2113, 2114, 2115 cars
KIA Shuma FreeLancer Logbook Fuel pump filter
The fuel pump and coarse filter are changed in the same way as described in the article on all VAZ cars with an engine capacity of 1.5 liters.
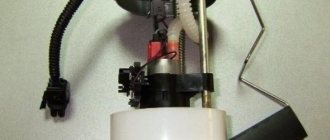
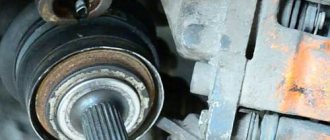
The fuel pump is located in the tank on all VAZ cars. It is installed in the housing, along with a mesh (coarse filter) and a fuel level indicator. It's easy to get to - just remove the back seat and find the hatch. Having unscrewed the fastening, under it there will be a pump housing with all the auxiliary units.
The pump is changed after diagnostics. It is described in more detail here: checking the pressure in the fuel rail on a VAZ car. It is not recommended to change based on “feelings” and mileage, since without diagnostics it is impossible to understand whether the problem has arisen with the pump or with the mesh (except in cases of complete pump failure). It is also difficult to determine service life. For the most part, it depends on the quality of gasoline. If you are a fan of driving “in steam”, when the tank is almost empty, the pump will have to be changed more often. This is due to air entering the fuel intake, as a result of which the pump begins to operate at high speeds and ceases to be cooled by gasoline. With this driving style, do not be surprised that you will have to change the pump every year (15 thousand kilometers).
If the diagnostics reveal a pump malfunction, then it is advisable to change the coarse filter. It is installed in the pump housing. If problems are found only with the mesh, then the pump does not need to be changed.
To replace, we will need - from the main tool:
- Key "7". Better head "7"
- Key "17"
- Key "19"
- Pliers
- Flat head screwdriver
- crosshead screwdriver
From the additional tool:
- WD-40 (or similar fluid)
- Rags
- Wheel inflation pump
From materials:
- Pump and mesh (or just mesh)
- Rubber O-ring
- Fuel supply hose from the pump to the fitting (not necessary, but preferable if it has not been removed for a long time)
So, the procedure for replacing the pump and coarse filter.
1. It is better to carry out all work with a practically empty tank. It is prohibited to carry out work on a tank filled “under the neck”!
2. First, relieve the pressure in the fuel line. In this case, it is better to do this by disconnecting the terminal from the pump. Remove the seat and unscrew the hatch:
3. Disconnect the terminal:
4. Start the car and let it run until it stalls.
5. Unscrew the fittings with a 17mm wrench (new tubes go to 14mm). It is better to pre-fill all connections with WD-40.
6. Apply WD-40 to the pump housing mounting nuts. Then unscrew the 8 nuts with a “7” wrench
Please note that the pump ground is screwed onto one of them:
7. Remove the metal clamping ring.
8. Pull out the pump housing. Be careful! It has a fuel level sensor installed. When removing the pump, do not bend the pointer. Otherwise the readings will be incorrect.
9. Remove the rubber seal:
10. Disconnect the lower glass. It just snaps off. Typically there will be a lot of dirt in it. We remove it with a rag and wash it. Sometimes this glass cannot be pulled out through the hole along with the pump housing. It just falls into the tank. There is nothing wrong with this (if the tank is not filled to capacity). It can be easily reached by hand and pulled out after dismantling the rubber seal.
11. Remove the coarse filter. We just pull it up. If the task is to change only the mesh, then we put it back together.
12. Remove the locking pin from the guide. We pull it out with pliers:
13. Disconnect the fuel pump and fuel level terminal:
14. Remove the pump housing with the level sensor from the guides.
15. Disconnect the hose from the fuel pump:
16. If the operation has not been performed for a long time, the rubber will lose its elasticity. You can heat it with a hair dryer, but it is better to change the tube. To quickly remove it, cut it off with a knife from the fitting in the upper part:
17. Unscrew the fuel level sensor with a Phillips screwdriver (2 screws). Remove it from the pump housing:
18. Remove the terminal from the fuel pump:
19. Disassemble the fuel pump housing. To do this, press on the 3 latches on the side wall:
20. We take out the fuel pump and replace it with a new one. If necessary, change the tube:
21. Reassemble in reverse order.
Where are the purifiers located?
The location of fuel filters on VAZ models depends on the engine. On injection and carburetor systems they are located in different places.
Filter location on carburetor internal combustion engines
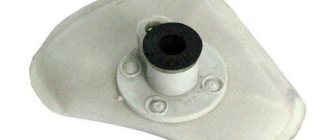
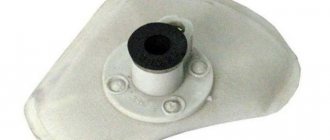
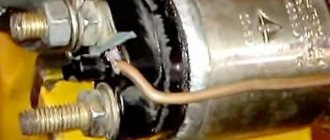
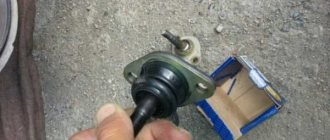
On carburetor VAZs, the fuel purifier is located under the hood. It is installed under the brake reservoir (main), secured with 2 clamps.
The filter for carburetor VAZs is located under the brake cylinder
Location of the cleaner on the injector
On a VAZ with an injection system, the FTO is installed under the car, at the rear near the muffler. It is mounted in the form of a cartridge in the fuel line. To inspect or dismantle it, you have to lift the car onto an overpass or pit.
Fuel filter VAZ 2114. Where is it located and how to replace it
Lada 2114 Lockdown Logbook Relighting the dashboard of the VAZ 2114
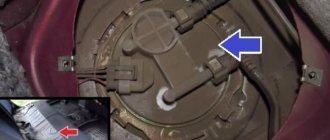
This article is simultaneously relevant for the following VAZ models: 2108i, 2109i, 21099i, 2114i, 2115i, 2110, 2112, 2111, Kalina, Priora. On each of these models there are two fuel filters, one for coarse cleaning (fuel pump mesh) located in the fuel module . Another fine filter is located under the car between the gas tank and the spare wheel niche (trough).
Before replacing filters, you first need to relieve the pressure in the system. There are several ways to do this. The first is to remove the fuel pump fuse (f1), located in the fuse box behind the center console.
To access it, you need to unscrew several screws securing the cover at the passenger's feet.
On Kalina, the fuse for the fuel pump is located under a plastic cover in the center console.
Or disconnect the fuel pump power supply, having first unscrewed the screws securing the hatch to access the fuel pump under the rear seat.
After this, start the car, and when it stalls, turn the starter a little.
A simpler option for relieving pressure would be to remove the protective cap from the end of the fuel rail and press the spool. It is better to place some small container under it, because... A small amount of gasoline will leak out.
The coarse filter (fuel pump mesh) is changed as needed, the fine filter every 30,000 miles.
To replace the coarse filter, you will need to unscrew the fuel pipes coming to the pump, and then unscrew the pump mounting nuts (head 10) and remove the pump from the tank. Remove the plastic flask at the bottom of the pump and remove the screen by moving downwards.
To replace the fine filter, you will need to unscrew the nut securing the filter to the car body, and then disconnect the fuel pipes from the filter.
There are two types of fastening of fuel pipes to the filter: classic threaded and snap-on. The first option will need to be unscrewed using two keys, one holding the nut on the filter, the other tightening the fuel pipe nut.
The second option simply snaps off by pressing the bracket.
Don't forget about the rubber O-rings at the ends of the fuel pipes. It would be better to buy at least 4 pieces in advance, and even better, instead of rubber rings, use copper washers.
Assembly is carried out in reverse order.
A coarse filter (fuel pump mesh) and a fine filter depend on the engine size. For the 1.5 engine there is a coarse filter with article number 2112-1139200, for 1.6 there is a filter with article number 1118-1139010. The fine filter for 1.5 (before 2005-2006 onwards) comes with threaded connections, for 1.6 (after 2005 onwards) with fittings for latches, but before replacing it is better to separately look at the connections of the fuel pipes to the filter. The catalog number of the original filter on nut connections is 2112-1117010-82, and the filter on snap connections is 2123-1117010-82
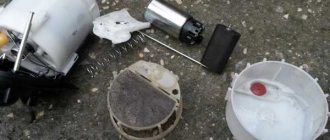
The module has been removed, what next?
Having disengaged the four latches, the module cover is disconnected from the “glass”. Then, the “glass” can be cleaned, the pump screen can be replaced, and so on. Details are illustrated in the photo:
The mesh will be fixed in front of the intake hole
The module is assembled in the reverse order. And when installing it in place, you need to make sure that the plastic protrusion coincides with the slot on the tank:
Here are a couple more tips:
- Do not turn on the pump motor “in the air” (the windings overheat);
- The module is replaced together with the sealing ring, which must be included in the kit.
In a Lada Kalina car, as in any other, you can observe the following effect: symptoms indicate that the fuel pump is not working, but its engine is humming. Then you need to clean or replace the mesh (discussed above).
Be careful when disconnecting or connecting fuel hoses. The fittings on the module cover are very fragile. They are easy to damage.
There are various folk tips for repair and tuning. One sounds like this: the pump is cleaned without dismantling it, but simply by turning on the electric motor in reverse polarity. It is this advice that is not recommended to be followed.
How to replace the fuel pump mesh, also known as the fuel pump, on a VAZ 2113-VAZ 2115
Lada Priora Sedan 16kl Kvartsukha Logbook REPLACING THE FUEL FILTER
Note!
How to change the fuel pump grid on a VAZ 2114.
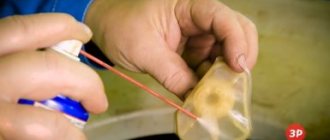
For now, let’s start with a few words about this mesh, practically you don’t have to replace it with a new one, you can first remove it and later wash it in gasoline; some dirt from such washing will lag behind the mesh and disappear, but still not all the dirt will disappear, so the leading option will obviously be Replacement of this mesh for the newest one, besides, it costs only around 50-130 rubles.
As annoying as this may sound, if you find yourself in a situation where your grid is very clogged and the car is moving jerkily, and you don’t have this grid next to it, then although there is an option to remove the clogged grid and wash it in gasoline and finally It is best to blow it out with compressed air under pressure, for example a compressor, pump, etc.
Removal: 1) First of all, remove the fuel pump itself from the car. (For information on how to remove the fuel pump, see the text of the article: “Replacing the fuel pump on a VAZ”)
2) Then, when you remove the pump, take it in your hands, in other words, continue to hold it in your hand (Based on the situation), and then turn the pump over so that one of its parts is directed to the top, so that the mesh is in your field of vision, and then grab this mesh with your hand and simply pull it up, then it will move away and disengage, then it will be removed from the fuel pump.
Installation: The new mesh is installed in the same way as it is removed, but only in the reverse order, then you take the new mesh in your hands and simply put it on where the old mesh stood, as annoying as it may sound, just put it on until a proper installation is completed it will not go in one hundred percent, it will not stick, and when it is put on, check whether it fits perfectly on the fuel pump or whether it is wobbly, and after checking, install the fuel pump in its place.
Note! When everything is in place, check how the fuel pump works with the latest network, for this purpose, start it all for you, it should start perfectly (The first time), but only in the circumstances that the engine is working properly, and when it starts, drive a little here, When driving, pay attention to how the car moves, in other words, it should not twitch and its movement should be smooth!
Additional video: You can see exactly how to change the mesh on a fuel pump using the example of replacing the same mesh on a VAZ 2110 car, they are replaced there completely identically, so watch the video and you’ll understand everything right away: