The crankcase ventilation valve (CVG) or PCV (Positive Crankcase Ventilation) is used for effective use formed in the crankcase gas mixture. The part is installed on most modern models with a fuel injection system and is directly involved in regulating the composition of the air-fuel mixture. Incorrect operation of the VKG valve leads to to excessive fuel consumption And unstable operation of the internal combustion engine.
We will describe in detail below the device, operating principle, malfunction and methods of checking the PCV valve.
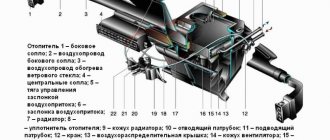
Where is the PCV valve located and what is it for?
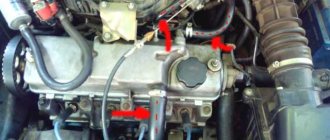
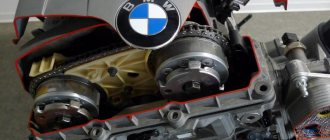
The location of the PCV valve directly depends on the vehicle modification. Usually the part is built into the valve cover of the internal combustion engine, but can also be placed in a separate housing, combined with an oil separator, close to it. The latter option is actively used in the latest generations and models of BMW and Volkswagen.
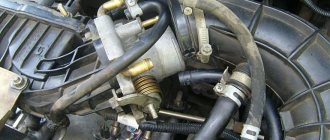
You can find the crankcase ventilation valve by the thin flexible pipe extending from it, connected to the air duct in the area between the intake manifold and the throttle.
You can see what the crankcase gas valve looks like in the photo with a clear example.
Where is the crankcase ventilation valve on a VW Golf 4, click to enlarge
Where is the pcv valve located in the Audi A4 2.0, click to enlarge
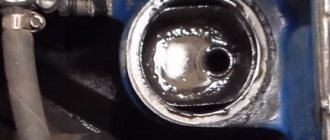
Location of KVKG on Toyota Avensis 2.0, click to enlarge
What does the crankcase ventilation valve do?
The main purpose of the PCV valve is to regulate the volume of crankcase gases supplied to the throttle body in various operating modes of the internal combustion engine. This achieves more precise air dosing to create an optimal air-fuel mixture ratio. Additionally, the KVKG prevents the ignition of crankcase gases during a backfire in the intake.
When should the valve be replaced?
Many owners of imported cars are faced with the need to replace a consumable part such as the PCV valve. Chrysler quite often requires this procedure. Signs that it is time to stock up on a new valve include the following:
- The appearance of a thin whistle under the hood of the car.
- Floating idle.
- Increasing the amount of oil in the intercooler. It is in it even if the PCV valve is working, but not in such large volumes.
- Increased oil consumption.
- Reduced boost pressure. At the same time, the car behaves differently than before.
- Oil leaks from the spark plug wells, oil filler neck or dipstick. As a result, this can lead to leakage of the crankshaft seals. Eliminating such a nuisance will cost a pretty penny.
- Plumes of dark gray smoke fly out of the exhaust pipe at idle speed.
Design and how the crankcase ventilation valve works
VKG valve design: video
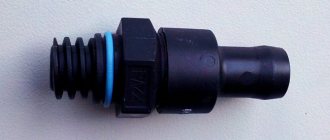
Structurally, this part in the ventilation of crankcase gases is a bypass valve, consisting of a housing with two pipes and a movable working element.
In built-in PCV valves, the inlet and outlet openings are blocked by a plunger, and in those located in a separate housing with an oil separator - by membranes. Free movement of the locking element without external influence is prevented by springs.
How does the VKV valve work?
The operating principle of the PCV valve is based on changes in inlet pressure. Conventionally, we can distinguish 4 main states of the crankcase gas valve according to the degree of opening and the amount of passing crankcase gases.
The degree of opening of the PCV valve depending on the operating mode of the internal combustion engine
| Modes | Engine not started | Idling/deceleration | Uniform movement, medium speed | Acceleration, high speed |
| Vacuum in the intake manifold | 0 | High | Average | Low |
| PCV Valve Condition | Closed | Ajar | Normally open | Fully open |
| The amount of passing crankcase gases | 0 | Small | Average | Big |
From the inlet side, the valve is exposed to pressure created by crankcase gases. When it exceeds the spring force, the element blocking the hole (membrane or plunger) moves inward, allowing the gas mixture to enter the filter housing.
VKV valve design in VW Polo
KVKG filling in the Chevrolet Lacetti
At the same time, from the outlet side, the valve is affected by a vacuum (pressure below atmospheric) created in the intake manifold. Limiting the valve flow area allows you to redirect some of the gases from the crankcase that have collected under the valve cover into the space between the air filter and the throttle valve. In the event of a backfire and a sharp drop in vacuum in the intake manifold, the outlet of the CVCG is completely blocked, thereby preventing ignition of the flammable gas mixture.
What does the PCV valve do?
PCV Valve Operating Modes
The PCV valve directly affects engine operation, optimizing the mixture formation process. By changing the flow area of the channel, it adjusts the flow of crankcase gases containing fuel particles into the air channel in front of and behind the throttle. This allows you to use the crankcase ventilation system as efficiently as possible and at the same time prevent the entry of unaccounted fuel-air mixture into the intake manifold.
When the crankcase ventilation valve fails, they are supplied to the intake in excess quantities or not at all. Moreover, in the first case this is usually not detected by any sensors, and in the second it leads to attempts at unjustified correction of the air-fuel mixture.
Due to the excess air entering the combustion chamber, the engine starts worse, failures are possible during acceleration or in other cases when it is necessary to increase thrust. Valve jamming can lead to increased fuel consumption and over-enrichment of the fuel assembly, resulting in unstable operation and vibration of the engine at idle speed.
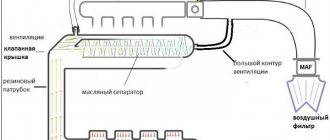
Valve in the crankcase ventilation system
Types of Crankcase Recirculation System
Two types of system are known:
In the first case, as described at the beginning of the article, the gases are simply released into the atmosphere. In the second, they are sucked into the intake manifold. The closed crankcase ventilation system: by VAZ and Lada, BMW and Mercedes, and by the Japanese and Americans is mainly used at the present time.
In addition, closed systems come with variable or constant flow. The first type is more accurately able to regulate crankcase recirculation. It changes depending on the amount of incoming gases.
Signs and Causes of a Malfunctioning PCV Valve
Stuck engine speed due to PCV valve and fixing the problem: video
Although the crankcase ventilation valve has a simple device, from time to time it still fails or does not work correctly. What may be signs of a faulty VCG valve? Most often this is:
- engine vibration other than vibration;
- hissing in the intake manifold after gas release;
- dip in traction from 3000 to 5000 rpm;
- XX rpm fluctuation.
If there are accompanying problems in crankcase ventilation, it is possible that oil consumption may increase and the throttle valve and ventilation hoses leading from the crankcase may become oily.
What malfunctions of the crankcase gas valve can occur?
Usually there is a violation of the seal of the housing due to mechanical damage (for example, during installation after cleaning) or untimely operation, incomplete opening and closing of the dampers due to their jamming.
Thus, the main causes of PCV valve malfunction are destruction or jamming of the locking elements or external influences.
Malfunctions of the crankcase gas valve and their symptoms are indicated in the table.
| Malfunction | Why does it occur | Symptoms | Why is this happening? |
| Depressurization/air leaks |
|
| Air that is not accounted for by the mass air flow sensor is sucked into the manifold, and crankcase gases come out completely or partially. |
| Stick Open/Increased Performance |
|
| Excess crankcase gases with fuel particles enter the intake. When warming up and under load, this mode is optimal; in other internal combustion engines it does not work correctly. |
| Stuck closed/reduced performance |
| The calculated flow of air into the intake is disrupted. The entire flow of crankcase gases is supplied in front of the throttle valve. |
The KVKG may not work correctly due to problems in the crankcase ventilation system or problems with the CPG. In this case, passing through the valve increases Therefore, before checking the PCV valve, you should make sure that there are no problems that lead to oil being released through the breather or being squeezed out through gaskets and seals.
Operating principle of the mechanism
As the system is currently known, the gases are not simply released into the atmosphere. They are sent to the engine through a tube removed from the crankcase, the other end of which is connected to the intake manifold. From there, the gases are directed into the combustion chamber. At the moment of a flash, some of them burn out, and the other part is thrown out through the release mechanism. Only a small fraction of these gases enters the crankcase again. This is how the process occurs without interruption.
PCV Valve Check
Diagnostic auto scanner Rokodil ScanX
You can check PCV valves using physical and software methods . In the second case, you will need an assistant, a diagnostic scanner or OBD II adapter, and a special application for a PC or mobile device. One of the best options is the Rokodil ScanX , since it is compatible with all brands of cars, view the performance of all sensors and systems, and provides error tips.
For physical diagnostics, carried out by checking the response of the KVKG to external influences from instruments, you only need an open-end wrench to remove the valve.
A preliminary check of the PCV valve is possible by blowing with your mouth. When air passes freely from the outlet side, the part is definitely not working. If the KVKG is purged only from the entrance side, this indirectly indicates that it is in order. You can definitely verify that the part is working properly using one of the following methods.
In some cars, particularly new BMW models, the PCV valve is non-removable and non-removable. to check it physically without destroying the case . In this case, you can check either using computer diagnostics or replacing it with a known-good unit.
To check the operation of the crankcase gas valve, follow this procedure:
Do-it-yourself check of the VKG valve Toyota Vitz: video
- Remove the valve from the hole in the valve cover, first removing the hose from the outlet pipe.
- Inspect the inlet for contamination and remove it if necessary.
- Blow out the valve with your mouth from the outlet side: no air should pass through a working CVCG.
- Reattach the ventilation hose to the outlet.
- Start and warm up the engine.
- Close the valve inlet tightly with your finger. In a working part, this action is accompanied by a click and a vacuum is felt - the finger will “stick” to the hole.
The crankcase ventilation valve is checked programmatically using the throttle position at idle.
Checking the PCV valve using computer diagnostics using the example of a Chevrolet Lacetti:
Professional check of the PCV valve on a Chevrolet Lacetti with computer diagnostics: video
- Unscrew the valve with a 24-mm open-end wrench, having first removed the hose from the outlet pipe.
- Place the hose onto the outlet fitting.
- Connect the scanner or OBD II adapter to the diagnostic connector in the passenger compartment.
- Run the diagnostic program and display the throttle position readings (actual throttle position).
- Start and warm up the engine. In this case, the value of the actual position of the remote sensing should be within 35–40 steps.
- Plug the valve inlet with tape or have a helper plug it with your finger. The parameter should increase by approximately five 5 steps.
- Remove the vent hose from the PCV valve outlet. If the KVKG is working properly, the reading of the actual throttle position will drop to 5 steps. This indicates that the valve was restricting the passage of gases into the intake at idle.
Supply open system
The design of this system is similar to the previous one. But at the same time it has an air flow. Passing through the filter element, it enters the crankcase through a separate pipe, and from there it is discharged through the control valve into the atmosphere along with gases. This system is extremely rare. It has a large number of shortcomings, so it was practically not used in cars.
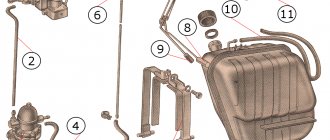
Servicing the crankcase ventilation valve
One of the main reasons for the incorrect operation of the KVKG is contamination of the working surfaces. This can be avoided by cleaning the crankcase ventilation valve every 20,000–30,000 km .
Slight oiling of the surface of the KVKG is a natural process. However, if it becomes oily faster than 10,000 km, this is a reason to diagnose the crankcase ventilation system. It is possible that the oil separator or ventilation hose is clogged.
How and how to clean the PCV valve
Cleaning the PCV Valve with WD-40 Aerosol
The following products are best suited for cleaning the PCV valve:
- carburetor or injector cleaner;
- brake cleaner;
- WD-40;
- kerosene or diesel fuel.
When using the product in the form of an aerosol with a tube, it should be pumped through the inlet pipe into the KVKG. Kerosene and diesel fuel can be injected using a syringe or syringe. The washing procedure must be repeated until all deposits are removed.
After cleaning, it is necessary to check the functionality of the PCV valve using one of the methods described above. If washing does not help, the part must be replaced .
In addition to the valve itself, the oil separator and hoses of the crankcase ventilation system also require periodic flushing with the same means. If they are clogged with oil deposits, the system will not be able to relieve pressure in the crankcase even with a working CVCG.
Methods for removing blockages and cleaning ventilation
If the above symptoms appear, first of all, check the oil separator and valve elements, as well as all parts located there, for various secondary deposits from combustion products. Even if, in your opinion, everything is in order there and there seems to be no need to clean it, then in any case, at least clean the oil separator from the oil located there, this is especially true for a diesel engine.
Cleaning the crankcase ventilation is a periodic preventive work, somewhat dirty and oily, but which even a non-specialist can carry out.
While it is quite clear how to check the oil separator, simply examining the appearance of the ventilation valve will not be enough. The valve is considered to be working when the valve moves well and there are no mechanical deposits on its reverse side, otherwise it is faulty.
Keep in mind that after cleaning and washing the damper rod, it is only wiped dry and in no case lubricated.
Frequently asked questions about the crankcase valve
What is a crankcase ventilation valve?
KVKG is an element of the crankcase ventilation system, which is structurally a membrane or plunger bypass valve.
Where is the crankcase ventilation valve located?
In most models, the KVKG is located in the valve cover of the internal combustion engine (rear or top) or in close proximity to it in a separate housing together with the oil separator.
What is a PCV valve for?
The PCV valve controls the flow of crankcase gases into the intake manifold, directing them ahead of the throttle valve. It allows you to optimize the composition of the air-fuel mixture under various operating modes of the internal combustion engine.
How to check the operation of the PCV valve?
A working KVKG is not blown through from the outlet side, but allows air to pass through from the inlet side. When closing the inlet hole of the removed valve with the engine running and warm, you hear a click and feel how the blocking object (finger) is attracted. If the valve does not pass any of these tests, we can conclude that the VKG valve is inoperable.
Ventilation cleaning procedure
Cleaning the crankcase ventilation is carried out as follows:
- open the hood and disconnect the ABC terminals (this is necessary to ensure that the reading work is completed safely);
- carefully remove the pipe that goes to the air collector;
- now you need to unscrew the self-tapping screw, and then remove the casing from the throttle valve (the self-tapping screw will be visible after removing the pipe, so unscrewing it will not be difficult);
- disconnect the injectors, and then move the cable where the connectors are located to the side;
- unscrew the bolts, fasteners that hold the dipstick and the upper part of the bracket responsible for finding the intake manifold;
- remove the tube located in the oil dipstick from the engine - this must be done strictly from the “up” position;
- Now you should remove the ramp cover, which covers the injectors and their connectors (to avoid difficulties, the manipulation is carried out with a sharp movement).
The first part of the “procedure” is completed.
Now let's move on to the second one:
disconnect the fuel line from the ramp (it is important to note that its connection is different on different brands of cars); make the damper clamp a little weaker, and then carefully remove it; in the same way you need to remove the pipe from the fitting (since the fitting is plastic, this is done extremely carefully); disconnect all XX connectors; remove the throttle cable from the damper, which will interfere with cleaning; We disconnect the bayonet connection from the “trunk” pulled out from the engine; remove the lid from the wells intended for candles; remove the valve hose, then unscrew the 4 bolts located on the top of the manifold; Now you should slightly loosen, but not completely remove the lower bolts (there are 5 of them), and then remove the manifold; slightly disconnect the clamps, and then remove the ventilation hoses from the oil separator box; Unscrew the remaining bolts, and then disconnect the engine block and the oil separator. That's it - the preparatory stage of work is completely completed
Now you can begin removing the putty, as well as cleaning and washing the oil separator cavity. It should be washed until the resins are completely gone from its base.
That's it - the preparatory stage of work is completely completed. Now you can begin removing the putty, as well as cleaning and washing the oil separator cavity. It should be washed until the resins are completely gone from its base.
After cleaning, we check the hoses located on the flame arrester and crankcase ventilation. If the throttle valve is dirty, it should also be washed.
Cheap and cheerful, but functional
Many drivers who have already managed to make a crankcase oil separator on their own are pleasantly surprised by the price. In some cases it is practically zero. Perhaps craftsmen make do with improvised means that they find in their own garage. But even if nothing suitable is available, the price of the crankcase gas oil separator is low, since all the parts from the instructions discussed above are cheap.
On the Internet you can find many ways to make a homemade device, for which different materials are used. However, everything is done according to the scheme described above. Differences may relate to the use of additional elements or the replacement of plastic pipes with metal fittings that are screwed into the oil separator cover.
At the same time, there is a positive trend in engine performance. Oil no longer accumulates, which means you can drive for a long time without problems. However, do not forget to look under the hood of the car and check the condition of the device.
In what cases is the presence of oil in the breather not related to the crankcase?
Before diagnosis, it is recommended to make sure that the unpleasant symptoms are actually associated with gases. Oil ingress is also possible in other cases, for example, if more fluid is poured than required according to the standards. It is possible that the breather is not installed correctly and moving it will correct the problem.
Sometimes oil penetrates from the internal elements of the power unit, including injectors. Driving style, as well as the condition of the roadway, also influences. Oil particles may remain when the motor actively moves in the transverse direction.
Prerequisites for high blood pressure
As in the human body, any deviations from standard indicators in the power unit are caused by very specific reasons. The following factors usually lead to excess pressure in the oil system:
One of the most common reasons is the use of a lubricant of the wrong viscosity. Oil that is too thick has great difficulty circulating through the channels. This reason becomes especially relevant in winter if the engine continues to use summer oil products; The malfunction in question can be explained by obstruction of oil pipes and filters. This problem is caused by clogging of these parts with oxidation products and other foreign deposits; An increase in pressure in the system is caused by a violation of the free circulation of lubricant, which occurs due to defects in the pressure reducing valve. The damaged part does not perform its intended function. Excessive amounts of petroleum product are not discharged to the inlet, remaining in the system; Violation of the normal operation of the bypass valve contributes to the formation of excess pressure. Through it, unrefined oil should be supplied to the power unit when the filter device is clogged; sometimes exceeding the standard value occurs due to excessive pressure in the crankcase. Typically, increased gas breakthrough leads to such consequences.
In addition, crankcase pressure can reach unacceptably high levels due to a defective exhaust valve; and last on the list, but not least, is equipping the lubrication system with inappropriate parts. Each element must meet certain parameters
Just as during transplantation, a foreign body is rejected by the human body, so when replacing spare parts, the inappropriate fragment quickly fails.
As you can see, there are not so many reasons that influence an excessive increase in oil pressure in the power unit. A sufficiently experienced driver is quite capable of preventing their occurrence.
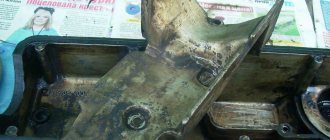
Causes of increased pressure in the crankcase
Posted by a3306_aka_BigAlex
Why didn’t you immediately put the gasket on the sealant?
When I first took everything apart, everything was covered in oil. I didn’t even think about the gasket then. I wiped everything down, replaced only the oil seal and started the engine to have a look. And the next day I saw that it was leaking through the gasket (maybe the old oil seal didn’t leak at all). Only after that I began to remove the crankcase and change the gaskets. Installed the gaskets according to the requirements outlined in the book. I applied sealant only to the ends of the gaskets; the pictures show everything by centimeters (in the book). After that I started it again and watched it. Everything was OK. And a month later again...
Posted by a3306_aka_BigAlex
I circled it in your picture
Pay attention. Do you see the shadow immediately under the thread (pointed at it with an arrow)? It's on the next part! (counterweight on the crankshaft, crankcase wall, etc.) If the hole were blind, it wouldn’t exist! And the bottom of each hole would be conical, as the drill would leave it
Or, as a last resort, flat (if processed with a countersink), but with concentric circles (small, small marks). But this is not there! You can feel it with a wire. Conclusion? The hole is through! But! Cold oil cannot flow through the threads. But hot - easily. And since the shaft and flywheel are spinning, everything will be thrown to the sides. Look at the flywheel. If it is not dry, and even on both sides, then so be it.
Hmmm... Judging by this photo, yes, it’s possible. But maybe this is still a shadow from the carving (nonsense, however). I found another photo where drill marks are visible in each hole in the center. Now I began to doubt the “tightness” of the 50/50 holes. But again, 2.5 years ago I bolted these same bolts “dry” and now during disassembly they were dry and the holes were dry. As they say, until you understand it, you won’t understand it! )))
Posted by a3306_aka_BigAlex
By the way, have you measured the compression? Judging by what you indicated, you have a lot of breather... In general, something like this: 1. Multiply the working volume of your engine (in liters) by 10 - you will get a certain value, which is the crankcase gas flow rate in liters per minute for your engine. This (and everything below) is considered normal. 2. Anything above is no longer normal. 3. Do the same thing, just multiply not by 10, but by 15. If the flow rate per minute reaches this figure, then this is the limit! Look for money for repairs, and the sooner the better.
What you indicated is a little more than 11 liters per minute. Not so much, but it’s better to have less... Reasons? This is the CPG. Possibly with Trouble cylinders. Or with rings. Or the rings have become coked, for example, the oil scraper rings (especially if the breather is weak, and the oil consumption is high and there are no leaks) or the compression rings too (but then the breather will be pretty bad).
By the way, what kind of oil are you using? Maybe you have a lot of oil sloshing around in the pan, which will also lead to oil consumption! Thirty lei! At the very least - forty!
I’m not catching up or I’ve forgotten how to count. We multiply the volume of 2.8 by 15 and get a certain number 42. And my gas pressure is 11.25 l/min. 11.25 2.47 Is everything really bad?
Or I wrote nonsense. Oil Manool mineral water 10w40. I haven't checked the compression yet. The artisan I always turn to if I can’t do it myself, I’m busy right now. I measured it a year ago, maybe a little earlier. I don't remember the exact numbers. 3 cylinders were something like 28 plus or minus, and one cylinder less was something like 26. Hmmm, there’s something to think about. In principle, I’m mentally ready for capital as summer approaches. But I have no confidence in our service stations. If I knew for sure that after the capital investment everything would be OK, I wouldn’t regret the $. And if you spend a lot of money, then you will have to worry about running to the service station with problems.
The operation of any modern vehicle can be completely identified with the vital activity of the human body. Each mechanism of this rather complex technological device is assigned certain functions.
Oil plays the role of the life-giving fluid of the human circulatory system in a car. Without it, the power unit will not be able to perform its duties. In the absence of lubrication, the moving parts of the motor will instantly fail, destroyed by the force of friction.
Any sane person who cares about their health should monitor fluctuations in blood pressure. Like him, an attentive owner, striving to keep the car in working condition for as long as possible, carefully monitors similar indicators in the lubrication system of the power plant.
The pressure in the lubrication system can be either too low or too high. Is it possible to foresee the reasons causing such a malfunction of the power unit? If deviations are detected, is it worth urgently looking for the nearest workshop or is it better to do it yourself and fix the problem yourself? Let's try to figure it out!