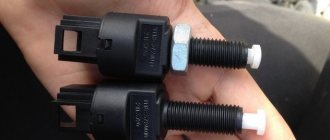
Many owners, at the first malfunction of the starter, change the entire unit, without understanding the causes of the breakdown itself. But in most cases, the reasons for failure are as follows:
- Failure of the solenoid relay - purchased and replaced separately
- Brush wear
- Burning dimes on the retractor relay
Each of the problems listed above can be solved much cheaper than buying a new starter for a Priora. Therefore, first you should contact a specialist who will tell you exactly what the reason is and answer whether it can be repaired or not!
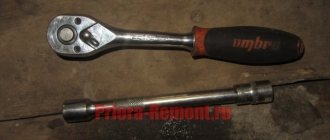
If repair is no longer possible, which is extremely rare, then a replacement must be made. To do this you will need the following tool:
- 13 mm head
- extension
- ratchet or wrench
How to check the starter solenoid relay for serviceability
In this article we will tell you how to test the starter solenoid relay to identify faults and look at ways to eliminate them.
The car starter is a traction motor, which spins the crankshaft to further start the power plant.
Unwinding is carried out by means of a gear mounted on the starter rotor, which at the time of starting has a gear engagement with the flywheel ring.
But the engagement between the starter gear and the flywheel is only necessary until the power plant starts.
If the engagement were constant, the starter would fail very quickly.
Therefore, the design of the latter includes a solenoid relay, through which the starter gear is brought into engagement with the flywheel during engine starting and disengaged after starting.
The retractor relay is combined with the starter relay, and the design of this device is not complicated, which ensures its operational reliability.
But nothing is eternal, therefore, and it can also fail, although this happens infrequently.
There are not so many malfunctions that can arise with this element, but if they do occur, it is often either impossible or very difficult to start the engine.
Malfunctions that may occur with the solenoid relay are:
- Wear of its elements;
- Burnout of contact plates installed in the housing cover;
- Break or burnout of the relay coil winding;
- Anchor jamming.
The occurrence of these malfunctions may result in:
- The starter fails to operate when starting;
- Weak starter speeds, which are unable to sufficiently spin the flywheel;
- It continues to work even after the engine starts.
Price issue
Finally, it’s worth adding that Bendix is an inexpensive spare part. For example, a Bendix VAZ 2101 (as well as other “classic” VAZs) costs about $5...6, catalog number is DR001C3. And the price of Bendix (no. 1006209923) for VAZ 2108-2110 cars is $12...15. The cost of Bendix for FORD cars of the Focus, Fiesta and Fusion brands is about 10...11 $. (cat. no. 1006209804). For TOYOTA Avensis and Corolla cars Bendix 1006209695 - $9...12.
Thus, repairs are often impractical for Bendix. It's easier to buy a new one and simply replace it. Moreover, when repairing individual parts, there is a high probability of rapid failure of others.
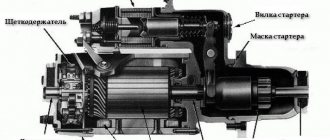
Solenoid relay design
To understand how to identify a malfunction, you first need to understand the design and operating principle of the retractor relay, as well as the starter relay, since they are located in the same housing.
So, there is a housing, inside of which two coils are installed - retracting and holding.
On the one hand, the body is covered with an ebonite or plastic cover. Three terminals for connecting wiring are installed on the outside of this cover.
One of the terminals is intended for connecting the “positive” wire from the battery, the second is for supplying electricity to the starter motor, and the third is for connecting the relay to the ignition switch.
On the inside of the cover there are two contact plates of the “positive” terminals.
Schematic diagram.
Inside the housing with the coils there is an armature, spring-loaded on one side, and a starter relay rod.
On the outside of the armature there is an eyelet, with which it engages with the Bendix fork and gear.
Starter diagram VAZ 2108, 2109, 21099
Electric current enters the starter circuit from terminal “30” of the generator. Next, through block Ш8 (Х8) of the mounting block (pins 5,6), block Ш1 (Х1) - pink wire, to the ignition switch. The driver turns the key in the ignition to turn on the starter (position 2) and closes the contacts (50, 30). After which the ignition switch, through the red wire, current flows to block Ш1 (X1) of the mounting block (pin 8), then block Ш5 (Х5) (pin 4), starter switch relay (pin 85). The relay is activated. From terminal “30” of the start relay, current flows to terminal “50” of the starter traction relay, energizing its winding. The traction relay is activated, activating the starter.
The starter electrical circuit uses a switching relay 111.3747-10.
- Screw securing the protective cap.
- Protective cap.
- Retaining half ring.
- Rear cover fastening nut.
- Back cover.
- Brush springs.
- Brush guides (outer part).
- Brushes.
- Stator.
- Anchor.
- Drive lever.
- Drive unit.
- Restriction ring.
- Retaining ring.
- Drive lever axis.
- Screws for securing the traction relay.
- Front cover.
- Plastic sealing ring for the lid.
- Tie rods.
- Rubber plug.
- Traction relay core.
- Return spring.
- O-ring for traction relay.
- Traction relay.
- Sealing washer.
- Adjusting washers.
Principle of operation
It all works like this: when the engine is not running, the armature of the retractor relay is pulled out of the housing due to the action of the spring on it. The same spring holds the Bendix and gear through the fork in a position where there is no engagement.
When the ignition key is turned to the start position, the solenoid relay is first activated.
The electrical energy supplied to the coils of the solenoid relay ensures the appearance of a magnetic field inside the housing.
This field acts on the armature, and it, overcoming the force of the spring, enters the body, after which the retracting coil is turned off and ceases to create a magnetic field, but in the retracted position the armature is held by the holding coil with its magnetic field.
In this case, the armature pulls the fork, which in turn moves the bendix forward along the rotor shaft, and its gear engages with the flywheel ring.
The armature, entering the housing, pushes the starter relay rod, and, moving, closes the contact plates of the positive terminals with each other.
Electricity from the battery is supplied to the brushes of the starter motor, and its rotor begins to rotate. And since the gear has already engaged, the rotor begins to rotate the flywheel.
After starting the power plant and turning the ignition key back, the power to the holding coil stops, its magnetic field disappears and the armature comes out of the housing under the influence of a spring.
At the same time, it disengages the bendix through the fork and stops acting on the relay rod. He, in turn, moving away, opens the contact plates, and the starter is completely turned off.
Malfunctions
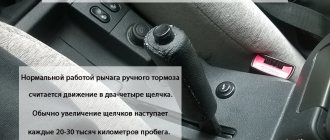
Troubleshooting a traction relay is not that difficult. It should be noted that its operation is accompanied by a click - this is the result of the armature being retracted and the gear being engaged.
When you turn the key, this click is clearly audible. Thus, the absence of a click may indicate a break in the coils, lack of power, or the armature being stuck in one position.
If, when you turn the ignition key, a click is heard, but the starter itself does not start or starts but spins very slowly, this may indicate that the contact plates are burning.
Continued operation of the starter after starting the power plant will be accompanied by a characteristic buzzing sound.
It is possible that the armature is stuck in the retracted position and cannot return back, so it keeps the bendix gear engaged and continues to close the contact plates.
Possible causes of failure
The starter overrunning clutch consists of a small number of parts, so there can be several causes of breakdowns. The inner rollers wear out most often. Reducing the diameter of these parts makes it impossible to reliably engage the moving elements. Sometimes, flat surfaces can form on the rollers, which also interfere with the normal operation of the clutch.
All working surfaces that engage are subject to wear over time. Such malfunctions of the starter bendix are natural, but if they are present, the part cannot be restored.
Checking the solenoid relay
Checking the functionality of this element is not so difficult. Moreover, you can check it even without removing the starter from the car. For example, let's take a VAZ-2110 car.
So, the starter on this car does not work. First you need to check the wiring going to it for a break.
If everything is in order with the wiring, you need to find out whether the traction relay works at all.
To do this, you can ask someone to turn the ignition key, and listen for yourself to see if there is a click. If it is missing, it is faulty and needs to be replaced.
If there is an actuating click, but the starter itself does not turn, it is possible that the relay does not operate due to burnt contact plates.
You can check whether this is true using a regular screwdriver. The terminal coming from the ignition switch is disconnected from the relay.
Next, a screwdriver is used to close the terminal coming from the battery with the terminal going to the starter - this results in a direct transfer of electricity to the electric motor, bypassing the relay. If it works, you need to look for the cause in the relay.
You can check the voltage going to the starter with a multimeter, but this will most likely make it clear whether the problem is in the starter or in the wiring and battery.
To do this, a multimeter is connected to the positive terminal of the solenoid relay, to which voltage from the battery is supplied. Connect the other negative wire of the multimeter to ground.
Next, someone must turn the ignition key to the start position. The voltage on the multimeter display should correspond to 12 V.
If it is lower, perhaps the battery is simply discharged and its energy is not enough to start the engine, but at the same time its charge is enough to operate the relay, but there is not enough energy to rotate the rotor.
Required Tools
In order to remove or install the starter on a Priora, you will need the tools from the table below.
Table - Tools required to replace the front strut
| Name | Note |
| Spanner | "at 13", "at 15" |
| open-end wrench | "at 13", "at 15" |
| Pliers | Can be replaced with pliers |
| Screwdriver | With a thin flat blade |
| Silicone Grease | If you plan to remove the air filter |
| Head | "at 13" |
| Vorotok | With extension and ratchet |
| Penetrating lubricant | For example, WD-40 |
| Rags and wire brush | To clean dirt |
Replacing the starter on a Lada Priora can be carried out without access from the bottom. If you don’t want to remove the air filter and the wires going to the sensors, then you can dismantle and install the unit from underneath. In this case, you will need an inspection hole, overpass or lift to access the place where the starter is located.
Replacing the solenoid relay
The solenoid relay is not repairable, and in the event of a malfunction, it is simply replaced.
The only thing that can be changed is the anchor. Replacing this element on a VAZ-2110 is a simple operation; it is more difficult to remove the starter itself from the car.
To replace, you will need to remove the starter from the car. To do this, the car is driven into a pit, since it can only be reached from below. If the car has a crankcase protection, then it is removed first.
Next you need to disconnect all the wiring going to the starter. To remove it, you need to unscrew the two nuts that secure it, after which it is carefully pulled out of its seat.
With the starter already removed, the two bolts securing the retractor relay are unscrewed and it is removed, while the armature along with the spring remains on the starter, since it is hooked onto the fork with its eye.
Before installing a new element, the old anchor is removed from the fork and a new one is installed in its place.
Next, the new relay is placed on the starter and tightened with mounting bolts. To consolidate the material covered, we recommend that you watch a training video on how to repair and troubleshoot the starter solenoid relay.
Didn't find the information you are looking for? on our forum.
Instructions for removing and installing the starter:
1. First of all, disconnect the wire from the battery at the “–” terminal.
2. Dismantle the crankcase on the engine.
3. Next, from the top of the engine compartment you need to unscrew one nut that holds the starter mount.
4. The wire must be disconnected from the traction relay terminal at the bottom of the machine.
5. Unscrew one nut from the contact bolt of the traction relay and disconnect the wire.
6. The starter is secured from below with one nut, which should also be unscrewed.
7. Now calmly remove it and do the repairs. A new or repaired starter should be installed in the same way as it was removed, only in the reverse order.