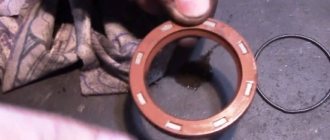
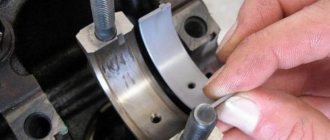
Crankshaft oil seals (cups) function as plugs that are located at the ends of the shaft and prevent oil leakage and dust from entering the engine. Signs of wear on the crankshaft oil seal, both front and rear, are splashes and drops of oil. The standard service life of oil seals does not exceed 150 thousand km.
When is a crankshaft oil seal needed?
- if there is an oil leak in the pulley area or at the junction of the engine and gearbox;
- when the oil seals are “squeezed”, that is, displaced outward from their positions, which indicates an increase in oil pressure;
The fuel-injected model has a crankshaft position sensor that measures and synchronizes its speed with the fuel supply. If the sensor has limited engine speed, then the reason is also a faulty oil seal. The sensor is located on the oil pump cover.
What causes premature wear of O-rings?
- low-quality material, counterfeit parts;
- increased engine speed, use of low-quality fuel, incorrect ignition timing;
- motor overheating;
- long-term operation with old oil and dirty filter.
During winter operation of the car, the window may become “clogged” with snow, and the increased gas pressure may “squeeze” the seals.
The front seal changes much faster than the rear. To replace the backrest, you need to spend much more time.
Regardless of which oil seal (or both, as the experts recommend) you change, you must:
- put the car in the pit.
- disconnect the battery;
- engage first gear to lock the crankshaft;
- Securely secure the vehicle using the parking brake.
Do-it-yourself replacement of the front crankshaft oil seal
Its internal diameter is 40 mm and external diameter is 56 mm.
- First we turn off the engine protection. We use an 8mm wrench. Self-tapping screws are installed separately on the front, back and sides. We remove the protection. If the VAZ 2107 has an injector, there will be an additional shield, but removing it should not cause difficulties.
- Remove the alternator belt to allow easier access to the shaft pulley.
We unscrew the generator nut, it can move along the axis. We take the assembly and move the generator until it stops, the belt is loosened and removed.
- Using a 38mm open end wrench, crankshaft wrench, or gas wrench, remove the crankshaft pulley nut and carefully remove the pulley.
- The seal is now clearly visible. Can be worn, blanks, cuts. Remove it carefully using a wide blade screwdriver and clean the seat with gasoline. We carefully and evenly lubricate the new oil seal with oil, carefully place it on the seat and, using a bearing or old oil seal instead of a mandrel, press it into the cover with light blows of a hammer.
- The replacement is complete. Then install the pulley, alternator belt and housing.
Product delivery options
Note! Below are the shipping methods available specifically for this product. Payment options may vary depending on the shipping method. Detailed information can be found on the “Delivery and Payment” page.
Parcel by Russian Post
Available payment methods:
Cash on delivery (payment upon receipt) Using cards Sberbank, VTB, Post Bank, TinkoffYandex.MoneyQIWIROBOKASSA
Shipping throughout Russia. Delivery time is from 5 to 12 days.
Parcel by Russian Post 1st class
Available payment methods:
- Cash on delivery (payment upon receipt)
- Using cards Sberbank, VTB, Post Bank, Tinkoff
- Yandex money
- QIWI
- ROBOKASSA
Shipping throughout Russia. Delivery time is from 2 to 5 days. More expensive than regular delivery by Russian Post, approximately 50%. Parcel weight up to 2.5 kg
Express Parcel EMS
Available payment methods:
- Cash on delivery (payment upon receipt)
- Using cards Sberbank, VTB, Post Bank, Tinkoff
- Yandex money
- QIWI
- ROBOKASSA
Shipping throughout Russia. Delivery time is from 3 to 7 days. More expensive than regular delivery by Russian Post, approximately 100%.
Transport companies
Available payment methods:
- Using cards Sberbank, VTB, Post Bank, Tinkoff
- Yandex money
- QIWI
- ROBOKASSA
Delivery is possible to any locality where there is a representative office of the transport company. Delivery time is from 2 to 10 days. Sending large parcels is approximately 50% more profitable than by Russian Post.
Replacing the rear oil seal
Now we are changing the rear crankshaft oil seal (bushing) on a VAZ 2107. This will require more time, patience and effort, since to access it you need to disable the gearbox. All preparatory work is carried out to the same extent, but the car is in neutral. Since you will have to hang the rear wheels, this should be done in a hole rather than on an overpass. The outer dimension of this oil seal is 90mm and the inner dimension is 70mm.
First you need to disconnect the cardan from the gearbox:
- raise and suspend the rear wheels;
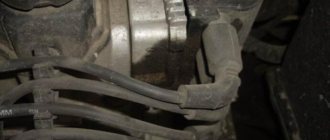
- if the VAZ 2107 is an injector, remove the heat shield of the catalytic converter (13 mm socket wrench) by unscrewing the 4 nuts from the studs (see figure). If the VAZ 2107 is not an injector, but a carburetor, skip this step.
- Now you can start removing the driveshaft. Important! Take a file and make a mark on the cardan fork and on the gearbox (differential) flange. When everything is put into place, it must be locked in this relative position to avoid vibrations and imbalance. That's what a label is for.
- Unscrew (with a 13 mm wrench) the driveshaft from the gearbox flange, holding the driveshaft from slipping with a crowbar. Now let's hang the rear part of the stabilizer on a cable to the rear suspension where you want it.
- disconnect the front part of the propeller shaft: unfold the antennae of the oil seal holder (4 pcs.), slide it along the propeller shaft. We unscrew the bolts securing the intermediate cardan support (2 pcs.) from the bracket and disconnect the shaft with the elastic coupling by moving the shaft back. Congratulations! The driveshaft is disconnected. Now you need to remove the gearbox to gain access to the rear oil seal:
- First, the central panel of the radio is removed in the cabin. You will need a 10mm wrench, pliers and screwdrivers. Unscrew the two console nuts on top. Then use a flathead screwdriver to pry up the decorative trim at the bottom, remove it and unscrew the bottom screws. We disconnect the toggle switches for lighting and heated rear window and pull out the connectors, disconnecting them. First you need to remember the connection diagram. Finally, lift the panel up and back slightly, release the shift lever and remove it.
- then remove the decorative covers of the gear shift knob. Then lift the handle, use a flat-blade screwdriver to tighten the lock and remove the handle. Carefully remove the shock absorber (rubber) from it, using tweezers. Using two screwdrivers, we disconnect the petals of the locking ring and remove the latter and its two bushings: one rubber and one locking.
- Unscrew the screws of the gear handle cover (using a Phillips screwdriver) and remove it with the foam seal.
- move the trim and unscrew the trim in the floor;
- open the hood, unscrew the starter mounting bolts and move it back. As a result, it will issue a checkpoint call.
- disconnect the elastic joint of the universal joint. Attention! In order to correctly install it in its original position after replacing the oil seal, it must first be tightened with a special clamp.
- Using an open-end wrench (19 mm), unscrew the nuts on the coupling bolts and the crosspiece of the gearbox shaft (3 pcs.). Next, remove the coupling along with the gasket and ring.
- Now, using the same wrench, unscrew the nuts securing the front flange of the cardan and remove it. These and the previous 6 nuts are self-locking, you will need new ones to reassemble!
- From the gearbox you need to disconnect the wires going to the white reverse light and the drive to the speedometer shaft.
- Now, without removing the hose, disconnect the hydraulic drive and clutch cylinder from the gearbox. Next, remove the clutch housing cover itself. It is necessary to unscrew 2 bolts with a 10mm socket wrench.
- Important! Now you need to install a support under the gearbox so that it does not fall on your head and the bolts are not deformed!
- take a 19mm socket wrench with an extension. It is necessary to unscrew the 6 bolts that secure the gearbox to the engine block. Now, using a flat-head screwdriver, pry the gearbox housing off the edge, remove it from the studs, rock it and remove the gearbox from the car, pulling the engine input shaft out of the clutch disc. Important! The box must not be distorted. The preparatory work is done! You can start replacing the rear oil seal. To do this:
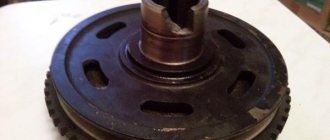
- remove the flywheel and clutch disc, for this we use a 10 mm socket wrench. It is necessary to unscrew 2 nuts on the shield;
- Before replacing the oil seal, it is necessary to remove its support so as not to damage the crankshaft flange. The figure clearly shows 6 bolts securing it and 2 bolts of the rear part of the oil pan, A and B. They also need to be unscrewed, since they are screwed into the oil seal holder body. Attention! There is a gasket between the oil seal holder and the cylinder block body. And if you have come a long way to the oil seal, do not be lazy and change it regardless of the conditions.
- We release the oil seal from the holder mandrel, to do this we fix it in a vice and remove it through a special slot with a flat-head screwdriver. The oil seal is checked for damage and wear.
- The seat is cleaned again with clean gasoline, the new oil seal is lubricated with clean engine oil and pressed into the holder using the bearing spindle or the old oil seal.
- To assemble, you must perform all steps in reverse order.
Congratulations! If you managed to reach the rear oil seal yourself, change it and reassemble (in reverse order) the disconnected components, you have passed the Advanced Amateur: Auto Mechanic exam with honors.
The front oil seal of the VAZ 2101-2107 engine is used to prevent engine oil leakage at the point where the auxiliary drive pulley is attached to the end of the crank. Although the sealing lip is made of high quality fluoroelastomer rubber, over time the sealing lip wears and lubricant leaks into the gap. Today we will share a method for replacing the front crankshaft oil seal on “classic” VAZs. Even a novice driver can handle the job, because to do this you don’t even need to remove the camshaft drive cover from the engine.
Transmission
Automatic transmission, Automatic transmission radiator, Valve block, Torque converter, Automatic transmission sensor, Decorative trim, Automatic transmission housing, Automatic transmission bracket, Mechatronics DSG, Automatic transmission pan, Automatic transmission gasket, Automatic transmission cushion, Automatic transmission handle, Automatic transmission oil seal, Automatic transmission solenoid, Automatic transmission thermostat, Brake Automatic transmission tape, Automatic transmission cable, Automatic transmission dipstick, Manual transmission, Oil cooler, Secondary shaft, Manual transmission sensor, Manual transmission housing, Manual transmission bracket (mount), Rocker, Input shaft, Manual transmission cushion, Secondary shaft bearing, Primary bearing shaft, Speedometer drive, Manual transmission gasket, Intermediate bearing, Manual transmission handle, Shift lever, Shaft seal, Manual transmission seal, Synchronizer, Manual transmission cable, Transmission gear, CVT variator, CVT belt
When and why to change the front oil seal
The manufacturer recommends replacing the front crankshaft oil seal of VAZ 2101-2107 engines every 150,000 km. However, in practice this replacement needs to be done more often. Accelerated wear of the sealing element and the appearance of engine oil leaks are caused by:
- skewed oil seal during installation;
- loss of elasticity due to engine overheating;
- greater radial eccentricity of the drive pulley of the auxiliary unit;
- use of low-quality motor oil;
- reamer on the crankshaft pulley hub.
We also do not rule out hardening of the bracelet due to natural aging and the possibility of manufacturing defects - unfortunately, the quality of parts for rear-wheel drive VAZ models leaves much to be desired.
It is impossible not to notice damage to the sealing element - the rotating pulley disperses the oil in the front of the engine and throughout the engine compartment. However, you should not think that such a malfunction only leads to lubrication of the units and a decrease in the lubrication level. If engine oil gets on the alternator belt or other rubber parts, it can quickly damage them.
Please note that the appearance of a leak through the engine seals is caused by another factor - an increase in crankcase gas pressure. For this reason, be sure to check the cleanliness of the engine ventilation system.
Something else useful for you:
Possible faults
Part designed to last for 10 years.
List of possible problems:
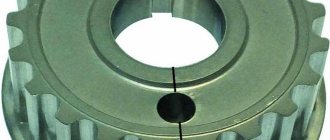
a burst rubber layer, which causes noise when the engine is running (a sign is the characteristic hum and timing noise); spontaneous unscrewing by cut parts; worn grooves, which affect premature belt wear; when beating during an accident, part of the part may break off, which leads to further breakdowns (therefore, after an accident, it is important to check the technical serviceability of the AvtoVAZ);
When purchasing a functional disk separately, you must choose the original part, no matter how much it costs. This contributes to reliable and long-lasting operation of the vehicle. Even if a simple part is turned, the size may not match.
Step-by-step instruction
Due to the limited space between the front of the engine and the radiator, it is difficult to install a new oil seal without distortion. For this reason, experts recommend replacing the sealing element with the front engine cover removed. Of course, doing this on a blacksmith’s workbench is much more convenient, but there are pitfalls here too. As practice shows, after such disassembly it is difficult to restore the tightness along the oil pan seam, and there is also a danger of breaking the internal thread in the rather delicate duralumin cover.
For this reason, it is recommended to use the more common and less labor-intensive method, in which the damaged oil seal is replaced directly on the engine. This work will require your attention and precision. It is more convenient to carry out all manipulations on an elevator, overpass or inspection pit.
- Apply the parking brake to the vehicle and move the gearshift lever to fourth speed.
- Disconnect the power terminals and remove the battery from the vehicle.
- Using a 17" Allen socket and a long wrench, remove the self-locking nut that secures the alternator to the adjuster plate.
- After installing a crowbar or the same crank between the generator and the right subframe (spar), use it as a lever to move the generator to the cylinder block. This will loosen the serpentine drive belt and remove it from the engine.
- Once under the car, remove the wing and the lower part of the oil pan.
- Unscrew the ratchet nut using a special size 38 wrench. In some cases, the fasteners are compressed so tightly that even the foot brake cannot lock the wheels. In this case, mechanics recommend removing the starter and blocking the flywheel using a strong handle. To remove a stuck nut, the wrench is pulled through with a suitable tube. Please note: a right-hand thread is cut on the crankshaft shank, then the ratchet is turned counterclockwise.
- Remove the crankshaft pulley. To do this, use a spatula, prying the part from different sides and using the tool as a lever. However, do not overdo it, as too much pressure may break the front engine cover.
To play it safe, make sure you have an extractor in your arsenal. With its help, you can easily and safely disassemble even those parts that are installed with obvious interference. - Clean the front of the cover, the oil seal and its seat, otherwise dirt will enter the engine when removing the sealing element.
- Using a strong, wide-blade screwdriver, use a strong, wide-blade screwdriver to pry off the nut on the oil seal seat. By touching the handle of the tool, remove the damaged part.
- Before installing a new oil seal, clean the seat before polishing it to make future installation easier. If a damaged oil seal is pulled out too easily, this indicates wear on the seat in the camshaft drive cover. Apply a coat of automotive sealant to the side of the new gasket to ensure future sealing.
- Carefully install the oil seal. Make sure it doesn't tilt and fits straight into the outlet.
- Using a suitable chuck (you can also use a wrench to remove the ratchet if it is the right thickness), carefully tap the seal into place.
- Carefully inspect the crankshaft pulley. If there is significant development on its working part, replacing the oil seal will not eliminate the problem of oil leakage. In this case, replace the part.
- Before installing the pulley, lubricate the inner and outer surfaces of the pulley hub with engine oil. Lubrication will make it easier to install the part on the crankshaft and, above all, prevent premature wear of the oil seal lip in the first minutes of engine operation.
- Rotate the pulley to align the groove with the key installed in the groove of the crankshaft. By sliding and simultaneously pressing on the part, make sure that the hub fits into the oil seal.
- Screw in the ratchet nut by hand until it stops and tighten with a wrench. According to the manufacturer's recommendation, the tightening torque does not exceed 101.3–125.64 N × m (10.34–12.8 kgf × m).
- Install and tighten the auxiliary drive serpentine belt. Remember that excessive tension will cause accelerated wear on the alternator and coolant pump bearings. The deflection of the belt between the pump and the crankshaft with a clamping force of approximately 10 kgf × m is 12-17 mm.
- Tighten the generator mounting nut.
- Insert the battery and connect it to the car's on-board network. At this point the repair is considered complete.
Replacing the crankshaft oil seal does not require special knowledge or expensive tools. The work can be done with your own hands, spending 1-2 hours on it. By being careful in your work, you will forget about oil leaks for a long time and will easily be able to keep the engine compartment clean.
Video: Replacing the front crankshaft oil seal on a VAZ 2101 - 2107
At some point, every car owner is faced with a problem that cannot be solved without prior preparation. One of them is removing the crankshaft pulley.
How to unscrew the crankshaft pulley
As a rule, difficulties are associated with disassembling and installing new cuffs, which become deformed and cease to perform their functions. As a result, an oil leak appears that must be repaired. For an experienced car owner, disassembling the crankshaft pulley is not a problem. Another thing is for beginners who are just learning the basics of car repair.
Where is?
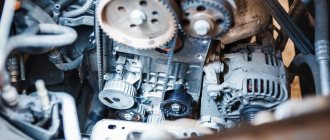
The oil seals are located in small holes on the camshaft drive covers. Being at the ends of the shafts, they perform two roles, the first is to prevent oil from leaking out and the second is to protect the components from dust and dirt entering the system. The camshaft cover is circled in red in the photo. The blue arrow shows where the crankshaft pulley is located, behind which the cuff is located.
What is needed to remove the crankshaft pulley?
If you open the manual for the technical operation of the machine, the repair procedure is described briefly, and the algorithm itself is simple and easy to implement. But this is at first glance. In practice, the work takes a long time. It is worth pointing out a number of difficulties here.
The pulley is located in the engine compartment, access is not available to all elements. As a rule, the necessary part is “hidden” behind the generator and housing parts. To access the unit, it is often necessary to loosen the tension bolts, as well as remove the power steering and alternator belts. But even then, removing the crankshaft pulley takes a lot of time.
The part of interest is fixed (always at the factory) using a nut or bolt. In this case, broaching occurs with maximum torque (to ensure tight fastening). During the next operation, the nut is tightened even more.
In addition, environmental factors and elevated temperatures lead to the formation of rust and oil coke. As a result, the locking bolt or nut literally “sticks” to the pulley body. However, it is not always possible to “tear off” the part the first time.
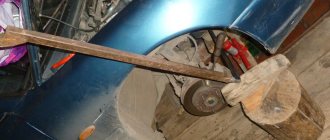
Before unscrewing the crankshaft pulley bolt, you should take care to secure the pulley itself to the crankshaft. Otherwise, you will not be able to unscrew the nut. The service uses special devices, and in the garage it is enough to put supports under the wheels and move the gear lever to the fourth speed position. Another option is to mount the flywheel using its holes or the toothed part of the support.
Tuning on carburetor modifications of the VAZ 2107
All old textbooks on servicing classic Zhiguli models describe a method for setting the moment of spark formation using a light bulb, although experienced motorists can easily do without it. You will understand why this happens as you read this material, but for beginners it will be useful to familiarize yourself with the old proven technique.
To correctly set the ignition of the “seven”, you need to ensure that the following conditions are met simultaneously:
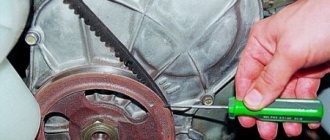
- the notch on the crankshaft pulley is opposite the long mark on the timing cover;
- in this case, the round mark marked on the camshaft chain drive gear coincides with the boss on its body;
- the piston of the 4th cylinder has completed the compression stroke and is at top dead center;
- the contacts inside the distributor are open;
- The movable contact of the slider faces the fixed contact on the distributor cover, where the wire from the spark plug of the 4th cylinder is connected.
Note. On non-contact systems, at this moment the Hall sensor sends a signal to the switch to break the low voltage electrical circuit, which leads to the appearance of a high voltage pulse on the wire leading to the spark plug of the 4th cylinder.
The light bulb is used to control the ignition timing, for which it must be connected with one wire to the “K” contact of the high-voltage coil, and with the second to the vehicle ground. You should know that at the same moment the piston of the first cylinder is also in the TDC position, only there the air-fuel mixture is not compressed, but exhaust gases are released after its combustion. This is why ignorant car enthusiasts often confuse the first cylinder with the fourth when installing the ignition.
When the above actions occur simultaneously, a spark discharge occurs on the electrodes of the spark plug of the 4th cylinder, as evidenced by the flash of the connected light bulb. To achieve these conditions and set the ignition correctly, follow the instructions:
- Turn the crankshaft with a 36 mm wrench, aligning the notch on the pulley with the long notch on the timing cover.
- If at this moment the engine valve cover is removed, then it is better to navigate by the mark on the camshaft gear, placing it opposite the housing boss.
- Take the ignition distributor, remove the cover and turn its shaft to place the slider opposite the wire leading to cylinder No. 4 (there are cylinder number markings on the cover). Insert the distributor into the engine hole, holding the slider and housing in this position, and then secure it with a 13 mm wrench nut.
- Connect the light bulb wires and turn on the ignition by turning the key. Loosen the nut securing the distributor and slowly turn it by the housing until the lamp flashes, indicating the moment of sparking. Reattach the distributor.
- Turn off the ignition and make sure that the contacts inside the distributor are currently open. Take a 0.35 mm feeler gauge and check the gap between them, if necessary, adjust it by loosening the fastening screws with a screwdriver.
Note. The instructions imply that before starting work the distributor was removed from the engine without aligning the marks.
The ignition is considered to be set correctly if, after installing the distributor cap and connecting the wires, you manage to start the engine, and then you need to adjust the timing. The non-contact system is installed in the same way, with the exception of checking the gap in the contact group due to its absence.
How to remove the crankshaft pulley?
Once you have identified potential dismantling difficulties, you can get to work. As a rule, the pulley is secured with a nut (on rear-wheel drive vehicles) or a bolt. The biggest problems arise with the first fastening option.
The crankshaft pulley is secured with a nut
Mounting nuts are often equipped with lifters to allow them to engage the ratchet mechanism. In servicing, craftsmen use hex keys of “thirty-eight” or “thirty-six”. To speed up the twisting process, an elongated handle and a special clamp are used, which is put on the pulley. But how to unscrew the crankshaft pulley when there is no access to a special tool?
In such a situation, proceed as follows:
- Drive your car to a suitable place (this could be an overpass or a pit).
- Move the gear shift knob to the fourth speed position (locks the crankshaft).
- Raise the handbrake to its extreme position (to avoid accidental movement of the car).
- Take a socket wrench (to the size of the fastening nut), install an additional “elbow” (a metal pipe will do), then try to tear off the bolt. Many people wonder which way to unscrew the crankshaft pulley bolt. Here the answer is clear - only counterclockwise.
Folk tricks
Let's look at a few folk car tricks that have helped more than one driver.
- Each threaded connection, by the way, not only on the part of the car, can be unscrewed by first lubricating it with a special oil, for example: HP, sunflower oil, vinegar, brake fluid.
- In rare cases, lightly tapping the edges of the bolt and nut with a hammer or wrench helps.
- Removing a bolt or nut does not mean removing the pulley. How to unscrew the crankshaft pulley without a special key? The pulley sits very firmly on the shaft; it can be removed using a pry bar or a screwdriver and carefully pry it off in several places.
( 2 ratings, average 4.5 out of 5 )
I couldn’t get the crankshaft pulley off, what should I do?
If you manage to break the support, it is not difficult to unscrew the nut completely. But this doesn't always happen. In some unfavorable circumstances, use a different technique:
- Put the car in neutral.
- Remove the caps (installed on the spark plugs). This is done to prevent accidental starting of the engine.
- Place a wrench on the pulley nut, then press the end of the arm against the spar (ground). The main task in this case is to prevent the pulley from slipping.
- Turn the starter briefly to give the required impulse. As a rule, one or two turns are enough to break the nut. Then you can continue working with the key.
As noted above, on many front-wheel drive cars the pulley is secured with a bolt.
In this case, the algorithm should be as follows:
1. Raise the car on the right side, then place a stand under the body (for safety). It could have been a piece of log.
2. Disassemble the air filter and housing, then loosen and remove the generator drive belt. Remove any parts that restrict access to the pulley.
3. To secure the crankshaft, remove the plug in the clutch housing and install something metal, such as a mounting plate, into the opening. Press the other side of the instrument against your teeth.
4. Place the head of the wrench on the bolt, then use the extension to make a few clicks to the left. This is necessary at a minimum to remove the bolt from its original position. Most attempts are successful. If this does not help, use the technique described above (with starting the starter).
To make it easier for you to loosen the nut (bolt), bind it with WD-40. In this case, it will be easier to turn the bolt (nut). After completing the work, all that remains is to remove the pulley using a special puller or crowbar.
Watch the video on how to unscrew the crankshaft pulley bolt.
In the latter case, use support points as close to the tree as possible. Use caution during this procedure to avoid distortion of the keyway and keyway. Good luck on the roads and of course no breakdowns.
Signs of a malfunction of the VAZ 2107 crankshaft position sensor
- The first thing that may indicate the imminent death of the crankshaft sensor is an arbitrary decrease or increase in engine idle speed.
- Severe reduction in engine power
- Unable to start the engine
Removing the crankshaft position sensor
- Disconnect the contact chip from the sensor by first releasing the latch
- Using a Phillips screwdriver, unscrew the sensor mounting screw.
- After removing the crankshaft position sensor, check its operation using a multimeter
Checking the crankshaft position sensor VAZ 2107
Moskvich 2141 1991, 101 l. With. — tuning
Cars for sale
Moskvich 2141, 1993
Moskvich 2141, 1992
Moskvich 2141, 1993
Moskvich 2141, 1999
Comments 32
Class! I did the same for myself!
Damn, how much did I saw off the seat for the oil seal, or rather, how much was left on the pulley from the plane...
I don’t even remember, it’s easier to take the original one and the pulley and try it on
Damn, how much did I saw off the seat for the oil seal, or rather, how much was left on the pulley from the plane...
Bring it to the boring machine turner along with the original UZAM pulley, and tell me to make me a landing tail on the VAZ pulley the same as on the UZAM pulley.
It’s not very clear what I sharpened where at the bushing expense. and what I pressed where. Can you be more specific?
Tell me how to knock out the teeth on the pulley at what distance from TDC. and which tooth should have DPKV?
Grind the teeth completely with a grinder, the dpkv is on the 20th tooth in rotation
How many teeth should I file down?
How much did you buy the pulley in amounts?
Oh yes, I almost forgot to take the DPKV from 2107 too? What do you have and how? The fastening there still needs to be tricky. it's not visible in the photo
this is just handsome! bracket)) I can’t do this myself ((exactly. But can you make one for me?
You yourself will have to comprehend the art of wielding a file, like a true Muscovite master! walk this difficult path, remember all the devils, and drink more than one liter of beer!
I see, do you still have aluminum corners like these? and most importantly, what did you cook it with? I would like at least some preparation! sawing and turning is the second half of the job. You will still have to do the adjustment in place
I bought a piece of corner at Yangi-Obad, I didn’t even think about taking it in reserve (aluminum turned out to be not cheap), I was still buying it for the adapter plate. Argon workers cooked it together with the collector.
It's clear. what kind of nuts are on the pump? with the new pulley what will move where? or will the belt and other pulleys remain in place? www.drive2.ru/cars/moskvi…/rolloff/journal/2685647/
with this pulley you need to pull out the pump pulley
but it’s clear, in general, it all needs to be adjusted in place and the generator will also have to be shifted, everything in front will come out, as I understand it, about 5 mm. but in any case, you need to make a pulley first.
Hello fellow countryman. Help me please, I also want to make a pulley like yours. As I understand it, I don’t need a pulley from a 2107 injection machine, my pulley is a standard and, most importantly, a turner with even hands. I’ll buy a pulley, but where can I find this turner? I have been following your work and records for a long time, and every day I want more and more to do all the work that you did, especially since I already have half of the MPSZ installed, even it cannot work normally on the distributor with backlashes, from which you simply cannot get rid of. If you have the opportunity to help me, write. please at this stage I need help in making a pulley.