One of the problem areas in the electrical system of the domestic Lada Vesta car is the generator assembly together with the drive belt. The latter is generally a consumable component, the breakage of which causes undercharging of the battery and failure of some electrical appliances. It is quite possible to carry out repair work on your own if you choose original consumables and spare parts.
Replacing the alternator belt on a Lada Vesta - checking, tensioning, replacing
One of the problem areas in the electrical system of the domestic Lada Vesta car is the generator assembly together with the drive belt. The latter is generally a consumable component, the breakage of which causes undercharging of the battery and failure of some electrical appliances. It is quite possible to carry out repair work on your own if you choose original consumables and spare parts.
What generators are installed on the Lada Vesta
The main function of the generator is to provide electricity to all devices when the engine is running and charge the battery, leading to the restoration of its expended capacity. Without this assistant, the battery life is quickly wasted, so you should pay attention to the signals of the warning lamp, which warns of a current or upcoming malfunction.
The automobile plant itself, located in Togliatti, does not manufacture generators for its vehicles, and these functions are assigned to third-party suppliers. Based on this, generators for Lada cars are supplied by manufacturers such as Bosch and Valeo. These products are sold under production article 8450006900. On the domestic market you can find other analogues that are installed by car enthusiasts during operation. The most famous of them is the StarVolt company.
Generator design and functions
A car generator is one of the auxiliary devices without which the operation of a vehicle is impossible. Its task is to provide sufficient electricity to all consumers on the car and charge the battery.
Malfunctions lead to the fact that the battery is left without an assistant; on its own, it can only provide movement for a short distance. To avoid such situations, manufacturers install a battery charging indicator lamp that signals a breakdown.
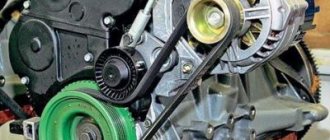
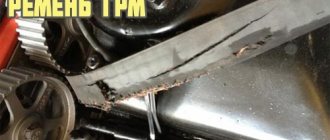
Generator belt. Photo source: https://www.drive2.ru/l/503533995397480550
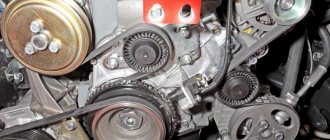
The generator is a mini power plant that produces three-phase alternating current. Then it is converted into a permanent one that powers the vehicle's electrical network. The device operates synchronously with the engine, driven by a poly-V-belt that transmits rotation from the crankshaft to the rotor. This generates electromotive force in the stator windings.
To assemble such a device, more than 20 parts are required. Main nodes:
- Rotor. It is an electromagnet whose winding is located around a rotating shaft. Contact between them is ensured by graphite brushes.
- Stator. These are 3 fixed windings made of copper. They are wound on a magnetic core and connected to each other.
- Relay regulator. Its function is to control the voltage at the output terminals at a level of 13.5 V. The relay has overload protection functions. More complex designs have a built-in temperature sensor, which provides a higher voltage supply in winter. At low temperatures, electricity consumption in a car increases. It is installed on the housing using a special brush holder, or inside the generator in one block along with the brushes.
- Rectifier (diode bridge). Its functions include converting an alternating signal into direct current.
- Frame. Made from light metals or their alloys to reduce weight. Since a running generator is subject to heat, the housing has many ventilation holes to ensure that the device is cooled by air currents.
An additional impeller is provided, the blades of which rotate along with the rotor and provide more efficient cooling by increasing air flow.
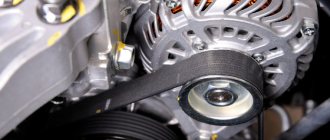
What belts are installed on the Lada Vesta
The size of alternator straps on Lada Vesta may vary depending on the specific modification. There are different versions for cars equipped with and without air conditioning systems. So, for Vesta with air conditioning, modification 6РК1039 is used, and for those without such an option - 6РК778. Contitech and Gates companies are official suppliers for AvtoVAZ for the installation of alternator drive belts.
The tension and support rollers deserve special attention. They provide the necessary level of tension so that the strap does not fly off, but allows the generator to produce the maximum possible charge for the on-board electrical network. If these parts are made with high quality, then they do not require adjustment for a long time.
Design of VAZ engines
Both models are equipped with gasoline power units. One of them is a new development of AvtoVAZ - the VAZ 21179 engine, with a power of 122 hp. With. and a volume of 1.8 liters. The second is the base engine, 1.6 liters.
As for the regulations, it is recommended to replace it every 180,000 km (for a 1.8 l engine). However, mechanics advise not to take everything to the extreme and change the belt at around 100,000 km. This will avoid very unpleasant consequences.
The fact is that if the belt breaks, the valves on Vesta and X-Ray bend, which means that the engine will have to be overhauled, with the replacement of pistons, valves, guides and other components. And this is a very expensive procedure. Therefore, it is better to play it safe.
The progress of work is demonstrated using the example of a 1.6-liter power unit, since replacing the timing belt on a Lada Vesta and X-Ray with a 1.8-liter engine is more difficult due to the fact that the camshaft pulley is equipped with a phase regulator.
All this is told in the video.
How to check the belt
If the alternator belt whistles, then every owner of a Lada Vesta will decide on replacing it as soon as possible. However, it is not at all necessary to reach this point. According to the regulations, you can safely change the strap without checking it after 10-15 thousand kilometers traveled.
However, if there is a need to check the condition, then first of all we lift the engine screen up to provide access to the unit. With your finger we look for the area in the middle between the generator pulley and the coolant pump. We press on it with a force of approximately 8.0 kgf. The deflection value should be around 12 mm from the original position. If necessary, tighten the belt or replace it with a new one.
H4Mk engine
One level higher in the xRay line is the H4Mk engine. It is developed by Nissan, and was widely used in the Lada Vesta. Like the previous version, it is installed in tandem with a French manual transmission. This decision had a positive effect on the dynamic qualities of the car. Previously, this engine was installed with the Lada xRay top package and is currently present only on anniversary versions of the car.
- Working volume - 1598 cm3
- Number of cylinders/valves - 4/16
- Timing drive - chain
- Cylinder diameter - 78 mm
- Piston stroke - 83.6 mm
- Power hp/kW - 110/81 at 6000 rpm
- Torque - 156 Nm at 4000 rpm
- Maximum speed - 171 kilometers per hour
- Acceleration to the first hundred - 10.3 seconds
- Fuel consumption - n/a
The engine gave the crossover more serious dynamics, which is especially useful on the highway when overtaking. Acceleration to one hundred is the highest in the line, and is 10.3 seconds, but the maximum speed has increased slightly, to only 171 km/h. Fuel consumption at full speed with this power unit was 6.9 liters, which was the minimum figure in the entire line.
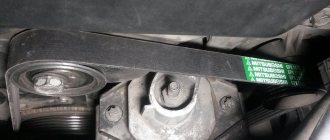
Signs of belt and tensioner wear
The drive and electric current generation system in the vehicle can function correctly for a long time, and the driver does not even have to look into the hood compartment. However, the driver should be aware of the approximate symptoms that may indicate a malfunction of the belt or its tensioner.
The following signs may indicate a drive malfunction:
- characteristic whistle when starting the engine. Indicates a faulty or overly worn belt. It is necessary to immediately check its surface for wear criteria. If almost none are identified, it is worth taking measures to check the degree of tension;
- the appearance of transverse or longitudinal cracks on the surface, scuffs and burrs. If there are too many of them, then it’s time to change the belt drive;
- abrasions on the surface of the roller can lead to uneven wear of the strap and, as a result, to its sagging in certain areas.
When is it time to change?
On Lada Kalina cars, the manufacturer does not regulate the replacement of this part. However, its failure is a common problem. In particular, we are talking about Lada Kalina cars. This applies to both 16-cl and 8-cl engines.
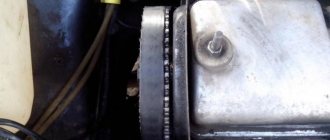
This is what a deformed element of a Kalina generator with an 8-cyl internal combustion engine looks like
Therefore, let’s look at the signs that indicate that the belt may fail in the near future:
- Whistle when moving. As a rule, this whistle appears when the electrical appliances of the vehicle begin to load. For example, if you start the car, and when you press the gas, a loud whistle is heard from the engine compartment, this indicates that the belt is loose. In this case, it must be tightened using a tensioner or replaced.
- Cracks on the strap. If you open the hood, look at the belt and see cracks on it, then you know that it’s time to change the element. Neither tensioning nor adjusting the rollers will help here. The component can be tightened, but this will not be enough for a long time. The only option left is replacement.
- Deformation. As in the previous case, neither tightening the tensioner nor adjusting the rollers will give much effect. You just need to change the element.
- Noise when the engine is running. If the element has already served its service life, this can be understood by the noise that appears when the motor is running. For example, some Lad Kalin car owners report loud knocking and even impacts when the engine is running.
The assembly is disassembled: this is what the strap looks like on the shafts
If the vehicle is equipped with a generator sensor that determines its performance, then it will be easier to identify the malfunction
For example, if you heard a whistle from under the hood, and at this time the indicator on the sensor came on, then you need to pay attention to the strap. This indicates that the belt needs to be tightened, since it may be in a weak state or that its service life has been exhausted.
One way or another, if the slipping and whistling of the strap cannot be eliminated by adjusting the belt or rollers, it needs to be changed.
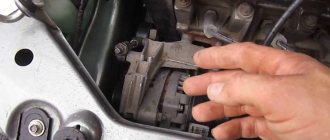
How to replace the alternator belt on Vesta
To ensure that replacing the alternator belt on Vesta does not take a lot of time, effort and nerves, we will prepare the tools in advance. So, we will need a flat-blade and a Phillips screwdriver, a set of open-end wrenches, a balloon wrench, a 13-socket wrench, and 20-, 30-, and 55-size Torx keys.
If all this is prepared, and the machine itself is already in the pit, you can proceed to the following step-by-step sequence of actions:
- If the car is not in the inspection hole, then use a jack to hang the right front wheel.
- After unscrewing the self-tapping screws, remove the wheel arch liner.
- Now you can remove the metal engine protection.
- If a manual transmission is installed on Vesta, then the hydraulic clutch cylinder is additionally removed, and then its mounting bracket is removed.
- Without touching the electrical wiring, unscrew and hang the starter. This will allow access to the flywheel.
- The crankshaft damper mounting bolt is unscrewed so that it can be disconnected.
- Remove the plastic plug from the roller using a screwdriver.
- Next, loosen the tension roller nut.
- Taking the Torx 55 key in your hands, rotate the roller until it reaches the top position, counterclockwise.
- You can remove the generator drive belt.
- Reassembly is carried out in the following sequence: first install the damper, then the air conditioning compressor, and then the generator and tension pulley.
- Once this work is completed, all that remains is to tighten the belt and check the degree of tension.
How to replace the tension roller
Experts recommend changing both the strap and the roller needed for tension at the same time. Such recommendations are also given by the manufacturer. On a Lada Vesta, you will have to hang the engine to remove it. Therefore, the first thing we must do is dismantle the alternator belt, and then proceed to install a new roller to replace the old one.
So, the step-by-step algorithm of operations will consist of the following actions:
- We remove the lower cross member to make it possible to install a jack.
- We dismantle the upper support of the power unit.
- Using a jack, we will lower it closer to the ground until the pin is below the spar. This will free up the space required to access the video.
- Unscrew the fastening nut and remove the old roller.
- We install a new one and tighten the nut without final tightening.
- Using a jack, we lift the motor up to the reverse position so that it becomes possible to install the upper supports.
- Having removed the jack, we fix the cross member located below.
- We throw on the generator strap and give it tension.
- Tighten the fastening nut from the roller until it stops.
Work on tensioning the belt drive or replacing it can be done on your own, since this does not require special qualifications. But it is best to trust the replacement of the generator to specialized specialists in the technical maintenance service. Anyone who has their own experience of performing such work or has questions after reading the review, please share them in the comments below.
Source
Removing the belt
1. Remove the right fender liner by unscrewing the fastening screws. Raise the car to a height.
2. For versions without air conditioning, remove the engine protection (on Vesta, XRAY).
3. For configurations with a manual transmission, remove the clutch hydraulic cylinder (Figure 4-3, No. 2) by unscrewing two bolts (No. 1). Hang it by the technological hook without disconnecting the tubes (No. 3).
4. For configurations without air conditioning, remove the bracket (Figure 4-4, No. 2) and the starter along with the wires by unscrewing three bolts (No. 1). Hang it on a hook. Lock the flywheel through the hole for the starter mounting bolts on the gearbox.
5. For configurations with air conditioning, turn the tension roller (Fig. 4-5, No. 2) to the upper position counterclockwise, having first loosened the nut (No. 1).
6. For configurations without air conditioning, remove the crankshaft damper (No. 6) by unscrewing the bolt (No. 7) and removing the washer (No. 8).
7. Remove the attachment belt (No. 5).
Refueling volumes
As mentioned above, three different engines were installed on the Lada Vesta - 11189, 21129 and HR16DE-H4M. It was also equipped with different gearboxes - 2180, 2182 and JHQ. Based on this, some Vesta filling containers have different volumes, while others are the same for everyone.
The following table will help you figure out how much of a particular technical fluid needs to be filled:
| Nominal filling volumes of Lada Vesta | |
| Capacities | Volumes (l.) |
| Engine lubrication system (including oil filter): 11189/21129 (stamped oil sump) 11189/21129 (cast oil sump) HR16DE-H4M | 3,2 (2,9) 4,4 (4,1) 4 |
| Cooling and heating system* : 11189/21129 HR16DE-H4M | 5,95 7,0 |
| Gearbox : Gearbox 2180/2182 JHQ | 2,25 3,34 |
| Hydraulic clutch and brake system | 0,559 |
| Hydraulic brake system (for cars with AMT) | 0,517 |
| Washer reservoir | 4,7 |
| Expansion tank (for cars with 21129 | 5.75 (max) 5.35 (min) |
| Air conditioning system (freon R134 “A”) | 0,475 (± 20) |
*A mixture of coolants of different brands should not be allowed.
In the same repair and maintenance manual for Lada West there are also the following volumes of coolant for the engine cooling system:
- for 11189/21129 with pre-heater - 9.3 l., without heating - 8.7 l.;
- for HR16DE-H4M with pre-heater – 7.6 l., without heating – 7.0 l.
Self-replacement of the Lada Vesta alternator belt
Vehicle maintenance does not have to be carried out exclusively at the station. If you have certain knowledge, skills and tools, some operations can be carried out with your own hands. One of them is replacing the Lada Vesta alternator belt yourself, because this operation is not nearly as complicated as replacing the timing belt.
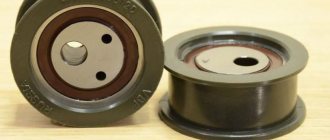
Support roller for auxiliary units 8450006996 for VAZ Vesta, X-Ray
- Manufacturer: INA
- 0 reviews
- Description
- Characteristics
- Video
- Reviews 0 ? '(' + product.reviewsCount +')' : »>>
Dear customers, in order to avoid mistakes when sending the tension belt pulley for the Lada Vesta / XRAY generator with air conditioning, in the “Comment” line, indicate with or without air conditioning, your car model, year of manufacture.
In accordance with the maintenance regulations for Lada Vesta and Xray vehicles, the condition of the auxiliary drive belt is checked every 15 thousand km, and replaced every 90 thousand km, regardless of the condition of the belt.
Support roller 8450006996 for the auxiliary drive belt, installed on Lada Vesta and XRAY vehicles equipped with air conditioning. The belt tension is adjusted automatically by a tensioner.
The design of the belt roller 8450006996 is such that it allows you to install and tension the belt with a given force. No tightening or tension adjustment is provided during the operation of the belt until it is replaced due to mileage or due to complete wear. If, during a belt check, significant defects are found or the mileage has reached 90 thousand km, then change the belt.
The belt should not be too dry or lose its elasticity, and there should be no cracks on the side of the rivulets. It is unacceptable to continue using a belt that has begun to slip on the pulleys (a sign is a characteristic whistle immediately after starting the engine).
During installation, sharp bends of the toothed belt with a radius of less than 20 mm are not allowed, so as not to damage the cord.
Other article numbers of the product and its analogues in catalogues: 8450006996.
Lada Vesta / Lada Vesta, Xray with air conditioning.
Any breakdown is not the end of the world, but a completely solvable problem!
How to independently replace the support roller of the auxiliary drive belt on a LADA Vesta family car.
AvtoAzbuka Internet Store, repair costs will be minimal.
Just COMPARE and BE SURE.
Don't forget to share the information you find with your friends and acquaintances, as they may also need it - just click one of the social networking buttons below.
Examination
To independently check the condition of the Lada Vesta alternator belt, you need to turn on the speed, and then begin to carefully push the car back, while simultaneously inspecting the component. Moreover, inspection is carried out not only of the external, but also of the internal side - from some angles it can also be partially inspected.
Next, a touch test is carried out. In this case, replacement is necessary in the following cases:
- Cracks appeared on the inside (where the grooves are located);
- The belt is too dry;
- There is a loss of elasticity.
In addition, if a whistle occurs, continuing to operate a sedan or station wagon with this element is not allowed by regulations - this means that the belt slips on the pulleys.
The Lada Vesta generator belt must be checked periodically
Body and interior
The quality of the paintwork on the Lada XRAY is frankly not the best. And although “PUMA” was developed specifically for this car, it also does not shine with quality, although it is better than others...
Another drawback is the XRAY’s poor interior ventilation. In wet weather, to combat glass fogging, it is not enough to simply open the window...
We also recommend that you read
Lada Xray owner reviews
Also on the XRAY the door seals are unimportant. Not only do they “tann” in the cold. They also often break when opening. Take the trouble to treat the rubber bands with silicone grease at least once every 2-3 weeks, this will save you from the unpleasant effects of cold on the seals.
At this stage of operation of the Lada XRAY, the owners and service centers did not find any more serious and critical faults. But not much time has passed. Keep an eye on the future fate of the Lada XRAY on our roads in our next articles.
Where can I buy?
The most convenient way to buy an alternator belt for a Lada Vesta is through the Internet if you don’t have a specialized store nearby in your city.
IMPORTANT! For Lada Vesta with and without air conditioning, different belts are used. When purchasing, you should consider the equipment of your car.
The most current offers are presented in the table.
| Online store | vendor code | Air conditioner | Price, rub.) |
| https://lada-vesta-shop.ru/shop/dvigatel/remen-generatora-avtovaz-8450006328-lada-vesta.html | 8450006328 / 6PK1039 | Eat | 1090 |
| https://autostol63.ru/vesta/standartnoe-vesta/remen-generatora-contitech-6pk1039-lada-vesta.html | 6PK1039 | Eat | 990 |
| https://avtomagnit.ru/category-18/category-36/product-17476.htm | 6PK778 | No | 987 |
| https://autostol63.ru/vesta/standartnoe-vesta/remen-generatora-contitech-6pk778elast-lada-vesta-bez-konditsionera.html | 6PK778ELAST | No | 740 |
| https://stovesta.ru/spareparts/item/15-vesta-sedan-engine/1737-remen-generatora-vesta-xray-1-6-i-1-8-s-2015-original | 50807 | 1100 | |
| https://stovesta.ru/spareparts/item/15-vesta-sedan-engine/1559-remen-generatora-1038-mm-vesta-xray-1-6-i-1-8-s-2015-contitech | 50662 | 1050 | |
| https://avtokrepeg.net/avtozapchasti/dvigatel/remni-grm-generatora/remen-generatora-6-1038-vesta-s-kondits | 8450006328 | Eat | 1000 |
| https://lada-vesta-shop.ru/shop/dvigatel/remen-generatora-lada-vesta-h-rei.html | 6PK | 920 |
It is worth noting that the product description does not always indicate the vehicle’s equipment – whether it is a version with air conditioning or not. Therefore, it is strongly recommended to clarify this point with the manager before placing an order.
Work progress
Removing the fender liner
First, you need to drive the car onto an overpass, jack it up and remove the front right wheel.
Next, the fender liner is removed. To do this, using a wrench and a Torx T-20 bit, first unscrew 2 self-tapping screws, with which the locker is fixed to the bumper at the bottom, after which 2 more self-tapping screws are unscrewed, but along the edge of the wheel arch.
Then, using a Torx T-30 bit, remove 2 screws that secure the locker to the subframe.
Attaching the locker to the subframe
The fender liner is fixed to the mudguard with 3 pistons, the clamps of which must be pryed and removed, and then the clips themselves must be removed.
In the end, all that remains is to pull the locker back so that it does not interfere with work.
Of course, there is another option to simply cut out a piece of the fender liner with a knife, so as not to waste time on removing and installing it, but it is still not recommended to damage the component.
Features of belt removal
The process of independently replacing the alternator belt on a Lada Vesta directly depends on the vehicle’s equipment – the presence or absence of air conditioning, as well as on the type of gearbox.
Equipment without air conditioning requires removal of the standard protection. To do this, 13 bolts are unscrewed using a wrench and a 10-point head.
Attachment points for standard Lada Vesta protection
Version with manual transmission - remove the clutch hydraulic cylinder. It is fixed with 2 bolts. When the cylinder is removed, it should be hung by the hook, but there is no need to disconnect the tube.
Configurations without air conditioning - you need to remove the starter (along with the wiring), as well as the bracket, and then also hang it up. It is secured with 3 bolts. In addition, it is necessary to block the flywheel, which is done through the technical hole, which is intended for the starter mounting bolts on the transmission.
Versions with “conduit” - first you need to loosen the nut, then turn the roller (tension) to the left until it is in the upper position.
Configurations without “condya” - you will need to remove the crankshaft damper, for which you first unscrew the bolt and then remove the washer.
List of works during maintenance 1 (15,000 km or 1 year)
- Changing the engine oil. The oil filling volume in an engine equipped with a manual transmission is 4.4 liters, and in an engine with an AMT it is supposed to be filled in 3.2 liters. It is recommended to use ROSNEFT Maximum 5W-40 motor oil, catalog number 4 l. canisters - 4291, and price - 900 rubles. There is a more expensive option - MOBIL 3000 5W40 engine oil, which has a catalog number - 150013 (4 liter canister), but the price is already 1,540 rubles.
- Replacing the oil filter. The catalog number is 21050101200500, and the price is approximately 200 rubles.
Checks during maintenance 1 and all subsequent ones:
- crankcase ventilation system;
- hoses and connections of the cooling system;
- coolant;
- exhaust system;
- fuel lines and connections;
- covers for joints of different angular velocities;
- checking the technical condition of front suspension parts;
- checking the technical condition of rear suspension parts;
- tightening the threaded connections securing the chassis to the body;
- condition of tires and air pressure in them;
- wheel alignment angles;
- steering gear;
- checking the free play (play) of the steering wheel;
- hydraulic brake pipelines and their connections;
- pads, discs and drums of wheel brake mechanisms;
- vacuum booster;
- parking brake;
- brake fluid;
- checking the drive belt;
- checking the timing belt;
- accumulator battery;
- spark plug;
- headlight adjustment;
- locks, hinges, hood latch, lubrication of body fittings;
- cleaning drainage holes;