Belt selection and price
If the generator design has a tensioner, then the belt length is 883 mm. In the vast majority of cases, Kalina has 8 valves. If the generator is like on Grant, the length is 823mm.
When choosing a manufacturer, you should take into account that the official supplier of these belts for AvtoVAZ is GATES, so preference should be given to its products. Belts are also produced by BTR (lots of bad reviews), Continental, Finwhale, and ANDYCAR. It is better to buy Dayco 825 (manufacturer GATES), elastic belts are marked Poly-V, if not, then the belt is rigid. The price of belts is approximately from 500 to 1000 rubles.
Prices for alternator belts vary on average from 300 to 400 rubles, depending on the manufacturer, which is not affordable.
Advantages of a tensioner
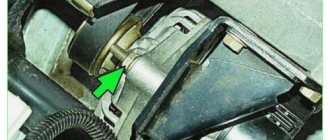
Why weren't designers happy with the previous adjustment methods? Why did they add an extra video? It's not just about convenience. The tensioner significantly increases the service life of the generator. Without a roller, the entire load falls on its bearings. If the belt is tensioned normally, then there is nothing to worry about. In this case, the generator will last many thousands of kilometers. However, very often car owners overtighten the belt, and this is bad.
The load on the bearings increases many times over, so they quickly fail. In itself, this is not so scary and expensive, although repairing a generator is quite labor-intensive. But the car owner does not always recognize the breakdown in time. The bearings gradually “break”, the rotor moves and begins to cling to the stator winding. The result is the need to purchase a new generator. Of course, the Kalina generator belt tensioner pulley can also fail, which happens quite regularly, but that’s only 400 rubles, not twelve thousand.
Belt and roller selection
Several types of belts are used on Lada Kalina cars.
The type of element depends on the engine model and its equipment:
- The motor version without air conditioning and tensioner has a belt length of 823 mm. Gates (number 6PK823) is standardly used, but such a part is not supplied as spare parts. To replace it, a slightly different strap is used - Gates 6PK823SF.
- The version of the unit with a belt tensioner, but without air conditioning is 882-884 mm. Standard part manufactured by Gates (article 6PK882). In addition to it, straps are often used - Finwhale BP6883, Dayco 6PK888 or the cheapest Balakovo belt BRT882.
- Engine with air conditioning and belt tensioner (motor 11183) - 1018 mm. Standard element manufactured by Gates (number 6PK1018). Alternative options are Dayco 6PK1018 or Continental 6PK1015.
- The 21127 16-valve engine with air conditioning and tensioner uses a 995 mm belt. The Gates part (6PK995) is supplied from the factory, and it is also used as a spare.
Sometimes when replacing a belt it becomes necessary to install a new tensioner. It is the same for all motors, its article number is 2123–1041056.
Repair technology for the auxiliary drive system
The sequence of actions is similar for both models with and without air conditioning and consists of the following points:
- Remove the engine protection.
- Remove the right wheel and fender liner.
- Remove the expansion tank.
- Jack up the right side of the engine and unscrew the mount.
- By tightening the tensioner mechanism pin, loosen the belt tension.
- Remove the drive from the roller and then from all pulleys.
- Install the new part and reassemble in reverse order.
- Adjust the tension.
What is it needed for?
As mentioned above, any vehicle is equipped with such an important device as a generator. If it fails, the operation of the vehicle will be impossible. Therefore, special attention should be paid to the performance of all elements of the device, be it a Lada Kalina with a 16- or 8-cl. engine, with or without air conditioning. What is the component size? How is the roller strap adjusted and replaced? How to tighten up? You can find out the answers to these questions in the article.
Car Lada Kalina tuning
Before answering questions that interest Lad Kalin owners, you should understand why this component is needed. Not every motorist knows what role he plays in the functioning of the car.
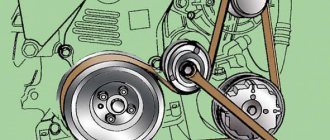
In modern cars, this belt is the only element that allows you to transmit crankshaft rotation to the generator. When the crankshaft transmits rotation to the device pulley, energy appears in the vehicle's electrical network, thanks to which all electrical equipment operates.
Fault diagnosis methods
When checking the correct operation of the tension device in the Lada Kalina, it is recommended to follow the following algorithm of actions:
- First, we carry out visual observation of the belt and the roller itself. To do this, you need to open the hood and start the LADA Kalina engine. When inspecting rotating components, we evaluate them for the presence of vibration.
- We control the tension force of the belt drive. To do this, stop the engine. We take hold of the belt branch with our hand and try to rotate it 90 degrees relative to the longitudinal axis. Rotate clockwise. If this manipulation is successful, then the tension is correct. When the angle obtained as a result of turning the branch is different from the indicated optimal value, further adjustment is required.
- Now you need to check the tensioner itself. To do this, you need to remove the belt. Before direct dismantling, remember the original location of the consumable element. Loosen the adjusting nut on the roller, after which the belt can be easily removed. We scroll through the video and observe the absence of jamming and noise. We inspect the protective cover and check for the presence of play. We pay special attention to the working surface, which comes into direct contact with the belt. It should be smooth, and the presence of deep ditches or other damage is unacceptable. If any of the indicated signs occur, then such a tensioner must be unconditionally replaced.
Replacement on 8 valve engines without tensioner
Replacing the belt on such an engine is the simplest; the only tools you need are a 13 mm wrench and a short flat-blade screwdriver. Since the tension in such a drive scheme is quite strong, when changing it is necessary to use only a Gates 6PK823SF or Dayco 825 six-V belt with the additional marking POLY-V. The remaining straps are too rigid, quickly collapse and damage the bearing on the generator shaft.
New Lada: Fog Light Relay Wiring Diagram -
How to assemble a belt tensioner for a Lada Granta and Kalina 2 generator
April 27, 2022 Lada.Online 74 766
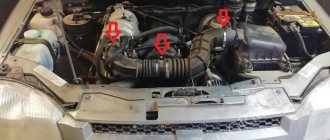
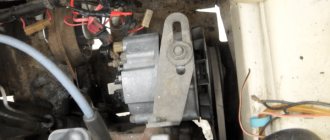
Lada Granta is in the TOP 6 cheapest cars in the world. To get into this rating, AvtoVAZ saved on the quality of parts, one of which is the generator. A problem familiar to everyone, when on 8-valve engines the manufacturer did not provide for tensioning the Lada Granta/Kalina 2 alternator belt. Due to the overtightened belt, the alternator bearing quickly failed and a howling sound appeared. You can control the belt tension by replacing the generator bracket, having previously modified it..
The Lada Granta/Kalina 2 generator bracket does not provide for belt adjustment; it does not have holes for the tensioner and pulley. Instead, it is proposed to assemble a new bracket based on the 1st generation Lada Kalina, which consists of:
- Generator bracket from Lada Kalina (1118-1041034).
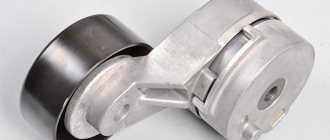
- Tension roller (2123-1041056).
- Tensioner pulley bracket (1118-1041084).
- Alternator belt from Lada Kalina (1118).
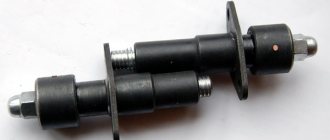
- Screw tensioner (1118-1041280)
- Bushings and bolt.
The price of the set is about 2000 rubles.
We assemble the structure as shown in the video. Installing a new bracket will allow you to tighten the Lada Granta/Kalina 2 generator belt and extend its service life.
Let us remind you that the howl of the generator is not the only “sore” of the car; another howl can be heard from the gearbox. How did you solve the generator problem?
Keywords: Lada Granta generator | Lada Kalina generator
7
2
Found an error? Select it and press Ctrl Enter..
- AvtoVAZ released prototypes of Lada XRAY Cross Black
- Production of reinforced lower engine mount, analogue from Lada Vesta Sport
- Installation of 2 DIN radio on Lada Vesta
- Malfunctions and problems of Lada Vesta with a mileage of 45,000 km (TO-3)
How does the tensioner work and what is the principle of its operation?
Only at a certain level of tension in the belt drive does optimal operation of the generator occur, which allows the supply voltage to be sent to the on-board network with maximum efficiency, otherwise tension is required. The generator belt tensioner we are considering is used for these purposes. Structurally, this is an ordinary bearing, the upper part of which is protected with a plastic coating. The belt moves along the working surface of this roller. The internal race of the tensioner is presented in the form of a conventional landing sleeve. Its tension must be certain.
Types of rollers according to design principle:
- Eccentric type. This option is the simplest product, whose design is very ordinary and endowed with enviable reliability. The part includes a bearing, bushing and protective pad.
- Bracket view. Here the adjustment process is carried out by moving the tensioner bracket present on the motor. The tensioner bracket is not difficult to find.
When to change?
VAZ Lada Kalina vehicles use a belt drive for auxiliary units. On cars with air conditioning, the service life of such a belt is no more than 30 thousand km. On simple versions of cars, the strap can last longer, but most owners try to change it after the same 30 thousand kilometers traveled.
For various reasons, the belt may fail earlier, so it must be checked periodically during vehicle operation. There should be no cracks on the working track, and delamination on the outer part of the belt is unacceptable. If such defects are present, we immediately change the strap. Another signal to replace this element is a whistle or other noise when the unit is operating.
The process of replacing the belt on a Kalina with air conditioning (sixteen valves) is presented in a video from the user Alexander.
How to properly tighten the alternator belt?
Replacing the alternator belt proceeds as follows:
- The bolt is loosened by 2-3 turns;
- When you unscrew the adjustment bolt, the belt tension is loosened, after which the belt itself is removed;
- Inspect the belt, and if there are tears, cracks, delamination of rubber and similar defects, it should be replaced;
- Inspect the pulleys, and if they are clogged or damaged, either replace them or clean them;
- If necessary, the tensioning device can be removed. To do this, you need to unscrew three bolts. For greater convenience, you should move the roller up.
It is worth noting that before you start replacing the alternator belt, it would be a good idea to study the manufacturer’s recommendations, in which you can often find useful information. One way or another, information about the individual properties of your car never hurts.
If there is a need to tighten the belt on the crankshaft pulleys, you can use a narrow metal strip. Be that as it may, in order to avoid various troubles, everything should be followed with maximum precision.
Video on replacing the alternator belt
Upon completion of the belt tensioning work, it is necessary to check the operation of the generator set. First of all, it is worth checking the circuit with the engine turned off. In order for the control lamp to flash on the panel, you need to turn the key. Only after completing these steps can you start the engine. After some time, at average crankshaft speeds, the warning light should go out.
It is worth noting that when tightening the belt, certain difficulties may arise. In this case, it is worth looking for information about the alternator and how to tension the belt for a specific car, since certain technical properties may vary.
The procedure for replacing the alternator belt is not particularly difficult. Almost every driver is able to independently check the belt and, if necessary, tighten it.
Source
When is it time to change?
On Lada Kalina cars, the manufacturer does not regulate the replacement of this part. However, its failure is a common problem. In particular, we are talking about Lada Kalina cars. This applies to both 16-cl and 8-cl engines.
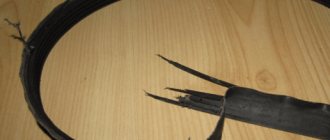
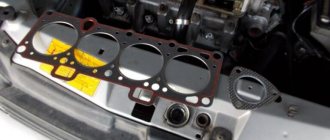
This is what a deformed element of a Kalina generator with an 8-cyl internal combustion engine looks like
Therefore, let’s look at the signs that indicate that the belt may fail in the near future:
- Whistle when moving. As a rule, this whistle appears when the electrical appliances of the vehicle begin to load. For example, if you start the car, and when you press the gas, a loud whistle is heard from the engine compartment, this indicates that the belt is loose. In this case, it must be tightened using a tensioner or replaced.
- Cracks on the strap. If you open the hood, look at the belt and see cracks on it, then you know that it’s time to change the element. Neither tensioning nor adjusting the rollers will help here. The component can be tightened, but this will not be enough for a long time. The only option left is replacement.
- Deformation. As in the previous case, neither tightening the tensioner nor adjusting the rollers will give much effect. You just need to change the element.
- Noise when the engine is running. If the element has already served its service life, this can be understood by the noise that appears when the motor is running. For example, some Lad Kalin car owners report loud knocking and even impacts when the engine is running.
The assembly is disassembled: this is what the strap looks like on the shafts
New Lada: Big test of generators for Lada Granta
If the vehicle is equipped with a generator sensor that determines its performance, then it will be easier to identify the malfunction. For example, if you heard a whistle from under the hood, and at this time the indicator on the sensor came on, then you need to pay attention to the strap. This indicates that the belt needs to be tightened, since it may be in a weak state or that its service life has been exhausted.
One way or another, if the slipping and whistling of the strap cannot be eliminated by adjusting the belt or rollers, it needs to be changed.
Checking the tension of the generator belt
If there is a suspicion of a malfunction of the alternator belt, it is necessary to carry out appropriate diagnostics. To carry out diagnostics, you need to acquire a caliper or an ordinary metal ruler.
Diagnostics of the alternator belt is carried out as follows:
- You should press the belt with a certain force (about 3-4 kg);
- Next, use a ruler to measure the degree of bending.
If you have extensive experience, it is not necessary to use measuring devices - it is enough to determine the condition of the alternator belt by eye. In the case of normal tension, the maximum bend is 1cm. Otherwise, we can confidently say that it is too weakened. If you do not have enough experience to identify the problem by eye, follow the diagram and use measuring devices to get the most accurate result.
Required Tools
To replace the alternator belt yourself, you will need at least the following tools:
- regular or box wrench for 13, 17 and 19 mm nuts;
- a head with a ratchet for 8 mm nuts; if it is not available, an open-end or regular wrench of the same size will do;
- a screwdriver with a thin flat blade;
- thin needle;
- rags;
- white spirit or gasoline, approximately 0.5 liters;
- container and brush for washing;
- CV joint bearing lubricant.
Replacement process
During the work process you need to perform the following actions:
- Raise the car on a jack and remove the right wheel, as well as the protective wheel arch liner and the support boot.
- Install a safety support under the bottom of the machine.
- Remove the protective shield under the engine.
- Raise the engine under the crankcase with a jack. A wooden stand must be placed between the lifting part of the jack and the engine oil sump.
- Remove two TORX E14 bolts securing the power unit support to the bracket. If the screws are tight, you need to vary the position of the motor with a jack, achieving easy rotation.
- Unscrew the three TORX E14 bolts securing the support to the side members of the car body.
- To loosen the belt tension, to do this you need to unscrew the fixing nut.
- Rotate the nut 8 mm clockwise until the belt is completely loosened. Then you need to remove the strap and thread a new element through the place where the support was removed.
- If necessary, you can replace the grease in the tension roller. The scheme is completely identical to that described above.
- Tension the belt by turning the nut 8 mm counterclockwise. The tension should be controlled by hand - the element should bend when pressed.
- Secure the tension with a 19 mm nut.
- Install all removed parts in reverse order.
- Start the engine and check the operation of the drive. To do this, you need to load the belt as much as possible - turn on all electricity consumers and the air conditioner.
- If a whistle occurs during operation, you must tighten the strap. To do this, with the engine running, you need to loosen the lock and carefully tighten the tensioner rod until the whistle disappears.
- Tighten the lock nut.
- If a whistling noise occurs during operation, the belt must be tightened further.
The engine mount is circled in red.
Loosening the tensioner
Arch locker and support boot
The engine mount is highlighted with a red oval.
Location of five TORX E14 bolts
Place for support on the New Lada engine: Control points of the Lada 4×4 body geometry (drawings) » Lada.Online - all the most interesting and useful about LADA cars
How to change it yourself?
The complexity of replacing the alternator belt on Kalina does not depend on the number of valves or additional units on the engine.
Replacement on 8 valve engines without tensioner
Replacing the belt on such an engine is the simplest; the only tools you need are a 13 mm wrench and a short flat-blade screwdriver. Since the tension in such a drive scheme is quite strong, when changing it is necessary to use only a Gates 6PK823SF or Dayco 825 six-V belt with the additional marking POLY-V. The remaining straps are too rigid, quickly collapse and damage the bearing on the generator shaft.
Stages of work
To complete the task you need to do the following:
- Unscrew the lower mounting bolt of the generator 2-3 turns.
- Unscrew the nut of the upper fastening, use a screwdriver to push out the bolt and remove it completely.
- Lower the generator down. The eye of the mechanism must pass through the gap between the radiator and the TV body.
- Remove the old belt and replace it with a new one. If the strap does not fit easily onto the pulleys, you can carefully tighten it using a screwdriver.
- Raise the generator up, ensuring the belt is tensioned.
- Insert the upper mounting point bolt and tighten the nut.
- Tighten the lower mounting point bolt.
- Check the operation of the belt.
The repair process on such an engine is clearly shown in the video filmed by the author Ilgiz Magafurov.
Replacement on 8 valve engines with tensioner
Here, the procedure for installing a new alternator belt is very different from that presented above.
Required Tools
To replace the alternator belt yourself, you will need at least the following tools:
- regular or box wrench for 13, 17 and 19 mm nuts;
- a head with a ratchet for 8 mm nuts; if it is not available, an open-end or regular wrench of the same size will do;
- a screwdriver with a thin flat blade;
- thin needle;
- rags;
- white spirit or gasoline, approximately 0.5 liters;
- container and brush for washing;
- CV joint bearing lubricant.
Stages of work
To adjust the degree of belt tension on Kalina engines, a mechanical tensioner is used, in contrast to the timing drive, which uses a hydraulic tensioner. When changing an element, it is recommended to carry out preventive maintenance of the roller by adding fresh lubricant.
To complete the work you need to do the following:
- Loosen the roller bolt. The thread on it is reversed.
- Use a screwdriver to pry up the plastic plug on the roller and carefully remove it.
- Unscrew the fixing nut on the tensioner rod a few turns.
- Loosen the belt tension by rotating the rod nut clockwise. The nut must be unscrewed until the rod begins to move freely in the seat.
- Unscrew the side bolt securing the rod end, located next to the tension roller.
- Remove the tensioner and set it aside.
- Proceed to dismantle the strap. The procedure must begin with the generator pulley, while overcoming the slight resistance of the belt.
- Remove the element from the crankshaft pulley and remove it completely.
- Unscrew the roller bolt and remove it.
- Using a needle, carefully pry up and remove the protective caps on the bearing. Wash the bearing with white spirit or gasoline.
- Refill with fresh grease and install protective rubber caps.
- Assemble all the parts and mount the roller in place. When assembling, you must remember that the bushing is in the bearing on the side of the bracket.
- Change the belt by installing it in the reverse order - from the crankshaft pulley to the generator pulley.
- Install the tensioner and begin tightening the belt by turning the nut counterclockwise. The nut must be tightened until the resistance increases. A well-tensioned strap should be slightly pressed when pressed by hand.
- Tighten the nut securing the tensioner rod.
- Check the operation of the mechanism; if a whistle occurs, tighten the strap.
Loosening the 17mm left nut
Removing the cover on the roller
Disassembled tension roller
Bearing with caps removed
Washed roller
Reassembling the unit
Belt tension
Tightening the control nut
Replacement on 16 valve engines
The difficulty of replacing the alternator drive belt on such Kalinas lies in the need to remove the front engine mount.
Required Tools
- head for hexagonal sprockets size 11 mm or TORX E14;
- two jacks;
- 17 mm socket or wrench;
- 8 mm ratchet head.
Replacement process
During the work process you need to perform the following actions:
- Raise the car on a jack and remove the right wheel, as well as the protective wheel arch liner and the support boot.
- Install a safety support under the bottom of the machine.
- Remove the protective shield under the engine.
- Raise the engine under the crankcase with a jack. A wooden stand must be placed between the lifting part of the jack and the engine oil sump.
- Remove two TORX E14 bolts securing the power unit support to the bracket. If the screws are tight, you need to vary the position of the motor with a jack, achieving easy rotation.
- Unscrew the three TORX E14 bolts securing the support to the side members of the car body.
- To loosen the belt tension, to do this you need to unscrew the fixing nut.
- Rotate the nut 8 mm clockwise until the belt is completely loosened. Then you need to remove the strap and thread a new element through the place where the support was removed.
- If necessary, you can replace the grease in the tension roller. The scheme is completely identical to that described above.
- Tension the belt by turning the nut 8 mm counterclockwise. The tension should be controlled by hand - the element should bend when pressed.
- Secure the tension with a 19 mm nut.
- Install all removed parts in reverse order.
- Start the engine and check the operation of the drive. To do this, you need to load the belt as much as possible - turn on all electricity consumers and the air conditioner.
- If a whistle occurs during operation, you must tighten the strap. To do this, with the engine running, you need to loosen the lock and carefully tighten the tensioner rod until the whistle disappears.
- Tighten the lock nut.
- If a whistling noise occurs during operation, the belt must be tightened further.
The engine mount is circled in red.
Loosening the tensioner
Arch locker and support boot
The engine mount is highlighted with a red oval.
Location of five TORX E14 bolts
Engine mounting location
Replacement cost
The cost of changing a belt on a Lada Kalina car depends on the type of engine, range of units and is:
- for a motor without a tensioner - from 300 rubles;
- engines with a tensioner without air conditioning - from 150 to 350 rubles;
- motors with tensioner and air conditioning - from 220 to 400 rubles;
- for unit 21127 - about 600 rubles.
Replacing the roller will require an additional 250 rubles. The total amount required by the car owner to purchase spare parts, in the maximum version, will not exceed 850 rubles.
Loading …
Instructions for replacing the alternator belt on a LADA Kalina car
When operating the machine, the alternator drive belt wears out quickly. It is necessary to constantly monitor its condition, since the functioning of the entire car depends on the proper operation of this mechanism. The procedure for replacing the alternator belt on Kalina is not a labor-intensive operation and can be done with your own hands.
How to change it yourself?
Replacement on 8 valve engines without tensioner
Replacement on 8 valve engines with tensioner
Replacement on 16 valve engines
Video “Replacing the belt on Lada Kalina”
Installing an alternator and belt without a tensioner on a Lada Kalina – autoblogs – Mirtesen media platform
Hello everyone, when replacing the generator on Kalina, it turned out there was no tensioner, and during installation the question arose of how to tension the belt, but it turned out that everything was just the principle of tensioning the chain on a bicycle. It helped a lot. But if there was a tensioner, it would be much easier of course
Source
Adjusting the alternator belt on Kalina
The first thing we need to do is loosen the tensioner rod lock nut by unscrewing it slightly counterclockwise:
And then we unscrew the tensioner rod, and thereby the belt will be tensioned. To avoid having to put a lot of effort during tensioning, you need to press the tensioner body with your hand and unscrew it at the same time, as shown in the photo below:
After tightening the belt, tighten the lock nut and check if there is no more whistling noise when the engine is running. To make sure of this, you need to turn on as many electrical appliances as possible with the engine running: high beams, heater at high speeds, rear heated glass, etc. If the belt does not whistle after performing this procedure, then it is tensioned normally.
But you should also keep in mind that reupholstering will also not benefit the device. Firstly, the belt itself will wear out a lot. Secondly, the bearing will not withstand heavy loads, it will hum and may even jam within a fairly short period of time. Once on a previous car I had a sad experience: I pulled it too tight and after a week of driving the bearing had to be replaced. So don't go overboard when performing this type of maintenance on your Viburnum.
If, on the contrary, it is necessary to loosen it, then you will need to tighten the rod clockwise. Then tighten the locking nut. These seem to be all the recommendations you need to know when performing this simple procedure. If you have any questions or comments on the material I prepared, please leave a comment.
Source
Stages of work
To adjust the degree of belt tension on Kalina engines, a mechanical tensioner is used, in contrast to the timing drive, which uses a hydraulic tensioner. When changing an element, it is recommended to carry out preventive maintenance of the roller by adding fresh lubricant.
To complete the work you need to do the following:
- Loosen the roller bolt. The thread on it is reversed.
- Use a screwdriver to pry up the plastic plug on the roller and carefully remove it.
- Unscrew the fixing nut on the tensioner rod a few turns.
- Loosen the belt tension by rotating the rod nut clockwise. The nut must be unscrewed until the rod begins to move freely in the seat.
- Unscrew the side bolt securing the rod end, located next to the tension roller.
- Remove the tensioner and set it aside.
- Proceed to dismantle the strap. The procedure must begin with the generator pulley, while overcoming the slight resistance of the belt.
- Remove the element from the crankshaft pulley and remove it completely.
- Unscrew the roller bolt and remove it.
- Using a needle, carefully pry up and remove the protective caps on the bearing. Wash the bearing with white spirit or gasoline.
- Refill with fresh grease and install protective rubber caps.
- Assemble all the parts and mount the roller in place. When assembling, you must remember that the bushing is in the bearing on the side of the bracket.
- Change the belt by installing it in the reverse order - from the crankshaft pulley to the generator pulley.
- Install the tensioner and begin tightening the belt by turning the nut counterclockwise. The nut must be tightened until the resistance increases. A well-tensioned strap should be slightly pressed when pressed by hand.
- Tighten the nut securing the tensioner rod.
- Check the operation of the mechanism; if a whistle occurs, tighten the strap.
Loosening the 17mm left nut
Removing the cover on the roller
Disassembled tension roller
Bearing with caps removed
Washed roller
Reassembling the unit
Belt tension
Tightening the control nut
Preparing to repair or replace the alternator belt
First of all, it is necessary to service the generator itself, for example, clean the contacts of the voltage regulator. To do such things, you need to use a soft rag soaked in gasoline. It is advisable to clean some parts of the generator with compressor or pump compressed air. In addition, it is necessary to inspect the condition of the wires and connections of the generator to the motor.
A weakening belt manifests itself in the unstable functioning of the generator and the entire motor. By the way, you should also not allow excessive tension, since this accelerates wear on the alternator belt, which can cause it to break while driving. For this reason, you should not delay troubleshooting.
A loose belt leads to a decrease in efficiency, resulting in overloads in the electrical network, which cause the car to slip on the pulleys.
Before you begin repair work, you need to prepare the following tools:
- Metal strip;
- Socket wrench 17;
- Ruler;
- Mounting and the like.
To achieve greater comfort during repairs, the machine must be placed on an inspection hole. Next, using a socket wrench, you should loosen the nut on the tension bar, since it secures the alternator belt. After this, while in the inspection hole, you need to loosen the fastening of the generator to the bracket. Before doing this, remove the engine mudguard.
Having completed the required actions, it is worth ensuring the necessary tension. To do this, use a pry bar to press the generator away from the engine. While the generator is in this position, the nut must be tightened again with sufficient force.
Tensioning the alternator belt is done in approximately the same way. It is worth noting that this is the best method available. However, individual drivers may well do as they please.