Lada 4×4 3D Kvakazyubra › Logbook › Replacing the chain and tensioner “Isai”
The work of the quacazubra's heart led to slight irritation of my hearing.
While the car is warming up, the engine whispers like a happy cat. After warming up, diesel sounds are heard. Perhaps I’ll start with the chain and tensioner and then go down the list... Everything was purchased in the same online store, supposedly original spare parts:
Chain tensioner shoe VAZ-21213 (BRT) 21213-1006090-R Engine gaskets (full set) VAZ-21213 Riginal RG21213-1002064-86 Chain stabilizer VAZ-21213 (JSC AVTOVAZ) 21213-1006100-00 Chain VAZ -2103-06 116 stars (company packaging LADA) 21030-1006040-82
Everything arrived in 5 days.
We open the parcel very carefully.
The parcel also contained valve stem seals, but seeing how difficult it is to replace them, it was decided to leave them out for now... The parcel also contains an FLS, but this is a topic for a separate post...
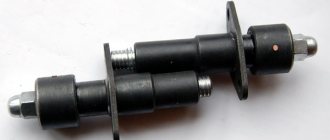
We also purchased an “Isai” tensioner for Lada 2101-2107 models.
It also arrived in five days. Inside the package is a neatly wrapped package.
Inside there is a package with a tensioner. The package contains brief instructions on “where to push and what to pull.”
Next, as Nivazbuka teaches, remove the valve cover and timing cover. align the marks and remove the gears.
It’s probably worth noting here that you need to remove the nuts on all gears and pulleys at once. While the chain is tight. It seems logical, but apparently I’m not good with logic... I had to take a homemade tool to fix the gearbox shank.
The gears and pulley can be easily removed by hand; there is no need to call for a soton or hammer with a sledgehammer. True, when unscrewing the limiter bolt, I dropped it into the pan. There was a lot of swearing at that moment, I just remembered how I changed the oil pump, I didn’t want to repeat it at all. Fortunately, I have the hands of a pianist and took out the bolt without removing the pan. I believe that this is the main luck of February, and perhaps even of 2020! There will be no more photos of the process after this procedure, so those who like to “gawk” will have to be disappointed.
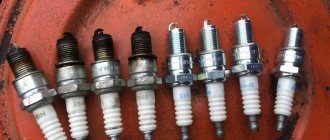
So we'll have a look at everything that's been filmed.
The gears are quite good. I didn’t find any signs of wear, although with my experience it’s not clear what I wanted to find there.
The chain length is the same. By the way, during disassembly I did not find any looseness in the chain; everything was well tensioned.
The old chain has a 26mm bend.
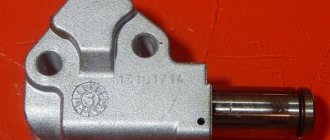
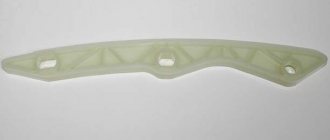
The damper did not fit, it looks like it is from 214 Niva, although the order number is from 213. The removed tensioner shoe has no wear. There are no more marks. Both are 15 mm.
I put everything back together without any problems. We take gaskets from the kit. The Isai tensioner installs easily. In fact, the chain and tension were quite normal. This operation did not add or remove any noise. Next we’ll dig into the valves, but for now it’s just a new skill...
Chain tensioner shoe VAZ-21213 (BRT) 21213-1006090-R — 170 Engine gaskets (full set) VAZ-21213 Riginal RG21213-1002064-86 — 350 Chain stabilizer VAZ-21213 (JSC AVTOVAZ) 21213-100610 0-00 — 75 Chain VAZ-2103-06 116 sp. (company packaging LADA) 21030-1006040-82 — 800 Tensioner ISAI — 1625 Oil scraper caps kit. (8 pcs.) (company packaging LADA) 21080-1007026-86 — 230 Delivery — 420
Source
Preparatory operations
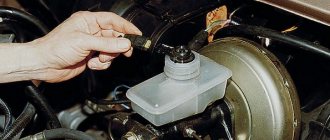
First, let the engine cool to an acceptable temperature. Remove the pipe by unscrewing the bolt by 10 and loosening the clamps.
Air pipes
Next, we unscrew the eight nuts by 10 and move aside the throttle cable and all the pipes that will interfere with us, remove the valve cover.
Valve cover fastening.
Engine without valve cover.
Remove the air conditioner belt by unscrewing the bolt 13 of the tension roller.
Air conditioner tension roller.
Then loosen three 13mm nuts and one bolt of the generator belt tension roller and remove it.
Service belt tension roller
Special tool
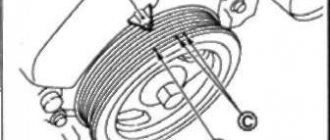
Now comes the fun part. To unscrew the pulley nut, we need a 38mm socket. Since the elongated head does not fit under a regular wrench (the radiator is in the way, but we don’t want to remove it), we use a pry bar, carefully sawed off from the hub key of some large car.
Homemade key.
Everything fits perfectly. Unscrew the nut and remove the crankshaft pulley.
Crankshaft pulley.
Unscrew the deflection roller.
Bypass roller.
We dismantle the reinforcing plate.
Plate.
We unscrew the six nuts securing the front timing chain cover to the block and the three bolts securing it to the pan and remove it.
Front timing chain cover.
Set the top dead center
The key on the crankshaft should align against the mark on the block.
Crankshaft mark.
The mark for the camshaft sprockets is against the ebb of the camshaft housing.
Camshaft mark.
Next, unscrew the oil supply pipe and two nuts 10 of the chain tensioner.
The tube is secured with a hollow bolt and copper washers on both sides. Don't lose them.
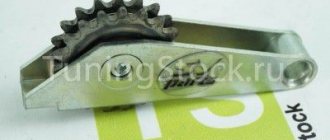
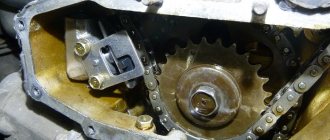
Next, unscrew the tensioner shoe, damper and remove the timing chain.
Tensioner shoe.
Compare the new and old timing chain. It could be worse.
Old timing chain.
Niva chain tension – Adjusting the camshaft chain tension VAZ 2121 Niva 2131
Loosen nut 1 (Fig. 2-56) of the tensioner. In this case, rod 3 is released and the chain is tensioned by shoe 7 (Fig. 2-55), which is acted upon by spring 7 (Fig. 2-56).
Rice. 2-56. Chain tensioner section:
1 – cap nut; 2 – tensioner body; 3 – rod; 4 – plunger spring; 5 – washer; 6 – plunger; 7 – spring; 8 – cracker; 9 – spring ring; A – plunger surface; B – places of punching at the end of the body.
Turn the crankshaft 1-1.5 turns in the direction of rotation. In this case, the tensioner spring acting on the shoe will automatically adjust the chain tension.
Tighten the nut 1 of the tensioner, due to which the rod 3 is clamped by the collets of the block 8, and when the engine is running, only the spring 4 acts on the plunger 6. This spring presses the plunger away from the head of the rod 3, and oil flows into the gap between them when the engine is running, playing the role of a shock absorber when shocks of the chain.
The timing chain plays an important role in the operation of the gas distribution mechanism. Over time, it stretches and requires tension, since the quality of the engine depends on it. Therefore, you need to know when to check the tension and how to tension the chain on a VAZ 2101. This topic is covered in an article and a video that demonstrates the process of checking and tensioning the chain drive.
conclusions
As you can see, to carry out this work you do not need to have any special knowledge or tools. Therefore, you can handle this kind of work yourself if necessary . If you follow these recommendations, it is impossible to carry out such repairs incorrectly.
The gas distribution system of any engine must work correctly. If problems occur in its operation, this leads to premature wear of the motor and numerous breakdowns. To accurately adjust the timing, special marks are used, according to which the shafts in the engine are aligned. We will tell you about the correct placement of marks on a Chevrolet Niva car in this article.
When is stretching necessary?
Chain tensioning is required in the following cases:
Timing belt VAZ 2101
In the first two cases, it is clear that a tension check is necessary because the chain was removed or replaced. In addition, you should also check that the alignment marks match. These marks are located on the crankshaft and camshaft. You can determine the need for tension by the sounds of the engine running. If the tension is weak, then during its operation extraneous noises are heard in the place where the chain drive is located. At the same time, timing parts wear out faster. Therefore, when checking the tension, it is necessary to pay attention to the condition of the damper and the shoe.
Replacing the chain tensioner on VAZ 21213, VAZ 21214, VAZ 2131
Welcome! Chain tensioner - as is already clear from its name, it is needed only to tension the chain so that it does not loosen while the engine is running, and so over time this part breaks for various reasons, this happens, sometimes the tensioner simply cannot withstand very heavy loads breaks, for example, if you keep the engine speed in the red zone for a long time, the tensioner cannot withstand and breaks, but it can also break because it is not very durable, for example, there are a lot of very bad tensioners on the market at the moment qualities that really fail very quickly and after that they will need to be replaced with a new one, and you will learn how to do this from this article.
Note! In order to replace the chain tensioner, you will need to stock up on: A basic set of wrenches, which will contain the most basic keys that you use almost everywhere in the car!
Summary:
Where is the chain tensioner located? It is located on the side of the engine, it can be easily found by the way if you approach the car from the right side of the engine compartment (The countdown starts from the rear of the car to the front), there is also a battery installed nearby and there is a standard injection receiver in the form of curved pipes ( It is white), so when you stand on this very right side, look for the place indicated in the photo, this is the same tensioner.
Step-by-step instruction
Before starting troubleshooting, check that all timing components are free of mechanical defects. To do this, you need to remove the protective cover of the drive and perform a visual inspection of the parts: sprockets, damper, tensioner and shoe. If defects are found, these components should be replaced.
Tools
Before you start work, you need to prepare the necessary tools:
To carry out work, the car should be placed on a convenient platform and supports should be placed under the wheels so that it does not roll. The gear shift lever must be set to neutral.
Engine compartment of VAZ 2101
Stages
Preparatory work
In order to create the necessary space to carry out work, you will have to perform a number of actions.
- Remove the air filter and close the carburetor neck with a plug.
- Disconnect the choke cable, electrical wire, and hoses. We move them to the side.
- Remove the fan, pump pulley and generator belt.
- We remove the sump protection and the engine boot, and clean the front engine cover.
- Now you need to put the Chevrolet Niva on the parking brake and place wheel chocks under the wheels. Then engage fourth gear. Now let's start the analysis.
- Loosen the ratchet nut by striking the wrench sharply with a hammer.
- Remove the valve cover, bend the lock washer of the camshaft gear bolt, loosening it by hitting the wrench with a hammer. Turn off transmission.
- Rotate the crankshaft pulley, align the marks on it and the front engine cover, and then align the marks on the camshaft gear and bearing housing.
Mechanical chain tensioner. Main manufacturers.
Pilot. The operating principle is a toothed rack. Good quality tensioner. The big brother of "autopilot". Stable quality. It is also possible to work without removing it from the cylinder head. The main disadvantage is the huge percentage of fakes on the market. This tensioner was the first successful design, and the Chinese grabbed it. If Autopilot is completely impossible to find, then Pilot is very difficult to find “original”. Based on the St. Petersburg market, I estimate the prevalence of counterfeits for this tensioner at 70%. I work with Rusmash directly, so this as a “minus” is insignificant.
Isaiah. The operating principle is a clock spring. To avoid questions and insinuations, I contacted the designer directly and in 2022, we installed several dozen of them. The main disadvantage of the product, which the designer passes off as its advantage, is that there are no precision parts. When the rod doesn't move out too much, everything is fine. When the chain is worn out and the rod goes beyond half, it “walks” quite a lot. If we are talking about a production engine without “pretensions” for tuning, this may be acceptable. If the engine is “more serious” this is unacceptable. The tolerance for axial “walking” of the chain and sprockets in the timing tract is only 0.3 mm.
chain tensioner Pilot for 21213
VAZ 21213 | Adjusting the timing chain tension | Niva
Service and operation
Manuals → VAZ → 21213 (Niva)
Engine timing mechanism mod. 2106
| 1 – camshaft sprocket; 2 – chain; Z – sedative; 4 – oil pump drive shaft sprocket; 5 – crankshaft sprocket; 6 – tension shoe; 7 – tensioner plunger; 8 – tensioner rod fixing nut . Performed on a cold engine when the new car has driven 1.5 thousand km (after tightening the cylinder head fastening) and subsequently every 15 thousand km, as well as in case of increased noise in the drive. |
| 1. Loosen the fixing nut 8 (see Fig. Engine timing mechanism drive mod. 2106) of the tensioner rod, lightly tapping it with a hammer to eliminate possible “biting” of the rod and use a special wrench to turn the crankshaft 1–1/2 turns in the direction of its rotation. . |
| 2. In this case, the plunger spring acts on the tensioner shoe 6 through the plunger 7 and automatically sets the required chain tension. |
| 3. Upon completion of the adjustment, the fixing nut 8 must be tightened. |
| Engines mod. 331, 3317 and 3313 |
| 4. Loosen the tensioner plunger pressure plate by unscrewing the locking bolt (1) 1/2–2/3 turn. You should not unscrew the locking bolt by an amount greater than the specified amount, as this may cause it to become disconnected from the locking plate and the tensioner plunger will not be fixed in the selected position. This will cause the chain to jump on the sprocket teeth and ultimately cause severe engine failure. Using a special wrench, turn the engine crankshaft 2-3 turns along the direction of rotation and tighten the locking bolt as far as it will go, fixing the new position of the tensioner sprocket. |
How to install an injector on a Chevrolet Niva (with photo)
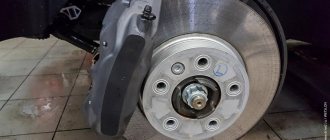
- The car is installed on the inspection hole. Wheel chocks are placed under the rear wheels and the hand brake is applied.
- The car hood is opened, unscrewed and the fan is removed. The radiator is also unscrewed and carefully moved to the side (it is not necessary to drain the coolant from there).
- Access to the engine valve cover is provided. Its fastenings are unscrewed with an open-end wrench, then it is carefully removed. There is access to the timing chain and the upper camshaft sprocket. The shaft pulley is rotated with a special wrench until the mark on the camshaft sprocket aligns with the protrusion on the timing case.
The mark on the timing case is aligned with the mark on the camshaft sprocket
The tension roller is removed, the chain can be removed
The mark on the crankshaft sprocket is precisely aligned with the DPKV core