Any friction pairs in a car require periodic replacement, therefore they are considered consumable (non-repairable) parts. The battery only starts the internal combustion engine, after which the generator begins to generate electricity for the on-board system and recharging the battery.
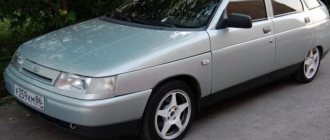
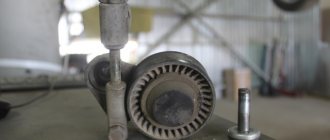
Rice. 1 Replacing the generator belt tension system roller
Therefore, the level of battery recharging depends on the quality of the belt tensioner, which transmits speed to the generator shaft, that is, whether the car will start after stopping the engine next time. The main “consumable” – the generator belt tensioner roller – can be replaced by the car owner on his own if he knows where it is located and what parts need to be removed before doing so.
Purpose of the roller in the generator belt tensioner assembly
Initially, the problem of tensioning the alternator belt in a car was solved by two mounting holes in the body of the electrical device itself. With the advent of air conditioners and other additional devices, it became no longer profitable to put several pulleys on an internal combustion engine shaft to provide individual V-belt transmission to each of them.
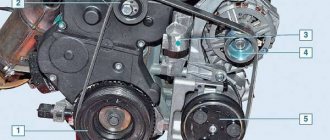
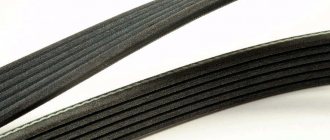
Currently, a common V-belt drive is used, and the generator belt tensioner roller as a whole is responsible for the absence of sagging, as in the lower figure.
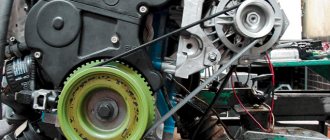
A single V-belt transmission from the internal combustion engine shaft to several pulleys of auxiliary devices.
Rice. 2 Single V-belt transmission from the internal combustion engine shaft to several pulleys of auxiliary devices
Signs that indicate a roller is broken
There are a number of unpleasant signals that there is a problem with the video. So, the most common ones are:
- On the part of the generator there is inadequacy in operation, it is not fully charged, there is no energy supply from it to the on-board network
- Unpleasant sound, squeaking or grinding noise from the location of the alternator belt.
- Increased noise or hum in the engine compartment.
- Perceptible vibration from the roller side, visually increased mobility, when the engine is running.
- There is a clear presence of play (free play) in the roller.
- Mechanical damage, increased wear of the belt on one side.
Increased noise can also be caused by a faulty bearing in the hydraulic steering pump, air conditioning, or the generator itself. Therefore, it is necessary to conduct a thorough inspection and only then disassemble the suspicious element.
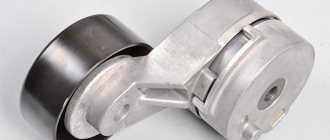
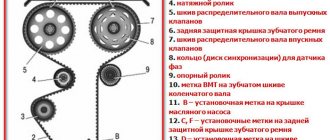
Tensioner pulley design
Thus, on most modern cars the roller is of the following design:
- ball bearing inside
- plastic cover with a working surface for the belt on top
- landing sleeve inside the roller
Rice. 3 Tensioner pulley design
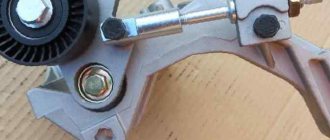
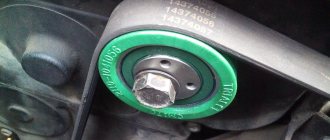
There are eccentric rollers, the adjustment of which is carried out by shifting the axis relative to the mounting bolt, and conventional ones. In the second option, the roller is mounted motionlessly on the tensioner bracket, and for adjustments the bracket itself is shifted relative to the internal combustion engine shaft.
Rice. 4 Eccentric tensioner pulley
Some cars use self-adjusting spring brackets, in which the number of turns and the diameter of the spring wire are designed for a specific force at the factory.
Rice. 5 Self-adjusting spring tensioner using the example of a Mercedes Sprinter
Since there is a bearing inside the structure, the roller is replaced when any of these parts (bearing race or plastic lining) wears out. In addition, when replacing a belt, it is also recommended to install a new roller/bearing set on the tensioner.
With the increasing popularity of high-quality car audio, owners are installing powerful stereo systems, subwoofers, and several amplifiers in their salons. The on-board network cannot cope with this amount of energy consumption, so a second battery is added.
An example of the layout of two generators with one tensioner pulley for high-quality car audio
Rice. 6 An example of the layout of two generators with one tensioner pulley for high-quality car audio
To ensure its recharging, the best option is to duplicate the generator, for which a second pulley is mounted on the crankshaft of the internal combustion engine. In this case, you have to service two rollers and a belt of the tension system.
Preparatory stage before modifying the Lada Granta generator belt bracket
Necessary tools, materials:
- a set of car keys, sockets, ratchet, screwdriver with a flat, cross-shaped bit;
- rags;
- liquid for removing deposits and rust WD-40;
- hammer, drill, metal drill bit for “6”, “8”, “10”;
- graphite-based lubricant;
- additional lighting, since visibility in the engine compartment is limited;
- metal mounting;
- torque wrench;
- bolt with a diameter of "8", length 100 - 110 mm.
Replacing the roller yourself
In contrast to a V-belt timing drive, replacing a car's alternator belt roller is much simpler. Therefore, if you follow the recommendations below, the car owner will be able to perform the operations on his own, after first making sure that the cause of the malfunction really lies in the wear of this consumable.
Diagnostics
Malfunctions of the tensioner installed on the generator belt drive are diagnosed in 90% of cases by a characteristic sound resembling a whistle. However, the tension may weaken, not only from the wear-out of the roller, but also for other reasons:
- misalignment - in the absence of alignment of the shafts and pulleys of the belt drive, accordingly, the sound arises due to poor contact of the belt in the cross section, one edge wears out intensively, the other remains intact
- ingress of lubricant - in the absence of tightness, oil can get onto the belt, sharply reducing friction, leading to slipping and destruction of the rubber, it is recommended to remove the consumable part, wipe it or replace it entirely, eliminating the cause of the oil leak
- hard belt - usually whistles when starting, then heats up, the sound disappears, this is caused by an increase in loads on the pulleys
- bearing wear - the whistle is slightly different in tone, the cause is the wear of the race, the bearing is removed for replacement
- belt sagging - no need to change anything, tensioner needs to be adjusted
- lack of battery recharging - determined by the instruments on the panel
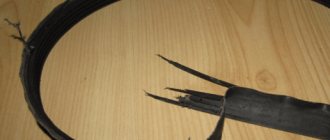
In other cases, the whistling can be eliminated by removing the roller and replacing it with a new consumable. The shine on the working surface of the belt indicates its frequent slipping, the cord peels off from the oil, but cracks on it under normal belt tension are much more difficult to notice.
Dismantling
Before changing the alternator belt tensioner roller, it is necessary to loosen the V-belt drive:
- the tension roller adjusting bolt is loosened until the belt can be removed
- together with it, 2–3 nuts of the tension bar are loosened (usually 10 and 13)
Attention: Depending on the layout of components/assemblies under the hood of a particular car model/brand, in order to provide access to the tensioner and roller, accordingly, some components and parts will have to be dismantled.
Rice. 7 Removing the roller
For example, on a ZAZ SENS you need to remove the belt that drives the air conditioning compressor shaft. You won’t have to remove anything for Chevy/Niva and Lada Granta.
Inspection and assessment of probable faults
Before changing the necessary part, for preventive purposes or making a full repair, it is worth first inspecting and also finding out the probable cause that caused the malfunction:
- assess the conditions under which the entire generator charging chain operated;
- find out the original source of the malfunction: bearing, belt or other components whose malfunction affected the repair;
- check the probable degree of wear of all working parts;
- pay attention to the marks from the belt on the guide and tension rollers; if there are any, it means that the belt displacement was caused by a broken bearing;
- identify probable causes that led to contamination of work surfaces that need to be replaced.
Since even replacing the alternator belt or tensioner pulley will not always bring the desired result, the reason for the failure may lie in something else. For example, if a removed belt has traces of antifreeze or oil, it is necessary to find the source from which these fluids get onto the belt and carry out the required repairs accordingly.
How to tighten the alternator belt: what you need to know
An alternator belt or an accessory belt drives a number of devices: a car generator, power steering pump, air conditioning compressor, etc. It is important that the specified belt is tensioned correctly.
If the attachment belt is overtightened or loose, then:
- the generator may not work correctly (the battery does not charge, the voltage drops);
- the generator belt whistles;
- bearings and pulleys of attachments wear out;
- The belt itself becomes unusable faster, etc.
To avoid such problems, the alternator belt must be changed in a timely manner, as well as correctly tensioned during installation and monitor the tension during vehicle operation. If necessary, adjust the belt tension. Read more in our article.
How does the generator belt tension system work?
Typically, in practice, two options for implementing belt tension are used:
This is a roller, the center of which is offset relative to its center, that is, the hole is not in the middle, but slightly on the side, and it is also equipped with two holes for fixing with bolts, it turns out that you rotate this roller until the required tension is achieved, and then fix it with bolts
The second option is to install the roller on a moving bracket. In fact, it turns out that the roller is fixed to a piece of iron, a holder, which, like a table in a table, can move back and forth, when you have pulled the required tension force, you simply fix this moving carriage with bolts and the belt is tensioned
Step-by-step instructions for removing the generator from a Lada Granta car
Before altering the mount, we remove the converter from its standard place in the engine compartment. To do this, perform the following steps:
- We place the car within the perimeter of the repair area, provide safety measures, and secure the rear row of wheels with wheel chocks. Additionally, squeeze the parking brake lever.
- Open the hood and disconnect the terminals from the battery to prevent a short circuit in the circuit.
Accumulator battery
- We unscrew 6 bolts under the bottom of the car and temporarily remove the oil pan protection.
- Remove the protective cap and terminals from the contact board on the converter.
Removes clamps
- We unscrew the nut of the upper fastening (key set to “13”), and use the mounting tool to move the converter to the side. Unscrew the lower mounting bolt.
Unscrew the nut and bolt
- We remove the generator belt from the pulleys.
- We remove the converter assembly and fix it on the surface of the workbench.
Removing the converter Parts diagram
Sequence of actions when modifying the generator bracket with your own hands on the Lada Grant
- We grind 2 - 3 cm on each side of the generator mount. It is better to do this in a stationary vice using drilling equipment. Due to the lack of equipment, we use a grinding machine, which is known as a “grinder”.
Sew 2-3cm on each side
- Using a drill with a metal drill (at “8”), we drill out the standard hole on the mount, making the stroke length for the bolt 1.5 - 2.0 cm.
Drill out the standard ring
- Using a grinder, we partially grind down the stiffening rib on the mount so that it does not interfere with the free movement of the converter.
- We cut out a corner of metal 40 mm long and 30 - 40 mm thick, and bend the edge. It turned out to be something like the letter “G”. One end is attached to the bracket, on the other we weld a nut to “10”.
Corner letter G
- We assemble the structural elements, screw in the bolt to tension the generator drive belt.
- We install the converter and the bracket without tensioner in its original place.
- We move the rocker to the third gear position, put on the drive belt, and turn the crankshaft pulley by hand.
- Check the degree of belt tension.
Belt tension level
At home, we check the tension level of the generator drive belt as follows. Using your finger, press on the section of the belt between the crankshaft pulley and the tensioner. The belt bends by 10 - 12 mm, no more. Tighten the fastening (tension) as necessary.
Finally, we start the engine and check the functionality of the system.
Replacing the generator bracket with tensioner on the Lada Grant from Lada Kalina
Despite the fact that the previous method is the most economical, it is time-consuming.
Many drivers prefer to pay an additional 350-450 rubles and purchase a ready-made kit for installing a bracket from the Lada Kalina to the Lada Granta.
The sequence of actions is as follows:
- After dismantling the converter from its standard place in the engine compartment, we proceed to install the bracket from the Lada Kalina.
Original equipment of the modernized mount:
- belt;
- tensioner roller;
- bracket;
- axis to “10”;
- tensioner
- We unscrew the three mounting screws from the old converter, remove the old bracket, install and screw the new one.
- We fix the structure in its regular place, screw the three nuts to “13”.
- We activate the rocker to the third gear position.
- We put on the generator belt, turn the generator pulley by hand until the belt fits into the groove grooves.
We start the engine, check the charging and the LED indication on the dashboard.
Recommendations
- As a rule, the alternator belt must be tightened every 15-20 thousand km. mileage, while the belt is replaced every 60 thousand km. or once every 4-5 years. It is also important to check the tension because the alternator belt stretches over time.
- On some cars you can find an automatic belt tensioner (tension is achieved using springs). In this case, the driver does not have the opportunity to tighten the belt. Only the belt and/or tensioner are replaced as the elements wear out or if the belt slips.
- To replace, you must purchase only high-quality alternator belts, pulleys, bolts and tensioners that are fully suitable for the specific make and model of the car. Ignoring this rule leads to the fact that the belt and tensioning mechanisms can quickly fail, whistles appear, the belt slips or breaks, problems with electrical equipment, etc.
- After replacing the attachment belt, replacing tensioners and other elements, as well as making adjustments, the tension must be re-checked after a while. The fact is that the new belt may loosen a little after 100-200 km. It also happens that when checking, the belt tension is too strong. However, if the adjustments are not made again, the problem will progress in the case of an insufficiently tensioned belt. If the belt is tightened, this will cause a significant reduction in its service life (by 50-60% or more).