30.05.2013
Oxygen sensor
The oxygen sensor (OS) is installed on injection VAZs (except for the first models with a Bosch 1.5.4 controller).
This is an integral part of the engine power system. This sensor is designed to assess the condition of the exhaust (the presence of oxygen in the exhaust). In other words, based on the amount of oxygen in the exhaust, it regulates the working mixture.
DC also has a second, but no less popular name: “lambda probe”. That is, it is one and the same.
Operating principle of DC (lambda probe)
The working surface of the sensor is a ceramic material coated with platinum.
The operating temperature of the surface is 350 degrees Celsius and above. Therefore, before heating the lambda probe, during the first 5 minutes after starting the engine, the working mixture is adjusted according to the readings of other sensors in the engine power system. To speed up the heating of the part to operating temperature, an electric heater is installed in it.
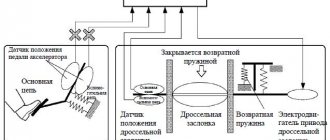
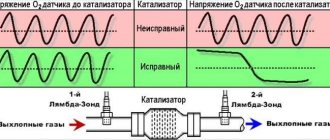
The principle of operation is as follows: exhaust gases cover the working surface of the lambda probe, which in turn reacts to the difference in oxygen levels in the exhaust gases and the environment. It then sends a signal to the ECU, which adjusts the fuel mixture.
Is it possible to simply turn off the sensor?
Some car enthusiasts are interested in the question of whether it is possible not to change, but simply to disconnect the lambda probe on the VAZ 2114. Experts say that the procedure itself is quite simple, but not desirable. After turning off the oxygen sensor, the ECU will switch to approximate parameters, supplying fuel for injection in average values.
This will lead to destabilization of engine operation, loss of dynamics, increased fuel consumption and deterioration of the properties of exhaust gases. In addition, the on-board computer will start to generate an error due to the absence of a sensor, so it will need to be re-flashed using chip tuning. Therefore, it is better to install a new sensor.
Where is the oxygen sensor (lambda probe) located?
For 1.5 l engine
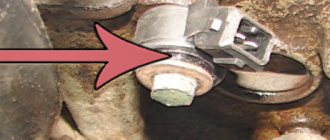
The lambda probe (number 11) is installed in the exhaust system on the exhaust pipe. Screwed in from above, in front of the resonator or spacer (if there is no resonator). In other words: put the car in a pit and look throughout the exhaust system for a sensor sticking up. DC is the only sensor that is installed in the exhaust system, so you won’t miss it.
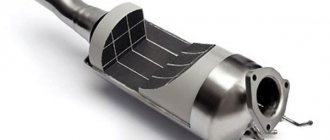
Exhaust system for 1.5l engine
For 1.6L engine
The exhaust system of this engine is slightly different from the 1.5 liter. Pay attention to the figure: In this exhaust system, 2 DCs are planned (at number 2) - both are located on the catalytic collector. These engines are equipped with both 1 and 2 oxygen concentration sensors: Euro-2 toxicity standard - 1 DC, Euro-3 - 2 DC.
Exhaust system for 1.6l engine
Useful video
You can find more information on this topic in the video below:
Experts note that when replacing the sensor, some problems may arise, in particular, the device may stick to the pipe. In this case, you should pour WD-40 on it and try to unscrew it. You can also heat the sensor or lightly tap it with a hammer.
When carrying out work to check and replace the oxygen concentration sensor, you need to be careful, because the sensor is installed on the exhaust pipe of the muffler, which heats up to high temperatures when the engine is running. For safety reasons, wait until the engine cools down.
To carry out the work you will need:
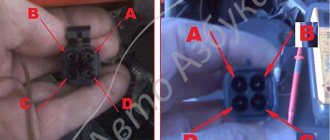
Disconnect the block with wires from the sensor.- We connect the negative terminal of the voltmeter to the engine ground, and the positive terminal to terminal B on the block and turn on the ignition. The voltage must be at least 12 volts. If it is smaller or missing, you need to check the battery charge, the health of the power circuit and the computer.
- After this, we connect the negative terminal of the voltmeter to terminal C and the positive terminal to terminal A. The voltage between them should be 0.45 volts. If the voltage is missing or differs by more than 0.02, then you need to check the power circuit and the computer.
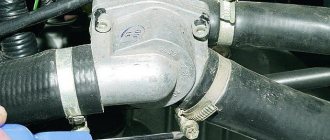
- To remove the sensor, cut the clamp securing the wire to the cooling system hose.
- Using a 22mm wrench, unscrew the sensor from the exhaust pipe and remove it from the car.
- Install the new sensor in reverse order. Secure the wire to the hose with a new clamp. After installation, check that the wire does not touch the exhaust pipe of the muffler.
Signs of DC malfunction
- High gasoline consumption (from 12 liters or more). But this problem can also occur for other reasons (Causes of high fuel consumption)
- Unstable idle. Also, the causes of this malfunction may be: dead IAC, mass air flow sensor, air metering sensor, etc.
- Dips during acceleration, drop in engine dynamics and power. Also, the reasons for low dynamics can be faults in the following elements: , , , low compression, etc.
Useful articles:
- How to check DC?
- How to repair a recreation center?
How to check if the sensor is working properly
Checking the sensor is usually carried out with the engine running. There are several ways to check the serviceability of the sensor, suitable for the VAZ-2115 car:
- Using a tester (in this case, it is necessary to determine the voltage, as well as the resistance; the probes must be connected to the connecting terminals and measurements must be taken in different operating modes of the internal combustion engine).
- Using a diagnostic tool or ELM 327 scanner with the OpenDiag program installed on a smartphone.
- An oscilloscope (The advantage of this test is that it allows you to determine the rate of change of voltage, which in a working device should not exceed 0.2-0.3 seconds.)
If the measurement result of at least one of the instruments shows a significant deviation from the norm, then the oxygen sensor must be cleaned or replaced.
Checking the oxygen sensor for functionality
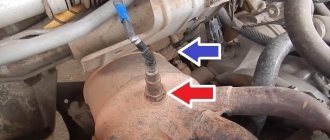
Note! For clarity, the performance test will be shown on the topmost sensor, which is screwed into the exhaust manifold of a 1.6 engine!
1) To check, you will need to stock up on a regular metal clip and a multi-meter that will be equipped with a voltmeter function, or if you don’t have this device, then just stock up on the voltmeter itself.
2) Then you will need to connect an unbent paper clip to the wire connector that also goes with the oxygen sensor, and you need to connect this paper clip to the signal wire that goes to the controller and then connect the positive lead of the ohmmeter to this paper clip, and connect the negative lead for mass, for example, your car engine may be the mass.
Note! The signal wire that goes to the controller is usually painted in different colors, for example, it can be white, black, red-white and other colors, so in order not to be mistaken, open the book on the operation of your car and look at the electrical diagram of your car in it, all these are there the nuances must be described!
3) After everything is connected, get into the car and start it and then carefully monitor the ohmmeter readings, on a cold engine it should show very small numbers, namely somewhere around 0.1-0.3 volts, as it warms up these numbers will you will have to increase, namely in two or three minutes when the engine warms up to operating temperature, the readings should already be in the region of 0.1-0.9 volts (They should fluctuate), if this is the case for you then this will mean that that this sensor is working normally and there is no need to replace it, but if the voltmeter shows, for example, readings of 0.1-0.9 volts very late (On a very hot engine), or these readings are not reached at all, then this will mean that that the sensor is faulty and needs to be replaced.
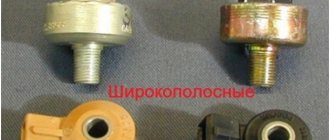
1. When you buy a new sensor, you will most likely be asked which one you need with heating or not? So, it is best to take this sensor with heating, because as a rule, this sensor begins to work normally only after 300 degrees and above it works as it should, and to heat it up to so many degrees it takes some time and so that it is reduced, we recommend that you install the sensor heated only!
Advice: If you still want to buy a non-heating sensor, then remember once and for all, you will not be able to install it instead of the old sensor if you had this sensor with heating, that is, if the old sensor was without heating, then you can install a non-heating sensor, and if your old sensor was heated, then perhaps you will install a new sensor without heating, but perhaps not!
2. And also, as we noted earlier, replacing this sensor must be done on a not too cold engine, because if the engine is completely cooled down, then, as we all know, the body contracts, as a result of which it will be difficult for you to unscrew this sensor, so it is best Replace this sensor with gloves and a barely warm engine!
3. Oh, yes, the most important thing was not noted, it is advisable to buy sensors exactly the same as those you had before, because on some cars the sensors are installed of a new type, and on some they are installed of the old type and with different power, but each controller is usually configured for what then there is one sensor and therefore, when choosing, it is desirable that the new sensor be exactly the same as the old one!
DK errors
You can detect the presence of these errors by the yellow light on the check engine panel coming on (or it may not light up). You can read these errors either using the on-board computer or using computer diagnostics.
| Error P0130 | Invalid signal DC 1 | ||
| Error P0131 | Low signal level DC 1 | ||
| Error P0132 | Crankshaft sensor 1 signal high | ||
| Error P0133 | Slow response DC 1 | ||
| Error P0134 | No DC 1 signal | ||
| Error P0135 | Faulty heater DC 1 | ||
| Error P0136 | Ground fault DC 2 | ||
| Error P0137 | Low signal level DC 2 | ||
| Error P0138 | High signal level DC 2 | ||
| Error P0140 | Breakage of DK 2 | ||
| Error P0141 | DK 2 heater malfunction | ||
| Error P1102 | Low resistance of DC 2 heater | ||
| Error P1115 | Faulty DC 2 heating circuit | ||
Most often, errors associated with DC appear due to a malfunction of the heating circuit, as a result of which the sensor gives incorrect parameters.
In this case, you need to look for a broken wire or replace the sensor.
Repair, replacement
The condition of the lambda probe is first checked on a measuring device, since if the contacts in the overheating line are damaged, the device can be repaired. If there is carbon deposits on the sensor, and the potential difference on it does not differ significantly from the permissible values, then it is worth cleaning.
Since the device operates in an aggressive environment, it is advisable to check it every 15-20 thousand. The performance of the oxygen sensor on the VAZ 2114 is tested using precision measuring instruments. The lower signal level of the device should be 100-200 mV, the upper – 800-900 mV.
Carbon deposits prevent oxygen from being trapped, resulting in distorted data being sent to the ECU. It is necessary to warm up the sensor very much and immediately cool it down sharply, after which the deposit will crack and can be easily removed with a soft brush.
Why does the lambda probe die?
We have already clarified above that the service life of the oxygen sensor is 80-160 thousand km. You probably have a question: why is there such a spread in the resource, as much as 80 thousand km? In fact, it depends on the conditions in which the car was operated:
- Bad gasoline, the exhaust of which contains a lot of lead and iron, clogs the sensor electrodes after several fill-ups.
- Poor condition of oil scraper rings and caps. Because of them, oil can get into the mixture, and with it into the exhaust system.
- Due to clamped valves, pops are released into the exhaust system, which destroy the working surface of the sensor.
- Due to an incorrect mixture, ignition timing, as a result of which the sensor overheats, crackling from the high temperature of the converter or catalyst.
Reasons for reducing the service life of equipment
- Violation of vehicle operating conditions, failure to comply with scheduled technical inspection deadlines;
- Filling the car with low-quality fuel;
- Purchase and subsequent installation of non-original parts;
- Violation of installation technology;
- Defective parts during manufacturing;
- Damage due to an accident, collision, impact;
- Incorrect operation of the firmware of the electronic control unit.
Repair of oxygen sensor VAZ 2115
Since the oxygen sensor components and mounts are located close to the exhaust manifold, carbon deposits may form on them. It is this that can cause the lambda probe to fail.
The most difficult reason for inoperability is broken wires. The wires can either actually come off in some place, or they can oxidize and not make contact. In this case, it is recommended to find a break and treat it with a Vedashka.
Since the cost of purchasing a new sensor starts from three thousand rubles, drivers prefer to first repair it themselves before replacing it. Due to the formation of scale and soot, it may stop functioning, so it is necessary to neutralize it.
Many motorists try to clean the oxygen sensor themselves using mechanical action. But after trying this recovery method, it may become completely inoperable.
Purpose
This sensor estimates the percentage of oxygen in the exhaust gas mixture. The lambda probe helps to identify both “enrichment” - the phenomenon of saturation of the fuel-air mixture with air, and “leanness” - the opposite phenomenon. Both of these processes are highly undesirable, so it is necessary that the oxygen sensor is not only present, but also functioning correctly.
The sensor also serves to reduce harmful emissions into the environment. With the advent of EURO standards, strict toxicity requirements began to be imposed on cars, and the DC is designed to control the exhaust gases released by the car during operation.
Location
In the VAZ-2115 car model, access to the lambda probe can only be gained by climbing under the bottom of the car. For repairs or maintenance, an inspection hole is most often used. You can also use a roadside overpass and a hydraulic lifting mechanism. The oxygen sensor is located on the exhaust pipe between the exhaust manifold coupling and the resonator.