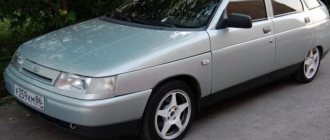
The Lada Priora, created on the basis of the VAZ 2110 sedan, belongs to the family of Russian small cars. The model was produced in various configurations with different drives for auxiliary units.
For example, the base model has a conventional alternator belt tensioning mechanism. At the same time, in cars equipped with air conditioning or power steering (power steering), the trajectory of the alternator belt is slightly different.
Accordingly, replacing the alternator belt on a Priora without air conditioning is a little easier than on a Priora with air conditioning. Let's consider the algorithm for replacing a belt with different types of drive.
Tensioning the alternator belt: a guide for car enthusiasts
The distinctive features of the Priora from previous modifications of the manufacturer are noticeable immediately, literally as soon as we open the hood. Here the new owner of the Lada will have to learn a lot again. This seemingly not very complicated procedure, which allows you to tighten the alternator belt in a Priora car to the required limit, will require considerable effort.
The peculiarity of new car models is that the ability to choose a car equipped with optional equipment is already present as standard. So in the “base” “Priora” can already be equipped with power steering or air conditioning.
Naturally, driving the car becomes even more convenient, but the recompense for comfort in this model is a more complex design of the generator belt drive. After all, the belt itself on a Priora car, which has air conditioning or power steering, is significantly longer, has a more complex trajectory, is serviced and replaced according to completely different rules.
Guide to replacing a car with power steering or air conditioning
The size of the strap with power steering and air conditioning is 1125 mm.
Replacement is carried out as follows:
- First, you should treat the screws that secure the power unit cushion and the bracket with WD-40, this will allow you to unscrew them without any problems.
- Wait about 20 minutes, then unscrew the nuts that secure the bracket.
- Now the front wheel should be jacked up. Unscrew the bolts that secure it, then place a reliable support under the engine; the wheel itself can be removed.
- Lower the car slightly and unscrew the installation tension roller.
- After completing these steps, you can bend the strap a little and unscrew the screws that secure the pillow.
- After this, the car must be lowered slightly so that the power unit begins to hang out. Having done this, the pillow should be moved slightly towards the engine.
- Now you can start replacing the strap. The old belt is removed, its installation location on the pulley is cleaned, and a new one is installed.
- The vehicle is raised on a jack to lower the engine. You must be careful at this stage, otherwise it may cause the strap to become dislodged, as well as the cushion.
- Now all the screws and nuts should be screwed back in. The wheel is put in place, the bolts are tightened, the car is removed from the jack (the author of the video is the channel Diary of Mechanics).
Tensioning the alternator belt in a Priora car - nuances of implementation
Any car enthusiast knows that there will definitely come a time when you need to tighten the Priora alternator belt. It is known that the belt drive of this car is quite durable, but during operation there is a slight stretching of the belt itself, as well as a decrease in the adhesion of its surface to the pulley and roller.
Literally as soon as you notice a whistling alternator belt on a Priora, you need to start tightening it at the same moment, especially since this is not difficult to do.
Before tensioning the Priora generator belt, you need to prepare an open-end or socket wrench for 19 and a special two-end tension wrench directly for the roller. This key is similar to the one used to change discs on an angle grinder.
Step-by-step instructions for replacing consumables on models without power steering and air conditioning
Briefly about how to disassemble the main elements and remove the strap in cars without air conditioning and power steering:
- First of all, it is necessary to loosen the nut of the generator unit bracket using a wrench, as well as the adjusting screw.
- Next, the unit should be moved as far as possible towards the engine.
- After this, you need to unscrew the bolts securing the front wheel (right) and remove it.
- Next, the fender liner is dismantled, so you can gain access to the installed strap.
- It should now be removed from the pulley and replaced.
- A new strap is installed, after which it is tightened. The tension is checked - note that the part should be normally tensioned, but not overtightened. Over-tightening can cause more accelerated wear of the bearing device.
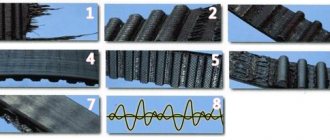
Photo gallery “We change it ourselves”
Checking the tension of the alternator belt on a Priora
Owners of a Priora car can know how to tension the alternator belt from numerous sources on the Internet and by reading the relevant literature. After all, any car enthusiast will learn how to properly tighten the alternator belt on a Priora from these sources, and not through the transfer of experience from other car enthusiasts. But some “tricks” associated with checking tension cannot be found even in the above sources. Let's take a closer look at them.
If you press on the belt at the longest interval directly between the pulleys, then its deflection should be within 8-12 mm, but this rule is only suitable for a very modest car configuration. After all, if the car is equipped with power steering or air conditioning, the belt then has a different trajectory, which helps reduce the area of interaction between the belt and the pulleys.
To make up for the lack of contact, you will need to tighten the belt on the Priora a little more. If it is not possible to use the services of a specialist, then you can try adjusting the tension of the Priora generator belt “by ear”. If the tension is insufficient, the belt will definitely slip, making a wild “whistle”, and if the tension is too strong, the generator bearings will hum.
How to determine the need for replacement or adjustment
The condition and tension of the belt must be checked at least once a quarter.
This will allow you to quickly detect weak tension or damage to the belt. A whistle that appears when starting the engine and accelerating the car indicates weak belt tension. Rapid battery discharge (as well as weak charging current) may also indicate a loose alternator belt. The service life of a high-quality alternator belt is 40–60 thousand kilometers or 2 years. After this, the belt must be replaced, even if it looks normal. If cracks or breaks appear on the belt, it must be replaced, regardless of mileage. To determine the condition of the belt, it is necessary to carry out diagnostics.
Tensioning the timing belt on a Priora: user instructions
In addition to the alternator belt in a Priora car, another important component is the timing belt. For this reason, many car enthusiasts are wondering how to tighten the timing belt on a Priora? It is not difficult to carry out this procedure; it is enough to prepare a tool: a “5” hexagon, a “17” and “15” head.
Before tightening the Priora timing belt, you should:
— unscrew the two screws securing the cover;
— remove the bottom cover covering the timing drive;
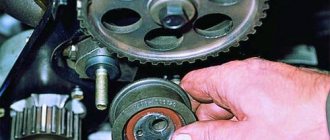
— insert the tips of the pliers into the grooves of the outer race of the tension roller in order to remove the locking rings.
- tighten the belt by turning the tension roller directly with pliers, counterclockwise.
— these actions are performed until the cutout of the outer race is aligned with the rectangular protrusion of its inner sleeve;
— after the above steps, the roller mounting bolt is tightened with a wrench;
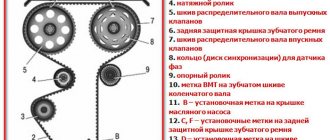
— we check that the marks on the camshafts and crankshaft are aligned, as well as the cutout matches the mark on the tension roller. If the marks do not match, you should repeat the operation to tension the timing belt.
Replacement
Required Tools
We will prepare everything necessary for the repair:
- Lubricant WD-40.
- Keys to 19, 17.
- Two copies of the key for 13.
- Head for 10 and 17.
- Jack.
- Special key for tensioning.
- Lever arm.
The alternator belt on a modified Priora with air conditioning and power steering runs around the engine mount. The designers decided to carry out such a modification for the Priora 16 due to the fact that the power steering pulley is installed low. Hence there are additional steps that you need to be aware of.
Step-by-step instruction
- First of all, we need to wet the bolts that hold the bracket and motor mounts. Wait 10-15 minutes for the lubricant to spread over the surface;
The replacement is complete, all that remains is to adjust the alternator belt with power steering and air conditioning. The new consumables on the Priora will have to be tightened several times until you get the required tension. If the component whistles or there is a hum coming from under the hood, then it is necessary to carry out repeated adjustments until these defects are eliminated.
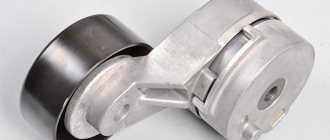
ALTERNATOR BELT TENSION ROLLER FOR VEHICLES WITH STEERING OR AIR CONDITIONING
The Priora, equipped with various options, has an alternator belt more than a meter long. It passes through four reference points. Three of them are pulleys. The first is the engine drive pulley and the second is the generator and power steering pump or air conditioning compressor. The fourth point is the tension roller itself. This simple mechanism is made in the form of a regular rolling bearing, with an eccentric base. That is, when turning it around its axis, thanks to the hole for the bolt, located not in the center of the bearing, but offset to the edge, the protruding part can tighten or loosen the drive belt of all additional Priora mechanisms.
How to tension a roller
After replacement or dismantling and subsequent return to place, the roller must be adjusted for proper operation of the drive mechanism. To work you will need tools:
- Size key
- Special key for tightening. It is a structure welded to the base in the form of a pair of rods with a gap of 18 mm between them (similar to a key for an angle grinder). The rods are designed for insertion into technological holes on the roller.
How should the belt be tensioned?
- The eccentric roller retaining bolt must be loosened.
- Clamp the roller cage and turn the part counterclockwise or clockwise with the adjuster key, increasing/decreasing the belt tension. At the longest section between the pulleys and the shaft, it should bend by about 6 mm.
When the desired result is achieved, the fastening is finally tightened.
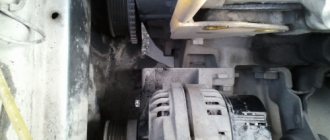
TENSIONER FOR PRIORA AND KALINA NOT EQUIPPED WITH OPTIONS
On the Priora, which does not have power steering or air conditioning, the belt is much shorter. It works on only two points: the crankshaft pulley and the generator pulley. The latest samples are equipped with a tensioning system similar to the VAZ Kalina. That is, if on other VAZ cars the tension is done by moving the generator itself, then on the Priora, a plastic roller of the tension system presses on the drive from above. A special tensioning mechanism is installed to move the roller. It consists of several parts:
The entire system is clearly visible in the photo. To adjust the drive and replace the tensioner, the following keys are needed. Slip on 19, end and socket on 13 and any wrench on 8. First, loosen the bolt and nut holding the movable platform with the roller with a wrench on 13. Then release the lock nut securing the adjusting rod using a wrench on 19. Using a wrench or socket on 8, unscrew the adjusting rod cravings The generator remains motionless. When the belt is loose, unscrew the bolt with the bushing on which the desired part is attached. Now remove the roller and install a new one in its place.
Check the free rotation of the tensioner for the generator drive and, having tightened the rod to the normal state of the drive, securely fix all the fasteners.
Description and location
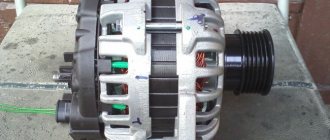
The generator's job is to provide power to the vehicle's electrical equipment. Like other components in a car, the generator is powered by the engine; to ensure constant rotation of the rotor, pulleys are installed on the generator shaft and the crankshaft of the power plant. A belt is pulled between them. After starting the engine, the crankshaft begins to rotate, and the movement is transmitted through the belt to the rotor.
On the latest Priora models, this element operates the air conditioning and power steering. This material discusses the replacement and tensioning of the belt in a new model car, where additional equipment is installed.
The belt is a consumable item that requires replacement after 45-60 thousand kilometers . The size of the standard belt on a Priora with air conditioning is 1125 mm.
Symptoms of malfunction and their elimination
You can determine whether a replacement is needed or whether you can simply tighten the power steering belt with air conditioning on the Priora 16 valves only after inspecting this component. To do this, just open the hood and examine the belt; it is located next to the right front wheel. There are signs that indicate it's time to check the alternator belt: something whistling and squeaking from under the hood.
Read more: Replacing the antenna with a fin
The reasons may be the following:
- Antifreeze, oil or other working fluids have come into contact with the generator pulley or belt.
- The belt is worn out - you can tell by its appearance.
- The tension has dropped - in this case, the component must be tightened.
- The bearing in the generator is worn out.
When the belt whistles in a Priora with 16 valves, it’s time to carry out diagnostics. If there are cracks, tears or other serious damage on its surface, then replacement is required. If the generator component with hydraulic booster and air conditioning looks normal, you should check its tension; the optimal level of deflection is 6-8 mm - you need to press the component in the middle between the generator and the pulleys.
Are there visible coolant or engine oil stains on the surface? If the contamination is not significant, they can be cleaned. If the liquid has penetrated into the material, cleaning will not bring any results; replacement is needed. If the component is well tensioned and no damage or stains are visible, then you should move on to checking the bearings. They may need to be changed.
Sometimes the generator consumable whistles due to the poor quality of the product. This is especially true for Chinese analogues, which are not of high quality. Such a belt whistles a lot already at the fifth thousand mileage, it is better to change it immediately. We recommend purchasing consumables designed for your model, in our case, for a Priora with a 16-valve engine.