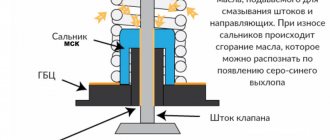
With time valve stem seals VAZ 2107 lose elasticity and wear out, oil gets into the valve guides and cylinders. Signs of such a malfunction are dirty spark plugs, increased oil consumption and smoke from the exhaust pipe. In this case, the oil seals (valve seals) need to be replaced.
Why are oil seals needed and how are they designed?
Engine cylinders need protection from foreign substances entering the combustion chamber. It is the oil seals (or valve stem seals) that play the role of a kind of protector. Their task is to prevent oil from penetrating while the valve stems are operating. If the caps have lost their function, they must be replaced. Otherwise, carbon deposits will begin to appear on the walls of the engine, which will lead to increased oil consumption.
A running engine causes all elements of the gas distribution mechanism to constantly move. They rub against each other, which inevitably leads to wear. To reduce the wear rate, oil gets onto the surface of each element. In this case, you need to ensure that the oil does not end up in the working area of the valves. Otherwise, the motor will begin to malfunction. To ensure that not a drop of oil penetrates into the combustion chamber, oil seals are installed.
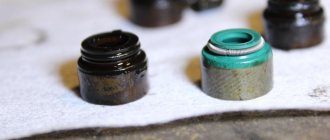
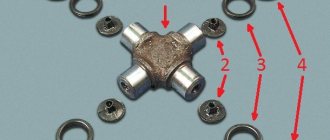
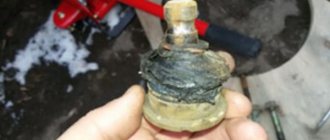
Valve seals have a very simple structure. They consist of only three elements:
- Base. This is the oil seal frame, which is made in the form of a steel bushing. This element ensures the strength of the spare part.
- Spring. It ensures the tightness of the mechanism by pressing the rubber tightly against the valve stem.
- Cap. This is the main element of the device, made of rubber. With its help, excess oil on the rod is eliminated.
Tools for repair
To carry out the repair you will need the following tools:
- a set of keys;
- valve puller;
- tweezers (to pull out crackers);
- oil seal remover;
- a mandrel (or something similar for pressing, for example a piece of tube slightly smaller than the diameter of the oil seal);
- hammer;
- tin solder rod 8 mm.
Signs of breakdown
To prevent serious problems in engine operation, it is necessary to promptly diagnose and correct oil seal failure.
You can judge the wear of valve stem seals on a VAZ 2107 by the following signs:
- There is an increased release of white or blue exhaust gases.
- Engine oil consumption increases significantly.
- The candles become covered with black soot.
If you find these signs of failure, you need to make sure that the entire gas distribution mechanism is working properly, and not just the caps. Pay special attention to valve diagnostics. If necessary, replace the valve stem seals on the VAZ.
If the problem is not diagnosed and corrected in time, the following consequences may occur:
- the motor will lose dynamics;
- it will begin to work unstably and will often stall at idle;
- the pressure in the cylinders will decrease;
- carbon deposits form not only on the valves, but also on the walls of the cylinders and pistons;
- the tightness of the system will be compromised.
When carbon deposits appear on the engine walls, its service life decreases sharply. If the problem is not corrected in time, the situation will lead to an expensive overhaul of the engine. But these difficulties can be avoided by simply replacing the oil seals on the VAZ 2107.
Sequencing
- There is a striker on the collet. You need to hit it accurately with a hammer. This will cause the cap to crumple and it will be possible to remove it from the collet with pliers.
The oil seal is removed from the guide bushing using a collet - Once the crackers are removed, the valve plate and its spring are removed.
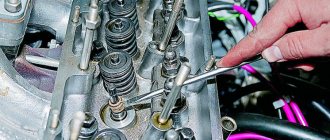
When the spring is fixed, the valve nuts are removed using medical tweezers - After this, a tool is installed to decompress the valves and, with its help, the valve spring is pressed.
- After the piston reaches the dead center, the spark plug is unscrewed from the cylinder, and a tin rod with a diameter of 8 mm is inserted into the opened hole. The tip of the rod should be between the valve and the bottom of the piston.
- Now the crankshaft must be turned so that the piston in the cylinder where the caps are planned to be replaced reaches top dead center.
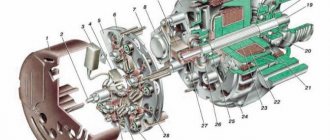
The camshaft is removed, then the oil seal is removed - First of all, you need to remove the wires from the battery.
- The timing belt is removed.
- The pulley with teeth is removed from the camshaft.
- The wires are removed from the first fastening, and the nuts are unscrewed from the third fastening.
- Four nuts are unscrewed from the front cover, then the nuts from the rear cover are unscrewed (there are six of them).
- Both covers are removed.
- The camshaft is removed.
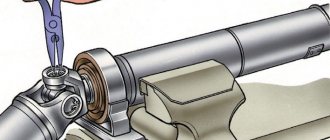
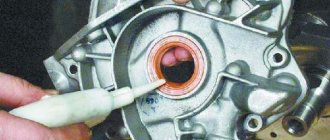
- The oil seal is removed from the camshaft.
The valve spring is pressed firmly using a collet - After pressing the valve spring, the crackers can be removed using tweezers.
First, the valve plate is removed, and then the spring underneath it is removed. - Now, using a collet, you need to remove the oil seal from the guide sleeve.
By hitting the handle with a hammer, the cap is compressed in the collet and removed - The new cap is pressed into the valve plate, then a spring is installed on it.
- Similar operations are performed with all caps that need replacement.
- After replacement, the cylinder head is reassembled.
DIY video on replacing valve seals on a VAZ 2109
Important points
- After removing the worn cap, you should carefully inspect the walls of the guide sleeve, since any scratch on this wall left by the collet can lead to renewed oil leakage into the combustion chamber and will negate all efforts to replace the cap.
- Before installing new caps, you must remember to remove the springs from them.
- Before pressing in the new cap, the installation site is generously lubricated with oil. This helps to place the cap in place more accurately, without putting extra effort into it.
This is interesting: Towbar
As can be seen from the article, it is quite possible to replace valve stem seals on a VAZ 2109 with your own hands. The main thing is to be patient, follow the sequence of operations and not make much effort when pressing the new caps into place.
Copywriter with five years of experience.
When is it time to replace
Over time, the sealing material of the valve stem seals becomes hard. As a result, it loses its elasticity, which leads to oil leakage into the cylinder. The same problem occurs when the piston rings are faulty.
The caps are changed in cases where oil leaks occur without visible places. Watch how the exhaust behaves while driving. Brake the car sharply with the engine, and then also sharply press the gas pedal. If this leads to the appearance of thick smoke from the muffler, then it is time to replace the seals.
Thick, bluish-colored smoke may appear on the car even after a long period of parking.
It's easy to explain. If the caps are worn out, this leads to oil entering the engine cylinder. If the piston rings are worn out or coked, the engine behaves a little differently. Smoke will remain behind the car only when driving uphill or during rapid acceleration.
If, in addition to smoke, you observe an increase in fuel consumption, a decrease in engine dynamics and problems during startup, this may all be evidence of wear and tear on the mechanisms.
Causes and signs of wear on valve stem seals
The caps are continuously exposed to engine oil and exhaust gases while the engine is running. Over time, the inside of the cap becomes dull and abrasion occurs. Oil seals (valve seals) last approximately 50-100 thousand km. mileage The life of the caps is influenced by the quality of the engine oil used, as well as the frequency of replacement.
There are several main signs of cap wear:
- High consumption of engine oil (more than 1 liter per 1000 km).
- Deposits on spark plugs (simply black plugs).
- Blue smoke from the exhaust pipe (especially noticeable at high speeds).
Also, these symptoms may indicate other problems, for example, wear of the CPG in general.
How to replace caps on a VAZ 2107
- Drain approximately two liters of coolant.
- Remove the air filter housing and throttle linkage if you have a carburetor.
- Remove the valve cover.
- Place the first cylinder in top dead center mode.
- Loosen the chain tension nut.
- Remove the camshaft gear mounting bolt.
- Remove the sprocket and chain and secure them with wire to prevent a possible fall.
- Remove the bearing housing and rockers.
- Remove the candles. To prevent the valve from falling into the cylinder, be sure to plug the spark plug hole with a tin rod.
- Using a valve remover, remove the "crackers".
- Using a screwdriver, carefully pry and remove the oil seal.
- Before installing the new one, do not forget to lubricate the surface of the rod with oil.
- Replace the springs and other parts.
- Repeat all the described operations with each cylinder, installing them at TDC.
After completing all the work, return the crankshaft to its original state, install the bearing housing, camshaft gear and chain. The remaining elements are installed in reverse order.
Preparatory work
Before starting work, it is necessary to wash the engine compartment of the machine. This must be done carefully so as not to wet the sensors, pads, and elements of the ignition system. Before washing the engine compartment, you must disconnect the ground wire from the battery.
It is advisable to carry out the work in a garage - this will help to avoid dust getting on the timing parts during assembly. It is also necessary to secure the machine with the handbrake and turn on neutral speed so that you can turn the crankshaft during operation.
Signs for repairing valve stem seals
However, this is not a panacea; there are several signs that it is time to change the valve stem seals:
- Increased oil consumption. Of course, you shouldn’t bring the engine to this state, but this situation can still arise. So, with severe wear, the oil seal becomes a filler neck, which only leads to even greater consumption. If this situation occurs, then goodbye oil after a couple of hundred kilometers. It's hard to believe, but it comes straight out of the exhaust pipe;
Blue smoke from the exhaust pipe. It is accompanied by an oil deposit at the end of the pipe;
- Black carbon deposits on spark plugs. Moreover, it should be carbon deposits, not soot.