Fans of classic “sixes” periodically have a question: “How to set the ignition on a VAZ 2106?” Of course, in those days they had never heard of automatic adjustment of angle and torque, so everything had to be done by hand. Today you will learn how to set up the ignition on a VAZ 2106 and not make mistakes.
Design of the ignition system on classic VAZ engines
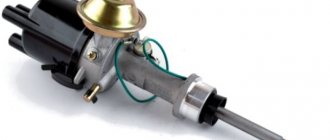
The engines installed on the VAZ 2106 differ in displacement, but have the same design. The distributor, timing parts, front cover with marks and crankshaft pulley are interchangeable during repairs. There are contact (KSZ) and non-contact (BSZ) ignition systems. In the first case, the contacts are opened mechanically when the distributor shaft is rotated by 900. In the second option, a Hall sensor and a controller are used, which makes it possible to accurately determine the moment the spark is supplied to the cylinders.
The simplest contact system consists of the following elements:
- Ignition switch, also known as a switch;
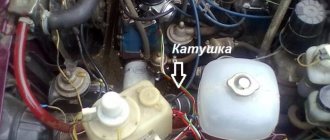
- Ignition coil with two windings to obtain high voltage;
- A mechanical breaker that opens the primary winding of the coil at the right moment;
- Rotor and contact cover for distributing voltage to the spark plugs;
- Centrifugal and vacuum regulators;
- Transistor to reduce the current in the primary winding and extend service life;
- Spark plug;
- High voltage wires.
Contact ignition circuit: 1 - generator, 2 - ignition switch, 3 - ignition distributor, 4 - breaker cam, 5 - spark plugs, 6 - ignition coil, 7 - battery
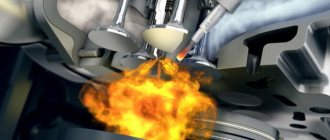
The operating principle of any ignition system is as follows. At the moment when the piston in the cylinder is in the upper position and compresses the fuel mixture as much as possible, the coil windings open. High voltage passes through the distributor cap along a high-voltage wire to the corresponding spark plug, at the electrodes of which a powerful spark occurs. Ignition occurs. This process is called the power stroke of the piston.
With increasing engine speed, the ignition timing angle (IAF) changes, and the centrifugal regulator makes the angle optimal. The vacuum regulator shifts the angle depending on the vacuum in the intake manifold. This allows you to achieve optimal power in all engine operating modes.
General information about the brand
Domestic cars of the 2106 brand were manufactured for the purpose of operating on roads equipped with improved surfaces, regardless of weather conditions. The cars are equipped with a four-door all-metal sedan body.
Cars are equipped with carburetor gasoline engines, four-speed or five-speed gearboxes. There is an independent spring front suspension; The rear suspension is dependent spring. The car's braking system is dual-circuit; there are disc brakes on the front wheels.
The rear ones are equipped with drums. Cars of the VAZ 2106 family were equipped with radial tubeless tires. The steering column has an anti-theft device that is built into the ignition switch.
The modification range of the VAZ 2106 family includes:
- VAZ 2106, 21065-00 - equipped with a model 2106 engine;
- 21061, 21065-01 – equipped with a model 2103 motor;
- 21063 – there was an engine from 21011.
- Car brand 21065 is the luxury version of this family. It has the following differences from the 2106 model: it is equipped with a five-speed gearbox and a final drive with a gear ratio of 3.9. Some cars were equipped with a Solex-type carburetor and a contactless ignition system. The car's electrical equipment is complemented by an electrically heated rear window, halogen headlights and a rear fog lamp. The body has been modified: the upholstery and seat headrests have been updated; The car is supplemented with bumpers of the 2105 model. Spare parts for the presented vehicles are available everywhere. In addition, the electric power steering is a kind of “novelty”, so to speak, the trends of the 21st century are making themselves felt. Thanks to this, car maintenance and repairs are not a big problem.
Symptoms of a problem
Adjusting the ignition on a car is required after repairing the engine or removing the distributor. Like any mechanical system, it tends to wear out, and characteristic symptoms appear:
- The engine does not start or runs intermittently. If gasoline enters the carburetor, the reason lies in incorrect setting of the ignition angle or misalignment of the marks on the timing chain.
- Reduced acceleration dynamics and deterioration of motor elasticity. The mixture does not ignite at the optimal time, so efficiency decreases.
- Increased fuel consumption. This happens with late ignition, when in order to obtain the same dynamics you have to press the gas pedal more actively. Some of the gasoline does not have time to burn and flies out into the exhaust pipe.
- Late ignition causes a popping sound in the muffler when the unburnt fuel mixture ignites when the exhaust valve opens.
- Rough operation of the engine is possible with early ignition of gasoline in the cylinders. An explosion at the moment the piston does not reach TDC is the cause of the characteristic rattling sound and ringing.
Attention! Late ignition often causes burnout of the exhaust valves, which at this moment overheat.
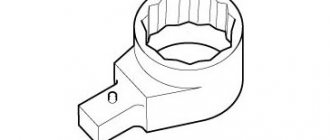
Having discovered a malfunction, you should check whether the ignition is installed correctly on the VAZ 2106, and if necessary, adjust it. To work, you will need a spark plug wrench, a “13” wrench, a light bulb or strobe light, and a plate probe.
Cold start rules
Compliance with them will help to avoid the negative impact of sub-zero temperatures on the life of the car:
- First, you need to warm up the electrolyte in the battery; to do this, turn on the side lights for 5-10 seconds.
- Next, you should check whether all electrical consumers are turned off (fan, oven, heated seats, etc.) - this is necessary to relieve the battery of unnecessary loads.
- The next step is to turn the starter on for no more than 5 seconds. Operating the starter for more than 5 seconds is dangerous for maintaining battery charge. All subsequent attempts to turn it on should also be made with a break of 10 seconds so that the battery has time to partially restore its charge.
- When, after these manipulations, the engine starts working, under no circumstances should you immediately release the clutch pedal and do it abruptly, because the mechanism needs to gain stable speed. The engine will not stall if the pedal is lowered smoothly and slowly.
- The last rule, failure to comply with which can lead to car damage - if the engine does not start, then there is no need to repeat the entire algorithm until the battery is completely discharged. Three or four unsuccessful attempts are enough, after which you should understand that the culprit for not starting the car is not frost, but some other malfunction.
Instructions for setting the ignition of the VAZ 2106
Let's look at 3 known methods of adjusting the ignition angle on VAZ engines.
Using a strobe light (by marks)
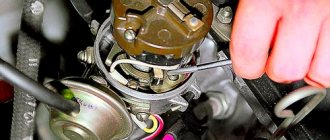
This method allows you to very accurately set the ignition to the marks, and does not require removing the distributor and valve cover. The entire adjustment process takes 5 minutes. A strobe light can be found at any auto store. The procedure is as follows:
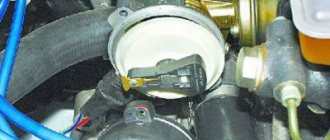
- With the car turned off, loosen the nut securing the distributor, having first made a mark of the initial position on its body;
- On the front engine cover we find two short and one long marks, clean them of dirt and oil;
- We connect the negative wire of the strobe to the engine ground, the positive wire to the ignition coil, and a special clamp to the high-voltage wire of the first cylinder;
- We start the engine and turn on the strobe. The light from its lamp directed at the pulley will show the true position of the ignition timing;
- Slowly turning the distributor body, we achieve alignment of the mark on the crankshaft pulley and the bosses on the front cover;
- We check the engine speed using the tachometer and, if necessary, adjust the idle speed on the carburetor;
- Tighten the distributor fixing nut.
The “4” mark on the pulley must be aligned with the mark you need on the cover. Label “1” corresponds to an angle of 100, “2” - 50, “3” - 00
The marks have values of 00, 50 and 100 relative to top dead center (TDC). For proper operation on 92 gasoline, select an advance of 0 degrees.
Installation by light bulb
If you don’t have a strobe handy and you need to set the ignition accurately, it is recommended to use a simple 12-volt car lamp. Two wires with stripped contacts are soldered to it. The settings are made in the following sequence:
- Unscrew the spark plug from the first cylinder;
- Using a ratchet or a suitable wrench, rotate the crankshaft until the compression stroke begins in the first cylinder;
- We combine the marks on the crankshaft pulley with the tides on the cover body, for 92 gasoline we select the middle or last short one;
- Remove the distributor cover, noting the position of the slider on the rotor opposite the first cylinder;
After removing the distributor cover, it is necessary to note the position of the slider on the rotor opposite the first cylinder
- We loosen the fastening of the distributor housing, the cover fasteners should be parallel to the engine;
- The distributor is installed immediately after its removal in this position - this simplifies further adjustment;
- We connect the wires from the light bulb to the body (minus) and the low-voltage wire inside the distributor (plus);
- Turn on the ignition in the cabin (do not crank the starter);
- If the ignition is set correctly, the contacts will be open and the light will not light up;
- You can twist the distributor body and achieve a stable position in which the light goes out;
- Tighten the distributor fastening, install the cover and turn off the ignition. The adjustment is complete.
Advice! Instead of a signal lamp, use a voltmeter, which is connected in the same way. By rotating the distributor body, we look for a position in which there is no voltage.
We set the ignition by ear
It is possible to quickly adjust the approximate position of the distributor without any instruments. It will take a little patience and good hearing. This method is applicable only if the carburetor and timing belt are in good working order. We proceed this way:
- We start the engine, let it warm up to operating temperature, the throttle handle in the carburetor should be recessed;
- We slightly loosen the fasteners of the distributor and begin to carefully turn it;
- When turning at large angles, the engine will stall or, on the contrary, increase speed;
- It is necessary to achieve smooth idle speed in the range of 700-800 rpm without extraneous knocking and detonation;
- In this position we fix the distributor.
This adjustment by ear requires testing on the road or with a strobe light, but for initial tuning it is the best option.
Video: how to set the ignition on a VAZ 2106
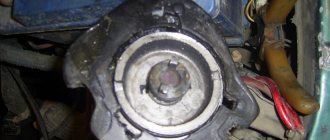
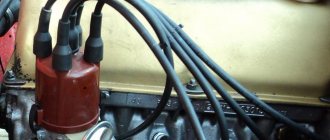
Purpose and types of distributors
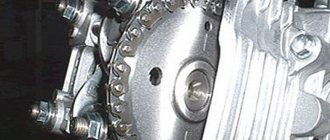
The main distributor of the “six” is located on a horizontal platform made to the left of the engine valve cover. The unit shaft, ending with splines, enters the drive gear inside the cylinder block. The latter rotates by the timing chain and at the same time rotates the oil pump shaft.
There is a special platform for installing the distributor on the engine block.
The distributor performs 3 functions in the ignition system:
- at the right moment it breaks the electrical circuit of the primary winding of the coil, causing a high voltage pulse to form in the secondary;
- alternately directs discharges to the spark plugs according to the operating order of the cylinders (1-3-4-2);
- automatically adjusts the ignition timing when the crankshaft speed changes.
The distributor distributes impulses among the spark plugs and ensures timely sparking
The spark is supplied and the air-fuel mixture is ignited before the piston reaches the upper extreme point, so that the fuel has time to fully burn. At idle, the advance angle is 3-5 degrees; with increasing crankshaft speed, this figure should increase.
Various modifications of the “sixes” were equipped with different types of distributors:
- VAZ 2106 and 21061 were equipped with engines with a working volume of 1.6 and 1.5 liters, respectively. Due to the height of the block, distributors with a long shaft and a mechanical contact system were installed on the model.
- VAZ 21063 cars were equipped with a 1.3 liter engine with a low cylinder block. The distributor is a contact type with a shortened shaft, the difference for models 2106 and 21063 is 7 mm.
- The updated VAZ 21065 series was equipped with contactless distributors with a long rod, working in conjunction with an electronic ignition system.
The difference in the length of the shafts of 7 mm is due to the different volumes of the motors used on the “six”
The difference in the length of the drive shaft, depending on the height of the cylinder block, does not allow the use of the VAZ 2106 part on a 1.3 liter engine - the distributor simply will not fit into the socket. Installing a spare part with a short shaft on a “clean six” will also not work - the splined part will not reach the gear. The rest of the filling of the contact distributors is the same.
As a young, inexperienced driver, I personally encountered the problem of different lengths of ignition distributor rods. On my Zhiguli VAZ 21063, the distributor shaft broke off on the road. At the nearest auto store I bought a spare part for the “six” and began installing it on the car. Result: the distributor was not inserted completely; a large gap remained between the platform and the flange. Later the seller explained my mistake and kindly replaced the part with one suitable for the 1.3 liter engine.
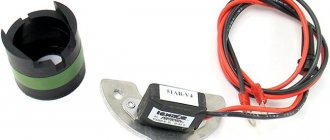
How to install contactless (electronic) ignition
Installing electronic ignition is the easiest way to improve engine performance. Replacing with a contactless system provides the following advantages:
- Confident cold start;
- Stable engine operation at any speed;
- High reliability;
- Increases the service life of spark plugs;
- Powerful spark;
- No gap adjustment or centrifugal adjuster required.
The finished kit includes a distributor with a Hall sensor, a special ignition coil and a switch. It is possible to leave the old high-voltage wires.
The electronic ignition system includes: an ignition coil, a distributor, a switch and a set of wires
To install contactless ignition to replace the old one, we need a key for “13” and “10”, two screws for fastening the switch and a strobe for adjusting the advance angle.
The order of work performed:
- We bring the crankshaft pulley to the mark on the engine cover, the piston of the first cylinder should be at TDC.
- Disconnect the negative terminal of the battery.
- Remove the cover from the old distributor and note the position of the slider relative to the engine. This will help you quickly install and configure the new distributor.
- We disconnect the wire coming from the ignition coil, unscrew the lock with a key set to “13” and remove the distributor from the engine block.
- We install the new distributor according to the marks made, trying to align the marks on the body and the position of the slider. Do not tighten the fastening completely.
- We replace the ignition coil with a new one and install the switch under the hood. Place the electronic unit in a dry place, away from heated parts. For example, on the wing or engine shield.
- We connect the wiring according to the diagram in the instructions for the BSZ. We connect high-voltage wires.
- Close the distributor with the lid and tighten the fastening nut. The system is installed and ready to use. All that remains is to adjust the ignition timing.
Contactless ignition circuit for VAZ 2106
Important! BSZ systems may differ in the length of the distributor shaft for different models of classic Zhiguli engines, so before purchasing it is worth checking with the seller about the interchangeability of components.
2sh.jpg
The VAZ 2106 electrical circuit diagram is a detailed “plan” on the basis of which the entire system of electrical connections of the vehicle operates. It consists of:
1 — front lights; 2 — side direction indicators; 3 - battery; 4 - relay from the battery charge warning lamp; 5 – relay with which the low beam headlights are turned on; 6 — relay for high beam headlights; 7 – car starter; 8 - generator; 9 – high beam lighting devices (headlights); 10 — low beam devices; 11 – sensor with which the fan motor is turned on; 12 — electric motor of the SOD fan (engine cooling system); 13 – horn (sound signal); 14 — ignition coil; 15 – ignition distributor; 16 — spark plugs; 17 – carburetor solenoid valve; 18 – sensor that shows the coolant temperature; 19 — engine compartment lamp; 20 – car reverse light switch; 21 – sensor indicating the oil pressure level; 22 — oil pressure sensor; 23 - sensor from the warning lamp, indicating the brake fluid level; 24 – electric motor, which is used by the windshield wiper; 25 — switch (equipped if a non-contact ignition system is used); 26 – electric motor from the windshield washer; 27 — fan motor relay; 28 – machine voltage regulator; 29 – special relay-breaker for the windshield wiper; 30 – special additional fuse block; 31 — main fuse block; 32 — relay-breaker for car alarms and corresponding direction indicators; 33 – relay with which the rear window heater is turned on; 34 — brake light switch; 35 – special plug socket for a personal transport lamp (not installed since 2000); 36 – special additional resistor of the automobile electric heater motor; 37 – electric motor, without which the heater cannot operate; 38 – mandatory switch for the heater electric motor; 39 – machine clock; 40 – lamp that illuminates the glove box; 41 — car cigarette lighter; 42 — alarm switch; 43 – special regulator for lighting transport devices; 44 - warning lamp, which symbolizes insufficient brake fluid level; 45 – light switch for headlights, sound signals and direction indicators; 46 — car ignition switch; 47 — rear window heater switch; 48 — car rear fog lamp switch; 49 — external lighting switch VAZ 2106; 50 — door lamp switches (A-pillars); 51 — electric window motor (some of the manufactured vehicles are equipped with it); 52 — door lamp switches (rear pillars); 53 — switch for the warning lamp of the car parking brake; 54 – lampshades that provide interior lighting; 55 - fuel level indicator in the car, which has a reserve warning lamp; 56 — coolant temperature indicator; 57 - oil pressure indicator, equipped with a warning lamp for insufficient pressure; 58 – car tachometer; 59 — control lamp (CL) of the parking brake; 60 – battery charge CL; 61 — CL carburetor air damper; 62 — side light CL; 63 — CL turn indicators; 64 — CL main beam headlights; 65 — auto speedometer; 66 — carburetor choke switch CL; 67 – “left-door” switch for the electric window motor; 68 – automotive power window relay; 69 – “true” switch for the electric window motor; 70 — rear transport lights; 71 – lights that illuminate license plates; 72 – sensor showing fuel level and reserve; 73 — rear window heater; 74 – lamp used to illuminate the trunk; 75 — rear traffic fog lamp.
Checking the ignition angle while the vehicle is moving
It is best to check the functionality of the ignition system after any adjustment while driving. This is due to the design features of the distributor and the octane number of the gasoline used. It happens that the ignition angles set according to the marks do not provide sufficient dynamics and throttle response. Adjusting by ear according to the beginning of detonation will help:
- We accelerate the car to a speed of 45-50 km/h on a flat section of the road;
- We turn on direct transmission (fourth on the VAZ 2106) and press the gas pedal all the way;
- A characteristic ringing sound (detonation) should appear, which will disappear after 2-3 seconds, and the acceleration will be smooth and powerful without failures;
- If detonation does not disappear throughout the entire acceleration, then the ignition angle is “early”;
- The complete absence of ringing and sluggish dynamics indicate a delayed spark in the cylinders;
- We adjust the position of the distributor in place, turning it by 3-5 degrees;
- When the adjustment is completed, the position of the distributor body relative to the block is marked with a mark or paint.
Ignition adjustment work should be carried out regularly. The service interval for a simple contact ignition system is 15,000 km, for an electronic one - twice as long. The condition of the spark plugs and high-voltage wires is also regularly checked. All setup operations can be easily done independently; a garage is not needed for this. The skill of independently repairing the ignition of a VAZ 2106 will always come in handy on a long journey or in winter, when problems arise with starting.
- Author: Andrey
Rate this article:
- 5
- 4
- 3
- 2
- 1
(26 votes, average: 3.6 out of 5)
Share with your friends!
Home →
Maintenance and Repair →
Engine →