When the generator breaks down on a Lada Priora car, owners in many cases turn to a service station. But it is not always possible to use the services of professionals, so in this article we will analyze in detail the entire dismantling process with our own hands. If the car is not equipped with an air conditioning system, then difficulties usually do not arise. But if there is air conditioning, then the task of removing the generator on a Priora turns into a real “dance with tambourines.” This is evidenced by numerous posts on auto forums, which are full of “kind” words addressed to AvtoVAZ designers. Is it so? Let's figure it out.
Features of removing a generator on a car with air conditioning
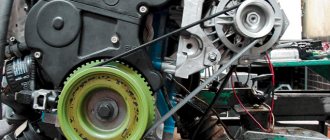
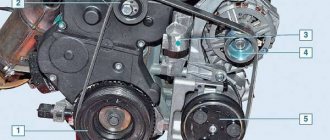
In a Lada Priora car with air conditioning, the air conditioning compressor and generator are driven by one belt. The design feature is such that it is impossible to dismantle the generator without removing the compressor. You must first disconnect the air conditioner pump from the bracket. This is the first difficulty encountered.
Generator Lada Priora from Bosch
A possible second problem awaits at the lower mounting of the generator. If the bolt is installed with the head towards the engine, it will not be possible to completely remove it. It is so long that it rests on the engine mount, and it is impossible to remove the generator. To remove the bolt, you need to jack up the engine and unscrew the mount. We advise you not to use this method. It’s easier to buy a new bolt and cut off the old one with a grinder. When installing the generator, install a new bolt, but with the head facing outward. This way you will save 10-15 minutes of your time in the future.
Removing the generator Priora with air conditioning: pulling it down without removing the headlight
If the process of removing the headlight seems complicated and time-consuming, which in reality it is, then you can use another method. Its implementation occurs in the following order:
- We de-energize the car.
- We remove the belt from the generator pulley by first unscrewing the bolt securing the tensioner pulley. It is recommended to remove it to check for serviceability.
- The upper mount of the generator is unscrewed using two “13” keys.
- The engine protection is removed.
- The electrical part of the generator is disconnected.
- Unscrew the lower mount of the generator. The nut is unscrewed with a wrench at “13”, and the bolt is fixed with a head at “17”.
- To pull the generator out through the space between the engine and the radiator, you must also loosen the fastening of the air conditioning compressor and move it to the side by 3-5 cm. The design of the compressors differs depending on the type: Halla and Panasonic. Let's immediately look at the location of the mounts for the Panasonic air conditioner. Using a “12” wrench, unscrew (not completely) the 4 bolts securing the Panasonic air conditioning compressor. The bolts on the right are shown below.
- Another bolt on the lower left side is at “12”.
- And one more left upper bolt for securing the Panasonic air conditioning compressor, which is best reached using a universal joint or a flexible ratchet extension.
- Below is shown where the top mounting bolt is located and how best to access it with a tool.
- Below is a picture of the Panasonic air conditioning compressor with the mounting holes placed for easier reference.
- Next, we move the Panasonic compressor to the side (closer to the radiator at the distance of the unscrewed bolts), and pull out the generator, moving the rubber tubes of the cooling system and air conditioning to the side.
Installation of the generator in place is carried out in the same way. The method involves removing a minimum number of parts. You can watch it in the video clip below.
It is important to consider that this method is only suitable for situations where the car has separate cooling fans. This is actually typical for Priors with Panasonic brand air conditioners, where the main fan is located between the radiator and the engine, and the additional one is moved forward between the radiator and the bumper (shown in the photo below). If there are two of them paired (as on Priors with Halla air conditioning), then a different method for dismantling the generator is described below.
Preparation and necessary tools
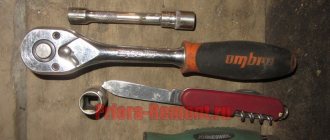
It is more convenient to remove the generator on a Lada Priora on an overpass or inspection hole. Before you begin dismantling, prepare the following tools:
- locksmith's crank;
- extension;
- cardan from the tool kit;
- heads for 10, 12, 13, 17;
- spanners for 10, 12, 13, 17.
- WD-40 product.
When driving onto a pit or overpass, do not forget to install chocks under the wheels so that the car does not roll spontaneously. Then disconnect the negative terminal from the battery. Apply WD-40 to the mounting areas of the generator and air conditioning compressor. Wait 10-15 minutes for the product to take effect.
Step-by-step instruction
- Remove the engine protection from below.
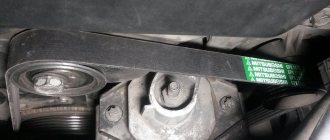
- Remove the ridge belt driving the air conditioning compressor and generator.
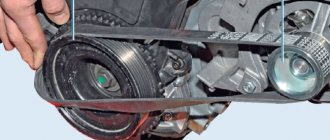
- Disconnect the contacts from the generator: first, under the rubber protective cap, terminal B+ (it is secured with a 10 nut), then terminal D (white chip). Using a 10 mm wrench, unscrew the generator contact
- Unscrew the top mount of the generator from the top of the engine compartment with two 13 mm spanners. Using two 13 mm wrenches, unscrew the top mount of the generator
- Remove the bolt.
Remove the generator mounting bolt - Unscrew the lower mounting bolt from the bottom of the engine compartment using a 17mm wrench. Unscrew the lower mounting of the generator with a 17mm spanner.
- Unscrew the compressor mount to the bracket with a 12mm wrench. The compressor is secured with 4 bolts: one short, three long. Start with the bottom ones. It is more convenient to unscrew the upper ones using a wrench, an extension, a universal joint and a 12mm socket. Start with the lower bolt securing the air conditioning compressor
- Move the compressor first downwards, then to the right towards the body side member. There is no need to remove the tubes. On a note. It is not necessary to secure the compressor. It will be held in place by the surrounding parts.
- Remove the bolt with metal sleeve from the lower mounting.
Remove the bolt with metal sleeve from the lower mounting of the generator - Pull the generator down from the engine compartment. Pull the generator down from the engine compartment
How to remove the generator on a Priora with air conditioning through the headlight
On Prioras, where an air conditioner is installed, the process of dismantling the generator is also complicated by the fact that the climate system pipes interfere with its removal. However, dismantling is quite possible, and there are different ways to do this. The most time-consuming option is to remove the generator through the headlight. How to do this correctly, we will consider in detail below.
- We de-energize the car by disconnecting the negative terminal from the battery.
- Next, you need to remove the right headlight, and also dismantle the adsorber. How to do this correctly is described in detail in this manual (for 8 and 16 valve models).
- After the headlight and adsorber have been removed, we continue to further describe the process of removing the generator on a Priora with air conditioning. Using a “10” wrench, unscrew the bolt securing the air conditioner pipes (shown in the photo).
- Lift the tubes out.
- Unscrew the bolt securing the air conditioner pipes next to the right engine mount.
- Remove the belt from the generator pulley by unscrewing the tensioner pulley bolt with a 17 key.
- Disconnect the wires from the generator. It is most convenient to do this from below, so we remove the protection (if it has not already been dismantled). Having gained access to the rear cover of the generator, disconnect the first connector “L” by removing the plug. To turn it off, you need to press the corresponding tab (latch or flag).
- Next, we move aside the protective cover from the other contact “B+” of the generator, and unscrew the nut with a wrench set to “13”.
- Using two “13” keys, you need to unscrew the upper mount of the generator and remove the bolt. The instructions from Avto-VAZ indicate that you need to unscrew the lower fastening first, but in reality there is no difference.
- After this, unscrew the lower mount of the generator using keys “13” (nut) and “17” (bolt head). We take out the bolt.
- We remove the generator through the vacated headlight hole.
- It is installed back in a similar way.
As noted above, removing the generator on a Priora through the headlight is one of the most labor-intensive processes, since many parts need to be removed. However, there are other options for dismantling the unit. Let's consider other methods.
Video report: How to remove the generator on a Lada Priora?
To clarify the process of removing the generator on a car with air conditioning, we suggest watching the video:
If you use the necessary tools and follow the instructions given above, you will be able to remove the generator on a Lada Priora with air conditioning in 40–60 minutes. Have you ever had to remove the alternator on your car? If yes, please share what difficulties you encountered and how you solved the problems. This can be done in the comments after the article. Let's help each other!
Let's get acquainted, my name is Dmitry Kuznetsov. (2 votes, average: 4 out of 5)
So, I was inspired to start replacing or repairing the generator. The blog will be edited and later I will tell you in more detail what, how and with what I performed this task.
Now the generator has already been removed, manufactured by KZATE. After removing the casing and removing the voltage regulator, it became clear that this was the reason.
And the question has arisen as to what to change it to. Waiting for your suggestions.
So, I will begin to describe the technology of the process.
Tools required to perform work on removing the generator and replacing the generator belt:
1. Socket wrench for 13. 2. L-shaped socket wrench for 13. 3. Socket wrench for 17. 4. Open-end or socket wrench for 10. 5. L-shaped socket wrench for 10. 6. Socket wrench for 8 , or a bit with an extension for 8. 7. Driver. 8. Extension funnel. 9. Head E10. 10. Head for 17. 11. Phillips screwdriver. 12. Jack. 13. Key for tensioning the generator belt roller. 14. Hammer. 15. A candle wrench or a pipe to create a shoulder. 16. Flat screwdriver.
Unscrew the negative terminal of the battery.
Unscrew the fastenings of the air conditioner cooling pipes on the fender and radiator mounting frame. (Key to 
We unscrew the bumper mounting bolts: 2 under the wing, 2-3 from the bottom, at the place where the casing is attached, all the bolts securing the bumper to the radiator mounting frame to the right headlight. (Crosshead screwdriver)
Unscrew the protective cover of the left headlight. (Crosshead screwdriver)
We pull off the bumper from the left wing.
Unscrew the headlight mounts. The bolt is under the front bumper and where the headlight is attached to the fender at the top. (A 10mm L-shaped socket wrench, or a screwdriver with an extension and a 10mm bit) Unscrew the headlight mounting bolt at the bottom of the fender. (Crosshead screwdriver)
We pull out the headlight a little, disconnect the connector, take out the headlight, carefully bending the bumper without breaking the headlight mounts.
We remove the absorber tubes by pressing the keys on the suitable tubes on both sides. Then unscrew the 2 bolts securing the absorber and remove it. (open-end wrench 10)
Unscrew the tension roller of the generator belt and remove the belt. (Open-end or socket wrench 17)
Unscrew the bolts securing the engine protection at the front. (open-end wrench 13 + shoulder screwdriver)
Unscrew the nut securing the wires going to the generator and remove the chip. (Key to 13)
Unscrew the top bolt securing the generator. This can be done from above. (2 keys for 13, socket + L-shaped socket)
Unscrew the bottom bolt securing the generator. (Wrench with head 17 + L-shaped socket wrench 13)
We remove the generator through the headlight, carefully twist it so as not to damage the paint on the radiator mounting frame. To do this, I first wrapped it with a rag.
To remove the voltage regulator, remove the cloth cover, very carefully, the clips are very easy to break off. Carefully bend the fasteners so that they fit into the places where they are fixed and use a flat screwdriver to lift the casing around the perimeter.
After which it will be possible to remove and inspect the voltage regulator and other components of the generator.
To replace the alternator belt, use a jack to lift the engine a little, right through the protection. We choose a flat place for the stop so as not to get on the oil drain plug.
Then, using the E10 head, a wrench with an extension and a shoulder for emphasis, in the form of a Pipe or a spark plug wrench, very carefully move the engine mount mounting bolts.
We do this very carefully! The bolts are very easy to break! First, slightly tap the knob with the head onto the bolt so that the head fits snugly!
After the bolts are unscrewed, gradually raise the engine with a jack until there is sufficient clearance to remove the belt. We take the belt down. A gap slightly less than the width of the belt was enough for me.
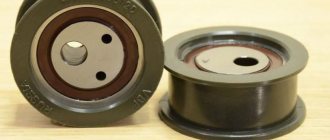
To replace the belt, a 6RK1115 belt was purchased. When checking, the roller did not make any noise, so I left the old one. We check the roller by quickly rotating the roller. If there is a hum or other unpleasant sounds, we either lubricate it or change it.
How to remove a generator without air conditioning from a Priora with power steering: detailed instructions with photos and videos
Without much further discussion, let's get straight to the point. For ease of work, it is recommended to install the vehicle on an inspection hole, if available. However, this is not a prerequisite, since you can reach the generator mount from below and without a hole. Be sure to begin dismantling work by first removing or disconnecting the negative terminal from the battery. This will protect the car from shorting the wiring.
On a Priora without air conditioning with power steering, the process of dismantling the generator is performed in the following sequence:
- First of all, using a key set to “17”, you need to loosen the bolt securing the tensioner pulley. There is no need to remove the bolt together with the roller if you do not plan to replace them. Remove the alternator belt from the pulley and move it to the side.
- Using a wrench set to “13”, unscrew the nut of the upper mounting of the generator. If necessary, hold the bolt with a key set to “13” on the other side. After unscrewing the nut, remove the bolt from the upper mounting of the generator. The photo shows it already removed.
- Now we move on to unscrewing the lower mount of the generator. To do this, we first remove the engine protection (if it is, and if not, then it is better to install it after completion of the work). We move down and unscrew the nut with a wrench at “13” of the lower generator mount. After this, we pull out the bolt, which is impossible to do on Priors with power steering. It will definitely rest against the engine mount bracket.
- And this is where the fun begins. Further actions throw everyone involved in the dismantling into a stupor. To remove the bolt, you need to remove the spacer sleeve from the side where the nut is located, as indicated in the instructions class=”aligncenter” width=”600″ height=”494″[/img]
- However, in practice this does not work, and after removing the bushing, the bolt still cannot be pulled out. That is why there are already proven methods on what to do correctly in this case in order to remove this bolt. The first method can be called anti-vandal. To implement it, you need to install a jack under the engine and jack it up.
- Next, in the engine compartment, we find the rear engine mount (aka guitar) and use a “15” key to loosen fastening No. 1 in the photo below. Having unscrewed the nut of bolt No. 2 (also with a key set to “15”), we pull it out (we do not pay attention to the air conditioner pipe, these instructions are specifically for Priora without air conditioning).
- We perform the same procedure with the front engine mount. Unscrew the nut with a 15mm wrench and remove the bolt. At this point, the engine must be secured with a jack so that it does not fall down.
- Unscrew the right support nut using a 17mm wrench. There is no need to remove the right airbag unless you plan to replace it. If you need to replace it, it is secured with two bolts with a Torx-E10 socket head.
- Next, slowly and carefully jack up the engine until the power steering pump pulley rests on the right cushion bracket.
- You can now remove the lower alternator mounting bolt. After this, the unit is removed. We’ll look at how best to do this a little later. For now, the second option is how to remove the lower bolt of the generator on a Priora. This method, unlike the first, is called vandal. To implement it, you will need a metal file (not a hacksaw, but only a blade).
- The blade is used to saw the bolt leg. There is no need to cut completely, but until it bends to be removed from the seat. If you cut the bolt completely, a new problem will arise. The rest of it will be difficult to get.
- We remove the bolt from the seat after bending it, and now all that remains is to disconnect the wires from the generator and begin dismantling it.
- In this case, it is important to purchase a new bolt to replace the deformed product. The original part has the number 21100-3701376-00 and standard dimensions M8×110. The bolt is installed back on the other side so that next time you don’t have to worry about removing it.
- Disconnect the “D+” wire connector from the device. After this, we move the rubber protective cover aside and use a “10” key to unscrew the contact nut “B+”. The negative terminal on the battery must be disconnected (check again).
- Now we remove the generator. If the engine has not been jacked up, then it is better to remove the device from below in the gap between the engine and the radiator.
- If the engine has been jacked up, the generator can be removed from the engine compartment.
Further actions with the removed generator depend on the type of its malfunction. After repair or in case of replacement, installation is carried out in the reverse order.
Below are video materials that show how to remove a generator on a Priora with power steering without air conditioning by lifting the engine.
And also a video instruction, which shows in detail how to saw off the lower mounting bolt of the generator on a Priora with power steering (without air conditioning), and remove the device from below.
Another method of removing a generator on a Priora is described in the video below.
Disassembly and assembly of the Lada Priora generator (VAZ-2170)
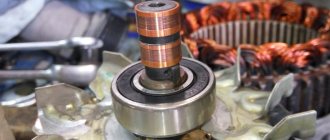
We disassemble generator 5102.3771 to check and replace the voltage regulator, rectifier unit, rotor, stator and bearings.
Checking the generator is shown in the “Fault Diagnosis” section.
The voltage regulator can be replaced on the car without dismantling the generator. For clarity, we show the replacement of the voltage regulator on a removed generator.
Use the 8mm socket to unscrew the nut...
...and remove the terminal from the “D+” terminal of the generator.
Using the “8” socket, unscrew the three nuts securing the casing.
Remove the generator casing.
Using a slotted screwdriver, unscrew the screw securing the voltage regulator output.
Using the “8” socket, unscrew the two nuts securing the voltage regulator.
Remove the voltage regulator.
We remove the gasket. To disassemble the generator...
...remove three washers from the casing mounting studs.
We use a marker to mark the relative positions of the generator covers.
Using a 7-point socket, unscrew the four bolts holding the covers together.
Remove the back cover with the stator assembly. If the stator does not come out of the front cover, pry it off with a screwdriver from different sides relative to the front cover.
We put a high “24” head on the pulley fastening nut and through its hole insert a “8” hexagon into the hole of the rotor shaft. We unscrew the pulley fastening nut, holding the tool head with a pipe wrench or in a vice.
Remove the spring washer.
...and a spacer washer.
We push the rotor shaft out of the front cover...
...and remove the cover. To replace the front bearing...
... use a slotted screwdriver to unscrew the four screws securing the bearing pressure plate.
Remove the pressure plate.
Use your hands to push the bearing out of its seat...
...and remove it. If it is not possible to push out the bearing, we knock it out using a mandrel or tool head of a suitable diameter.
To replace the rear bearing...
...using a two-jaw puller we press the bearing from the rotor shaft. When performing this operation, the puller screw should be pressed exactly into the center of the shaft so as not to damage the plastic insulator of the rotor slip rings. To install the puller grips, two flats are made on the plastic rotor bushing.
If it is necessary to remove the rectifier unit or stator...
...unsolder the six terminals of the stator winding from the terminals of the rectifier block... ...and unscrewing the three fastening nuts with an “8” wrench, remove the rectifier block and the stator.
We assemble the generator in reverse order.
To install the rear bearing, we rest the front end of the rotor shaft on a wooden block...
...and press the bearing onto the rear end of the shaft using a mandrel or a piece of pipe of suitable diameter, applying force only to the inner ring of the bearing. If the front bearing cannot be inserted into the generator cover...
...press the bearing into the cover using a suitable tool head, applying force to the outer ring of the bearing.
Video on the topic “Lada Priora. Disassembling and assembling the generator"
Priora generator repair, Lada Priora 115A generator repair
Generator bulkhead VAZ 8,9,10,11,12,13,14,15 Priora, Gazelle Volga, Sable
Without electricity, nothing will work. So on a car, the voltage in the on-board network is maintained by a generator. You need to understand how many amperes you need in the on-board network.
It all depends on the amount of attachments, air conditioning, heating, etc. Depending on the configuration, a generator is also selected. Read the article to the end and we will cover this topic. Removing and replacing the generator on a Lada Priora car depends on the attachments; if the car does not have air conditioning, then the unit can be removed in 6 steps. If the air conditioner costs 9 steps, we will talk about them in the article. This part on Priora comes in 3 types. Their prices are also different.
The installation location may vary for different car brands and models. You should look for it in the engine compartment, near the rubber cushion on which the engine is mounted. 90A article 3282.3771, is a source of energy in the electronic equipment system of 2170-72 Priora cars.
Generator for Priora produced by BATE price from 4120 rubles
- Weight 5.5 kg
- LxHxW 200x170x200 mm
- Rectified current 90 A
- Power 0.98 kW
- Voltage 14 V 100 A
It has article number 5132.3771 and is a source of energy in the electronic equipment system of 2170-72 Priora cars.
Generator for Lada Priora with air conditioning manufactured by Pramo price from 4200 rub.
- Maximum rectifier current 100 A
- Weight 5.3 kg
- Voltage 14 V
- Power 233 W/kg
- Internal cooling
- Stator diameter 125 mm
- 115 A
It has article number 9402.3701-14 and is a source of energy in the electronic equipment system of 2170-72 Priora cars.
- Maximum rectifier current 115 A
- Weight 5.2 kg
- Nominal voltage 14 V
- Power 1610 W
- Stator diameter 125 mm
- Length 188 mm
- 115 A
It has article number 9402-14 and is a source of energy in the electronic equipment system of 2170-72 Priora cars.
120 A Has article number 9402-3701-14P, is a source of energy in the electronic equipment system of 2170-72 Priora cars.
- Maximum rectifier current 120 A
- Weight 6 kg
- Nominal voltage 14 V
Manufacturer ATE-1 cost from 4000 rub.
Disassembling and assembling the Lada Priora car generator
We disassemble generator 5102.3771 to check and replace the voltage regulator, rectifier unit, rotor, stator and bearings. Checking the generator is shown in the section. The voltage regulator can be replaced on the car without dismantling the generator. For clarity, we show the replacement of the voltage regulator on a removed generator.
Use the 8mm socket to unscrew the nut...
...and remove the terminal from the “D+” terminal of the generator.
Using the “8” socket, unscrew the three nuts securing the casing.
Remove the generator casing.
Using a slotted screwdriver, unscrew the screw securing the voltage regulator output.
Using the “8” socket, unscrew the two nuts securing the voltage regulator.
Remove the voltage regulator.
We remove the gasket. To disassemble the generator...
...remove three washers from the casing mounting studs.
We use a marker to mark the relative positions of the generator covers.
Using a 7-point socket, unscrew the four bolts holding the covers together.
Remove the back cover with the stator assembly. If the stator does not come out of the front cover, pry it off with a screwdriver from different sides relative to the front cover.
We put a high “24” head on the pulley fastening nut and through its hole insert a “8” hexagon into the hole of the rotor shaft. We unscrew the pulley fastening nut, holding the tool head with a pipe wrench or in a vice. Remove the spring washer.
We remove the pulley...
...and a spacer washer.
We push the rotor shaft out of the front cover...
...and remove the cover. To replace the front bearing...
... use a slotted screwdriver to unscrew the four screws securing the bearing pressure plate.
Remove the pressure plate.
Use your hands to push the bearing out of its seat...
...and remove it. If it is not possible to push out the bearing, we knock it out using a mandrel or tool head of a suitable diameter. To replace the rear bearing...
...using a two-jaw puller we press the bearing from the rotor shaft. When performing this operation, the puller screw should be pressed exactly into the center of the shaft so as not to damage the plastic insulator of the rotor slip rings. To install the puller grips, two flats are made on the plastic rotor bushing. If it is necessary to remove the rectifier unit or stator...
...unsolder the six terminals of the stator winding from the terminals of the rectifier block... ...and unscrewing the three fastening nuts with an “8” wrench, remove the rectifier block and the stator. We assemble the generator in reverse order. To install the rear bearing, we rest the front end of the rotor shaft on a wooden block...
...and press the bearing onto the rear end of the shaft using a mandrel or a piece of pipe of suitable diameter, applying force only to the inner ring of the bearing. If the front bearing cannot be inserted into the generator cover...
...press the bearing into the cover using a suitable tool head, applying force to the outer ring of the bearing.
Principle of operation
When you turn the ignition on, current from the battery enters the field winding through the brush assembly, where a magnetic field appears. When the crankshaft rotates, the rotor goes into rotation. The magnetic field passes through the stator winding and an alternating voltage is generated at the output. Having reached a certain rotation speed, the excitation winding begins to be powered directly from the generator.
The alternating voltage is changed to constant thanks to the rectifier unit. Now the generator charges the battery and powers consumers. When the rotation speed changes, the voltage regulator is connected to the operation.
Basic faults
Why does the generator not charge the Lada Priora car? There may be several reasons:
- the diode bridge is damaged;
- the turns of the stator winding are closed;
- slip rings wear out;
- the pulley is damaged or worn out;
- the wires of the charging circuit are damaged;
- the bearing is destroyed or worn out;
- the voltage regulator is damaged;
- The current collecting brushes wear out.
In all of the above cases, repair of the Lada Priora generator will be required.
Removing and installing the generator
For the owner of a vehicle manufactured by AvtoVAZ, which is equipped with air conditioning, the question of how to remove the generator from a Lada Priora car will be more difficult.
Tight installation of components and assemblies under the hood will complicate the procedure. Installation of a new unit is carried out in the reverse order of the removal procedure. After replacing, do not forget to tighten the timing belt.
How to remove a generator on a Priora with air conditioning:
- Remove the protection on the engine.
- We loosen the tension of the drive belt roller.
- The upper mounting bolt can be easily unscrewed with a 13 mm socket wrench.
- The bolts that hold the air conditioning compressor are unscrewed.
- The Lada Priora alternator belt going to the compressor is being replaced.
- The part should be moved slightly towards the battery. This will give you access to the bolt that secures the air conditioning compressor.
- After unscrewing the last fastener, the compressor is hung. There is no need to fix it.
- Now the bolts securing the part are unscrewed.
- The terminals are disconnected and the alternator belt of a Lada Priora car with air conditioning is replaced.
Without air conditioning
- Disconnect the terminals from the generator connectors.
- Remove the drive belt. To do this, you need to loosen its tension.
- Unscrew the generator bracket bolts. Top and then bottom. The bottom bolt is unscrewed from under the car.
- We turn out the adjusting bolt.
- Remove the bottom bar.
- We remove the part.
Generator for Priora with fasteners, brackets and belt: articles and types
The mounting scheme for the generator on a Priora without a generator and air conditioning differs from more expensive modifications. The difference lies in the unit mounting bracket. Below is a diagram of the device with the designation of all elements.
Priora without power steering and air conditioning
The names of the parts, as well as their original numbers, are shown in the photo below.
As can be seen from the diagram, on such motors the belt tension is adjusted by changing the position of the unit itself. The upper fastening element is designed accordingly for this purpose. In addition, it is important to pay attention to the fact that Priors are equipped with generators of various modifications. Their original codes are presented in the list above.
Priora engine without power steering and air conditioning
On Priors with air conditioners (and without them) and power steering, slightly different modifications of the generator brackets are used. The photo below shows their diagram with the designation of the elements.
Priora with air conditioning or power steering
Interesting! Priora was also produced in a limited number of models with power steering and air conditioning.
It can be seen that the bracket is significantly different from the previous type. It does not have an adjustment plate, and the tensioner roller is responsible for adjusting the belt tension on Prioras with this fastening design. Below are the names of the parts, as well as their article numbers, which may be needed if it is necessary to purchase new original products due to failure of standard elements.
Having understood the differences, you can now consider the process of removing or dismantling the generator on a Priora in different ways.
Alternator bearings for Lada Priora: diagnostics, signs of malfunction and replacement
The following circumstances indicate the need to replace the bearing:
Malfunctions of electrical equipment;
Extraneous noises, whistling and humming when starting up;
Slow or insufficient battery charging;
Distinct beating due to uneven rotation of the shaft;
Diagnosis of the malfunction is carried out using the following steps:
What kind of bearing is needed
- For a 17 mm shaft, bearing No. 303 is suitable.
- Bearing No. 302 is suitable for a 15 mm shaft.
- They have the same rear bearing No.202.
Bearing replacement
For work you will need: Phillips and flathead screwdrivers, 8 and 10 wrenches, 8 and 24 socket wrenches, a hammer. First you will need to remove the generator of the Lada Priora car, and then follow the sequence:
- Remove the voltage regulator.
- Remove the generator cover and remove the stator from it.
- Using a spanner, unscrew the nut holding the shaft from turning.
- Remove the pulley with the spring washer of the generator rotor shaft.
- Press the rotor shaft out of the bearing.
- Remove the 4 screws holding the bearing thrust washer.
- Using a 24mm socket wrench and a hammer, press in the bearing.
Reassemble the product in the reverse order, starting with pressing the new bearing into the generator cover.
Repair of generator 5102.3771 Lada Priora
You will need: flat and Phillips blade screwdrivers, 8" and 10" wrenches, 8" and "24" socket wrenches, hammer, tester
Remove the generator from the car.
Remove the voltage regulator (see Checking and replacing the voltage regulator of Lada Priora).
Unscrew the three nuts securing the rectifier unit and the two nuts securing the remote bushings of the “plus” terminal and the generator excitation terminal.
Remove the bushings.
Unsolder the six terminals of the stator winding.
Remove the rectifier unit from the generator.
This is what the removed rectifier unit looks like from the side of the protective casing
This is what a capacitor looks like, which is non-removable.
Check the “negative” diodes by connecting the “positive” (red) probe of the tester to the “negative” plate (bus) of the rectifier unit, and the “negative” (black) probe alternately to the three contact terminals of the diodes in three places (one at a time) of the stator winding mountings .
If the diodes are working properly, the tester will show 580–620 Ohms.
Connect the “negative” (black) probe of the tester to the “minus” plate of the rectifier unit, and the “positive” (red) probe alternately to the same three contact terminals.
If the diodes are working properly, the tester will show an infinitely high resistance.
If the tester shows low or close to zero resistance, then the diode is “broken,” if the tester reading tends to infinitely high resistance, regardless of the color of the connected probes, then the diode is “broken.”
In both cases, the rectifier unit must be replaced.
Check the “positive” diodes in the same way, but only relative to the “positive” plate of the rectifier unit or the “B+” terminal of the generator.
Using a tester, check the stator windings for an open circuit (diagram with solid lines) and for a short circuit to the starter housing (diagram with dotted lines).
When taking measurements, make sure that the winding leads do not touch the generator cover.
Mark the relative positions of the generator covers.
Remove the four pinch bolts.
Using a screwdriver, remove the generator cover from the slip ring side.
Remove the stator from the cover.
Inspect the stator. There should be no traces of the armature touching the stator on its inner surface.
If there is wear, the bearings or alternator covers must be replaced.
Place the spanner on the nut or socket and through its hole, insert the hex key into the shaft hole.
Unscrew the nut with a spanner wrench, holding the shaft from turning.
Remove the spring washer and pulley from the rotor shaft.
Remove the rotor shaft from the bearing.
If necessary, screw the pulley fastening nut onto the rotor shaft and press the rotor shaft out of the bearing through a wooden spacer with light blows of a hammer.
Inspect the cover on the drive side (assembled with the generator bearing).
If, when rotating the bearing, you feel play between the rings, rolling or jamming of the rolling elements, the protective rings are damaged or there are lubricant leaks, replace the bearing, and if cracks are found in the cover, especially in the places where the generator is attached, it is necessary to replace the generator cover.
To replace the bearing or cover, remove the four screws securing the bearing thrust washer.
Remove the washer
Using an aluminum spacer, press the bearing out of the generator cover with light blows of a hammer.
Press the new bearing into the cap using a socket of the appropriate diameter.
Inspect the slip rings.
If they have burrs, marks, scratches, signs of wear from brushes and other defects, the rings must be sanded.
If damage to the rings cannot be removed with sandpaper, turn the rings on a lathe, removing a minimum layer of metal, and then sand them.
Check the resistance of the rotor winding with a tester by connecting it to the slip rings.
If the tester shows infinity, it means there is a break in the rotor winding and needs to be replaced.
Check that the rotor winding is not shorted to the housing by connecting the tester leads to any slip ring and the rotor housing.
The tester should show infinity.
Check the ease of rotation of the bearing on the slip ring side.
If, when rotating the bearing, you feel play between the rings, rolling or jamming of the rolling elements, the protective rings are damaged or there are lubricant leaks, the bearing must be replaced.
To do this, use a puller to press the bearing off the rotor shaft and press on a new one using a suitable mandrel, applying force to the inner ring of the bearing.
Inspect the generator cover from the slip ring side.
If cracks are found, the cover must be replaced.
Assemble the generator in the reverse order of disassembly, orienting the generator covers and stator housing according to the marks made
How to tension the alternator belt
When checking whether the belt is tensioned on a Priora car, keep in mind that marks are applied to the camshaft pulleys. Rotate the crankshaft until the marks on the camshaft pulleys coincide with the cutouts on the reverse side of the drive.
With normal timing tension, the protrusion of the inner sleeve of the tensioner pulley should coincide with the opening of the outer race. If the belt is in good condition and the marks do not match 1/2 of the reach width, the tension should be adjusted.
- Loosen the bolt holding the tension roller.
- Make sure the cutout of the roller aligns exactly with the protrusion on the back of the roller bushing.
- Using wrench 15, tighten the tensioner pulley bolt.
- Simply put, to tension the belt, the generator roller needs to be turned in the opposite direction clockwise.
Reasons for replacing the belt on a Priora and how to change it
The generator has to be removed for various purposes, for example, to repair it, modify it, check it, or replace it with a new one. Sometimes in order to gain access to other elements of the engine compartment. The process of removing the generator may vary depending on the engine type and vehicle configuration. The instructions presented below will also be useful for replacing the alternator belt.
Signs of trouble
Other manifestations may indicate malfunctions of the energy generator, for example:
- dim headlights/dashboard;
- unstable lighting brightness;
- blinking or lighting of the indicator lamp on the instrument panel.
It is worth considering that the generator is partly interdependent with the battery. The generator is responsible for the electricity; the battery functions as a backup battery, which operates only during certain periods: when the engine starts and to supply power to the electronics when the engine is turned off.
Problems with power supply and voltage drops make it clear to the motorist that it is time for maintenance.
Causes of problems
Lack of power supply may be due to mechanical damage or disturbances in the electrical device of the generator.
In the first case it is:
- body deformation;
- violation of fixation (breakage of fastenings);
- wear of bearings, springs, couplings and other components.
Electrical problems on Lada Priora:
- interruption of the electrical circuit in the winding/short circuit;
- relay failure;
- disturbances in the conductivity of the diode bridge current;
- wear of carbon brushes;
- armature plate deformation/short circuit.
Given the differences in models, there are also nuances in removing the generator.
Features of detecting generator breakdowns on Priora
The generator on a car is the most important element, therefore, if its electrical part malfunctions, the battery icon on the panel will immediately light up, which indicates that the battery is not receiving current from the source of its generation. In this case, the unit must be checked, the cause must be identified and eliminated. The reason could be anything:
- oxidation of the battery terminal;
- alternator belt break or loosening;
- brush wear;
- malfunction of the regulator (integrator);
- failure of the diode bridge;
- collector wear.
All these breakdowns will appear in the form of a highlighted battery icon on the instrument panel. If the cause of the generator breakdown is a faulty bearing, then it will also not be difficult for the driver to identify it. After all, in this case, extraneous noise will be emitted from the engine, and if you open the hood, it will clearly be visible next to the generator. To really make sure that the cause of this extraneous noise is the generator, and not the pump or other timing elements, you should remove the belt from the generator and start the engine. The absence of a characteristic sound is the main sign that the breakdown lies in the generator and it needs to be dismantled.
Interesting! You can check the serviceability of the generator for electrical function using a multimeter. With the engine running, you need to measure the voltage at the battery terminals. Without any electrical appliances on the car, the multimeter should show a voltage of at least 13.8V, and ideally 14.2-14.5V. Now let's make sure that the generator produces sufficient voltage under load. We turn on the car's heater, headlights, heated rear window, fog lights, and record the readings again. A voltage drop to 13.7V indicates that the electrical part of the generator is working properly and the unit can continue to be operated. If the value is 13.5V and below, then the device should be diagnosed, otherwise the battery will soon be completely discharged at one point.
Alternator malfunctions should be repaired after removing it from the vehicle. Exceptions include situations where the belt breaks or loosens, as well as contact oxidation. Some car owners are so afraid of the procedure for removing the generator on a Priora that they resort to replacing the voltage regulator on the installed device. However, this is quite possible to do, as evidenced by the experience of car owners.
It is only important to make sure that the cause of the corresponding malfunction is the voltage regulator, and not a worn-out collector or a broken diode bridge.
Preparation and necessary tools
It is more convenient to remove the generator on a Lada Priora on an overpass or inspection hole. Before you begin dismantling, prepare the following tools:
- locksmith's crank;
- extension;
- cardan from the tool kit;
- heads for 10, 12, 13, 17;
- spanners for 10, 12, 13, 17.
- WD-40 product.
This is interesting: On the way to a “perpetual” engine When you drive onto a pit or overpass, do not forget to install chocks under the wheels so that the car does not roll spontaneously. Then disconnect the negative terminal from the battery. Apply WD-40 to the mounting areas of the generator and air conditioning compressor. Wait 10-15 minutes for the product to take effect.
Algorithm for removing the generator
In any configuration, it is initially necessary to prevent the flow of electricity. To do this, disconnect the negative terminal from the battery.
Next, perform actions in the following sequence:
- remove the generator drive belt;
- remove the rubber cover, which is secured with a nut;
- remove the connection wires with the contact pin;
- unscrew the lower fastening nut;
- remove the nut with sleeve;
- remove the lower fastening bolt;
- remove the bolt and remove the tension bar.
The generator can be removed. Reinstalling the unit is carried out in reverse order.
The hydraulic booster on the Lada does not prevent the generator from being removed through the lower protection or through the headlight; it depends on the specific model.
Additionally, we recommend reading the article by our specialist, which describes in detail the VAZ-2106 generator.
We also recommend reading our expert’s interesting article on how to remove the generator on a VAZ-2114.
If there is a need to remove the pulley, first remove the generator drive belt and loosen the radiator mounting bolts. Next, the adjustment bolt is unscrewed and the fastening nuts are removed directly. When removing the mounting bolt, it is necessary to support the generator; after removing the bolt, you can remove the pulley.
Generator replacement
Taking into account that the Lada Priora is equipped with a large number of electrical appliances, it is necessary to install a powerful generator that can cope with all tasks. Characteristics of a suitable device:
- marking 5102.3771;
- power 80 Ampere or 115 Ampere. For lovers of good music, the power should be 170 Amps.
First, you need to remove the old generator. This should be done in three steps, shown in the photographs:
- Remove the terminal from the battery and the belt placed on the generator and crankshaft pulley (there is no need to lift the engine mount).
- Disconnect the three wires going to the generator. The first is in the form of a connector, the other two are in the form of terminals under a protective cap, which must be bent and the fastening nut unscrewed to disconnect the wires.
Secondly, install a new suitable generator. It is mounted in the same order in which the old mechanism was removed. It is necessary to take into account that installing a generator with a power of 115 Amps from Priora Lux on the Lada Priora requires connecting a new D+ wire connector, which has different parameters. It can be bought at any car dealership. Finally, you should connect the remaining wires to the generator.
As you can see, replacing the generator with a new one according to the above scheme is not difficult.
If you find an error, please select a piece of text and press Ctrl+Enter.
Repair work
Replacing a Lada Priora generator with air conditioning
If you need to replace a Priora generator with air conditioning, then there are two nuances that lie in the manufacturer of the air conditioner. Panasonic allows you to remove the unit without a compressor, but the Hull compressor will not allow you to get the generator.
Removing the generator from a Lada Priora with air conditioning step by step:
- remove engine protection;
- if necessary, remove the ridge belt of the compressor drive;
- access to the generator contacts that need to be disconnected is opened;
- unscrew the engine compartment mount and remove the bolt;
- if the above steps allow you to remove the compressor, it must be moved down and to the right;
- remove the bolt and bushing;
- remove the generator from the bottom plane of the engine.
If the bolt cannot be removed, there are two options:
- Cut the bolt with a grinder and then install a new one.
- Raise the engine with a jack, remove the cushion, remove the bolt.
During subsequent fastening, screw the bolt with the head outward to prevent such difficulties.
You may also be interested in our specialist’s article on how to remove the front bumper on a Priora.
We recommend that you further study our expert’s article, which talks about how to remove a headlight on a Priora.
If you are sure that the problem is caused by wear of the carbon brushes, then you can change them without removing the generator. It is worth noting that generators on Priors have a non-repairable brush mechanism, that is, this part is completely replaced when the brushes wear out.
Replacing generator brushes
Step-by-step process - replacing the Priora generator brushes without removing the generator:
- remove the negative terminal;
- remove the power wire going to the generator;
- remove the plastic casing;
- unscrew the fastening mechanisms holding the brushes;
- install a new spare part and connect the wires.
It is recommended to check with a voltmeter whether the charging process is in progress and what is displayed on the panel. If the indicators correspond to each other, you can install the remaining parts in place.
How to remove a generator from a Priora without removing the air conditioner in the absence of an overpass
Taking into account the technical features of the location of mounted units, including the generator, sometimes it is impossible to do without a pit or overpass. But there is an option to remove the dynamo not from below, but through the headlight. This option is convenient to use for models with air conditioning.
- unscrew the plastic protection above the headlight;
- loosen the bumper mounting nuts from below;
- completely unscrew the fastenings from the wing;
- unscrew all headlight mounting bolts;
- disconnect power;
- remove the headlight;
- disconnect the adsorber clips and remove it;
- loosen the tension roller of the generator belt;
- move the air filter aside;
- unscrew the generator mounting bolts;
- disconnect the wires;
- remove the generator.
If you do not have experience in disassembling, removing units and replacing elements, then it is better to enlist the support of specialists or contact a VAZ service workshop.
In the absence of experience, there is a possibility of damage to air conditioner elements or, as often happens, poor-quality fastening of parts, which is confirmed by excess bolts and nuts remaining after repairs.
Priora. Generator repair.
The generator made a loud noise during operation.
99% that this is due to the bearings.
We remove the generator from the car. To do this, simply unscrew the lower ear bolt and the upper ear adjusting bolt. We take it to the workbench.
The initial inspection did not show any severely damaged bearings, but a small amount of play was still present. In advance, the owner of the Priora purchased a set of two generator bearings.
Remove the pulley and rear plastic casing. To remove the pulley, we use the original generator belt for the noose. This makes it easier to unscrew and tighten the pulley mounting nut.
We visually inspect (for now) all the elements for burnout, fraying and soot. I didn't like the wiring from the capacitor. The insulation on it had melted. Or frayed. During assembly, I insulated it with electrical tape.
The brush assembly with voltage regulator is new. There are no questions for him. But the copper current collectors are not so hot. The continuity test, voltage regulator and diode bridge did not reveal any anomalies. Everything is in working order.
Now it's up to the bearings. By the way, the plastic support sleeve of the rear rotor bearing, which is located in the rear cover, must also be replaced.
We completely disassemble the generator. We take out the winding and half the covers.
It is better to remove the bearings themselves from the rotor using normal pullers.
True, I had an incident that caused me a lot of trouble. Not because of my crooked hands, but because of my crooked eyes. The domestic manufacturer made the rotor shaft from such raw metal that during the process of pressing out the front bearing, I did not see that under the action of the puller rod, the rotor shaft simply flared out... like plasticine.
And there is a threaded part on which the pulley is seated and the nut is tightened. Thread M14, thread pitch 1. I cursed at myself for a long time...
Anyway. The second problem is that from a set of new bearings, the rear one fit, but the front one turned out to be larger than the old one.
I called the owner and by the evening I had the required bearing. I went to a specialized store and luckily they had the die I needed in stock.
We press on new bearings.
All that remains is to repair the flared threaded shaft. Grinded around the circumference. And cut a new thread.
After which the pulley stood up as it was. Tightened the nut.
All that remains is to put the generator in place. Check the voltage on the battery, start it and check the voltage on the battery with the generator running. In our case, there is charging, everything works quietly and smoothly.
And now, in terms of a lyrical digression. Since the owner of the Priora is a friend of a friend of mine, we started talking. He says that the maintenance of this generator cost him the same as a new one. Considering that I charged him 1000 rubles for such work, I’m surprised. A new one costs around five?! It turns out that he had already changed the “tablet” at some service for 1,800 rubles. 300 rubles per tablet and one and a half thousand for the work! He says they removed the generator from the car while he was there, and that’s why the cost of the work is so high.
Dear Prior owners