Belt faults
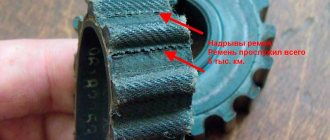
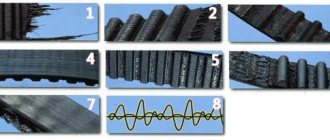
Malfunctions of the timing belt can arise as a result of its long-term operation, and can also be the result of incorrect adjustment or malfunctions of the pump or tension roller. These include:
- violation of the integrity of the belt (cracks, delamination);
- deformation;
- belt break.
If any of the specified malfunctions are detected, the belt must be replaced.
How to replace the tension roller
14
- Remove the faulty roller, put a new one in its place, and tighten it with a special wrench.
15
- Use a tension roller to adjust the timing belt tension (follow the instructions).
Why change the belt?
In accordance with the list of routine maintenance for the VAZ 2110, the timing belt must be changed after every 60-75 thousand kilometers, however, here you also need to take into account the conditions of its operation, and this is:
- temperature changes;
- oil getting on the belt;
- problems with the tension roller;
- faulty pump.
All this will inevitably lead to damage.
It is necessary to inspect at least once a month:
- belt (determining its integrity);
- tension roller ;
- water pump gear.
And although on 8-valve VAZ engines, the valve does not bend when the belt breaks, this breakdown can damage the pump or generator.
How to Install a Timing Belt - Step by Step Guide
Everything is done in reverse disassembly sequence.
1. It is almost impossible to install the generator drive pulley incorrectly; it has a special recess, if it does not match, it simply will not fit into place.
2. When installing the belt, carefully monitor the tension of the drive branch.
3. After the belt is installed, tension it using the special wrench prepared earlier with two protrusions at the ends.
5. Having installed the key in the holes on the outside of the tension roller, turn it counterclockwise until the cutout on the outer disk aligns with the rectangular protrusion on the inner sleeve of the tension roller.
6. Using a wrench set to “15”, tighten the tension roller mounting bolt.
7. If, after installing the timing belt, belt noise is heard while the engine is running, then the tension roller bearing may be faulty or gradually failing.
8. To check this, dismantle the rollers, then slowly, rotating them, check for any play or jamming.
9. If you find that the tension roller has abnormalities in operation (play, jamming, creaking during rotation, traces of oil on the surface, replace the tension roller.
Timing belt price
The price of a VAZ 2110 timing belt, depending on the manufacturer, can vary from 400 to 1000 rubles. The tension roller costs about the same, which is recommended to be changed along with the belt. The cost of replacing these timing drive elements is 600-1000 rubles.
To save money, you can replace the belt and roller yourself. There is nothing complicated in this procedure, and no special tools are required. You just need to purchase spare parts.
The table below shows timing belt models for the 8-valve VAZ 2110 from different manufacturers, indicating their catalog numbers.
| TIMING BELT VAZ 2110 (8 VALVES) | |
| AVTOVAZ | 2112-1006040 |
| BOSCH | 1987949559 |
| CONTI | CT996 |
| CONTITECH | CT 996 |
| GOODYEAR | G1535 |
| GATES | 5539 |
| FLENNOR | 4428 |
| LUZAR | LTB0112 |
| LYNX | 136CL254 |
| PILENGA | CTP0996 |
| OPTIBELT | ZRK1538 |
| TENSION ROLLER | |
| AVTOVAZ | 21120-100612000 |
Help in choosing a timing belt and rollers
The reliability, efficiency and operating life of the motor depend on the quality of the rollers and belts chosen for replacement.
Research shows that the cost of a belt is from 450 rubles, and rollers will cost you at least 600 rubles.
When buying spare parts, be guided by the opinions of VAZ 2110 car owners. There are many forums. Also consult with specialists at the service station. They will be able to give professional advice, or even order quality components for you.
Surveys among owners of AvtoVAZ’s creation, namely the VAZ 2110, showed that the most popular belts are products manufactured by the following companies:
- Gates;
- Bosch;
- Kraft;
- Power Grip;
- Dayco;
- Contitech.
As for videos, it’s better to pay attention to the following brands:
- Gates;
- Power Grip;
- VPZ;
- BRT;
- Dayco;
- Marel.
Of course, the choice is purely individual and depends on the financial capabilities and available assortment of a particular store. But if the necessary elements are not available in your city, you can always order them online. Nowadays this is not a problem.
Replacement
- keys for 10, 13, 17;
- key for rotating the roller;
- flat screwdriver;
- wheel wrench;
- jack;
- a little engine oil to lubricate the tension roller.
1. Place the car on level ground and put it in gear.
2.Using a 10mm wrench, unscrew the bolts securing the timing case.
3. Loosen the generator belt tensioner using a 13mm wrench. Remove the belt.
4. We check the marks on the camshaft gear and the protrusion on the rear cover of the belt housing.
5.If they do not match, you need to turn the crankshaft until they match. This can be done by rotating the front wheel, jacking it up first, or turning the crankshaft with a 17mm wrench using the crankshaft pulley bolt (the gear must be engaged).
6.Behind the 4th cylinder on the clutch housing there is a rubber plug. We open it by prying it off with a screwdriver. Below it you can see the flywheel crown, which also has a mark. It should coincide with the triangular cut located on the crankcase to the left of the flywheel.
7.If they do not match, you need to loosen the tension roller, turn it to the left, thus loosening the belt, and remove it from the camshaft gear.
Also check out
- Self-adjustment of VAZ 2110 headlights at home
- How to replace brake fluid on a VAZ 2110 yourself
- Dismantling the cylinder head on a VAZ 2109. Algorithm for replacing the cylinder head gasket yourself
- Using a 17mm spanner, unscrew the bolt that secures the crankshaft pulley and remove it along with the washer.
9
- Then remove the generator drive pulley from the crankshaft.
11
- Next, remove the timing belt drive washer from the pulley. Then you need to remove the timing belt from the crankshaft pulley.
10
Replacing the timing pulley on a VAZ - step-by-step instructions
Description of the work on replacing the timing pulley on a VAZ: information about the tension roller, indications for replacement, preparation, step-by-step instructions.
Video about replacing the timing belt tension pulley. The timing roller is responsible for adjusting the tension of the timing belt in the car. But like other consumable parts, during operation it wears out and fails. As a result, the belt tension is weakened and normal engine operation is jeopardized. Today we will look at the intricacies of replacing the timing belt tension roller using the example of VAZ 2113, 2114, 2115 cars.
Replacing the tension roller is done as follows:
1. Remove the faulty roller, then install a new roller in its place and tighten using a special wrench according to the instructions described above.
2. Adjustment of the timing belt tension using a tension roller is carried out according to the instruction manual.
Replacing the VAZ 2110 timing belt has been successfully completed, start the engine and make sure that everything is in order. There is nothing complicated about how to replace a timing belt, so there is no need to pay for something that you can easily do yourself, so you can save money while gaining valuable experience.
Some information about the tension roller
The tension roller is an important mechanism in the timing belt, which affects the quality of tension of the belt drive and connects the crankshaft to the generator. Therefore, not only the operation of the timing belt, but also the voltage of the on-board network and the battery charge depend on its serviceability.
The purpose of the roller is to maintain tension at a normal level. When the mechanism is overtightened or loosened, there is a risk of the following problems:
- excessive noise when starting the power plant (for example, whistling or squeaking of a belt);
- a decrease in voltage level, which causes a number of malfunctions in the operation of on-board equipment and disrupts the battery charging cycle;
- roller jamming. In this case, it will be impossible to continue driving.
How to change it yourself?
You can replace the belt on an 8-valve VAZ 2114 with an injector engine yourself or by ordering the appropriate service at a service station. During the shift process, there are nuances that must be taken into account when performing the task. If you make mistakes and do not change the strap correctly, this can lead to rapid wear and breakage. Below are instructions for replacing the belt in a VAZ 2114 8 valve.
Tools
If you change the belt yourself, prepare the following:
- a set of open-end wrenches, you will need tools for 13 and 17;
- long flat blade screwdriver;
- 10mm ring wrench, you can use a ratchet head;
- key for installing the tension roller;
- wheel wrench;
- jack.
User Pro Remont shared a video that describes in detail the procedure for replacing the timing belt pulley and timing belt in a VAZ 2114 car.
Algorithm of actions
How to change a belt correctly:
- Drive the car into a garage with a pit. The surface on which work is performed must be level. Switch the gear selector to neutral position.
- Loosen the bolts on the front right wheel. Place this part of the car on a jack so that the wheel can be rotated.
- Open the hood of the car. Using a 10mm wrench, remove the three screws that secure the plastic strap protector.
- Using a 13mm wrench, you need to loosen the bolt that secures the tension roller. Remove the device.
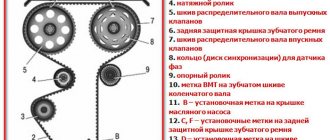
- You can see a mark on the camshaft gear; it is made in the form of a rectangular protrusion on the edge. When performing work, it is necessary that this mark coincides with the protrusion located on the fastening of the strap casing. If these marks do not match, you need to turn the wheel until they match.
- Then find the rubberized plug installed on the top of the clutch housing; it is located to the right of the power unit’s BC. The part is carefully pryed off with a screwdriver and removed from the seat. Under the plug you can see the flywheel crown; there is a mark on this device. It should be opposite the triangular protrusion located on the left. If the marks do not match, then take a 17mm wrench and loosen the tensioner. Using a pulley removal wrench, turn the device counterclockwise to loosen the timing belt.
- When the upper part of the belt is removed from the gear assembly, take a 17mm wrench and turn the crankshaft until the flywheel marks are opposite each other. The flywheel itself must be secured in this position; to secure it, use a screwdriver and install it between the teeth. If you have an assistant, ask him to hold the tool to prevent it from turning.
- Now you can remove the right wheel. Unscrew the screws that secure the arch protection and dismantle it.
- Using a 17 mm wrench, unscrew the nut securing the generator set pulley. When unscrewing, make sure that the flywheel does not turn.
- Dismantle the generator pulley and remove it from its seat.
- Remove the timing belt from the crankshaft disc.
- Using a 17mm wrench, completely unscrew the tensioner pulley lock and remove it from its seat. If you loosen the fastening, the belt can be removed.
- Install the new product onto the crankshaft disc. When installing, make sure that the marks are not broken. Install the generator set drive pulley by first placing a strap on it.
- Place the product on the gear of the mechanism. Install the tension roller.
- The strap is being installed. During installation, the tension roller must be turned with a special tool purchased in advance at the store. If you don't have one, you can use two self-tapping screws and a screwdriver. Self-tapping screws are installed in the grooves, and a screwdriver secures them. Turning is done counterclockwise. Tension the belt using the tension roller and tighten the screw that secures the roller.
- It is necessary to set marks if they are lost during the work process. The installation procedure for all components is performed in reverse order.
Photo gallery
Photos of belt replacement are shown below.
Remove the screws securing the timing belt guard.
The mark on the camshaft gear must coincide with the mark on the housing mount
Loosen the strap tension roller by turning it counterclockwise
Remove the belt from the pulleys and install a new product
Unscrew the nut securing the generator shaft
Put on the new belt and tighten the roller
How to understand that the timing belt on a VAZ needs to be changed
When the engine is running, the roller maintains belt tension. But over time it wears out and needs to be replaced. The service life is indicated in the instructions and is 40-50 thousand km. But in practice, the part may fail earlier.
You can determine that the mechanism is damaged by the following manifestations:
- defects appear on the bracket, bearings and other elements;
- the roller is loose;
- there are signs of abrasion;
- the mechanism makes a grinding or squeaking sound.
How to change the timing belt yourself
You can replace it in a VAZ-2114 car (8 valves) yourself if you read the operating instructions, in which everything is clearly described. It is recommended to change this element no less than after 35-45 thousand km, but it is better to be guided by the situation. After all, replacement may be needed earlier, and if you wait for the “recommended kilometers” to run, you can only wait for the belt to slip off the gears, fray, burst, or even break completely. In the VAZ-2114 car, you can install a special injector that will notify you when the timing belt comes off or breaks. Before deciding whether it needs to be replaced, it is necessary to inspect it, and if it is in poor condition, then it is not recommended to delay replacement. Information on which belt is best to choose can be found in the instructions for the VAZ-2114.
Preparation for work
To change the timing belt tension roller yourself, you need to prepare a basic set of tools:
- spanners;
- knob;
- union heads;
- socket wrenches or screwdrivers;
- drills or wrench.
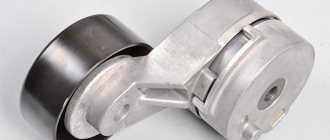
Under the protective cover covering the timing belt assembly there is a cover that needs to be removed. A roller and a gas distribution mechanism are hidden under it (however, the timing belt itself is installed inside the power unit, so you won’t be able to see it immediately after removing the protective cover). The tension mechanism is indicated by a red arrow, and the blue arrow indicates the nut that secures the roller.
If you unscrew it, you can completely remove the part from the motor. In addition, you will need to release the belt from the camshaft pulley. Otherwise, removing the roller will become impossible or the work will become inconvenient and difficult.
There is a bearing inside the roller (it can be seen from the outside), which ensures rotation of the product around its own axis after the engine starts. During operation, the part becomes unusable and begins to play. Try shaking the roller by hand, and if it makes squeaking or play, you will need to replace it immediately. Often the structure jams or begins to leak lubricant. This leads to increased engine noise.
How to change it yourself?
You can replace the belt on an 8-valve VAZ 2114 with an injector engine yourself or by ordering the appropriate service at a service station. During the shift process, there are nuances that must be taken into account when performing the task. If you make mistakes and do not change the strap correctly, this can lead to rapid wear and breakage. Below are instructions for replacing the belt in a VAZ 2114 8 valve.
Tools
If you change the belt yourself, prepare the following:
- a set of open-end wrenches, you will need tools for 13 and 17;
- long flat blade screwdriver;
- 10mm ring wrench, you can use a ratchet head;
- key for installing the tension roller;
- wheel wrench;
- jack.
User Pro Remont shared a video that describes in detail the procedure for replacing the timing belt pulley and timing belt in a VAZ 2114 car.
Algorithm of actions
How to change a belt correctly:
- Drive the car into a garage with a pit. The surface on which work is performed must be level. Switch the gear selector to neutral position.
- Loosen the bolts on the front right wheel. Place this part of the car on a jack so that the wheel can be rotated.
- Open the hood of the car. Using a 10mm wrench, remove the three screws that secure the plastic strap protector.
- Using a 13mm wrench, you need to loosen the bolt that secures the tension roller. Remove the device.
- You can see a mark on the camshaft gear; it is made in the form of a rectangular protrusion on the edge. When performing work, it is necessary that this mark coincides with the protrusion located on the fastening of the strap casing. If these marks do not match, you need to turn the wheel until they match.
- Then find the rubberized plug installed on the top of the clutch housing; it is located to the right of the power unit’s BC. The part is carefully pryed off with a screwdriver and removed from the seat. Under the plug you can see the flywheel crown; there is a mark on this device. It should be opposite the triangular protrusion located on the left. If the marks do not match, then take a 17mm wrench and loosen the tensioner. Using a pulley removal wrench, turn the device counterclockwise to loosen the timing belt.
- When the upper part of the belt is removed from the gear assembly, take a 17mm wrench and turn the crankshaft until the flywheel marks are opposite each other. The flywheel itself must be secured in this position; to secure it, use a screwdriver and install it between the teeth. If you have an assistant, ask him to hold the tool to prevent it from turning.
- Now you can remove the right wheel. Unscrew the screws that secure the arch protection and dismantle it.
- Using a 17 mm wrench, unscrew the nut securing the generator set pulley. When unscrewing, make sure that the flywheel does not turn.
- Dismantle the generator pulley and remove it from its seat.
- Remove the timing belt from the crankshaft disc.
- Using a 17mm wrench, completely unscrew the tensioner pulley lock and remove it from its seat. If you loosen the fastening, the belt can be removed.
- Install the new product onto the crankshaft disc. When installing, make sure that the marks are not broken. Install the generator set drive pulley by first placing a strap on it.
- Place the product on the gear of the mechanism. Install the tension roller.
- The strap is being installed. During installation, the tension roller must be turned with a special tool purchased in advance at the store. If you don't have one, you can use two self-tapping screws and a screwdriver. Self-tapping screws are installed in the grooves, and a screwdriver secures them. Turning is done counterclockwise. Tension the belt using the tension roller and tighten the screw that secures the roller.
- It is necessary to set marks if they are lost during the work process. The installation procedure for all components is performed in reverse order.
Photo gallery
Photos of belt replacement are shown below.
Unscrew the screws securing the timing belt protective casing. The mark on the camshaft gear should coincide with the mark on the casing fastening. Loosen the belt tension roller by turning it counterclockwise. Remove the belt from the pulleys and install a new product. Unscrew the nut securing the generator shaft. Put on the new belt and tighten the roller.
Step-by-step instructions for replacing the roller
The work of replacing the timing roller on a VAZ begins with dismantling the old mechanism. To simplify the task, you can use schematic images that indicate the location of the main components.
After reading the diagrams, you need to slightly unscrew the nut holding the roller (it is indicated by the blue arrow in the previous image). Behind it is a washer, which is important not to lose when turning it out. It is enough to slightly turn the roller by hand and loosen the belt. The mechanism itself is presented in the form of an oval structure, which is responsible for adjusting the tension of the belt drive.
After completing these steps, you must remove the belt from the camshaft, taking special care. It also needs to be released from the video itself. To completely remove the belt, you will need to unscrew the bolt holding the generator pulley.
At the next stage, after successfully dismantling the belt, you need to completely unscrew the nut holding the tension roller and the washer that is located behind it. Further along the shaft, remove the roller itself and check its bearing. This is done by rotating the outer part of the roller (it should not jam, play, make squeaks or other extraneous sounds). Make sure that there are no defects and that no grease is leaking from the bearing. Otherwise, the substance will contaminate the roller.
Note!
After removing the old roller, look at the spacer ring installed behind it and check it for defects. If the part is in good condition, not crimped or deformed, there is no point in buying a new ring, because you can put the previous product in place.
Types of alternator belts
As for the types of belts, they are as follows:
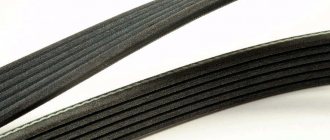
- wedge;
- polycline;
- serrated.
The V-belt cut has the shape of a trapezoid. Such a part is capable of transmitting great forces and withstands significant loads. Transmits rotation from the crankshaft to no more than two devices, because cannot bend in the opposite direction. Serpentine belts are much wider, similar to rubber belts that are somewhat glued together. They have longitudinal grooves on the inside. There are transverse grooves on the inner surface of the timing belt that help transmit rotation most accurately.
Note. In modern engines, the belt can provide the functions of many components: generator, compressor, power steering, pump, etc. Connecting them can be quite difficult. Therefore, it is recommended to have a diagram on hand that will make the replacement easier.
Installation of a new video
You need to install a new part on VAZ cars in the reverse order to its original place. In addition, installation must be carried out in such a way that the two existing holes are directed outward and not inward.
At all stages of installation, you need to monitor the marks and prevent them from moving. All that remains is to check the tightness of the roller fastening and adjust the tension of the belt drive.
To test the correctness of the actions, you should start the car and evaluate the quality of work. If a large branch wobbles even at low speeds, it is necessary to increase the tension. Any noise and hum should be excluded. If they are present, the tension must be loosened.
Belt problems
When replacing the timing belt, you should pay attention to the type of damage that caused the belt to fail. Using these symptoms, you can easily identify signs of a malfunction. Let's consider the causes and consequences of untimely replacement, listing the main ones:
- If it’s frayed, torn or damaged – it’s almost always due to the reupholstery.
- The absence of one of the teeth means weak tension.
- A high degree of tooth wear indicates incorrect tension, as does the presence of wear between several teeth or the appearance of abnormal noises.
- Cracks – temperature differences beyond the calculated limits.
- An oily surface suddenly indicates an oil leak. It is worth replacing the timing belt as soon as possible and finding the leak.
- End wear indicates misalignment, angular or parallel.
Do valves bend on a VAZ 2110?
This problem is considered common among some individual VAZ 2110 models.
Groove for valves
To understand whether the valve is bent on a VAZ 2110, it is necessary to determine which engine is installed. On certain engines (VAZ 2111, 21114, 21124 engines) there are special grooves on the pistons and when the valves break into the pistons, bending does not occur.
On other VAZ 2110 engines such grooves are not provided. (VAZ 2112) Some car enthusiasts grind such grooves on their own on VAZ cars, but this should be done carefully and in checked places because engine compression may be impaired.
Replacing the timing belt on a VAZ
Since experts recommend changing the belt along with the roller, we suggest that you familiarize yourself with the instructions for installing this consumable using the example of VAZ cars. The list of tools for upcoming work should include:
- keys for 10, 13, 17;
- key for rotating the mechanism;
- flat screwdriver;
- jack;
- a small amount of engine oil to treat the tension mechanism;
- balloon wrench.
Then you need to follow the instructions below:
The machine is placed on level ground with the gear engaged. Using a 10mm wrench, you need to unscrew the timing case mounting bolts.
Next you need to loosen the belt tension mechanism using key 13 and remove the belt.
After this, you should make sure that the marks on the camshaft gear and the protrusion of the rear casing cover match. If they are not, you will need to rotate the crankshaft until they are in the correct location. To do this, just turn the front wheel, having previously lifted it with a jack, or the crankshaft using a 17mm wrench.
Behind the fourth cylinder of the clutch mechanism you can find a rubber insert. It needs to be opened with a screwdriver. Below it is the flywheel crown with a mark. Make sure it lines up with the triangular cut on the crankcase to the left of the flywheel. If there are deviations, you need to release the fixation of the roller by turning it in the left direction. This will loosen the belt and quickly remove it from the camshaft gear.
Using a 17 key, you need to turn the crankshaft, following the above recommendations. This is done until the marks match. After immobilizing the flywheel, you need to lock it with a screwdriver in the hole where the plug is located. Using a 17mm wrench, unscrew the bolt that holds the generator pulley.
Behind it you can find the crankshaft pulley that holds the belt.
Next, you should remove the old belt drive and replace it with a new one, starting the installation with the crankshaft gear, then you need to screw on the generator pulley and put the belt on it.
A worn timing belt pulley should be removed in favor of installing a new one (remember to thoroughly lubricate it on all sides).
Next, you need to tighten the belt by turning the roller to the right. If a special key is not available, you can install two pins in the holes and secure them with a screwdriver or other similar device. The optimal tension is 1.5-2 kgf.
In the absence of suitable tools, to determine the tension value, it is enough to use a proven method - with the correct tension, one plane of the belt will rotate 90 degrees if you grasp it in the middle with your fingers between the camshaft and crankshaft gears.
In this position, you need to tighten the mounting bolt until it stops, remove the screwdriver from the hole and install the plug. The belt drive guard does not need to be installed until the operation of the system has been verified.
Conclusion
Wearing of the timing pulley is not a reason to contact a service center for professional help. Without much effort and time, you can change the part yourself. The main thing is to familiarize yourself with its structure and placement, read the recommendations of specialists and strictly follow the step-by-step instructions. In this case, the work will be completed in a short time and without errors.
Video about replacing the timing belt tension pulley:
Description of the work on replacing the timing pulley on a VAZ: information about the tension roller, indications for replacement, preparation, step-by-step instructions. Video about replacing the timing belt tension pulley.
Source
Replacement procedure
The replacement procedure for a VAZ 2110 is quite simple, but varies significantly on different engine models, depending on the number of valves. According to the standard opinion, it is easier to change the timing belt on an 8-valve engine than on a 16-valve engine, but this is not entirely true. Let's look at the replacement process in two cases.
VAZ 8 valves
It is believed that replacing the timing belt on a VAZ 2110 with 16 valves is more difficult than the classic model. Let's look at this myth by looking at the replacement procedure for 8 valves:
- Remove the negative cable, thus disconnecting the battery.
- Tighten the bolts on the protective casing and remove the cover.
- Remove the wheel from the front passenger side, removing the engine compartment protection and mud flaps.
- Install the generator pulley so that its mark matches the mark on the cover.
- Remove the protection from the gearbox and check that the marks match.
- Lock the flywheel.
- Remove the generator pulley.
- Remove the old belt.
- Before installing a new belt, clean it, then dry the area with any clean cloth.
- Install the new roller, checking the direction arrows, move it clockwise while tensioning the belt.
- Check that the timing and tension marks are correct.
- Reassemble all components.
VAZ 16 valves
The 16 valve version of the engine in the VAZ 2110 did not gain much popularity, despite its power, and became famous as being difficult to repair, in contrast to the easy procedure of replacing the VAZ 2110 timing belt with 8 valves. Let's look at the process and its differences from the standard:
- Remove the protective cover by unscrewing the 6 nuts.
- Release the crankshaft sensor.
- Find an area on the pulley that does not have a tooth. This is a reference point for finding the dead spot at the top. The piston from the first cylinder should be installed at this point.
- Align the crankshaft sensor and pulley, lock and remove the latter.
- Loosen the tensioner pulley nut, pull out the old belt, removing the roller along with it.
- Clean the area before installing a new part.
- Install and tension the belt.
- Perform two full revolutions of the crankshaft, make sure that the marks are aligned correctly and install all parts in place.
Checking the condition of the belt
First, remember that you need to check the condition of the belt once a year, or every 10-15 thousand kilometers. Replacement is carried out after every 50 thousand kilometers.
To examine the status of an item, follow these steps:
- Remove the plug from the protective front timing cover;
- Remove the alternator belt so that it does not interfere with you;
- Unscrew the six bolts, which will allow you to remove the cover;
- Access the belt and examine it.
Removing the timing belt cover
If you notice any of the following, be sure to replace the belt:
- The element has bulges or cuts;
- Broken threads and traces of delamination appeared on it;
- There are abrasions, cracks or folds;
- Oil is leaking.

