Published:
29.11.2016
There are a large number of varieties of Solex carburetors on the market. The carburetor is one of the most important parts in the fuel supply process, ensuring the quality of the car.
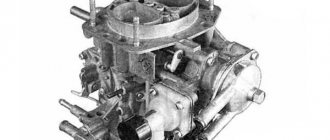
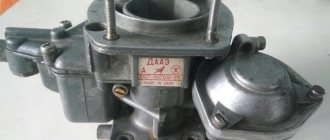
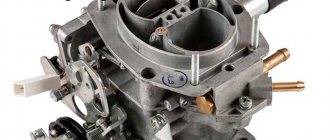
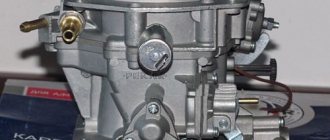
The Solex 21083 carburetor is a very popular model that can be found on a large number of domestic cars
The Solex 21083 carburetor is a basic version, equipped with diffusers of a minimum cross-section, thanks to which this series has gained immense popularity, as it allows for various types of modifications, such as grooving.
Where to begin
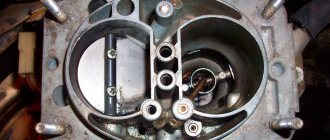
You should start setting up the Solex 21083 carburetor by adjusting the fuel level in the float chamber. This involves directly starting the engine and warming it up for five minutes. Then the motor is turned off and the following steps are performed:
- The fuel supply hose is carefully separated to prevent gasoline from entering the chamber during further operation.
- The five screws securing the cover are removed.
- The choke system cable is removed.
- The lid is lifted horizontally with extreme caution so that the floats are not damaged.
- In the chamber itself, the fuel level is measured using a ruler or caliper.
The distance from the top level of gasoline to the edge of the sealing surface of the lid should be from twenty-three to twenty-five millimeters. It is necessary to select an average value, since the fuel level is not able to be in a constant state due to the manifold, which itself does not have the ability to be in a horizontal position all the time. If there is a deviation from the norm in the parameters set earlier, then it is enough to bend the float holders to correct the situation.
Some gasoline is then removed and the reverse carburetor assembly process begins. The key word here is reverse, which means performing the same process, but starting from the end.
At the stage of the engine control check, it is necessary, of course, to start it, and then for about thirty seconds observe the flow of fuel into the chambers from the small diffusers, using a small flashlight for a better view. If gasoline arrives, then there is an overflow and another adjustment of the fuel level is required. To carry it out, you need to turn off the engine and re-carry out fuel measurements in the chambers.
- Attention!
If the parameters are within the permitted standards, then the adjustment of the Solex carburetor ends here. Then the transition to the next stage occurs.
Scooter starting enrichment device
Setting up the carburetor 2107 ozone
There are two types of starting concentrators - manual and automatic.
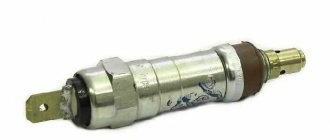
The manual (mechanical) starting enrichment requires adjustment - it must be opened at startup and closed after the engine warms up using a cable on the steering wheel. But manually opening and closing the additional channel for supplying the mixture is inconvenient. An automatic starting enricher (thermoelectric valve) is installed on most modern 2t and 4t scooters. We will learn about the device of the automatic starting enrichment further.
- Solenoid valve body
- Ceramic heater
- Drive (powder)
- Stock
- Pusher
- Damper
- Fuel chamber
- Float chamber
- Starting fuel jet
- Spring
The scooter carburetor has a small additional fuel chamber 7, which is connected to the main float chamber 8 through the start nozzle 9. The tube from chamber 7 leads to the mixing chamber into which air is supplied and from which the air-gasoline mixture goes into the engine. A valve 6 can move in the mixing chamber, similar to a carburetor throttle valve, only much smaller in size. Just like the throttle valve, the starting valve contains a spring-loaded needle that closes the fuel channel when the valve is lowered. Valve body 1 is wrapped in thermal insulation (polyethylene foam) and covered with a rubber boot. This enricher design is used on almost all modern scooters.
Older models may use a design without an electric heater, heat is transferred to the drive through a copper heat-conducting cylinder directly from the scooter's engine cylinder, and instead of a powder with a heating element, a membrane is installed. One cavity of the flask, where it is located, is connected through a thermal valve to the intake manifold, which is mounted on the cylinder head.
Idle mode - second stage
Having completed adjusting the fuel level in the float chambers, the engine again warms up, coming into working condition. Further work proceeds as follows:
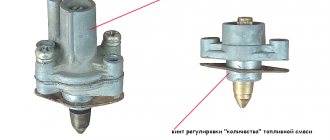
- The mixture quality screw is located in the recess of the lower part of the carburetor, and then screwed in counterclockwise all the way.
- When tightening this part, it is very important to control your own strength, since excessive persistence can lead to thread failure.
- Make five or six turns clockwise to remove the screw.
- The engine starts again and the choke is removed.
- The quantity screw allows you to set the minimum frequency for the motor to operate without interference.
- If the device is working properly, then the revolutions are made in an amount from five hundred per minute to one thousand two hundred.
- The quality screw is turned at a fairly slow pace until unstable motor operation begins.
- Then, in one or one and a half turns, it turns back again for stable frequency activity.
- The idle speed is regulated by a quantity screw ranging from eight hundred and fifty to nine hundred pieces per minute; if it is not possible to establish the process, then the quality screw comes to the rescue.
- Attention!
The result of adjusting the idle speed is a competent ratio, where the engine operates extremely steadily and with a minimum vacuum.
Advantages and disadvantages
Solex has certain inevitable disadvantages, but there are also positive qualities for which owners of domestic cars love them:
- High quality build. This includes everything related to materials and the precision of manufacturing of all parts. There is no need to “finish with a file” what is already well done;
- Better fuel mixing performance. Since the design of the diffusers is much better thought out than in OZONE carburetors, with proper tuning you can achieve better power output with lower fuel consumption;
- The ability to modify and adjust the carburetor, achieving optimal operating parameters;
- Maintainability and low cost of spare parts. Compared to modern injection engines, repairing a Solex carburetor is much easier and cheaper;
Well, the main drawback is sensitivity to blockages, which is inevitable for any precisely fitted device. The dirt comes from gasoline, which, as we know, is not of the highest quality. And dust can be pumped from the air bypassing the air filter if there is deformation and cracks in the housing, as well as through holes in the float chamber.
Today you can hear that carburetor cars are a thing of the past. This is partly true, because new standards, including environmental ones, and progress have long dictated a new perception of convenience and comfort. Injectors operate more economically, adapt more accurately to external conditions, and meet new requirements. But it is impossible to simply cross out the huge number of completely normal cars that operate, albeit with an obsolete, but very efficient fuel system.
How long will the Solex carburetor remain relevant? Given its reliability and convenience, cars with this fuel supply system will be in use for a long time. So far, the interest in servicing and repairing the Solex has not waned, since there are quite a lot of cars with it.
Modifications and applicability of Solex carburetors
| Modification | Applicability | Engine volume, cm3 | Notes |
| DAAZ-2108–1107010 | VAZ 2108, 2109 | 1,3 | |
| DAAZ-21081–1107010 | VAZ 21081, 21091, ZAZ 1102 | 1,1 | |
| DAAZ-21083–1107010 | VAZ 21083, 21093, 21099 | 1,5 | |
| DAAZ-21083–1107010–31 | VAZ 2108, 2109, 2110, 2111 | 1,5 | Has a semi-automatic starting device |
| DAAZ-21083–1107010–35 | VAZ 2108, 2109, 2110, 2111 | 1,5 | Has a two-level semi-automatic starting device (winter/summer) |
| DAAZ-21083–1107010–62 | VAZ 2109, 2115 | 1,5 | Has an electronic device for controlling the composition of the combustible mixture |
| DAAZ-21083–1107010–05 | VAZ 2109 | 1,5 | |
| DAAZ-21412–1107010, DAAZ-21412–1107010–30 | AZLK 2141, 2141–23 | 1,5/1,8 | |
| DAAZ-1111–1107010 | VAZ 1111, 11113 "Oka" | 0,65/0,75 | |
| DAAZ-21051–1107010 | VAZ 2103, 2105 | 1,5 | |
| DAAZ-21053–1107010 | VAZ 21074, 21061 | 1,6 | |
| DAAZ-21051–1107010–30 | VAZ 2104, 2105 | 1,3 | |
| DAAZ-21053–1107010–62 | VAZ 2107, 21072, 21074 | 1,3/1,5/1,6 | |
| DAAZ-21073–1107010 | VAZ 2121, 21213 "Niva" | 1,6/1,7 |
Table: comparison of basic calibration data for Solex 21081 and 21083 carburetors
| 21081 | 21083 | |||
| For 1st camera | For 2nd camera | For 1st camera | For 2nd camera | |
| Mixing chamber diameter, mm | 32 | 32 | ||
| Diffuser diameter, mm | 21 | 23 | 21 | 23 |
| Air jet of the main dosing system | 165 | 135 | 155 | 125 |
| Fuel jet of the main metering system | 95 | 97,5 | 95 | 97,5 |
| Idle air jet | 170 | 170 | ||
| Idle fuel jet | 39–44 | 39–44 | ||
| Air jet of the second chamber transition system | 120 | 120 | ||
| Fuel nozzle of the second chamber transition system | 50 | 50 | ||
| Economizer fuel jet | 40 | 40 | ||
| Accelerator pump cam number (size) | 4 | 7 | ||
| Throttle valve starting gap, mm | 1,0 | 1,1 | ||
| Air damper starting gap, mm | 2,7±0,2 | 2,5±0,2 | ||
| Needle valve hole diameter, mm | 1,8 | 1,8 | ||
| Vacuum regulator hole diameter, mm | 1,2 | 1,2 | ||
Problems that occur when adjusting the idle speed
Under the right circumstances, the engine should reduce the number of revolutions, and eventually stall completely. But if the quantity screw does not cause any kickback in the engine, then this directly indicates a problem. And it lies in the excessive flow of fuel into the idle channel, which does not allow the quality screw to block it.
Factors that caused the problem:
- The installed idle jet is larger than necessary.
- The plug is not screwed in well enough or the solenoid valve is not securely fastened, which causes gasoline to leak past the fuel metering hole.
- The jet itself or the place for it is deformed.
To find the problem, you need to disconnect the wire from the valve while the engine is running and look at the result. If the engine stalls, then the real problem lies in the incorrectly selected nozzle size. When the engine is running, the defect lies in the fuel bypassing the idle system.
To overcome these difficulties, we get rid of the valve with a plug and look at the condition of the jet, as well as the place where it should sit, to find various local distortions.
The carburetor cover must be replaced if it is possible to detect places of deformation in the area of the seat. If damage cannot be detected, the jet is placed on the valve and the O-ring is coated with oil.
After this, the nozzle is screwed in with a wrench without using force.
How to flush a carburetor assembly without disassembling it
Flushing the Solex carburetor is recommended by the manufacturer in cases where there are clearly any problems with its operation: increased gasoline consumption, jerks and jolts when driving, unstable idle speed, problems with starting.
The traditional method of washing carburetors is to completely disassemble them into individual components, which is not always possible for an inexperienced VAZ owner to do. To simplify the procedure, a technique was created for washing and cleaning the carburetor without disassembling it into components. This technique is based on the use of special aerosols in cans. The most affordable carburetor cleaners are considered to be aerosols produced by ABRO and Mannol - they can be bought at any auto store for 100–150 rubles.
These cleaners do an excellent job of cleaning carburetor mechanisms, and they are also very easy to use. To flush the Solex carburetor, it is recommended to turn off the engine, let it cool and begin the procedure:
- Remove the air filter box from the car and place it to the side.
- Unscrew the solenoid valve from the carburetor body.
- Place a special narrow nozzle on the aerosol can and spray the liquid on the nozzle channels, the first and second chambers, dampers and all visible elements of the carburetor.
- After this, spray the aerosol on the external parts of the mechanism.
- Wait 5–8 minutes (depending on the aerosol manufacturer’s recommendations). During this time, the liquid will be able to corrode accumulations of soot and dirt.
- Next, you can start the engine so that it removes all remaining dirt.
- If during one procedure the carburetor did not have time to be properly cleaned, then you can treat it again with the same aerosol.
After such cleaning, the VAZ 2108/2109 will significantly increase its dynamic characteristics, since the accumulation of dirt will not interfere with the normal operation of all parts of the carburetor.
Video: how to clean the carburetor on a VAZ with your own hands and without removing it from the car
How to replace carburetor parts
Replacing the float, accelerator pump diaphragm, and seals is not particularly difficult. Most often, during repairs, repair kits selected for the type of carburetor are used, which include everything necessary to replace the elements.
The replacement procedure is not regulated in any way: it is enough to remove the damaged part and install a new one in its place. The main criterion: the identity of the elements when replaced.
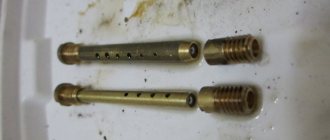
Correct jet for Solex 21083
The selection of the appropriate jet for adjusting the Solex 21083 carburetor is influenced by the volume of the engine itself. For the primary chamber, fuel samples should be purchased, only then the necessary air analogue is selected for the found model. And finally, it is recommended to start looking for a device for the secondary camera.
The jets that come with the original carburetor are considered exemplary models for further purchases. Experienced craftsmen advise taking them with you in search of new parts.
It is necessary to take into account the fact that to lean the mixture, a nozzle of a larger diameter is taken by one position, and to enrich it, by the same position less.
To control the composition of the fuel mixture in relation to engine speed, emulsion hoses are used. There are three types:
- 23;
- ZC;
- ZD.
It should be noted that such a mechanism is not installed on engines with volumes of 1.5 liters or more. This causes malfunctions at excessive speeds.
A little history
A new carburetor was needed when the front-wheel drive VAZ project was being developed. The transverse arrangement of the engine did not make it possible to install the old OZONE carburetor, which was used for the “classic”. But the development of the French company Solex, after a little “finishing with a file,” went off without a hitch. The production of new carburetors began at the Dimitrovgrad Plant (DAAZ), where French equipment was installed and the production process was launched under a Solex license.
The design of Solex carburetors made it possible to install them on engines of different types and power, slightly changing some parameters. So, the most common was the Solex model 21083, which was installed on a 1.5 liter engine. VAZ 2108, 2109. For “classics” with a 1.45-1.6 liter engine. modification 21053 was developed, structurally similar to Solex 21073, designed for the VAZ 21213 Niva with a powerful 1.7 liter engine. And even for Moskvich with a 1.5 liter engine. Solex 21041 was installed, and for 1.8 liters. – modification 21041-10, suitable for both Volga and UAZ.
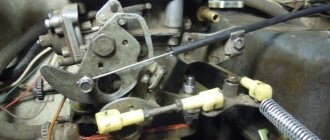
Problems with the accelerator pump
The accelerator pump serves to consistently and timely supply a fuel stream through an uncovered carburetor valve. A weak flow or dripping is not considered normal. Spreading fuel along the walls of the diffuser is also taken as a deviation.
The acceleration pump nozzles are inserted into different chamber compartments. However, for speed, they can only be installed in the primary, which in exceptional cases will result in excessive overflow.
Problems in applying the transition regime
Under special conditions, an area of high vacuum forms under the closed carburetor flaps. When they open sharply, the vacuum can instantly decrease, which causes disturbances in the operation of the primary chamber, forming a failure, since at idle speed gasoline was sucked out of the channel through the nozzles.
To eliminate the consequences, the idle jet or pump nozzles are adjusted, changing in order of rotation, in order to eliminate the resulting difficulties with dips and delays when pressing the gas pedal quickly and abruptly.
It is always worth remembering that this kind of manipulation is carried out exclusively with a preheated engine.
Checking the functionality of the jet
Now you need to return to the removed cover and check the functionality of the idle jet.
It is imperative to clean the cover, check the diaphragm and the cold start gap.
Check also the float geometry, which directly affects the technical properties. How is this geometry checked? Using your own float.
What troubles can happen with the second camera?
The secondary chamber system cannot be regulated due to the original jets produced at the factory, as well as the econostat located in its planes, since it is this that supplies additional fuel to enrich the mixture when a vacuum forms in the carburetor caused by high speeds.
The acceleration pump nozzle is perhaps the only element that can undergo slight changes in cases where the flow of gasoline does not reach its intended place.
Further maintenance of the carburetor
To prevent the carburetor from seriously malfunctioning in the future, it is necessary to carefully monitor its operation and not run it to a critical state, which precludes independent repairs.
It would be appropriate to purchase the necessary parts of a similar carburetor model, disassembled into parts specifically for these purposes.
For better engine performance, it is recommended to get rid of the forced idle economizer. And timely prevention and precisely selected jets will ensure the most reliable operation of the unit.
The article fully reflects the main goal of adjusting the Solex carburetor starting device, based on many years of practice and consisting in a stable start of the engine at idle, which ensures standard operation of the starting system.
Jet markings
For each carburetor system, jets of different cross-sections are provided, so during repairs it is important to know what cross-section the fuel or air jet is needed. When purchasing a car, it comes with a service book, which outlines the main characteristics and its structure, as well as a jet marking scheme depending on the carburetor model.
The main metering system has fuel jets marked 80 or 95 for the primary chamber and 100 for the secondary. There are also air jets 150, 155, 165 for the primary chamber and jet 125 for the secondary. The idle system includes fuel nozzles marked 38-44 and 50, and air nozzles 170 and 160. In the secondary chamber of the transition system, fuel nozzles 50 and 80, and air nozzles 120 and 150. For the main metering system, a fuel nozzle 85 is provided.