Published:
21.03.2017
Initially, the VAZ-2106 car left the factory with an Ozone carburetor. However, this unit has so many shortcomings that with the advent of the more modern Solex carburetor, many owners of classic Zhiguli cars could not resist the opportunity to improve the engine of their car. Among most of them there was an opinion that this would improve the technical characteristics of the car, while others believed that this decision would have a detrimental effect on the stability of the engine. In this article we will look at what advantages such a modernization has and, if any, how to install and adjust the Solex carburetor on a VAZ-2106 car with your own hands.
With the “native” carburetor, the engine of the “sixth” model had good throttle response. But there was also a significant drawback in the form of failures when trying to sharply increase the crankshaft speed. That is, as soon as the driver pressed the gas pedal, the engine first “choked” and only then began to gain momentum. The reason for this is the insufficient fuel level in the float chamber, which affected during intensive acceleration of the car. That is why the owners of the “sixes” wondered about the possibility of installing an alternative carburetor that could increase the engine’s throttle response with minimal losses. The choice fell on the Solex unit as the best option.
Initially, the six was equipped with an OZONE carburetor
How to set up a Solex carburetor
This can be done without removing the device from the car. However, in some cases you have to do this to configure some parameters. Both options are considered further. How to adjust the carburetor directly on a car?
Setting levels in float chambers
Before making adjustments, start the engine and warm it up for 10 minutes, then turn off the ignition. The following actions:
- disconnect the fuel hose from the device;
- unscrew the 5 screws securing the carburetor cover;
- disconnect the choke control cable;
- lift the lid evenly and slowly so as not to deform the floats;
- Using a caliper, measure the distance from the plane of the cover to the surface of the fuel - it should be 23-25 mm;
- if the value is incorrect, bend the float tongue in each of the chambers in the desired direction;
- At the same time, clean the cameras from dirt;
- put the cover in place, then you need to install the dismantled elements.
Adjusting the needle
Place the Solex lid on a horizontal, flat surface. Now, by bending the metal “petals”, adjust the stroke of the valve needle, which should be equal to 2 mm. At the same time, check the tightness of the fuel valve. To do this, take a rubber bulb, insert it into the tip of the inlet fitting and squeeze so that it is deformed. At the same time, close the return fitting channel very tightly with your finger. When you turn the lid over, the bulb will become normal in shape, which indicates that the valve is opening, i.e., working.
Idle speed setting
Start the car and warm up the engine to operating temperature of 85-90 degrees, and then turn it off. Further:
- at the bottom of the Solex, find the mixture quality adjusting screw and screw it in completely (but not with excessive force, so as not to strip the thread);
- “back up” by unscrewing the screw 4-5 full turns;
- start the engine, press the choke handle all the way;
- by rotating the quantity screw, achieve stable operation of the internal combustion engine at minimum speed (according to the tachometer this is 700-1100 rpm);
- screw the quality screw back in until the engine begins to try to stall, and unscrew the hardware 1-1.5 turns;
- tighten the quantity screw until it reaches 900 rpm - if the motor starts to work unstably, slightly unscrew the quality screw again.
What to do if the motor does not respond to the rotation of the propellers
It’s quite a common situation: you turn the quality or quantity screw, but the engine does not change speed. The reason for this phenomenon is poor flow of gasoline into one of the idle channels (ICH). At the same time, the hardware responsible for the quality of the mixture simply does not have time to shut off the gasoline supply. This is due to:
- incorrectly sized jets: check their diameter and install standard products;
- the seat for these parts is loose;
- The XX solenoid valve (the “barrel” or cylinder to which the electrical wire fits) or the plug in its place is not screwed tightly enough.
How to set the transition mode
It is he who is “responsible” for the failure of the accelerator pedal when it is pressed sharply. Here the main role is played by the hole located above the throttle valve (spout). After sharp pressure on the gas, an additional portion of gasoline begins to be sucked in. In order to avoid failures, it is necessary to carefully select the XX jet and the spout that sprays fuel. Work algorithm:
- start the car and press the choke handle all the way;
- gently press the gas pedal: if there are dips, the nozzle located in the first chamber is to blame; with a normal set of revolutions, proceed to the next point;
- sharply press the accelerator: if there is a failure, you need to select the spout (optimal dimensions 40*40) and the jet (39-40).
The most common breakdowns
However, the most common devices are the OZONE family of devices. They need to be cleaned and adjusted twice as often. In addition, they have a lot of different diaphragms, which break every now and then. The most common breakdowns of these units are incomplete opening of the second chamber, as well as malfunctions of the accelerator pump.
- Popping sound when you press the accelerator pedal, as if something is shooting into the carburetor.
- Similar pops, but now it shoots into the muffler.
- The idle speed is either too high or too low (floats).
- The car thinks for a long time when driving on the highway. When you press the gas pedal all the way, it does not accelerate at all or accelerates too slowly.
- When you shift into 2nd or 3rd gear and press the accelerator pedal, the car first slows down and then jerks forward with a sharp increase in speed.
The detonation problem may be associated with a violation of the ignition timing angle. In any case, you should first try to eliminate detonation by adjusting the carburetor. In 90% of cases this helps.
The symptom described in point 3 indicates the need to adjust the idle speed. The situation indicated in paragraph 4 indicates that camera drive 2 is faulty. Eliminated by replacing broken parts. The symptom described in paragraph 5 indicates a breakdown of the accelerator pump - the diaphragm or spring must be replaced.
Table of fuel jets for Solex carburetor 21083
Repair and cleaning of the VAZ 2109 carburetor
In the process of throttling the carburetor, one can observe an unstable composition of the fuel mixture over time in the working charges; there is no cycle identity. This has a significant impact on the composition of exhaust gases. Also, the heterogeneous composition of the combustible mixture over cycles can be affected by three factors:
- the nature of the mixture distribution over the flow cross section;
- fuel dispersion;
- the nature of the mixture distribution along the flow.
The type of flow of the emulsion mixture from the channel of the main spray system can have a significant impact on the flow structure. Depending on the ratio of the productivity in the dosing jet system and the flow rate of the emulsion, the following types of flow can be obtained: laminar, plug, coarse emulsion, axisymmetric and wave.
Thus, depending on the change in the type of flow from the nozzle of the main emulsion system, the homogeneity of the composition of the fuel mixture in the operating cycles of the car engine will change significantly. The axisymmetric mode is the most optimal for stable operation of the car engine. This can be achieved thanks to a uniform fuel supply.
The air jets of the Solex 21083 carburetor allow you to adjust, together with the fuel jets, the optimal operation of the carburetor. It should be remembered that the location of the air jet of the main system inside the fuel-air main path is undesirable due to the possibility of clogging or tarring of the jet, which can lead to carburetor malfunctions.
This is often observed when engine crankcase gases pass through the carburetor. It is best to place the air jets in special pockets that will protect them from the effects of direct air flow.
In case of modification or tuning of the Solex 21083 carburetor, it is necessary to pay due attention to the selection of jets. This process should be carried out depending on the engine size of the car.
Thus, for large engine volumes, for example 1.5-1.7, it is best to use small jets.
Due to the large volume, a lot of air will pass through the diffuser per unit of time, and as a result, significantly more fuel will be consumed. Of course, if you are not going to pump up your car for fast driving, then this will not be so significant for you. Otherwise, it is better to install jets with a smaller cross-section.
It is best to start selecting a jet with a fuel jet, and then move on to choosing an air jet. It should also be noted that you first need to select jets for the first chamber, and after installing the jets on it, you should move on to the second chamber of the carburetor. This is the only way to consider the most correct installation or replacement of jets.
Qualified specialists advise that before starting work, find the original factory Solex 21083 carburetor, which is designed for the same engine size as that installed on your car, and try installing these jets on it. Below is a table of jets for the Solex 21083 carburetor.
Depending on your preferred driving style, you can choose the most optimal jet size for yourself. But keep in mind that when using sport series jets, the fuel consumption of your car can double.
Therefore, if you prefer optimal fuel consumption and a dynamic car, then it is better to choose the middle option, for example “normal power” or “moderate power”. For those who prefer a measured, calm driving style, “economical” jets are best suited. By the way, there is also another modification: Solex carburetor 21083 1107010, it has its advantages.
And the video shows how to choose the right jets for the Solex 21083 carburetor:
Installing a custom carburetor
Owners of “classics” in some cases resort to installing non-standard carburetor models on their cars. Such an installation will require certain modifications and subsequent configuration. We are talking about the Solex 21073 and Solex 21083 carburetor models.
Model Solex 21073
This model was developed for a 1.7-liter engine and was standardly installed on the power unit of a Niva car. The Solex 21073 carburetor differs from others in its large channels and jets. Installing this model on other VAZ cars with a carburetor allows you to achieve an increase in dynamics, but fuel consumption rises to 9-12 liters per hundred.
Model Solex 21083
Solex 21083 was installed on the VAZ 2108-09. If you install it on “classic” engines, then modifications will be required. The gas distribution systems of engines 01-07 and 08-09 have a number of differences. Installing such a carburetor without modifications will lead to the fact that at speeds of about 4000 the speed of the supplied air can reach the sound speed, and the engine will not be able to spin up further. To install this model of carburetor, it is necessary to drill out the diffusers of the primary and secondary chambers to expand them. You also need to install large jets. The refinement process is labor-intensive, but the result allows you to obtain gasoline consumption lower than model 21053, and dynamics exceed those of 21073.
Vehicle identification
Device repair and adjustment of carburetor for 151C
All VAZ-2106 cars received passport data, which was applied to the car in certain places in the form of plates and markings.
Thus, the main plate with data on the car was located in the engine compartment on the right side on the air supply duct. This table was attached to the body using rivets.
Car data plate
This table included the designation of the car model, engine model, mass characteristics of the car, identification number and number for spare parts, data on the manufacturer.
However, some of the data was still encrypted in an identification number, which included:
- International car manufacturer code;
- Car model;
- Year of manufacture code;
- Vehicle body number;
Next to the main plate, the identification number was once again stamped on the box. Some factories that produced the VAZ-2106 additionally affixed a sticker with the same number next to the plate.
Also, the identification number was placed at the top of the front wall of the trunk. It was also applied using branding.
The power plant had its own number, which was stamped along with the engine model on the tide of the block, next to the fuel pump.
New or used?
You can buy a new Solex for a classic, but it is also possible to purchase a used carburetor. In the second case, it is necessary to carry out an inspection - thoroughly clean the channels, polish the diffusers. In addition, it is better to purchase and replace jets.
But at the same time, you should not buy modern products - it is better to ask your friends and acquaintances for those that were made in the USSR. Modern jets found in repair kits often do not correspond to the calibration dimensions.
In order for the diffuser to work effectively, burrs and protrusions are removed from its elements using a file. Such defects create air turbulence, and this does not have the best effect on filling the cylinders.
What are the jets responsible for?
Single injection
This is the name given to carburetor parts that have calibration holes for dosing fuel or air. As you may have guessed, depending on their purpose, jets are divided into fuel and air. These elements have opposite effects and have different effects on the composition of the fuel mixture. By increasing the cross-section of the fuel (main) jet, we get a rich mixture, and, on the contrary, a lean mixture of air.
Carburetor parts for fuel metering
From all of the above, it is clear that these parts affect fuel consumption and, naturally, the financial side of car maintenance. As the performance of the main element increases, fuel consumption in all modes will increase. And by changing the air performance, the car will “eat” more only when driving at higher speeds.
Symptoms of a problem
If the carburetor begins to produce a rich mixture, you will understand this by the following signs:
- Fuel consumption increases
- Loud exhaust is heard from the muffler and the smoke turns black
If the engine receives a lean mixture, you will understand this by the following sign:
Loud bangs are heard from under the hood.
In both cases, the engine heats up noticeably more, and its power is also lost.
If you encounter a similar problem, remember that it is a natural consequence of using the carburetor. Any element of the car requires care, regular inspection and maintenance. Therefore, the VAZ 2106 carburetor must be adjusted from time to time.
Before proceeding with the adjustment, you need to make sure that the cause of the breakdown is not the failure of any element inside the device. You need to disassemble it, wash it and clean it. And only after you are convinced that all components of the structure are in full working order, you can begin adjustment.
The easiest option is to send the car to a specialist. Carburetor technicians have a special tool - a gas analyzer. Using this device, you can achieve the most efficient system setup. However, the services of specialists in this profile are not cheap. You may want to do all the work yourself, using available materials. Next we will look at how to set up a carburetor step by step.
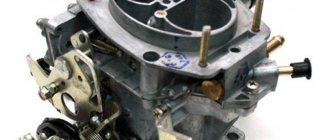
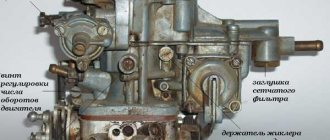
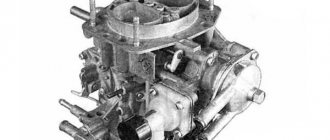
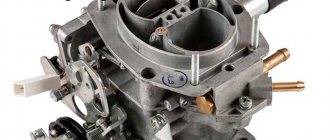
Solex carburetor system 21083
In general, this carb is usually installed on engines with a transverse installation, but some people argue that it works great on cars with a longitudinally installed engine, in other words, on classics.
By type, this carburetor is classified as an emulsion carburetor, which has two chambers that open alternately. The carburetor also has a transition system, an economizer, an accelerator pump, and a forced idle system.
https://youtube.com/watch?v=gWwZJETZFSI
https://youtube.com/watch?v=gWwZJETZFSI
Today Nail Poroshin will tell and show the main nuances of the installation
53rd
Carburetor
for
Classic
! Everyone.
In principle, all this is enough for the carburetor to work successfully on a classic car. After installation, the carburetor is immediately ready for use; all that remains is to adjust the idle speed and correctly set the fuel level in the float chamber. If you install a carburetor on the 2108 engine, then the mixture formation may turn out to be quite poor. In this regard, it will be necessary to replace the fuel jets with larger ones.
Jets are always selected depending on engine size. Moreover, everything happens in inverse proportion; smaller jets are installed on large-volume engines and vice versa. The thing is that on a large-volume engine, more air will pass through the diffuser, and at a higher speed, so the fuel will be drawn in more easily.
It is best to immediately choose such a Solex
, which is suitable for the volume of a given engine.
Features of the installation DAAZ-2108, -21083
To install any of these models on the “Classic”, it is necessary to prepare a new set of gaskets, hoses for the carburetor heating system, a tee for connecting to the fuel system, a valve and rods for the accelerator. To get the maximum result from this procedure, it is advisable to replace the ignition. It is better to install a more technologically advanced, electronic one. Contact ignition is a thing of the past. The system is very unreliable and often causes operational problems. The installation of contactless electronic ignition is one of the most useful improvements for domestic VAZs, in particular for the Six.
Installation on classics
As mentioned above, the Solex carburetor 21083
It is quite possible to install it on a classic, anyone can do it if they have the skills to work with technology. It is more difficult to adjust the carburetor so that it produces its maximum potential.
Some car enthusiasts find it advisable to grind down internal joints and various jagged edges in the carburetor
and then polish them. This way, air passes into the engine with less resistance, which leads to savings and improved traction.
The accelerator pump plays a significant role in carburetors installed on classics. This device must always work perfectly and without interruption. Otherwise, the car will not accelerate, shots will occur in the carburetor due to a lean mixture, and so on. Craftsmen modernize the accelerator pump, increasing its volume, as well as refining the profile of the release cam.
However, having installed the Solex 21083 carburetor correctly on your classic, you won’t have to modify anything special. These carburetors are quite high quality and well adjusted at the factory.
It is only important to ensure that the air and fuel filters do not become dirty. It is also not permissible for shots or sneezes to occur from the intake manifold, this will quickly ruin any carburetor
How to get the most benefit
It’s not enough to install Solex on a classic; to experience all the benefits, you also need to modernize the ignition system. Instead of the standard one, contactless ignition is installed. Any Solex is initially configured and designed to prepare a lean mixture. To ignite it effectively, a more powerful discharge is needed. A contact ignition system cannot produce such a discharge, but a contactless one can. Its coil can generate voltage up to 25 thousand volts. The spark plug gap will be no more than 0.8 mm.
Carburetor VAZ 2108 for VAZ 2101
Probably every driver who operates not new cars and maintains them in some part has independently encountered a problem related to the operation of the carburetor.
And then the thought came to mind of how to change the carburetor of a VAZ 2108 to a VAZ 2101.
If the carburetor is faulty, the car runs very poorly, has high fuel consumption, sneezes and sometimes does not start at all. This happened to me too.
My old VAZ 2105 with the old carburetor was already flatly refusing to work and there was nothing else to do but change the carburetor.
When replacing the carburetor, I decided to experiment a little and install not the original carburetor, but an “eight”, “Solex”.
To do this, we had to slightly alter the carburetor drive, since on the VAZ 2105 the drive comes through rods from the pedal, and on the VAZ 2108 through a cable. Otherwise, the carburetor is identical in terms of fastenings and fits into place without problems.
It’s not difficult to remake the drive; to do this, we simply make two rods, one from the gas pedal to the intermediate lever, on which, on one side, there is a cap that is put on the intermediate lever, and on the other side, a hook that attaches the rod to the pedal.
The other rod has caps on both sides that cling to the carburetor and the intermediate lever. You can buy a ready-made drive at the car market.
Also, the Solex carburetor has an idle speed solenoid valve installed, and therefore it was necessary to supply power to it. Power to the valve should be supplied immediately after turning on the ignition, so I took it from the ignition switch.
As soon as the ignition is turned on, power is supplied to the valve and it opens. Although, again, if you replace the ignition system with an electronic one from the same “eight”, then you can control the solenoid valve from electronics - EPHH, which ultimately will give a small fuel saving.
And let’s not forget to change the air damper cable from the eight, too, since it is longer. And the standard cable will not reach, because it will be attached to the carburetor on the other side.
As a result of replacing the carburetor of a VAZ 2108 with a VAZ 2101, I got a completely different car, it became much faster at the start, the engine picks up speed well and in addition the car became a little more economical.
For 100 kilometers, the car began to take fuel approximately 1-1.5 liters less than with the original carburetor.
Read an interesting article from the catalog of articles: How to prepare a car for winter
Material details
First name boseda
Video for the article on the Catalogclub website
https://youtube.com/watch?v=gWwZJETZFSI
Video for the article on the Katalogclub website
Author's materials
Recommended Method
Level control technology includes a number of stages:
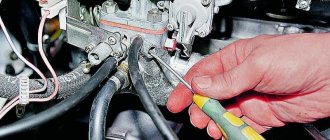
- We dismantle the housing of the air filter element. To do this, unscrew the fastening nut of the housing cover, unclip the latches, remove the cover, take out the filter and tighten the 4 nuts that secure the housing to the carburetor.
- Raise the body and disconnect the rubber pipes. We move the body to the side.
- Loosen the clamps securing the fuel pipes going to the carburetor and disconnect them.
- Remove the wire suitable for the idle speed solenoid valve;
- Disconnect the drive cable of the air damper (the “choke” handle);
- Unscrew the 5 screws securing the carburetor cover;
- Having removed the cover, we immediately determine the fuel level in the chambers by lowering a ruler or caliper into one of them until it stops (using its depth gauge). If the measurement shows a level of 25-26 mm, it corresponds to the norm and no adjustment is required;
If the amount of fuel in the chamber is lower or higher than normal, we perform a visual inspection and a series of measurements on the floats, and if necessary, we correct their position.
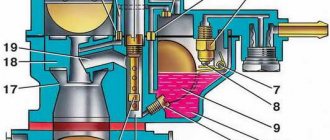
To carry out adjustment work, place the removed carburetor cover on a flat horizontal surface with the floats facing up.
First, we look at the position of the elements from above. The outer side surfaces of the floats are parallel to the special imprints on the gasket. Deviations can cause the floats to touch adjacent elements and surfaces, causing the fuel level to be incorrect. If necessary, adjust the position of the floats by bending their mounting arms. The next step is to measure the gap between the floats and the gasket. A rod with a diameter of 2 mm is useful here - this is how much the specified gap should be.
If it does not correspond, we bend the tongue of the floats, with which they act on the locking needle. After this adjustment, we check the total height of the floats, which is normally 34 mm. If this is not the case, check the gap again, adjust it if necessary and measure the height again.
The last stage of setup is determining the working stroke of the floats. To do this, place a caliper near the float, mark the distance from its lower corner to the surface of the cover, then lift the float with your hand and mark where the lower corner is.
A working stroke of 15 mm is considered normal; if it differs, it is adjusted by bending the tongue.
What you might need
The first step is to purchase spare parts that will be needed during the installation of the Solex on a classic model VAZ:
- You should buy thin paronite gaskets. But they need to be made specifically for Solex. The holes in the gasket for diffusers differ from Webers and Ozones.
- Instead of two gaskets, you can buy one with two holes. It is placed between the carburetor and the getinax gasket. In addition, they take another one - with an oval hole. It is intended for installation between the manifold and the getinaks gasket.
- They also buy a return hose. Its length must be at least 80 centimeters. Otherwise, it will not reach the fuel line under the pump.
Problems that occur when adjusting the idle speed
Under the right circumstances, the engine should reduce the number of revolutions, and eventually stall completely. But if the quantity screw does not cause any kickback in the engine, then this directly indicates a problem. And it lies in the excessive flow of fuel into the idle channel, which does not allow the quality screw to block it.
Factors that caused the problem:
- The installed idle jet is larger than necessary.
- The plug is not screwed in well enough or the solenoid valve is not securely fastened, which causes gasoline to leak past the fuel metering hole.
- The jet itself or the place for it is deformed.
To find the problem, you need to disconnect the wire from the valve while the engine is running and look at the result. If the engine stalls, then the real problem lies in the incorrectly selected nozzle size. When the engine is running, the defect lies in the fuel bypassing the idle system.
To overcome these difficulties, we get rid of the valve with a plug and look at the condition of the jet, as well as the place where it should sit, to find various local distortions.
The carburetor cover must be replaced if it is possible to detect places of deformation in the area of the seat. If damage cannot be detected, the jet is placed on the valve and the O-ring is coated with oil.
After this, the nozzle is screwed in with a wrench without using force.
Types of Kopeyka carburetors
Jets for carburetors of VAZ 2101, VAZ 2103, VAZ 2106, VAZ 2107 cars
During the production of the VAZ 2101, several modifications of carburetors were installed in its system. They differ in the size of the jets, as well as the presence or absence of a vacuum corrector. In early Zhiguli models, a carburetor was installed with an ignition system without a vacuum corrector.
The most common carburetor on the VAZ 2101 car is the DAAZ carburetor model 2101-1107010. A vacuum corrector system is already used here. All modifications of carburetors can be adjusted using a similar scheme. But it is impossible to install a model with a vacuum corrector instead of a design without it, or vice versa. Carburetors of well-known brands DAAZ/Weber, Ozone, Solex are also often used; among non-standard carburetors, I would like to highlight Solex 21073 and Solex 21083.
Calibration data for DAAZ carburetors 2101-1107010-01, 2101-1107010-03, 2105-1107010-20, 2105-1107010 10:
| Parameter | Carburetor model and chamber number | |||||
| 2101-1107010-01 | 2101-1107010-03 | 2105-1107010-20, 2105-1107010 10 | ||||
| 1st | 2nd | 1st | 2nd | 1st | 2nd | |
| Diameter, mm: | ||||||
| diffuser | 23 | 23 | 23 | 23 | 21 | 25 |
| main fuel jet | 1.30 | 1.25 | 1.30 | 1,30 | 1.07′ | 1.62 |
| main air jet | 1.50 | 1,90 | 1.50 | 2,00 | 1.70 | 1.70 |
| idle fuel jet and transition system | 0.50 | 0.45 | 0.45 | 0.60 | 0.50 | 0.60 |
| idle air jet and transition system | 1.70 | 0.70 | 1,70 | 0.70 | 1.70 | 0.70 |
| accelerator pump nozzle hole | 0.40 | 0,40 | 0.40 | |||
| accelerator pump bypass jet | 0,40 | — | 0.40 | — | 0.40 | |
| ecomostat fuel jet | — | 1.50 | — | 1.50 | — | 1.50 |
| air jet econoepta | 0.90 | — | 0.90 | 1.20 | ||
| econostat emulsion jet | 1.70 | — | 1.70 | — | 1.50 | |
| starter air jet | 0.70 | — | 0.70 | 0.70 | — | |
| jet of the pneumatic drive of the throttle valve of the second chamber | — | — | — | 1.20 | 1.00 | |
| Spray calibration number | 4 | 4.5 | 4 | 4 | 3.5 | 4.5 |
| Emulsion tube calibration number | FI5 | FI5 | F15 | FI5 | F15 | F15 |
| Accelerator pump flow for 10 full strokes, cm3 | 7±0.25% | 7±0.25% | 7±0.25% | |||
| Distance of the float from the carburetor cover with gasket, mm | 7.5±0.25 | 6.5±0.25 | 6.5±0.25 | |||
| Clearance at the dampers for regulating the starting device, mm: | ||||||
| air damper | 8±0.5 | 7±0.25 | 5 | |||
| throttle valve | 0.75 | 0.85 | 0.75 | 0.85 | 0.7 | 0.8 |
Standard carburetor models
Various carburetor models are focused on the environment, reducing consumption or maximizing vehicle dynamics. Carburetors were also created for engines of different sizes. Some models of carburetors from one power unit can be easily installed on another, and in some cases modifications will be required.
Carburetor DAAZ/Weber
DAAZ carburetors (Dmitrov Avtoaggregatny Zavod) 2101, 2103 and 2106 were products that were produced thanks to a license from Weber. For this reason, the models are called both the DAAZ carburetor and the Weber carburetor, but they mean the same device. These carburetor models are characterized by maximum simplicity of design and provide excellent acceleration characteristics.
Operation and repair of the device
The carburetor serves to form a combustible mixture by combining injected fuel and air, in order to ensure the operation of the internal combustion engine. In this case, the correct proportions must be observed to ensure normal combustion. If the proportions are not observed, an over-enriched mixture is formed due to an excess amount of fuel or lack of air, which leads to breakdowns.
The carburetor includes a system that maintains the required fuel level; a system responsible for starting and warming up a cold engine; idle system; main dosing system; acceleration pump; econostatic system. Adjusting the idle speed of the VAZ 2105 should be performed exclusively on the engine, which is warmed up in advance. The temperature value of the coolant should fluctuate around 90-95 degrees.
In addition, you need to adjust the gaps on the gas distribution mechanisms and open the air damper
Special attention should be paid to the correct setting of the ignition timing. When adjusting the 2105 carburetor, first of all, set the crankshaft rotation frequency to 700-800
This process is carried out by means of a screw that regulates the composition of the mixture, after which the same screw achieves a carbon monoxide concentration of approximately 0.05.2% reduced to 20 ° C and 760 mm Hg. Art. with the screw in the above position. After this, using the first screw, you need to restore the crankshaft rotation frequency to 700-800. Using the second adjustment screw, the carbon concentration value can be restored as a percentage to 0.05.Jan.2.
Then, by sharply pressing the throttle drive pedal and then releasing it, the engine will increase the crankshaft rotation frequency, and if it decreases, the engine will stall. In this case, using the first screw, you should again increase the rotating frequency to 750-800, after which a plastic plug is installed in the hole for the second adjusting screw. After all these steps, the adjustment process 2105 is considered complete.
When installing a carburetor on a classic VAZ 21053, you should remember that, unlike the VAZ 2105, 21053 20 has a somewhat poor second chamber. This is explained by the fact that the first has a fairly rich adjustment. It can be made poorer by installing 102-150 jets, but then there will be a need to enrich the second chamber by installing 115-135 jets.
Considering the technical characteristics of the VAZ 2105, of course, it is necessary and more advisable to install the 2105 Ozone carburetor, but still, installing the 21053 20 carburetor is also considered acceptable. In order to increase engine power and the efficiency of the VAZ 2105 carburetor, a compressor is usually installed on the car.
The compressor consists of a pulley, a drive gear, a rotor driven gear and an internal oil gear. All installation work should be carried out with the engine cool. After installation, the compressor should have minimal resistance to air movement. Typically, an installation kit is used for this, which includes all the necessary parts. A mechanical supercharger (compressor) plays an important role in the process of improving the quality of a car.
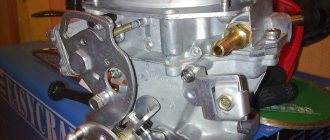
Replacing the Solex 21083 carburetor on a VAZ 2106
To carry out work on replacing the Solex 21083 carburetor, you need to prepare gasket material made of paronite, a fuel supply hose about 80 cm in length, a carburetor rocker and the Solex product itself. A set of motorist's locksmith supplies will be useful for the job.
Installing a Solex 21083 carburetor on a VAZ 2106:
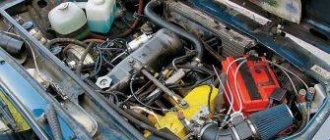
- We clean the power compartment to prevent contamination of the motor and power system.
- We disconnect the cables and ties of the carburetor device, the fastenings of the fuel wires and hoses of the heating complex.
- We remove the bracket holding the casing covering the throttle valve drive cable.
- We clean the manifold platform for attaching the carburetor.
- Apply a layer of sealing lubricant to prevent air from entering the system.
- We place the gaskets in the following sequence: thin, then thick, then again thin gasket. A large cross-section gasket is used to remove heat and prevent heat transfer to the carburetor device.
- We mount the Solex on the seat, removing the front part of the product for ease of operation.
- We install the rocker on the side of the over-valve cylinder head cover.
- We pull the cable from the throttle drive of the carburetor valve and set the required length of the cable and then connect it to the carburetor device.
- We install the updated gasket and lock the front carburetor cover.
- We connect the hoses of the heating and distribution ignition system.
- Connect the tee to the fine fuel filter element and connect the return hose to the fuel system.
- We connect the return valve to the return hose, and then connect it to the carburetor device.
- We connect the return type spring to the axial element of the rocker, which is located on the cylinder head casing.
- We mount an additional spring element for the throttle drive of the carburetor valve for the period of running-in of the product (if necessary).
- Connect the idle air solenoid valve to the relay connector.
- Restore the original position of the air filter housing and connect the gas outlet hose.
- This completes the Solex installation.
Everyone liked the Do It Yourself section! I'm continuing it! Enjoy watching everyone! ?? Dear subscribers!
It is important to choose the right model of Solex carburetor for the VAZ 2106, the price of which is quite reasonable for Russian car enthusiasts. It all depends on the size of the power plant
In some cases, it is advisable to install the Solex 21073 product, but you should know that when using such a modification of the carburetor, the dynamics of the vehicle improves, although fuel consumption also increases in direct proportion.
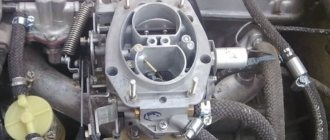
In a VAZ 2106 car, adjustment begins with correcting the fuel level in the float chambers. For all the different methods of arranging the return line (directly into the fuel tank or tapping into the gas line in front of the pump), the following steps must be taken:
- We place the vehicle on a level surface, start the engine, warm it up, test it at all speeds and turn off the power plant.
- We remove the fuel hose from the carburetor device, and do this carefully so that fuel does not get into the chambers, because The float level will be incorrect.
- We dismantle the front cover of the Solex together with the accelerator cable, after which we use a caliper to measure the distance from the fuel level to the cut of the product body (should be 24 mm in both chambers) with an error of 1 mm. Due to a possible system error in the vehicle horizon, you can take the arithmetic average value based on measurements in the carburetor chambers.
- Based on the measurements taken, we bend the tongue of the float in the required direction, after which we check, after assembling the product, for the transfer of fuel from the chambers.
- Next we adjust the idle speed.
This work is carried out on a power plant heated to operating temperature. The peculiarity is that the mixture quality regulator is equipped with a red arrow, and the mixture quantity regulator is equipped with a blue arrow. Otherwise, the adjustment is of a normal nature, only the value is set by the quantitative regulator to 9000 instead of 800 on previous models.
Bottom line
Of course, these are not all carburetor models that can be installed specifically on the VAZ-2106 and other classic Zhiguli cars. There are a lot of Chinese devices, as well as devices from European and American manufacturers. Both single- and double-chamber models are available for sale. But they are expensive and do not always guarantee high dynamic performance and efficiency. You will only get one of the two. Therefore, the question of which carburetor is better to install on a VAZ-2106 can be answered this way: it is best to install a domestic device, one of the above. Reviews from motorists recommend installing “Ozone”. It is one of those that, with low fuel consumption, produces maximum dynamics for a car.
Chassis
To dampen the vibrations that the car's wheels perceive from the road surface, the design of the VAZ-2106 included a front independent suspension, and a dependent suspension was used on the rear axle.
The front suspension consisted of two wishbones - upper and lower, a shock absorber strut with a coil spring, a suspension cross member to which it was attached, and a stabilizer bar.
Chassis
The wheel hub was attached to the levers using two ball joints.
The rear suspension, as already indicated, was dependent. The rear axle was hinged to the car body. This connection was provided by two lower and two upper reaction rods installed longitudinally, as well as one transverse rod. There was also the use of shock absorbers and coil springs in this suspension.