Russian passenger cars VAZ 2108, 2109 and even the first “tens” were equipped with carburetors produced by the Dimitrovgrad Plant (DAAZ) under license from the famous European brand Solex. The units are quite unpretentious and reliable in operation, but still require periodic maintenance and adjustment. Most G8 owners can perform this procedure on their own if they carefully read all its intricacies. It is unacceptable to mindlessly interfere with the operation of the carburetor.
When adjustment is needed
Before you take a screwdriver and start turning the screws of the fuel unit, you need to understand one important point. It is as follows: adjusting the Solex carburetor is not a separate operation, but the final stage of the troubleshooting procedure or its scheduled cleaning. The only exception is if the settings were accidentally or unknowingly changed by you or someone else.
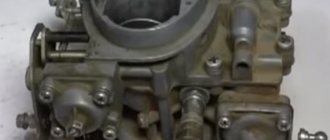
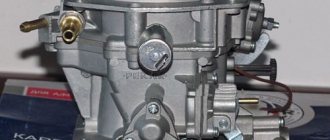
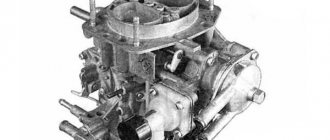
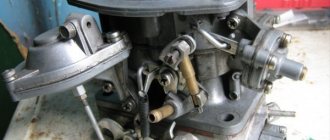
Solex carburetor - general view
The following signs indicate interruptions in the supply of the air-fuel mixture to the engine associated with Solex problems:
- the car began to stall at idle;
- fuel consumption has risen above normal and is accompanied by unstable operation of the power unit;
- a cold engine starts and immediately stalls, you have to make several attempts by manipulating the choke lever and the accelerator pedal;
- when you press the gas, a “failure” occurs, accelerating dynamics are completely absent;
- The car stalls while driving when you release the accelerator pedal while coasting.
Note. Unfortunately, the cause of the listed malfunctions is not always the carburetor. Problems with cold starts also arise when there is no compression in the cylinders, and the “culprits” for failures are often faulty spark plugs.
Wear of spark plugs also leads to increased gasoline consumption and the appearance of failures.
Point two: fixing not every problem ends with adjusting the fuel supply. The issue will be covered in more detail below, along with methods for repairing common breakdowns of the G8 carburetor. But in some cases you can’t do without adjustment:
- after removing or disassembling the Solex for the purpose of repair;
- upon successful cleaning or purging of the unit’s channels;
- after replacing rings or the entire piston group in a car engine;
- as a result of reconfiguring the timing in the ignition system, replacing high-voltage wires or installing new spark plugs.
Advice. Considering the low quality of fuel sold at many gas stations in Russia, it is recommended to remove the entire carburetor once every 20-25 thousand kilometers, disassemble it and thoroughly clean it with a compressor. After which you need to make adjustments.
Important points
- Before adjusting the carburetor, it is recommended to self-clean it. To do this, a special liquid for cleaning carburetors is poured into the gas tank, the engine starts and runs (the volume of liquid poured and the engine operating time are always indicated on the container with the cleaning liquid and depend on the specific brand). Sometimes this measure is enough to get rid of the above signs of carburetor malfunction and do without fine adjustments.
- If self-cleaning does not help, there is only one way out: you need to remove and wash the carburetor. For washing, both special liquids and ordinary kerosene are used. It is strictly not recommended to use brushes or fluffy rags to remove dirt. Hairs and lint remaining in the small holes of the carburetor can negate all efforts to clean it. The best option: thorough rinsing in a special liquid, and then blowing out all small holes with compressed air.
- Before removing the carburetor and cleaning the inside, it is recommended that the outside be thoroughly cleaned. Moreover, it is necessary to clean not only the carburetor itself, but also all the parts located next to it. Please be aware that any dirt left on adjacent parts may find its way into the clean carburetor when it is installed back into the engine. And if this happens, the entire cleaning procedure will have to start again.
In order for the carburetor to work correctly, attention should be paid not only to its adjustment, but also to cleaning. If any of these procedures are neglected, the carburetor will soon fail again. In addition, attention should be paid not only to the quality of gasoline, but also to the condition of the car’s air filter, since in some cases it is a worn filter that causes rapid contamination of the carburetor.
This is interesting: Double exhaust on the Lada Priora (VAZ 2170) - efficiency plus beauty
Copywriter with five years of experience. (1 vote, average: 5 out of 5)
Preparing tools and devices
If you intend to thoroughly clean the carburetor of your V8, then you will not be able to do it without a compressor. To blow out accumulated dirt from the channels, it is necessary to supply air at a pressure of at least 6 bar. The remaining tools are common ones found in every garage:
- 2 screwdrivers - Phillips and thin with a narrow flat slot;
- a set of small open-end wrenches - 8, 10, 13 mm;
- round nose pliers;
- rubber bulb (syringe);
- 2-3 wooden toothpicks;
- rags.
Compressor for carburetor purging
Note. It would be nice to have a tester or multimeter on hand to check the voltage. But if necessary, you can do without it.
Liquids for cleaning carburetor channels
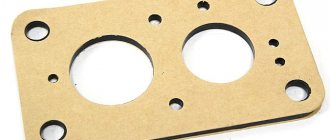
A special product sold in aerosol cans (for example, from the ABRO brand) is excellent for cleaning channels. Do not use acetone or inorganic solvents, which corrode plastic parts, for cleaning. Buy new paper gaskets for DAAZ 2108 carburetors in advance (they will also fit the “nine”). You cannot buy or change jets, since the standard ones are designed for the entire service life of the machine, and fakes with large holes for fuel are often sold in repair kits.
This material will help you repair the carburetor mechanisms of VAZ 2106/2107 cars:
What to do with increased consumption
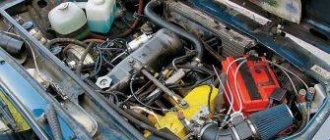
Before you tightly grasp the carburetor, be sure to make sure that the other systems are in good working order - the spark plugs are in working order, the high-voltage wires do not break through to ground, and there is compression in the engine cylinders (the minimum value for the VAZ 2108 is 11 Bar). Unscrew the spark plugs and check the condition of the electrodes.
Important. The color of the electrodes reflects the picture of the operation of the power unit. A black coating indicates that the mixture is over-rich, the proportion of gasoline in it is too high. White color indicates a lean mixture, the norm is a light brown tint.
Light brown is the correct color for the electrodes on the spark plugs
The most unpleasant problem is an increase in fuel consumption, which occurs for the following reasons:
- the economizer diaphragm is worn out;
- the main air jet or channels inside the unit are clogged;
- the needle valve, which limits the flow of fuel into the float chamber, does not hold;
- jets of unknown origin from a repair kit were installed.
Location of the economizer cover
Note. Listed here are problems that you can solve on your own. If the recommended measures do not have an effect, then the malfunction is more complex and you will have to contact a carburetor repair specialist to fix it.
To check the diaphragm, remove the air filter housing (the cover is secured with 3 10 mm nuts, the housing with 4 8 mm nuts). On the left wall of the carburetor in the direction of travel of the car, find a triangular economizer cap screwed with 3 screws, unscrew them with a Phillips screwdriver. Underneath there is a spring-loaded membrane that needs to be checked and replaced if necessary.
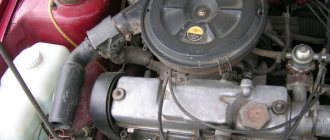
Removing the filter on the figure eight
You can read more about adjusting the carburetors of OKA cars here:
To eliminate other causes, you will have to remove the top cover of the Solex by disconnecting the starter cable and unscrewing the 5 fastening screws with a Phillips screwdriver. Then follow the instructions:
- Unscrew the air jets, remembering where each one should be. Fuel jets are hidden under them in the wells; unscrew them with a thin screwdriver and pull them out with a toothpick. Blow through the calibrated holes thoroughly.
- Using a blower, suck the gasoline out of the float chamber along with the dirt. Fill all channels and diffusers with the product from an aerosol can, wait for the time indicated on it and carefully blow out the carburetor without removing it from the car.
- Take the removed cover of the unit, turn it with the floats up and try to blow into the fuel supply pipe, plugging the pressure release fitting with your finger. If air passes through, replace the needle valve as it will also allow gasoline to pass through unhindered.
- If you replaced all the jets before increasing the flow rate, feel free to unscrew them and throw them away, and return the standard ones to their place.
- Before assembly, make sure that the floats do not touch the walls of the chamber; if necessary, carefully bend them.
- Reassemble the Solex in reverse order and begin adjusting.
To remove the top cover of the Solex you need to unscrew 5 screws
Reference. Oddly enough, with a lean mixture, gasoline consumption also increases. Since the car “does not pull” due to lack of fuel, you solve the problem by pressing the gas too hard, or even pulling the “choke”, half closing the air with the damper. Naturally, fuel is consumed beyond the norm.
Setting up jets
The jets may only be adjusted based on how they are supposed to work. Otherwise, actions will not bring the desired result. The engine jet is required for the successful passage of air flow through the diffuser opening. The large volume of the power unit will lead to successful air intake by the motor. In carburetors that are designed for large engines, it is customary to install small jets. The conformity of all installed jets is a mandatory requirement. Correctly installed jets guarantee successful operation of the VAZ-2108 Solex engine.
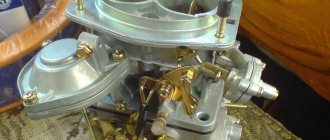
Photo of the location of carburetor parts
General diagram of the DAAZ 2108 unit
Jet placement diagram
Scheme for purging the cover channels
Fuel nozzles are removed with a wooden stick or toothpick
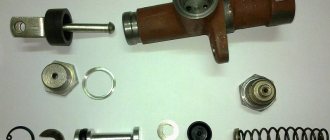
Replacing the needle valve
This is what the floats installed on the Solex lid look like
Checking the correct fuel level
We place the carburetor cover vertically, as we have discussed more than once on the website mashinaa.ru. In this case, the tongue on the float levers should recess the damping ball on the needle valve and be approximately parallel to the plane of the needle valve, and the stamping line on the floats should be parallel to the surface of the carburetor cover. If this does not happen, we adjust the fuel level again, more carefully.
checking the correct position of the floats on the Solex carburetor
Troubleshooting other problems
Among minor problems, the most common problems are idle speed. They are decided depending on the reason:
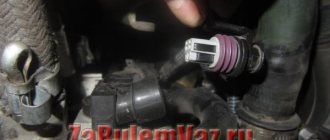
- The electric valve that opens the idle jet does not work. Check the voltage supply to it with the ignition on, and then unscrew the valve and watch how it retracts the needle. If this does not happen, replace the part.
- The idle jet is clogged. Again, unscrew the valve and blow through the calibrated hole.
- The rubber o-ring on the valve has become loose. As a result, air leaks occur, causing the engine to operate unstably. Replace the seal.
- The rubber ring sealing the idle channel is torn or weakened. It is put on a thin brass tube pressed into the carburetor body. To get to it, you need to remove the unit cover.
- The channels supplying the fuel mixture for idling are clogged. The issue is resolved by washing and purging, as described in the previous section.
Idle valve with jet
Advice. If the idle speed disappears due to the fault of the electric valve during a trip, you can organize the fuel supply directly. Unscrew the element, remove the jet and remove the valve needle. Put it in place and calmly continue your journey, and upon arrival, replace it.
Replacing the trigger diaphragm
When the car stalls during a cold start, you need to change the trigger diaphragm. Due to the breakthrough, it does not retract the air damper, causing the engine to “suffocate.” The unit is located on the right side (in the direction of travel), its square cover is held on by 4 screws. Unscrew them and change the diaphragm.
Replacing the accelerator pump diaphragm
When you feel a “failure” when you press the accelerator and accelerate the car, your actions should be as follows:
- Check the accelerator pump diaphragm, located under the cover on the left wall of the carburetor (in the direction of travel of the car). If it is torn, replace it.
- Remove the air filter housing and the top cover of the Solex. Underneath it, look for nozzles built into the fuel supply diffusers. Pry them off with a screwdriver, pull them out and blow them out. Replace the rubber ring if it is torn.
- Test how well the accelerator pump lever presses the diaphragm. If play is detected, change this lever.
The nozzles are removed using a screwdriver
The last malfunction lies in the electronic unit EPHH, which controls the operation of the electric valve. If the “eight” stalls when coasting in gear, then the reason is precisely this block. Changing it is not a problem; the price of this part is low.
Replacing the EPHH block
As a rule, after eliminating the listed problems, carburetor adjustment is not required. But if you notice a change in speed in one direction or another, then the settings can be slightly adjusted.
Diagnostics of VAZ 2108 carburetors - video
How to adjust the carb after removal
The carburetor is dismantled for one reason or another: for example, to replace individual elements that cannot be repaired and which cannot be reached when the Solex is on the car. Sometimes the device needs to be removed for basic cleaning and washing. In this case, it would be a good idea to check the throttle clearance. For this:
- Turn the removed carburetor upside down;
- turn the lever that influences the position of the air damper counterclockwise all the way;
- Use a caliper to check the gap between the device body and the lower edge of the damper: the value may vary between models, so you should look for information on reference resources.
DIY adjustment instructions
The first adjustment of the Solex is performed during the assembly process. This is the installation of the trigger drive cable. Press the “choke” handle all the way, insert the cable into the hole in the lever, and clamp its casing on the bracket. Then secure the cable with a bolt when the damper is in the “fully open” position and check the operation of the mechanism.
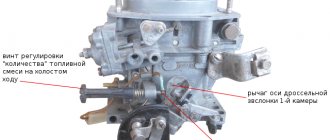
1 — screw-regulator of the amount of mixture; 2 — quality screw; 3 - rubber ring; 4 - plug
2 screws are responsible for the fuel supply settings:
- a plastic handle installed on the right wall of the unit and regulating the amount of mixture;
- on the same side, at the end of the carburetor sole, there is a well where a screw is hidden - a mixture quality regulator, which is responsible for the ratio of air and fuel for idling.
The end of the starter cable must be secured with a bolt.
Important point. Please note that both propellers have virtually no effect on the operation of the engine while driving, since 90% of the fuel mixture goes into the cylinders directly through the diffusers, bypassing the idle system.
The operation of the VAZ 2108 carburetor is adjusted on a warm engine, so after assembly, start it and bring it to operating temperature. If the engine stalls during warm-up, add speed manually by slightly tightening the fuel quantity screw. Perform the settings in the following sequence:
- Using a thin flat screwdriver, unscrew the quality screw until the engine speed stops increasing. Then tighten it half a turn.
- Reduce engine speed to 100 rpm by turning the plastic quantity screw knob counterclockwise.
- Achieve a crankshaft speed of 850 rpm by tightening the mixture quality screw.
Adjusting the mixture quality
If you have previously corrected minor problems, as a result of which the engine idle speed has become higher, then you do not need to touch the quality screw. Reduce them by turning the plastic handle, bringing them to the norm - 850 rpm.
Reference. Masters adjust VAZ 2108 carburetors using a special device - a gas analyzer that shows the level of carbon monoxide (CO) in the car's exhaust. At idle it should not exceed 1.5%, and at 2000 rpm - 2%. This is the best setup method, use it whenever possible.
How to adjust a Solex carburetor yourself
Functionality check
How successfully you have repaired and adjusted the carburetor, you need to check in the following ways:
- According to the stability of the engine at idle speed.
- By changing the color of the spark plug electrodes.
- Based on the vehicle's driving dynamics in different modes and efficiency.
When all manipulations on setting up the Solex are completed, the engine should idle stably and without shaking. If this is not the case, you need to look for the causes of problems in other systems or go to a specialist. If the outcome is successful, take a two-liter plastic container, pour 1 liter of gasoline into it and secure it under the hood. Run 2 hoses from the bottle to the fuel pump and the carburetor return fitting, then start the engine and check the car while driving until the fuel in the container runs out. In urban conditions you must drive at least 12 km, on the highway - 14 km.
After the trip, unscrew the spark plugs and inspect the electrodes. If they are covered with a black coating, and there is enough gasoline for tens of kilometers, tighten the quality screw 1-2 turns, accordingly increasing the rotation speed with the plastic handle. Then check the car while driving again.
Advice. Do not rush to reconfigure the unit if the electrodes are white. If the mixture is not too lean, and you are satisfied with a quiet driving style, then with these settings you can significantly save gasoline (up to 1 liter per 100 km). Otherwise, unscrew the quality screw 1 turn and adjust the crankshaft speed.
VAZ 2108 Solex carburetors are quite complex units. Therefore, do not try to disassemble them down to the screw yourself if you do not have the appropriate skills and experience. Also, do not listen to the advice of ignorant motorists, otherwise, instead of tuning, you will only worsen the situation and inevitably end up with a specialist, where you will have to pay money. And lastly: do not turn the mixture quality screw for no particular reason, this will affect fuel consumption and the life of the spark plugs.