Setting the hand brake on a car with brake drums
In order to adjust the handbrake, the first step is to remove the wheel. The next step is to lift the wedge of the self-propagation mechanism upward. This is done using a screwdriver, which must be inserted into one of the holes in the wheel bolt, and lift the wedge.
Having made these simple movements, the next step will be to turn the cable tension coupling, and do not forget to systematically turn the drum by hand. When it feels like the pads have moved towards the drum, you will need to tighten the handbrake and then release it. Do this procedure a couple of times.
When you tried to spin the drum, and it turned out easily, you need to turn the tension clutch a couple more turns.
Bleeding the brakes alone
This process is labor-intensive, but some people resort to it. In this case, devices for pumping can be a cap from the brake fluid reservoir (similar to yours), a container, or a syringe.
- The syringe must be hermetically built into the lid of the tank intended for the fluid using a “sealant”, then it is screwed onto this tank, drawing brake fluid into the syringe.
- The fitting located at the outlet of the pumped circuit is unscrewed. A container is installed into which the flowing liquid will be collected. Then this liquid is injected with a syringe.
The second method of pumping the brakes individually involves using a block or other stop.
- After adding fluid to the brake barrel to 100%, you need to pump the brake pedal several times and lock it in the depressed position.
- Then a standard type of process is performed: the fitting is unscrewed, after which it is necessary to wait until the flow of escaping brake fluid becomes uniform and weak. Then you need to tighten the brake system fitting.
- Release the brake pedal and repeat the entire procedure again.
- Add the correct brand of liquid. Then you can test drive the brakes with caution.
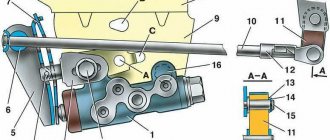
We repair the handbrake drive of Audi 80
When adjusting the handbrake cable, the main problem is unscrewing the adjustment nut. The reason for this difficulty is the influence of an aggressive atmospheric environment on the rod with the nut, which leads to corrosion of the metal. For a rod with an M6 thread, which is susceptible to corrosion, a small force is enough to break it.
The solution to this difficulty will be described below.
It’s good if there is at least a centimeter of thread left on the rod. If more, then cut off the excess.
Using an M6 die (step 1.25), you need to cut a new thread. Since there is not enough space for the handle of the die, we use round nose pliers. We insert them into the internal holes and cut the threads.
Everything you need can be purchased at the car market. You will need a rod or bolt M6x1.25, about ten centimeters long. You will also need two M6 x1.25 nuts and two couplings with the same thread. The coupling is the same nut, only 5 times longer.
Having everything you need, let’s begin the step-by-step repair:
- Screw the nut onto the manufactured thread until it stops.
- After the nut, screw on the coupling
- We measure the gap between the coupling and the cable fastening
- Cutting the required section of the rod
- Screw the rod into the coupling until it stops, and clamp it on top with a second nut.
- Using open-end wrenches, tighten the nuts on both sides of the coupling
- We insert the manufactured new rod into the cable fastenings
- We screw the remaining coupling onto the free end
Useful tricks for Audi 80
Even if the car is equipped with rear drum brakes, they can be easily replaced with disc brakes.
This is done in several ways:
- Complete replacement of the rear hub assembly (recommended).
- Purchase an installation kit.
- Finding a donor car and replacing only the brake system (problems with the handbrake may arise).
Conventional front discs can easily be replaced with ventilated ones:
- all actions are performed as when replacing pads;
- after turning the caliper, unscrew the brake caliper (2 bolts 17: above and below the caliper);
- After removing the bracket, the disk is removed and a ventilated one is installed in its place.
Attention! Ventilated discs are thicker than regular discs and require special pads. The list of available Audi pads is in the instruction manual.
Selecting the handbrake cable for Audi 80 B3
The cables have different sizes. So, you won’t be able to buy the first one you come across.
There are several ways to select it:
- By year of manufacture and modification, taking into account the engine size of the car
- By car body number
- Knowing the article number (spare part number)
To avoid problems with new cables and the handbrake working after their installation, you must immediately determine which brakes are on the rear beam. After all, the length does not depend on whether the cables are original or analogue, but on the type of brakes. When there are drums on the car, the cable dimensions range from 1578 mm to 1600 mm. In the case when discs are installed, the length will be longer, from 1722 mm and above.
Video on replacement - unfortunately I couldn’t find it for the roll, but don’t be alarmed by the title, in this video the drum structure is the same as on the barrel, because these are cars on practically the same base and almost the same:
Differences and specifics of bleeding brakes with ABS
The anti-lock braking system allows you to control the vehicle's handling when braking. After pressing the pedal, the central control panel receives a response signal from sensors installed on the front and rear wheels. Thanks to the control system, the wheels slow down at the same speed as the car itself. In other words, thanks to ABS, the car cannot skid.
Regardless of the manufacturer, most devices have common characteristics:
- Electronic speed sensors on the hubs;
- Pressure controllers for main brake fluid lines;
- Electronic unit for signal processing.
Unlike most cars with simple braking systems, bleeding anti-lock brakes is difficult. For the procedure to be successful, it is necessary to familiarize yourself in detail with the theory of ABS operation. However, if the hydraulic accumulator, valves and pump are located nearby due to the design solution, the pumping technology will be very similar to the standard one.
Before starting work, in addition to standard tools, you must acquire a scanner to read information from the electronic unit. However, if the car has additional sensors, it is better to take the vehicle to a specialized salon. Any improper intervention calls into question the safety of road users.
Usually, for successful bleeding with the ABS system, it is enough to monitor the pressure in the hydraulic system. The standard value is 180 atm, but to work with the brakes it must be reduced - turn off the ignition and apply the brake 20 times. Only after this, some of the liquid will splash out and the pressure will drop significantly. After reducing the pressure, you can begin to turn off the ignition and disconnect the connectors and controllers on the GTZ tank for further manipulations.
The brake bleeding diagram, or, in other words, the brake bleeding sequence, should look like this:
- front left wheel mechanism;
- front right wheel mechanism;
- rear right wheel mechanism;
- rear left wheel mechanism.
- front right wheel mechanism;
- front left wheel mechanism;
- rear left wheel mechanism;
- rear right wheel mechanism.
Starting the pumping procedure itself, provide comfortable access to the relevant mechanisms with which you will work - remove the desired wheel, or drive the car into the inspection hole. Procedure for bleeding the brakes.
- Remove the cap from the expansion tank.
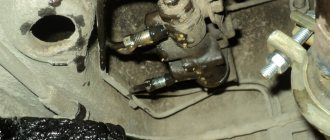
- Unscrew the brake bleeder fitting and clean it of any buildup.
- Place a clean hose onto the fitting of the corresponding brake mechanism, lowering the free end into a reservoir filled with brake fluid. Due to the fullness of the container, air does not enter the cylinder through the fitting.
- Start the engine and leave it running.
- Press the brake pedal several times (your assistant can do this) until the brake fluid flows through the hose into the reservoir. Perform these actions as long as the brake pedal allows, until it hits the floor.
- Bleed the brakes until all the air is out of the mechanism, while constantly refilling the reservoir with new brake fluid. The tank should not be completely empty, otherwise it will fill with air again. This system is used for cars with a manual transmission.
- Tighten the abs bleeder fitting. Tighten it while the pedal is reversed to prevent air from entering.
- Remove air and fluid from the clutch hydraulic drive as well.
- Add fluid to the expansion tank to the maximum mark.
- Check the action of the brake pedal; it should be depressed 1/3 of the entire pedal stroke.
In any case, before starting pumping, read all the nuances in the technical documentation for the car.
Miracles with brakes. Help.
- Log in to reply to this topic
#1 Diver
- Users
- 151 Messages
- City: St. Petersburg
- Car:
Audi 80 B4, 2.6, ABC, 1993.
- Top
#2 Sanych
The truth is somewhere near.
- Gender: Man
- City: St. Petersburg, Sennaya square.
- Car:
Nissan X-Trail - year of issue:
2019
- Top
Audi 80 Bucket of vegetables › Logbook › Bleeding the brakes, LOSHARA part 2
After replacing the front calipers and grinding in the pads, I realized that it was necessary to bleed the entire system, because... pumping only the front when replacing is nothing,
“Brake fluid pressure is distributed through two brake circuits independent of each other, located diagonally. This means that the brake circuit is formed by the front and diagonally opposite rear wheels. This ensures that the vehicle stops with sufficient efficiency in the event of a failure of one of the circuits of the working system. In this case, more force is required on the brake pedal, and the braking distance will be longer.” I hung my ass out, took off the wheels and the whole idea went to waste, because... twisted the fitting in the wrong direction, but to twist the PLYA (( - almost the same story was repeated as it was - when I broke off the fitting with a side blow while twisting the tube
in short, he broke it at the root, the st-mashinist told me so at that moment
what a bastard you are!
I put everything back together and went to get a new fitting.
And now, the fitting has been purchased, we are trying to repair it
Full size here it is BUMMER
I’m trying the same method with the Ketai extractor, but H.Y. You nailed it
Uncle Liao said hello
This is pestle, you can’t get it out of there
But you need to leave in a car, and preferably with brakes, so - having found the old cylinder, smelled it and cleaned it, I threw the giblets into it
Dimon said - this is from VolktsVagen, because. aude rings are closed
the giblets from the cylinder removed from the car were inserted into the old body
ready to reinstall
well, everything is in place
We begin pumping the system, under the supervision of a hydraulics specialist st-mashinist
They rocked it according to the classics - the air behind is hyauric - suspicion of a sorcerer.
then they pumped it up using the specialist’s method, and they pumped up better.
After bleeding the entire system, relatively good brakes appeared, the sorcerer and drums should be replaced with new ones.
Thank you all for your attention, don’t break down and take care of your cars.
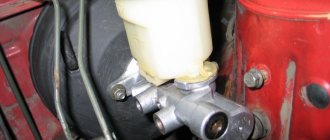
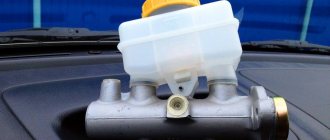
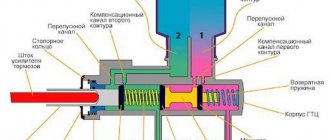
How to bleed the master brake cylinder
The optimal option for pumping the GTZ is to pump each section separately - releasing air through the nuts.
The best option is to pump each section of the turbocharger separately - releasing air through the nuts. But, for example, on the VAZ 2108 and the like it is difficult to ensure that the sections are pumped separately. Therefore, they often do it simpler - pour brake fluid into the reservoir attached to the cylinder (there are plugs in the holes for the tubes). Place the turbocharger on the studs of the vacuum booster without tightening the nuts. The tubes are screwed tightly, after which the cylinder is finally secured. As a rule, this is enough. But the most scrupulous car owners can bleed the entire brake system - so to speak, “for the soul.”
Features of Audi brakes
The wheels on the Audi 80 b3 are installed not only at the front, but also at the rear. Equipping a car with disc brakes “in a circle” is carried out, depending on the modification of the power unit. On cars with low-power engines, solid wheels are installed; on more powerful versions and models with automatic transmissions, ventilated wheels are installed.
The advantage of ventilated brakes is their high efficiency - due to special blades, the disc is cooled by air currents when moving, which prevents it from overheating and extends its service life.
Audi cars, in which the rear drum is replaced by a disc, are equipped with an ABS system that prevents the wheel from locking when stopping.
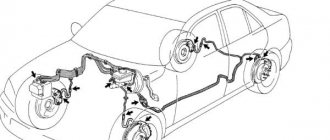
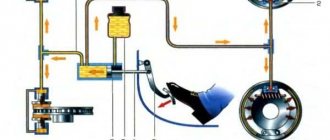
The Audi 80 B3 brake system used is dual-circuit - the scheme implies separate operation of diagonally located wheels. Even if one brake circuit fails, the car does not lose control.
The system on the Audi 80 consists of several elements:
- directly the brake pedal;
- vacuum brake booster, which greatly enhances the impulse transmitted by the pedal;
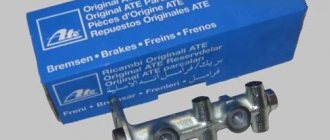
- the master brake cylinder, which pumps fluid through both circuits;
- rear wheel brake force distribution system (usually not used when ABS is installed);
- brake discs at the front (ventilated as an option), drums at the rear (disc as an option);
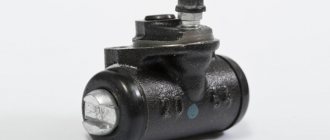
- brake cylinders that press the pads to the discs or drums (single and double piston);
- brake pads.