Payment for goods and downloading of the book in electronic form (PDF format) is made on the website.
To do this, you need to find the book you are interested in and click on the “Buy” button. The price of the book is indicated on the button.
For convenience, the price on the website for residents of Russia, Belarus and Kazakhstan is presented in rubles.
For residents of Ukraine in hryvnias, and for all other countries - dollars.
After clicking on the “BUY” button, a payment window will open where you can select a payment system with which you can pay for the selected book using any bank card (Visa, MasterCard, MIR, etc.)
When you click on the “Pay by bank card” button, the Portmone payment system will open, which is the easiest way to make a payment.
In addition, the website offers four payment systems for payment:
- Yandex (payment from any bank cards, Yandex Money account, QIWI Wallet, terminals, etc.);
- Portmone (payment from any bank cards, Portmone account);
- PayPal (payment from any bank cards, PayPal account);
- WebMoney (payment from any bank cards, payment from WebMoney wallets).
Payment via Yandex Cashier
After selecting payment via Yandex, the Yandex Cashier payment system will launch, where you need to select a convenient payment method (bank card, QIWI, Yandex Money account, etc.)
After specifying payment details and confirming payment, payment for the goods will occur.
If you have a bank card in a currency other than the ruble, then the money will be debited from the card at the rate of the Central Bank of Russia at the time of the purchase.
This payment method is optimal for residents of Russia, Kazakhstan and Belarus.
Official website of the Yandex Kassa payment system https://kassa.yandex.ru
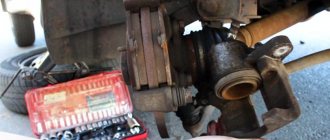
Replacing brake cylinder 2107
If the replacement operation on a VAZ classic is not performed on a car lift, it is more convenient to do the work sequentially - first on one side, then on the other side of the rear wheel. To perform the work, the vehicle must be placed on a level surface, then proceed as follows:
- We turn off the engine, set the car to speed, and put chocks under the front wheels. Don’t forget to fully release the handbrake;
- loosen the wheel nuts of the rear wheel, jack up the car and remove the wheel;
- To prevent the car from going anywhere, it is advisable to place a “tragus” next to the jack;
- remove the brake drum - use a 12 mm combination wrench to unscrew the two guides;
- pull out the cylinder, freeing it from the pads;
After the work has been done, it is necessary to top up the fuel injection system reservoir and bleed the brakes.
Payment via Portmone
After selecting payment through Portmone, the payment system will launch, where you need to select the payment method: bank card or Portmone account.
The price in the Portmone payment system is converted into dollars at the exchange rate of the Central Bank of the country where you are located.
If you have a bank card in a currency other than the dollar, then the money will be debited from the card at the rate of the Central Bank of your country at the time of the purchase.
After specifying payment details and confirming payment, payment for the goods will occur.
Official website of the Portmone payment system https://www.portmone.com
Replacing the brake cylinder cuff
If desired, on VAZ cars you can not change the entire rear working cylinders, but only replace the cuffs. To do this, you need to disassemble the RTC - remove the pistons and spring, remove the old cuffs from the pistons and install new ones. It is advisable to repair the RTC only if the cylinders did not last long, but they began to leak. The thing is that on VAZ cars the RTCs are very inexpensive, it is advisable to change the rear cylinders as a whole - replacing the cuffs is often unjustified.
Payment via PayPal
After selecting payment via PayPal, the PayPal payment system will launch, where you need to select the payment method: bank card or PayPal account.
If you already have a PayPal account, then you need to log into it and make a payment.
If you do not have a PayPal account and you want to pay using a bank card via PayPal, you need to click on the “Create an Account” button - shown with an arrow in the picture.
PayPal will then prompt you to select your country and provide your credit card information.
After specifying the information required to make the payment, you must click on the “Pay Now” button.
Official website of the PayPal payment system https://www.paypal.com
Installing an element
Now we mount the tank with bushings on the new cylinder. If it was not included in the kit, you can take the old one. But it must be free of cracks and other deformations. Then we take out the rubber sealing bushings from the old GTZ. There are two of them. If they are worn out and have cracks, we take new ones from the master brake cylinder repair kit. We put the mechanism back to the “vacuum chamber” and tighten the fastening nuts. Next, place an empty container underneath and fill the tank with new liquid. It is advisable not to mix different classes - buy Series 4 Dot.
View gallery
Next, you will need an assistant who, at your command, will press the brake pedal in the cabin. At this time, you need to close all four pipe holes in the master cylinder with your fingers. Pressing should be done to the floor and very slowly. We repeat the procedure until liquid flows out of the holes. Next, you can safely connect the tubes that go to the front wheels. After this, ask the assistant to press the pedal again. We make sure that all the air comes out of the holes for the rear wheels.
View gallery
After this, remove the fingers and screw in the remaining tubes. At this point, the replacement of the "tens" GTZ is almost complete. All that remains is to add liquid to the tank to the required level, connect the sensor and put the soundproof cover in place.
Payment via WebMoney
After selecting payment via WebMoney, the payment system will launch, where you need to select the payment method: bank card or WebMoney wallet.
If you already have a WebMoney wallet, then you need to log into it and make a payment.
If you do not have a WebMoney wallet and you want to pay in another way, you need to select any of the methods that WebMoney offers and make the payment
After specifying payment details and confirming payment, payment for the goods will occur.
Official website of the WebMoney payment system https://www.webmoney.ru/
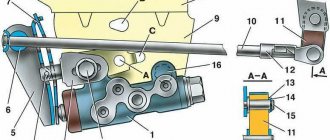
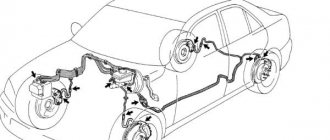
The device of the VAZ brake system
The brake system of Togliatti-made cars is quite simple; the vehicle consists of the following main parts:
- pedals, which are pressed to achieve braking;
- brake master cylinder (MBC), it transmits the force of pressing the pedal through hydraulics to the working cylinders, respectively, to the wheels. GTZ VAZ - dual-circuit, the circuits are divided to transmit fluid pressure to the front and rear wheels;
- a vacuum booster that makes it easier to press the pedal;
- tubes that connect the elements of the vehicle;
- brake working cylinders (RTC);
- pads (drums) and discs;
- brake distributor (pressure regulator).
Downloading a book
After successfully completing the payment (by any method) and returning to the KrutilVertel store from the payment system website, you will be taken to the successful payment page:
On this page you need to indicate your e-mail, where access to download the book will be sent.
If you are already registered on our website, then simply follow the link to your personal account.
The book you purchased will be in your personal account, from where you can always download it.
Please note that after making the payment, you need to return back from the payment system website to the KrutilVertel website.
If for some reason you did not return back to the site and closed the payment system tab with a message about the successful completion of the payment, please let us know - we will send you a letter indicating access to download the book.
Replacing the brake cylinder VAZ 2109
The RTC on the rear axle of the 2109 wheels is changed according to the same principle as on the VAZ classic; the wheel and drum are also removed, the tube and two cylinder fastenings are unscrewed with a ten key. It often happens that the tube and RTC bolts on the support disk boil; to remove them carefully, you need to spray the connections with WD-40, and wait 15-20 minutes before unscrewing. The brake pipe nut will be easier to unscrew if you gently tap the metal around it with a hammer. When tapping, it is important not to break the bleeder fitting.
Replacing brake cylinder 2109 is not a difficult task, and many drivers can do this work themselves.
Problems when paying with bank cards
Sometimes difficulties may arise when paying with Visa/MasterCard bank cards. The most common of them:
- There is a restriction on the card for paying for online purchases
- A plastic card is not intended for making payments online.
- The plastic card is not activated for making payments online.
- There are not enough funds on the plastic card.
In order to solve these problems, you need to call or write to the technical support of the bank where you are served. Bank specialists will help you resolve them and make payments.
That's basically it. The entire process of paying for a book in PDF format on car repair on our website takes 1-2 minutes.
If you still have any questions, you can ask them using the feedback form, or write us an email at [email protected]
Auto repair school - Do-it-yourself car repair
Sep 12, 2016 VAZ 2108, VAZ 2109, VAZ 2110, VAZ 1117 Kalina, VAZ 2170 Priora by admin
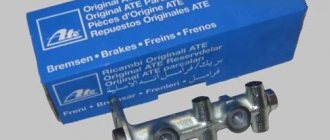
There are several reasons why it will be necessary to replace the main brake cylinder and vacuum booster on VAZ 2108, VAZ 2109, VAZ 21099, VAZ 2110, VAZ 2113, VAZ 2114, VAZ 2115 . If the effectiveness of the brakes on the car has deteriorated, the brake pedal has become much “softer” and checking the condition of the brake pads with bleeding of the entire brake system (removing a possible air lock) did not lead to the desired result, then the first reason appears to replace the master brake cylinder assembly. Reason number two could be a brake fluid leak from the master cylinder (characteristic traces of brake fluid leaks on the vacuum booster). And rebuilding the master cylinder (replacing the cuffs) quite often does not correct the situation, although you can always try. Fortunately, the repair kit for cuffs for the main cylinder is inexpensive, the main thing in this case is to buy a quality product.
To check the serviceability of the brake pedal vacuum booster, you need to press the brake pedal several times and, holding it in this position, start the car engine. If you feel a downward push, it means the vacuum booster is working . If not, then you should check the tightness of the connection between the vacuum hose and the intake manifold fitting and the check valve on the amplifier housing. Are there any problems with tightness? No. Then we are preparing to replace the vacuum booster. Another reason to replace. A faulty vacuum booster can cause uneven operation of the engine itself and cause a significant loss of power from the car's engine. In this case, checking the correctness of the diagnosis is easy. With the engine running, you should tightly clamp the vacuum hose and if after this the engine runs more stable, then buying a new vacuum booster is not far off.
To replace the master brake cylinder and vacuum booster with your own hands, you need to have: pliers, a screwdriver, socket and socket wrenches “17”, socket and socket wrenches “13”, a special wrench for brake pipes “10” (see photo 1) and brake fluid. Small devices such as rubber caps and plug fittings will also be useful in the work (photo 2). You will find out below where they can be used.
Have you prepared the tools and spare parts? Let's move on to the process - replacing the main brake cylinder and vacuum booster on our own.
Removing the main brake cylinder on cars VAZ 2108, VAZ 2109, VAZ 21099, VAZ 2110, VAZ 2113, VAZ 2114, VAZ 2115 :
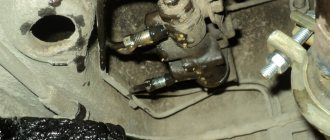
Disconnect the block with wires from the brake fluid level sensor (photo 3).
Using a “10” wrench for the brake pipes, unscrew the fittings from the main brake cylinder one by one. And, as shown in photo 4, we install plugs on the brake pipes and brake cylinder. This trick, if performed carefully, will prevent brake fluid from leaking and airing the brake system.
After this, using a “17” wrench (socket or socket) we unscrew the two nuts securing the cylinder to the vacuum booster (photo 5). Remove the brake cylinder.
Installation is carried out in reverse order. If we are installing a new master brake cylinder, it must be bled (filled with brake fluid) in a vice before installation.
Replacing the vacuum booster on VAZ 2108, VAZ 2109, VAZ 21099, VAZ 2110, VAZ 2113, VAZ 2114, VAZ 2115 :
1. Repeat the steps described above in the “Removing the master cylinder” section. To replace the vacuum booster, you can not completely unscrew the master cylinder, but disconnect only the fittings on the left side and move the brake cylinder to the side. But this is optional.
2. Next, disconnect the hose from the check valve (photo 5a) and inside the car, remove the brake pedal pin locking bracket and pull out the pin (photos 6 and 7).
3. Using a socket or socket (whichever is convenient) wrench “13”, unscrew the four nuts securing the vacuum to the car body (photo 8). We can say that this is the most inconvenient operation.
4. After removing the vacuum, using a socket wrench set to “17”, twist the mounting frame onto a new vacuum (photo 9).
5. We carry out the assembly in the reverse order. Do not forget that it is better to first connect the vacuum and the brake pedal using a nut, and only then screw the vacuum frame to the body.
It is also recommended to replace the vacuum hose, since during operation it loses its elasticity and flexibility, as a result of which cracks and kinks appear on it.
I hope that this article will be useful to you. If something is not clear to you or you notice any inaccuracies in the article, then I will be glad if you tell me about them. To do this, you can use the “feedback” form, “comments” or find my contact details in the “About the site” section.
When using an article or photographs, an active direct hyperlink to the website www.avtorem.info is required!
Did you like the article? Share it on your page!
Symptoms of failure
Below we highlight the main signs of malfunction of this mechanism:
- Increased pedal travel.
- Uneven braking.
- Pedal too soft.
- Increased braking distance.
The problem may also be accompanied by a leak of brake fluid from the reservoir.
This is interesting: The fuel pump of VAZ 2110 and 2109 is the heart valve of a car
Choice
We will give some recommendations regarding the choice of a new vacuum amplifier.
| Selection criterion | Required parameters |
| Price | The cost of a good vacuum cleaner is now about 2.5 thousand rubles. These are not the most expensive, but not the cheapest Chinese options. Optimal for VAZ 2109 |
| Package | This packaging, used by a genuine manufacturer, is made of corrugated cardboard |
| Label | The label should be clearly legible - the production batch number, the production date of the part and the name of the manufacturer itself |
| vendor code | The vacuum unit corresponding to the technical parameters of the VAZ 2109 has article number 2108-3510010TM |
| Point of sale | You should not buy from market traders. There are many good, trusted spare parts stores in any city. Don’t be shy to ask for certificates, documents for parts |
Choosing wisely
Now there are a lot of fakes on the market. Such parts cost the same as the originals, but last much less.
Signs of a faulty caliper
Signs of a faulty brake caliper:
- increased braking distance;
- difficulty rolling;
- the car pulls to the side when braking;
- pedal vibration when braking;
- grinding noise in the caliper area when driving: it is worth noting that the reasons can be different, from a trapped stone to banal wear of the pads, but wear of the pads can be caused by a faulty caliper;
- characteristic signs of overheating on the brake disc;
- uneven wear of pads from one caliper;
- excessive heating of the disk.
Contents of the repair kit
The composition of the brake master cylinder repair kit differs depending on several factors:
- car model for which the set is intended;
- manufacturer;
- composition of the kit (complete or incomplete).
Thus, the kits differ from each other not only in the presence of certain consumables, but also in their quantity. Complete sets include the items listed below, while incomplete sets include only the cuffs. And so, in most cases, the repair kit includes the following consumables:
GTZ repair kit for VAZ-2109
- chamber separating cuff;
- main cylinder piston cuff;
- outer cuff of the cylinder;
- sealing collar for GTZ;
- protective cap for GTZ;
- seal for the piston head;
- cap for the fitting of the bleeding hoses from the clutch release cylinder;
The brake master cylinder repair kit should be used if malfunctions occur in its operation. More about them later.
Causes of breakdowns and their symptoms
One of the main reasons for brake master cylinder failure is uneven distribution of fluid in the system, leading to circuit failure. The wear of the sealing collars located at the points where the rod enters the cylinder has a negative effect. It is also possible that scuffs may appear on the pistons and deformation of their return springs with rubber cuffs.
In addition, the compression hole becomes partially or completely clogged. The above malfunctions can be caused by poor-quality brake fluid. Any failed part should be urgently dismantled and a new one installed in its place; if the cylinder mirror is faulty, the entire assembly must be replaced. Moreover, you cannot hesitate, since the correct operation of the gas turbine engine is one of the keys to your safety.
Much can be understood by the performance of the brake pedal. So, if it has a reduced stroke, then most likely the reason lies in the compression hole. It may be clogged or blocked. It may also be due to the lack of clearance between the gas turbine seal and the piston. When the piston gets stuck, the channels are blocked and the cuff is deformed, the pedal does not make a full stroke. But if it moves too easily, then the cause is a hydraulic fluid leak, and the rubber bushings need to be replaced. Sticking of the piston is indicated by the wheels braking when the pedal is released.
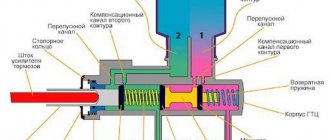
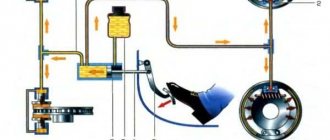
Operating principle of the brake system
The operating diagram of the hydraulic drive of this system is simple: a depressed pedal that acts on the vacuum booster (if provided), or directly on the main brake cylinder, the latter, creating pressure on the hydraulic fluid, sends it through the pipes to the working rollers that release the brake pads.
It follows that the main unit in this diagram is considered to be the main cylinder; to understand how to repair the main brake cylinder with your own hands, you need to study all its components.
This is interesting: Brake fluid is leaking: what is the cause of the leak?
Repair of the MP 654K pistol - replacement of the over-cylinder gasket
Replacing the over-cylinder gasket is the simplest procedure for eliminating gas leaks in a Russian-made Makarov 654K air pistol. However, it does not always solve the problem, despite its apparent simplicity and appearance of a breakdown. As a rule, after replacing the silicone element, you will need to install other spare parts of the repair kit.
Take a small, thin screwdriver and an awl. Remove the magazine from the gun, turn it so that you can see the needle that pierces the cylinder when loading the gun and the white gasket that is installed around the needle. Using an awl, hook the gasket and carefully, so as not to damage the needle, pull it out of the neck of the gun seal.
After removing the old gasket, all that remains is to install a new, large white gasket for the pistol repair kit. Gently press it against the neck of the seal with your finger, but not with your nail, so as not to damage the seal of the spare part. We take a small screwdriver with a blunt end and use it to tighten the gasket so that it fits in the right place.
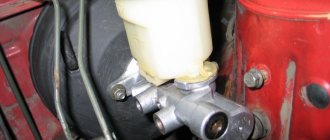
Algorithm for removing the GTZ VAZ 2108
- Remove the reservoir cap from the brake fluid and brake fluid, remove the reservoir from the brake fluid, using something wooden to remove it from the seat.
- To prevent brake fluid from getting on electrical wiring and other elements, you need to place some kind of rag under the turbocharger. After this, use a special key, which eliminates the possibility of “licking” the edges, to turn off the pipes.
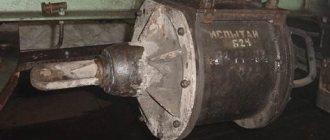
Key for removing the turbocharger
Be careful!
TJ is toxic, leaves stains on clothes, plastic, rubber. It is better to leave marks on the tubes with paint or a marker.