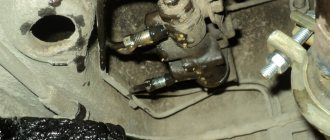
Problems that arise with the brakes while traveling are considered critical and must be corrected immediately. The culprit of the malfunction is often the main cylinder, installed in the engine compartment and rigidly connected to the pedal. To find out the cause of the breakdown and repair the unit yourself, you need to know the structure of the brake master cylinder (MBC) and its principle of operation. During the diagnostic process, it is necessary to distinguish and filter out problems with other elements of the system.
Purpose of the GTZ in a car
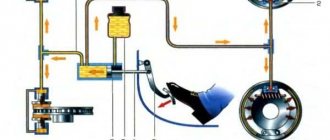
Braking begins by pressing the pedal. For now, there is no need to consider all sorts of smart driver assistance systems that work great even without his participation.
The maximum that will support the foot of a person who wants to slow down the car is a vacuum brake booster (VBS), located between the pedal assembly and the first hydraulic device in the chain ending with the brake pads.
The combined action of muscular force and the atmosphere through the VUT membrane should increase the pressure in the entire hydraulic system. If the valves and pumps of the ABS system do not interfere, then this pressure is the same at any point.
Fluids are incompressible, which is why they are used in passenger car brakes. Before this, no less incompressible solids were used in the form of rods and cables to drive the pads of the first machines.
The pressure is directly created by the piston of the main brake cylinder (MBC). Due to incompressibility, it increases very quickly; every driver felt the pedal harden under his foot after selecting its free stroke.
Relieving pressure after releasing the pedal and replenishing the lines with liquid when required are also functions of the GTZ.
How does a brake master cylinder work?
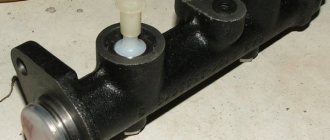
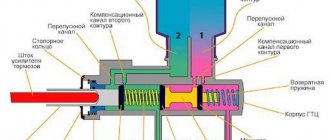
The structure of the main brake cylinder: 1 - Housing with compensation holes; 2-3 - Circuit drive piston; 4 - Spacer washer; 5. Rod;
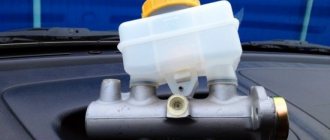
To make it easier for the driver to brake comfortably and confidently, in modern cars the pressure on the pedal is transmitted through a brake booster, often a vacuum one. Often the brake master cylinder is mounted on the booster cover, forming a single unit with it. In this case, a compensation tank is located above the cylinder, which contains a reserve of brake fluid, which can be useful in case of minor leaks or natural evaporation.
The rod coming from the vacuum booster rests against the double piston. Since the pistons are located on the same axis, the force of the rod moves them simultaneously, allowing pressure to be created in two circuits at once. At the same time, liquid also enters the compartments expanding behind the working cavities from the tank. This will avoid vacuum in the circuits, which can occur if the pedal is released abruptly. Having removed the force on the rod, the piston is returned by springs to its original position, after which the pressure in the cylinder is equalized.
Principle of operation
Single-circuit gas turbine engines, where there was only one piston, are no longer found in cars, so only a double-circuit one is worth considering. It is distinguished by the presence of two pistons, each of which is responsible for the pressure in its own branch of the system.
In this way, the brakes are duplicated, which is required for safety. If a fluid leak occurs, a branch that remains in good working order will allow you to stop the car without using the parking brake or other emergency techniques.
The first piston is directly connected to the pedal rod. Having started to move forward, it closes the bypass and compensation holes, after which the force through the volume of liquid will be immediately transferred to the primary circuit pads. They will press against the discs or drums, and deceleration will begin using frictional forces.
Interaction with the second piston is carried out through a short rod with a return spring and the primary circuit fluid. That is, the pistons are connected in series, hence such GTZs are called tandem. The piston of the second circuit works similarly to its branch of the system.
Typically, the working wheel cylinders operate diagonally, that is, one front and one rear wheel are connected to each circuit. This was done in order to use the front, more efficient brakes, at least partially, in any case.
But there are cars in which, for structural reasons, one circuit works only on the front wheels, and the second on all four, for which additional sets of wheel cylinders are used.
Symptoms of problems
The general technical condition of the car (including the brake system) can be checked using a personal diagnostic adapter - a car scanner. These types of devices are widespread and have a wide price range. We would like to draw your attention to the budget model of Korean production Scan Tool Pro Black Edition.
At a cost of about 2 thousand rubles. This scanner is capable of fully diagnosing your car (engine, gearbox, transmission, abs, srs and much more), which will pay for itself in 1-2 trips to the service station. The adapter is quite easy to use, has Russian-language software and is compatible with most cars produced in 1993. The device will also be useful when buying a used car, as it can show its real mileage and VIN.
The fluid brake system consists of many parts that can become unusable: pipes, wheel cylinders, calipers, drums and pads. Typical signs of a faulty master cylinder:
- After pressing the pedal, the car stops slowly. The reason is that the cuffs of one or two pistons have lost their tightness - they have cracked or “floated”.
- To slow down, you need to press the brake pedal hard. The phenomenon occurs due to swelling of the rubber of the piston seals.
- The brake pedal travel is too short. The fluid inside the cylinder has nowhere to go because the compensation hole is clogged. Another option is that the passage is blocked by a swollen rubber seal.
- A common symptom is pedal failure, the brakes coming on at the end of the stroke. This indicates complete wear of the cuffs; as a result, liquid penetrates behind the piston and rushes into the expansion tank - the cylinder “bypasses.”
- The pads do not release the brake discs and drums and get very hot when driving. Options: one of the pistons is jammed or the bypass hole is clogged.
The listed symptoms of a GTZ malfunction are similar to malfunctions of other elements. Pedal failure also occurs when a large amount of air enters the tubes or loss of fluid in one of the working cylinders. Sluggish deceleration and increased force on the pedal are often caused by a breakdown of the vacuum booster - a cracked membrane or a lack of tightness at the joints of the hose that takes off engine vacuum.
There are signs that clearly indicate the performance of the main hydraulic cylinder and the malfunction of other elements:
- during braking, the car pulls to the side - the problem lies in a certain circuit or wheel;
- jamming of the brake mechanisms of one wheel;
- creaking and squeaking when braking;
- heating the discs and pads on one wheel.
If you eliminate these symptoms, it will become easier to check the brake master cylinder in a garage. This also includes obvious brake fluid leaks and the knocking sound of worn calipers.
Device
The GTZ includes:
- a housing with fittings supplying fluid from the supply tank and discharging it to the lines of the working cylinders;
- pistons of the primary and secondary circuits;
- sealing rubber cuffs located in the piston grooves;
- return springs that compress when the pistons move;
- a boot covering the entry point of the rod from the VUT or pedal into the recess on the back side of the first piston;
- a screw plug that closes the cylinder from the end, by unscrewing which you can assemble or disassemble the cylinder.
Compensation holes are located in the upper part of the cylinder body; they can overlap when the pistons move, separating the high-pressure cavity and the supply tank with a supply of liquid.
On the subject: What is a brake caliper and how does it work (types, device, repair)
The tank itself is usually attached directly to the cylinder through sealing collars, although it can be moved to another location under the hood, and the connection is made through low-pressure hoses.
What to do?
The most unpleasant thing is when the breakdown takes you by surprise, somewhere in the middle of the highway, in which case it will not be easy, repairing it on the road is not an option, and continuing to move is unacceptable and dangerous. As you can see, the reason, as a rule, is always that the line is clogged and the coolant cannot circulate through the system. In most cases, the problem is associated with rubber seals that become unusable. By cracking and deforming, they interfere with the normal operation of the pistons and bypass fluid. To avoid such a phenomenon, it is necessary approximately once every 100 thousand km. mileage, carry out diagnostics and, if necessary, change all rubber seals.
Before checking the brake master cylinder, be sure to check that other components of the brake system are in good working order.
- Perform a visual inspection of the brake caliper cylinders, as well as lines, for leaks and leaks.
- Check the level and condition of the fuel fluid in the tank.
- Start the engine and try to clamp the vacuum take-off pipe to the amplifier; if the speed has increased and there is air leakage, then the turbocharger seems to be working properly.
- The presence of drops on the GTZ body, as a rule, always indicates that it is faulty. If there is depressurization, dismantle and determine the cause of the leakage of the fuel fluid. It is also recommended to do the following: ask an assistant to press the pedal, and open the tank lid yourself and listen to the sounds. Easy pedal travel and obvious gurgling in the reservoir - there is serious wear on the cuffs; due to a loose fit, they cannot create pressure in the circuits, and liquid seeps through the cracks back into the reservoir.
You can also understand the state of the GTZ by looking at the brake pedal. Press the pedal a couple of times, then start the engine, without releasing the pedal. If the pedal has sunk to the floor or has not moved a millimeter at all, there are problems with the GTZ.
Did you like the article? Write a comment and share the link to the article with your loved ones on social media. networks!
Basic faults
Failures in the master brake cylinder are practically excluded, and all malfunctions are associated with the passage of fluid through the seals:
- wear and aging of the sealing cuffs on the rod side, the liquid goes into the cavity of the vacuum booster or, in its absence, into the passenger compartment, onto the driver’s feet;
- similar malfunctions of the cuffs on the pistons, the cylinder begins to bypass one of the circuits, the pedal falls, braking worsens;
- jamming of the pistons due to corrosion of the pistons themselves and the cylinder bore, as well as loss of elasticity of the return springs;
- an increase in travel and a decrease in pedal stiffness when braking due to airing of the brake line.
For some cars, repair kits with pistons and cuffs are still preserved in spare parts catalogs. As well as recommendations for removing cylinder surface defects with sandpaper.
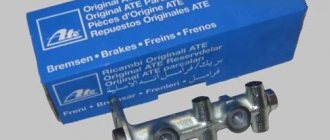
In practice, this activity does not make much sense; it is unlikely that it will be possible to noticeably extend the life of an exhausted turbocharger, and driving with an unreliable hydraulic brake cylinder, which is not for nothing called the main one, is unpleasant and dangerous. Therefore, in the vast majority of cases, the cylinder is replaced with a new assembly.
How to check the brake master cylinder
Car maintenance and diagnostics include checking the brake fluid level every week: if it drops sharply, you can judge about leaks. In addition, it is important to change it in a timely manner, since over time the quality of the fluid deteriorates, which leads to premature wear of parts. It is also worth paying attention to compatibility with the cuffs, as some auto chemicals can damage them. And, of course, you should promptly change all rubber seals, paying attention to the service life declared by the manufacturer. It would be optimal to resort to a repair kit with all rubber bands every 100 thousand km, and it is better not to skimp on the quality of components.
If symptoms of a gas turbine engine malfunction appear, it is advisable to check it, and you need to start with a visual inspection. If, when inspecting the housing, drops of brake fluid are found, the hydraulic cylinder should be removed to look for a leak problem. Also common problems include fluid flowing through the seals, which is easy to check: if gurgling is heard from the reservoir when you press the pedal, the seals must be replaced. And, of course, special attention should be paid to the behavior of the pedal: as already noted, a short stroke or dips may indicate the need to clean the cylinder and replace all rubber elements. The best way to judge their condition is by dismantling the part and disassembling it: sometimes, in addition to minor damage to the gaskets, you can also find a crack in the cylinder itself. In this case, the entire part will have to be replaced.
Classification of car brake systems
Modern cars are equipped with three or four types of brake systems:
- working;
- parking;
- auxiliary;
- spare.
The main and most effective braking system of a car is a working one. It is used throughout the movement to regulate speed and come to a complete stop. Its device is quite simple. It is activated by pressing the brake pedal with the driver's right foot. This procedure ensures simultaneous reduction of engine speed, by removing the foot from the accelerator pedal, and braking.
The parking brake system, as the name suggests, is designed to keep the vehicle stationary during long periods of parking. In practice, experienced drivers leave the car in first or reverse gear. However, on large slopes this may not be enough. The manual parking brake is also used when starting off on uneven sections of the road, when the right foot should be on the gas pedal and the left foot pressing the clutch. By smoothly releasing the brake lever with your hand, simultaneously engaging the clutch and adding gas, you can prevent the car from arbitrarily rolling downhill.
The spare brake system is designed to duplicate the main working one in case of its failure. This can be a completely autonomous device, or it can be part of one of the brake drive circuits. Alternatively, a parking system can perform the functions of a spare one.
The auxiliary braking system is installed on heavy-duty vehicles, for example, on domestic KamAZ, MAZ, KrAZ vehicles. It is designed to reduce the load on the main working system during prolonged braking - when driving in the mountains or on hilly terrain.
The process of replacing the turbocharger and brake fluid
When the tools, new mechanism and fluid are prepared, you can begin dismantling the old VAZ 2114 spare part:
- The first step is to disconnect the negative terminal from the battery. Replacing the master cylinder involves completely removing the old brake fluid - this is best done with a syringe;
Advice! When assembling the system, motorists often confuse brake pipes. To make your work easier, it is recommended to sign them with a marker. This applies to any parts in the VAZ 2114 car.
- Once the threads have been removed, dismantling the main unit can begin. Using the “18” socket, you need to remove the nuts that attach the main cylinder to the amplifier;
The vacuum booster may also need to be replaced. In this case, remove the fitting and turn the main unit to the side. After this, you need to unscrew the hose and go into the interior of the VAZ 2114 car, where the pin locking bracket is located. After removing all the fasteners, you can install a new fluid pressure booster.
Pneumatics
hydraulic (for example, in Toyota Corolla or Rav 4);
pneumatic (trucks, tractors and other heavy vehicles).
In the first case, oil acts as the “working fluid”, in the second – gas.
How to check the air brake system? It is important here to ensure tightness, paying close attention to the connections. You can detect a compressed air leak by ear or with a soap solution.
Corrected by replacing or tightening damaged elements.
When checking you must:
drive pressure 0.6 MPa;
turn on compressed air consumers;
When the level drops below 0.05 MPa for half an hour in the free position of the controls (or 15 minutes when operating).
The parking brake is checked in the off state, the leak is determined by ear. If it is, the root of the problem is in the cylinder seals.
The spring chambers are checked if there is compressed air in the drive circuits of the handbrake and the brakes of the rear cart.
Required tools and materials
Replacing the master cylinder should only begin if the necessary tools and materials are on hand. It's worth starting with the tools:
- Pliers.
- Head on "18".
- Keys for "17", "13" and "10".
- Metal brush.
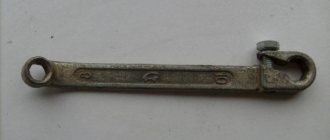
- Device for removing fittings.
- Tool for tensioning springs.
As for materials, these include only liquid for the system.
Of course, it is worth purchasing a new brake unit. An oilcloth or other clean covering should be laid out near the work area. Parts should be placed there during the process. The unit must be purchased directly for the VAZ 2114, since there are differences with the 2109 and 2111.
Self-pumping using the example of a VAZ-2110
On the Lada “Ten” everything is done in the same way as on the VAZ 2108-21099 models, since the design of the brake system is the same. Therefore, let’s look at how to bleed the brakes on models 2110-2112 yourself, without help.
To do this, you will need to use one additional element - an aerator, which you can buy or make, and a rubber hose with ends on both sides for connection to the nipple.
A homemade aerator is a lid from a “classic” brake reservoir (without a built-in sensor), into which a nipple from a tubeless wheel is installed.
The essence of pumping yourself is very simple and it is done like this:
- The car is immobilized. A bleeding hose is put on the fitting of the brake mechanism that is being pumped;
- The aerator is screwed onto the brake reservoir, and one end of the hose is connected to it. The second one is put on the nipple of an inflated car wheel (for example, a spare tire);
- Unscrew the fitting half a turn. In this case, the air pressure from the spare tire will begin to squeeze out the liquid. All that remains is to monitor when liquid flows through the tube without air bubbles, and tighten the fitting;
This way all mechanisms are pumped. The air pressure of one wheel is enough to completely bleed the system;
But there is one nuance in this - the pressure supplied to the tank should not be very high (no more than 1 atm). Otherwise, there is a risk of the lid falling off or the tank being damaged.
Bleeding the brakes using the described methods is also applicable for more modern VAZ models - 2114-2115, Priora, Kalina. And all because the design of the brakes is completely identical.
What happens if one of the circuits loses its seal?
Even despite the loss of tightness of one of the circuits, the second circuit will remain in working order. Let's say a leak occurs in the first circuit, then the first piston moves without resistance along the cylinder to the second piston. And the second piston, moving, will create the pressure necessary for the operation of the brake mechanisms in its circuit. Just keep in mind that free play in the pedal will be added due to a malfunction of the primary circuit.
If a leak occurs in the second circuit, then the operation of the first circuit will occur like this: both pistons will move until the second piston reaches the end and only then pressure will be created in the first circuit that can bring the circuit into working condition. Here, too, the brake pedal travel will be increased, but the braking system will still work.
How to bleed the brakes on a VAZ 2107 yourself (Video, photo)
When is it necessary to pump the brakes of a VAZ 2107
How to Check for Signs of a Bad Brake Booster
It is necessary to bleed the brake system in four cases:
- Replacing brake fluid. Brake fluid has a limited service life. Over time, it absorbs moisture from the air, which can cause corrosion of the surface of the brake cylinders and their failure. Water also worsens the main property of brake fluid - it reduces the boiling point.
- The recommended service life of brake fluid on VAZ cars is 2 years, after which it is worth replacing it. This applies to standard glycol-based brake fluid.
- Troubleshooting the brake system. When replacing brake hoses and cylinders, brake fluid leaks and air enters the system. Therefore, after repair work, the VAZ 2107 brakes must be bled.
- Air ingress during operation. This manifests itself in deterioration in braking efficiency, a “soft pedal” or uneven braking of individual wheels.
What is needed to bleed the brake system
It is almost impossible to bleed the brake system yourself. The work is carried out by two people. One person (“mechanic”) works with the brake system, unscrews the fittings. The second (“partner”) is located inside the car and must press or release the brake pedal on command.
You also need the following tools:
- 8/10 socket wrench;
- a PVC tube or rubber hose, the inner diameter of which corresponds to the diameter of the fitting;
- container for collecting waste liquid.
- Brake fluid is also needed.
How to bleed the brakes on a VAZ 2107
For ease of work and to ensure free access to the brake cylinder fittings, you should use an inspection hole. The design of the front brake mechanisms requires removal of the wheels to bleed the brake system.
Before starting work, it is necessary to fill the brake reservoir to the maximum, and during bleeding, you must ensure that it is constantly filled with brake fluid. If you miss this moment, air will get into the working cylinder and you will have to start work again.
The procedure for each of the 4 working cylinders is as follows:
- Remove the protective cap from the fitting.
- Loosen the fitting using a spanner. If the fitting has not been unscrewed for a long time, significant effort may be required. You must be especially careful not to damage the edges, otherwise the work may become very difficult, even to the point that the brake cylinder will need to be replaced.
- Place the tube on the fitting and lower it into the brake fluid container.
Direct pumping is performed as follows:
- The “partner” sitting in the cabin, at the command of the “mechanic”, presses the pedal all the way.
- The “mechanic” unscrews the fitting half a turn so that the liquid, along with air bubbles, comes out into the container through the inserted tube. The brake pedal “sinks” to the floor.
- The “fitter” tightens the fitting, and the “partner” releases the pedal on command.
The procedure is repeated until no more air bubbles come out of the tube. During bleeding, the end of the tube must be constantly lowered into the brake fluid so that air does not enter the cylinder.
In this way, all four working brake cylinders are pumped. A certain sequence should be followed when bleeding the cylinders. They are pumped “from far to near”:
- Right rear.
- Left back.
- Right front.
- Left front.
After completing bleeding of each cylinder, it is necessary to tighten the fitting and put on the protective cap.
Bleeding the brakes of a VAZ 2107 is quite feasible at home and does not require expensive special tools and devices. No special qualifications are required either. Even a child can release and press the brake pedal at the “locksmith’s” command.
Often, owners upgrade the brake system by installing more efficient, high-quality and expensive parts. However, this does not change the bleeding method in any way and does not eliminate the need for periodic work to replace the brake fluid.
semerkavaz.ru