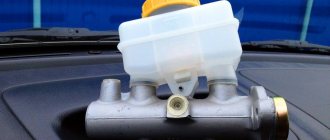
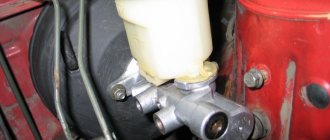
The brake system of the VAZ 2114 car contains a master brake cylinder (GTC). The main task of this unit is to convert force when the driver presses the brake pedal. The brake cylinder is located on the cover of the vacuum booster, and above it is the brake fluid reservoir. Like any other part, the GTZ can be damaged and fail. To replace it, you don’t have to go to a car service; you can do this work yourself.
Signs of a faulty master cylinder
Author: Sochi Auto Repair
The automobile braking system includes several elements that perform their own functional task. Signs of a faulty master cylinder in our material. The brake cylinder is the most important among the components of this system.
The force created when it acts on the braking system is hydraulic in nature.
Signs of a faulty master cylinder
When the brake master cylinder (MBC) fails, various troubles arise. For example, the effectiveness of the brakes may decrease or they may fail altogether. To prevent this, any car owner needs to understand the signs of brake system malfunctions and know how to eliminate them.
Working principle of the brake master cylinder
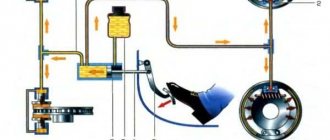
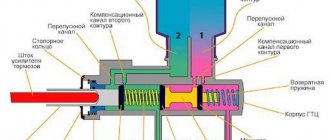
GTZ uses for its work the property of a liquid to maintain its “shape” under pressure. The design of the device includes a main cylinder, consisting of two sections, each with its own hydraulic circuit. The GTZ is installed directly on the vacuum booster.
Brake fluid is poured into a tank located under the GTZ and including 2 sections. The tank is connected to the main cylinder through holes made specifically for this purpose.
To facilitate the operation of the wall, translucent plastic was used to make the walls of the tank, making it easy to monitor the level of liquid in it.
When the level drops below the nominal value, the sensor transmits a signal to the control panel, on which the indicator lights up. There are 2 pistons installed in series inside the cylinder.
One is located freely, the second is fixed and comes into contact with the vacuum booster rod. To increase reliability, rubber seals are installed on the pistons. The pistons return to their initial position thanks to return springs that hold them in it.
After pressing the gas, the vacuum booster rod is pressed in. When moving through the cylinder cavity, the rod closes the compensation hole. This causes the primary circuit pressure to increase and drives another piston.
As a result, the secondary circuit pressure increases. When the pistons move, they create empty areas into which brake fluid flows through a special hole. The pistons move until the spring has done its work.
The pressure in the circuits increases to the maximum, due to which the mechanism begins to function. When the car stops, the pistons return to their original position. The good thing about the circuit system is that if one circuit breaks, the second will continue to work.
Common brake master cylinder malfunctions
In order to timely identify faults in the gas turbine engine and eliminate it, you need to know their main symptoms, which include:
- Increased brake pad wear or brake fluid leakage, reducing its level. If a leak is detected, it is necessary to replace the faulty part.
- Reduced braking efficiency (brake softness). This is due to a drop in brake fluid level or mixing with air. If the braking, on the contrary, has become harsher, the brake booster or the valve that regulates the vacuum booster may break.
- Increasing the brake pedal travel. This usually happens if the brakes have been incorrectly adjusted, there is air in the system, or the turbocharger is faulty.
- Uneven braking or a strong drop in the effectiveness of the braking system. The first reason is associated with fluid getting on the brake pads, the other reason is usually associated with wear of the brake discs.
Diagnosis of GTZ malfunctions
First, you should carefully study the instrument readings. Usually they promptly show problems with the brake system and signal this with a corresponding indicator on the dashboard. If such signals appear, it is necessary to carefully inspect the brake system and the turbocharger for leaks.
You also need to inspect the brake circuit outlets and joints. Having completed the inspection from the outside, you need to check the pressure in the system.
If there are significant pressure deviations from those recommended by the manufacturer, it means that one of the circuits is faulty. Depressurization is the main cause of gas turbine engine malfunction, which is easily detected by leaks and a specific smell.
We have explained the signs of a faulty master cylinder, diagnose it and get it repaired!
Where does the brake fluid go?
The presence of brake fluid (BF) can be determined by the level in the reservoir.
It is advisable that the TJ is always at the max mark. If you notice that the fluid level is dropping, make sure that it does not drop below the minimum. To be on the safe side, a red exclamation mark will light up on the central panel inside the car (most often this happens when braking). If the TJ level decreases, you need to do the following:
- top it up;
- At the first opportunity, find and replace the faulty element of the brake system.
How does the GTZ function?
The unit consists of the following parts:
- metal housing with holes for supplying brake fluid, pedal rod and connecting the expansion tank;
- 2 pistons with rubber seals;
- 2 return springs;
- guide bushings;
- end plug with gasket.
An expansion tank is attached to the top of the main distributor body, where excess fluid goes through compensation holes. Inside, the element is divided into 2 cylinders with separate pistons standing on the same axis.
The blind end of the housing is closed with a threaded plug; on the other side there is a flange for attaching to the vacuum booster. The brake pedal rod is attached to the first piston. The brake circuit pipes are connected to the lower holes - separately for the front and rear wheels.
The operating principle of the master brake cylinder looks like this:
- When you press the pedal, both pistons simultaneously move forward and push fluid into the circuit tubes. Under its pressure, the wheel cylinders are activated, compressing the pads on the discs.
- Part of the liquid that does not have time to pass into the tubes flows into the expansion tank through special bypass holes.
- When the driver releases the pedal, the springs push the pistons back, returning them to their original position. Liquid from the tubes and reservoir refills the cylinders.
- To compensate for the expansion of the liquid (for example, from heating), another pair of holes is provided leading to the expansion tank.
Note. The GTZ acts in conjunction with a vacuum booster (not shown in the diagram), which helps put pressure on the pistons. This allows the system to respond faster and make the driver's actions easier.
Vulnerable spots of the car
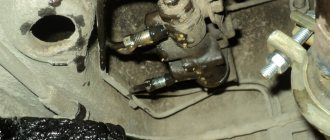
The brake cylinder (TC) is leaking. To find it, you need to remove the wheels and inspect the front discs for leaks from the caliper; on the rear wheels you also need to remove the drum. Most often, the rear TC fails due to poor-quality rubber seals. And such problems, as a rule, begin in cold weather (How to replace the rear brake cylinder?).
The main cylinder of the brake unit (GTC) has leaked. It is necessary to conduct an external inspection to look for smudges. Most often, the GTZ leaks precisely because of the rubber seal closest to the vacuum booster. The fuel fluid from the GTZ flows onto the gearbox, then flows onto the left CV joint. But it may also be that the GTZ flows into the vacuum chamber without external leaks. This can only be discovered by removing the GTZ.
The brake hose is leaking/falling off. Again, the malfunction is determined by visual inspection for the presence of smudges. The hose could fly off the caliper itself, leak at the joints, or burst.
Therefore, first, evaluate the condition of the pipes and cylinders on the calipers, and then proceed to the main one.
If you find a malfunction, carry out repair work and replace parts if necessary. Then be sure to bleed the brakes, as there will be air in the system. Also, do not forget that brake fluid is hygroscopic and requires regular replacement (How often do you change brake fluid?).
Source
Tool preparation and removal
What do we need:
- brake fluid;
- keys “10”, “13” and “17”;
- equipment for unscrewing fittings;
- pliers;
- metal brush to remove oxidation of contacts;
- dry cloth;
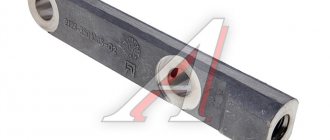
- device for tensioning springs;
- new brake cylinder for VAZ 2114.
Before starting work, you need to prepare a place where you can easily lay out all the dismantled parts. Be sure to record their location in the vehicle system.
Where do we start repairing the master cylinder? We remove the negative terminal from the battery, then open the hood and remove the remaining brake fluid with a syringe. We unscrew the brake pipes with an open-end wrench (you need to be careful so as not to leak fluid onto other parts of the car).
Removing the main brake cylinder on a VAZ 2114
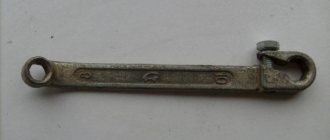
What to do when the thread is rooted and cannot be removed? Let's try to moisten the connection with brake fluid, and after a while, use a No. 10 wrench to remove the hoses. When all the steps taken do not allow you to unscrew the mechanism, you can use a special wrench with a cap slot and a clamping bolt. It should be secured to the nut, tightened with a bolt and rotate the desired part.
In order not to mix up the brake pipes during reinstallation, they must be signed with an identification corrector.
If all efforts are crowned with success, we proceed to unscrewing the master cylinder. Using a 18mm socket, remove the two main nuts of the mechanism that secure it to the amplifier.
Continuing the repair of the VAZ 2114 master brake cylinder, we install a new device with an updated fluid barrel. Next, we return all the parts back in the correct order. Do not fix the hoses too tightly, so as not to break the fastening threads. It is advisable to change the fluid in the system, because the mechanism will need to be pumped.
When installing a filled barrel, the help of another person is required, who will lightly press the brake pedal until liquid flows out of the front holes of the system. At this point, the two front tubes are installed.
If the vacuum booster does not work correctly, the product must be replaced. To do this, you need to remove the fitting on the left side and turn the cylinder slightly to the side (if possible). Unscrew the hose from the check valve, and in the vehicle interior, remove the locking bracket of the lever pin and the pin itself.
Using wrench No. 13, unscrew the 4 nuts securing the vacuum to the car body. Now you can replace the old unit with a new one.
It is best to secure the vacuum and the brake pedal with a cracker finger, and then screw the frame to the body. It is also possible to change the vacuum hose for better functionality of the main mechanism.
Advice from professionals
- Before completely assembling all the parts into one whole, it is important to treat them with isopropyl alcohol, blow them off and wipe them with a rag.
- Do not allow parts to come into contact with kerosene, gasoline or other oils, as they can damage the integrity of the seals.
- Before replacing the main brake cylinder on a VAZ 2114, it is necessary to restore the working body of the unit in proper condition, remove oxidation, plaque and other contaminants.
- It is important to monitor the sealing of the mechanism and change the O-rings in a timely manner, even if they are still in good condition.
- All units must be lubricated with brake emulsion during assembly.
- It is imperative to change the sealing gaskets that are located under the screws.
- After replacing the main brake cylinder on a VAZ 2114, it is necessary to bleed the hydraulic brake drive to remove air from the system.
- When dismantling blocks with wires, it is necessary to close all openings in the main mechanism and pipeline to prevent dirt and dust from getting inside, or to protect yourself from liquid leakage.
- When disassembling the unit, it is first better to remove the barrel of the master cylinder, and then unscrew the locking screws, which will allow you to effectively and easily access all other components of the system.
- The most common cause of master cylinder failure is leakage of brake fluid, which indicates a faulty cuff of the unit. To see oil stains, you need to open the hood and look at the joint of the unit.
Examination
You should make sure that the master cylinder is the culprit for the malfunction of the brake system. This is easy to do; you don’t even have to go to a service center and spend money on it.
Unit location
- Press the brake pedal with the power unit off.
- Start the engine without taking your foot off the gas pedal.
- During normal operation, the gas turbine engine fails under the influence of vacuum.
- If the pedal does not fail, you will need to conduct more thorough diagnostics and restore the device to functionality.
Mechanism diagnostics
Checking the brake cylinder is quite easy; to do this, you need to hold down the brake pedal with the engine off. And then start the car without taking your foot off the pedal. If it “fails” under the influence of vacuum, then the system is in perfect order.
If not, diagnostics and restoration of the tightness of the connection of the reverse regulator, which is located on the housing of the intake manifold amplifier, is required. Today, the price of the VAZ 2114 master brake cylinder is low, from 800 rubles. Of course, you can save money and buy a repair kit by replacing the cuffs on the vacuum side of the system, or new rubber bands.
But will this be advisable? New devices will wear unevenly in relation to the old ones, which may lead to the ring breaking or other trouble. So it’s better to buy and install a new gas turbine engine, improving the functionality of the entire system.
If the functionality of the master cylinder is impaired, irregularities in engine operation, decreased dynamics when driving the car, fluid leakage, etc. may occur. Experienced drivers know that they need to clamp the vacuum hose with the engine running, and if the signs of malfunction disappear, it means that the system’s brake booster has failed.
Replacing the master brake cylinder of a VAZ 2114 includes simple manipulations that will be easy for every motorist to perform.
SOME SIGNS OF ITS MALFUNCTION
The driver should be alert to the following comments in the operation of the brake system:
- Liquid leakage from the tank;
- The brake pedal sinks when pressed;
- The appearance of air in the car brake system;
The manifestation of at least one of these signs should cause an immediate response from the driver to eliminate it.
Restoring the performance of the GTZ is impossible without removing it, so it will have to be removed from the car.
FAQ
When the engine is running, the pedal slowly sinks to the floor with constant force, is it necessary to change the turbocharger?
Smooth subsidence of the pedal is a frequent sign of leaking GTZ seals. In this case, it is possible to repair the part by installing new cuffs from the repair kit.
Brake fluid leaves the reservoir, but then appears, is it the GTZ?
Changes in the level of brake fluid in the reservoir are not necessarily a sign of a breakdown of the turbocharger. The fuel fluid can also either go down or rise due to airing, boiling due to overheating of the pads, or jamming of the actuator cylinders.
Does it make sense to install a repair kit or is it better to replace the GTZ?
It makes sense to install a repair kit when only the rubber parts are worn out. If the piston is severely worn or the housing is damaged, it is better to replace the entire turbocharger.
Malfunctions and ways to check them
It is possible that you may need to replace the vacuum booster on your VAZ 2110. The cause may be various malfunctions, the characteristic symptoms of which are as follows:
- When you press the brake pedal, a hissing noise occurs, and at the same time, the engine speed often increases;
- The car starts to shake;
- Spark plugs stop working efficiently;
- Fuel consumption increases noticeably.
Before replacing the vacuum booster on a VAZ 2110, it should be checked.
This procedure is performed as follows:
- As with normal bleeding of brakes, with the engine not running, press the gas pedal several times;
- After 5 or 6 presses, keep the pedal in the down position, resting it on the floor, and start the engine;
- After starting, the pedal itself will move forward a little.
There is also a high probability of damage to the diaphragm, on which a hole is formed over time. You can purchase the diaphragm with a repair kit, the cost of which is no more than 500 rubles.
Replacement
To replace an element, you need to understand the main issue - how to remove the vacuum booster from a VAZ 2110. Directly replacing the old element with a new one will not be difficult, just like the reassembly process.
Therefore, we will tell you about the main thing - dismantling the amplifier. Let's start with the fact that the procedure is not complicated, but it requires accuracy and sequence of steps. If you follow the recommendations, the work will take little time and will not take much effort.
- Disconnect the block with wires, which includes brake fluid level sensors in its design.
- Hold the booster check valve with one hand and carefully disconnect the hose with the other. It is advisable to disconnect the hose with a strong hand, since this will require a lot of force.
- Remove the two bolts connecting the booster and master cylinder.
- Carefully remove the cylinder from the amplifier.
- There is no point in disconnecting the brake lines.
- Give access to the dashboard, which will allow you to unscrew the nuts holding the brake pedal bracket. There should be 4 of them.
- It is recommended to dismantle the bracket and amplifier through the engine compartment, since there is enough free space for such manipulations.
- Remove the pin lock plate. To do this, pry the finger with a screwdriver and squeeze it out.
- Now you can easily disable the brake pedal and booster.
- To disconnect the amplifier and bracket, you will have to unscrew the two nuts on the mount.
- A new one is installed in place of the dismantled old vacuum amplifier, and the reassembly procedure is performed in strict sequence of the dismantling process.
Classification of vehicle brake systems by drive type, device
One person, even a very strong one, cannot apply enough force to the brakes to stop the car. The brake system drive is used to multiply and transmit force. There are different types of drives:
Mechanical
A typical example is a parking brake, which is driven by a cable and levers. This system is as old as the car itself, but engineers have not yet come up with anything simpler and more trouble-free.
Hydraulic
Every passenger car has hydraulic brakes; this is the system we are most familiar with. We can say that hydraulics combines efficiency and accessibility: it works great, is quite easy to maintain, and components can be found in any auto supply store. Hydraulic brakes are divided according to the type of brake elements into disc and drum.
- Disc brake.
Effective? Yes. Reliable? Yes. Disc brakes once became a sensation in motorsport, and then in everyday life. In terms of efficiency, it immediately surpassed the then usual brake drums. The design of disc brakes Any driver knows the principle of operation of a disc brake: friction linings are located on both sides of a steel disc, which is put on the wheel hub and rotates with it. Pressing the brake pedal activates the drive, the linings clamp the disc and stop it, and with it the car. - Drum brake. Unlike a disc brake, a drum brake has friction linings located inside the brake drum. When you press the pedal, the drive pushes the pads apart and they are pressed against the inner walls.
The design of drum brakes In terms of efficiency, drum brakes are far behind disc brakes, both literally and figuratively. Since braking the front wheels is more important than the rear wheels to stop a car, drum brakes are sometimes installed on the rear wheels in inexpensive car models.
Pneumatic
Pneumatics are not used as a brake system drive in passenger cars; they are used in heavy commercial vehicles. The principle of operation is a bit similar to hydraulic, but the working medium is not liquid, but compressed air, which is pumped into the system by a compressor. When the driver presses the brake pedal, pressurized air flows to the brake elements and activates them.
Combined
The combined braking system can be found on heavy special equipment. It consists of different types of drive, which gives a bulky but reliable result. Electromechanical or hydromechanical drives are needed for heavy transport in difficult conditions.
Malfunctions of the main brake cylinder VAZ 2108, 2109, 21099
A malfunction of the master brake cylinder immediately affects the operation of the entire braking system of the car for the worse.
Signs of a faulty master cylinder
— Braking (incomplete release of the brakes) of the car’s wheels, which is accompanied by increased wear of the brake pads, overheating of the brake mechanisms and wheel hubs, a decrease in the vehicle’s run-out distance when driving downhill or coasting, and an increase in fuel consumption.
— Reduced braking efficiency due to brake fluid leaking through the connections of the master cylinder and air entering the brake system.
Malfunctions of the main brake cylinder VAZ 2108, 2109, 21099
— Jamming of the pistons inside the master cylinder
For example, due to swelling of the rubber sealing rings on the cylinder pistons. This happens if brake fluid of inappropriate quality was poured into the brake system of the car, or motor oil or gasoline got into it during repairs.
Features of pedal settings
The driver controls this entire complex assembly with just one pedal.
That is why it is very important to monitor the condition of these mechanisms and correct errors in a timely manner.
It is necessary to pay attention to the following features:
- Each owner of this vehicle must remember that when the engine is not running, the pedal must have free play. The adjustment can be made with the vehicle turned off. This can be done by moving the brake light switch and lowering its nuts.
- When the switch at the brake light is very close to the pedal itself, this risks the fact that it will not return to its original state. But even here there is a possibility of only partial release of the wheels when the pedal is released.
- When it was not possible to correct errors using a brake light and eliminate incomplete release of the brakes, you can simply disconnect the master cylinder at the brake drive and double-check that the adjusting bolt is not too far from the plane to which the flange of this cylinder is attached (the difference can be from 0.2 to 0.25 mm). This size will be optimal for adjusting the pedal.
Symptoms of problems
The fluid brake system consists of many parts that can become unusable: pipes, wheel cylinders, calipers, drums and pads. Typical signs of a faulty master cylinder:
- After pressing the pedal, the car stops slowly. The reason is that the cuffs of one or two pistons have lost their tightness - they have cracked or “floated”.
- To slow down, you need to press the brake pedal hard. The phenomenon occurs due to swelling of the rubber of the piston seals.
- The brake pedal travel is too short. The fluid inside the cylinder has nowhere to go because the compensation hole is clogged. Another option is that the passage is blocked by a swollen rubber seal.
- A common symptom is pedal failure, the brakes coming on at the end of the stroke. This indicates complete wear of the cuffs; as a result, liquid penetrates behind the piston and rushes into the expansion tank - the cylinder “bypasses.”
- The pads do not release the brake discs and drums and get very hot when driving. Options: one of the pistons is jammed or the bypass hole is clogged.
The listed symptoms of a GTZ malfunction are similar to malfunctions of other elements. Pedal failure also occurs when a large amount of air enters the tubes or loss of fluid in one of the working cylinders. Sluggish deceleration and increased force on the pedal are often caused by a breakdown of the vacuum booster - a cracked membrane or a lack of tightness at the joints of the hose that takes off engine vacuum.
There are signs that clearly indicate the performance of the main hydraulic cylinder and the malfunction of other elements:
- during braking, the car pulls to the side - the problem lies in a certain circuit or wheel;
- jamming of the brake mechanisms of one wheel;
- creaking and squeaking when braking;
- heating the discs and pads on one wheel.
If you eliminate these symptoms, it will become easier to check the brake master cylinder in a garage. This also includes obvious brake fluid leaks and the knocking sound of worn calipers.
Working principle of brake caliper
The brake caliper performs its main task - it provides the necessary braking force required to slow down or stop the car.
Pressing the brake pedal causes pressure to build up in the brake line. It is transmitted to the caliper pistons, which at this time strictly parallel fixes the pads relative to the disc. When braking, the calipers compress the pads on both sides of the disc, causing it to slow down. But there is another effect. It involves heating, as friction energy is transformed into heat. This significantly heats up both the disc and the pads and calipers. The temperature of the brake fluid also increases.
This effect places certain demands on manufacturers. So the front brake caliper must have the following characteristics:
- high heat transfer rates;
- strength;
- high resistance to heat (so that increased temperature does not deform the caliper components).
Master brake cylinder repair
The main brake cylinder is repairable; GTZ repair kits are available for sale. Kits may be complete or incomplete. An incomplete kit usually includes only seals and cuffs for cylinder repair.
The complete kit allows you to perform a comprehensive overhaul of the device and includes:
- GTZ protective cap and fitting cap;
- seals for the piston and piston head;
- sealing cuffs;
- pistons, return springs;
- spring holder, screw.
How to find the cause of the leak
To find where the VAZ 2114 brake fluid goes, you should conduct a thorough visual inspection.
Brake hoses
The easiest way to detect a leak is on the brake hoses - here it is enough to check the rubber by touch. If it is rigid, inelastic and cracks form when bent, the hose must be replaced, even if there are no leaks.
Sometimes a brake hose of the wrong diameter falls off the fitting. In this case, it should be replaced with a similar one, but smaller in diameter. You can put on the same hose, but in this case you will have to secure it with special clamps.
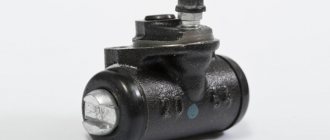
Wheel brake cylinders
To detect fluid leaks on the brake cylinders, remove the wheels and inspect the brake system for signs of leakage on the calipers.
VAZ-2114 is equipped with a drum braking system. To detect leaks in the wheel cylinders, the brake drums must also be removed. This usually causes difficulty in removal due to the fact that their surface wears out.
In this case, they are removed in two ways:
- You can “squeeze” the drum out of the hub by selecting bolts of the required diameter and screwing them into the threaded holes on the drum. This is done until the drum is removed.
- Knock out the brake drum by hitting its internal parts with a hammer from opposite sides.
Important! With the second method, you should only use a hammer with a rubber striker. Metal cannot be used, because The drum may be damaged.
The best option for the VAZ-2114 is to replace the entire brake cylinder assembly at once. Otherwise, you should disassemble the cylinder and inspect its parts for damage.
You need to carefully examine:
- the surface of the cylinder itself;
- pistons - need to be changed if there are signs of corrosion or scratches on them;
- seals - if worn or in case of a loose fit, they should be replaced;
- Anthers - check for rips, scratches, cuts and other damage.
Attention! Before assembly, all cylinder parts should be cleaned and washed with brake fluid.
Master brake cylinder
If the cuffs of the main brake cylinder are clearly worn out, they should be replaced.
- pump out as much liquid as possible from the tank with a syringe;
- disconnect all tubes from the cylinder;
- remove and disassemble the cylinder itself.
The process of replacing the turbocharger and brake fluid
When the tools, new mechanism and fluid are prepared, you can begin dismantling the old VAZ 2114 spare part:
- The first step is to disconnect the negative terminal from the battery. Replacing the master cylinder involves completely removing the old brake fluid - this is best done with a syringe;
Advice! When assembling the system, motorists often confuse brake pipes. To make your work easier, it is recommended to sign them with a marker. This applies to any parts in the VAZ 2114 car.
- Once the threads have been removed, dismantling the main unit can begin. Using the “18” socket, you need to remove the nuts that attach the main cylinder to the amplifier;
The vacuum booster may also need to be replaced. In this case, remove the fitting and turn the main unit to the side. After this, you need to unscrew the hose and go into the interior of the VAZ 2114 car, where the pin locking bracket is located. After removing all the fasteners, you can install a new fluid pressure booster.
Source