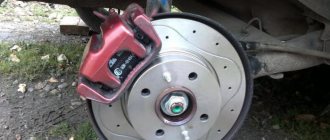
The brake system on the Lada Samara (2115) is presented in a typical VAZ style: discs in front, drums in the rear.
Despite the fact that most manufacturers switched to the disk type in 2000, domestic engineers are in no hurry to change traditions.
On the other hand, the system has been proven over many generations. Defects and shortcomings have long been known. When buying a car, the owner already knows what and how. Many minor breakdowns are repaired independently, bypassing the service station. Thus, you will save a couple of thousand rubles.
Interior improvement
Changes in the interior of the VAZ 2114 are no less varied than improvements in the appearance of the car. Here everything is subject to tuning: from the rear-view mirror and gear knob to sound insulation and the steering wheel.
https://youtube.com/watch?v=CTAy5q8H3mg
The simplest tuning performed at home or in the garage are:
- installing an armrest;
- replacing the rear view mirror;
- installation of attachments for mobile phones;
- decorations.
The next stage is the trim of the doors and the entire interior. You can cover the inside of the car with anything: from fabric and leatherette to leather-suede. After the trim, the audio system and instrument panel are installed. The dashboard can be either regular or replaced with a more pleasant-looking panel.
After the instrumentation, seats are placed in the cabin. Any suitable size can be installed.
As an additional improvement to the visual component of the VAZ 2115 car, you can use LED lighting for the underbody, trunk and interior.
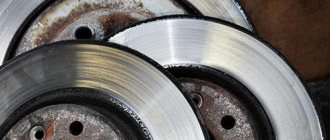
Typical signs of premature disc wear on a VAZ 2115
- Reduced braking efficiency;
- Increasing the length of the path to a complete stop;
- Periodic failures of the pedal when pressed;
- Stopping the car is accompanied by a creaking, metallic grinding sound.
Typical causes of disc wear on a VAZ 2115
- Failure to comply with the deadlines for preventive maintenance, routine inspection, and troubleshooting;
- Third-party mechanical damage, negative consequences from an accident, impact, collision;
- Manufacturing defects, which contributed to the formation of abrasive wear;
- Loose fit of the brake pad to the disc body;
- Aggressive driving style;
- Frequent overheating and boiling of the hub mechanism.
Appearance
Appearance is the main component of tuning; it is the stylish appearance of the car that attracts a huge number of glances from onlookers.
Below is a list of all the improvements that should definitely be made in every fourteenth.
Tinted glass
Window tinting is a charming attribute of any car. It not only hides what is in the cabin, but also gives the car a stylish look and saves you from bright sun rays in the sultry heat.
Lip installation
Many automakers install a bumper cover on their cars, which not only gives a stylish look, but also protects against splashes that fall on the car’s windshield when driving in the rain. The lip on the VAZ 2114 is installed from this lip, which is made of rubber, which has a rather positive effect on its service life.
Lipspoiler
Some VAZ 2114 models already have a spoiler installed on the 5th door from the factory, but not many people want to see such a huge spoiler on their car. To replace the standard spoiler, you can install a lip spoiler, which has a small and neat size. By the way, to install it you do not need to drill holes in the trunk lid; this spoiler is easily attached with double-sided tape.
Alloy wheels
Wheels are 50% of the appearance of a car. A VAZ 2114 on beautiful large-radius alloy wheels will look simply wonderful and definitely attract a lot of attention on the roads.
On 2114 you can install wheels with a radius from R13 to R17 without any major modifications.
SE caps and mirror repeaters
Many owners of the fourteenth install mirrors from Priora with turn signals in them on their car, and instead of standard repeaters they put on the “SE” badge from the same Priora. This modification will add advantages to the appearance of the car.
Antishildik
As you can see on the roads, you can increasingly see VAZ cars, and not only others, without identification plates of the make and model of the car. No matter how strange it may seem, this modification takes place. After all, without the boring AvtoVAZ nameplates, the car actually looks more interesting and mysterious.
Replacing the speaker system
Another way to significantly change the interior of a vehicle is to install new acoustics. Good sound in a car is the dream of many car owners. The standard acoustics in the VAZ are, to put it mildly, of low quality. Also, don’t forget about the radio that plays tracks.
It must also be of high quality, since otherwise installing expensive acoustics will not lead to improved sound. Replacing the speaker system should be carried out taking into account the information below:
1. In order for the sound in the car to be surround, you should install several additional speakers at once. At the same time, you can choose high-quality tweeters that do not have high power. It is better to install several low-power tweeters than one powerful one. When using a high-quality radio, the sound will be distributed across channels, creating a truly unusual effect.
2. It is best to install the acoustics at the time of reupholstering or insulating the interior. This is due to the fact that new tweeters will need seats. They can be made in doors and other finishing elements.
3. No acoustic system is complete without a subwoofer. It is responsible for the bass that tweeters do not reproduce. This acoustic element has quite large overall dimensions, which makes it difficult to choose a place to install it.
4. Do not forget about the correct placement of the wiring and its fixation.
Sidebar: Important: Complex speaker systems require the installation of an amplifier, which is also supplied with power. Therefore, as in the case of interior upholstery, the work of installing acoustics should be entrusted to professionals in the field of activity in question.
What front brake discs can be installed on a VAZ 2115
Technical characteristics: diameter 240 mm, thickness 12 mm, number of holes: 4. Material: carbon enriched steel.
Original
| Article/model name | Unit price (RUB) |
| 24.0312-0125.1 | From 1600 |
| 24.0112-0125.1 | —/— |
| 24.0112-0144.1 | —/— |
| 24.0112-0136.1 | —/— |
*Check the price at the time of purchase from an authorized dealer.
Analogs
| Art. | Cost, rub.) | Art. | Cost, rub.) |
| BREMBO 08.5211.19 | From 1450 | ATE 24.0112-0125.1 | From 1500 |
| BOSCH 0 986 479 905 | —/— | FENOX TB2108O3 | —/— |
| LPR L1031P | —/— | PATRON Article: PBD1748 | —/— |
| STELLOX 6020 1206-SX | —/— | METELLI 23-0205 | —/— |
Designer interior makeover
After modification, or rather complete replacement of sound insulation, work can be carried out to change the interior design. Such work can lead to various costs - it all depends on the final result. There are several ways to change the interior:
Use of new skin. The original material used to finish the car in question, roughly speaking, does not have attractive performance qualities. VAZ 2114 interior tuning with a complete replacement of the headliner, side panels and floor will be quite expensive, but you can try to find better quality panels from other cars. It is quite difficult to stretch the fabric yourself, but it is still possible. A fairly simple way to modify the interior is to install new seats. Recently, you can find sports seats with lateral support on sale, which will fit the car in question. Their cost is quite high, but the result will be impressive. You can also select seats from other cars, but in this case, difficulties may arise with fitting the fastenings. If it is planned to install new seats and create a separate fastening for them, then this work should be carried out before insulating the body. Nothing catches attention like the front panel of a vehicle: material, shape, central dashboard, installed player. When completely changing the interior of a car, it is almost impossible to do without dismantling the front panel and changing it. However, there are several difficulties: it is quite difficult to modify the old one, but choosing a new one for your car is also not easy. Work on changing the front panel is also complicated because it involves electrical wiring. In order to avoid difficulties with connecting the wiring during assembly, individual wires should be combined into groups and labeled. Some craftsmen modify the central dashboard, which is often expressed by creating a large seat for a multimedia system. Note that there are quite a lot of similar systems on sale that have a relatively low cost, but at the same time decent functionality. Made in China, the quality is average, but high-quality multimedia systems can cost several hundred. Another fairly simple way to modify the interior is to modify the instrument panel. You can make this change yourself: stick on a new scale, create an original backlight, and so on. The work will not take much time, will not cost much, but the changes will be significant
Some craftsmen install instrument panels from other cars, but here it is quite important to choose the most suitable version. Small details of the interior, such as the gear shift knob, handles for opening doors, keys on the center panel and many other elements, may also undergo changes. Every little detail can significantly change the interior design if you choose it correctly. Recently, interior lighting has become very popular.
This can be done using special diode strips, which are inexpensive and last quite a long time. The color of the diode strip can be very different; it can be attached to illuminate the central panel, floor and other elements of the car. Most car owners like to listen to music in the car. In order for it to be of high quality, it is not enough to install a good radio. Particular attention is paid to improving the car's acoustics: new speakers, a subwoofer, and an amplifier are installed. At the same time, the quality of the radio or multimedia system must correspond to the quality of the acoustics, since otherwise the investment will be in vain and there will be no significant changes.
The above information reflects how to carry out interior tuning of a VAZ 2114. Only with an integrated approach can good results be achieved. An example is that without good sound insulation, the installed acoustics will not bring proper pleasure. This is due to the constantly appearing noise
Music lovers prefer to listen to music at medium volume, paying careful attention to sound quality
In conclusion, we note that a complete transformation of the car interior will take quite a lot of time. In this case, the vehicle will be in a disassembled state, that is, at this moment it cannot be used. To comprehensively change a car, you need to understand many things; electricians usually cause special problems.
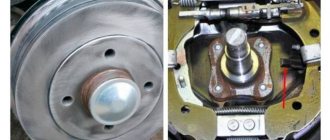
Drum brake disc VAZ 2115
We install the rear drum discs in the same way as the front ones. Fixing the disk on two slots clamped with screws. Before removing the drum, gently tap the body. This is necessary in case rust or layers have formed inside the “cap”.
Tips for servicing VAZ 2115
We comply with the technical inspection (TO) deadlines. We carry out maintenance every 15,000 km, as indicated in the instructions.
After long trips on muddy or snowy roads, rinse the calipers with running water. This will remove chemicals from the surface and reduce the likelihood of deformation and corrosion. If you have a covered area, leave the car in a non-ventilated box.
Avoid overheating of the wheel bearing and caliper, as this reduces braking efficiency.
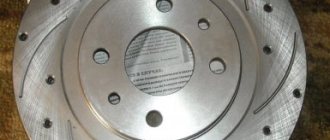
Which type of disk is better?
- Stock;
- Ventilated;
- With notches.
The first type is the simplest with minimal efficiency, frequent deformation against the background of increasing operating temperature. At high speeds, the operating temperature rises, which has nowhere to go, which leads to disk jamming. Since 2000, most automakers have increasingly installed ventilated discs in production models.
The second type is the most in demand in terms of price-quality ratio. The main advantage of the ventilated type is the presence of multiple through holes on the plane of the disk. This facilitates the rapid removal of excess heat, preventing overheating.
A disc with notches is the most effective, but at the same time expensive product. Notches can be combined with or without holes. In the first case, cooling, removal of moisture and condensate will be several times faster, which will increase the overall service life of the equipment.
Chassis
Improving the chassis of a car will not change its appearance in any way, but will significantly improve its dynamic properties and behavior on the road. It is divided into 2 types:
The first improves the driving characteristics of the car, allowing it to move quickly along city streets, the second reduces fuel consumption. The main systems subject to tuning are the engine and chassis.
Tuning the VAZ 2114 suspension includes both calibration of the entire system, wheel alignment of the car, and modernization of individual parts:
- replacing springs;
- shock absorber tuning;
- installation of anti-roll bar.
These details will increase driving comfort and also improve the car’s behavior on the road: the car will rock less and will not roll during sharp turns.
Tuning a VAZ 2113, 2114 or 2115 engine is a rather complicated, but feasible undertaking. To slightly increase the power of the machine you need:
- reflashing the control unit;
- increasing the cylinder diameter by boring.
To achieve a more significant effect, it is necessary to change the cylinder block that distributes the gas. Taken together, these changes are considered safe; they will help increase engine power by up to a third.
Among the more effective, but risky methods is installing a turbine and replacing the crankshaft with a new one, with an increased piston stroke. This will reduce the operating time of the car, but can lead to its rapid breakdown.
We change brake discs on a VAZ 2114 ourselves: check wear
In the VAZ 2114 brake system, the parts most susceptible to wear are the pads; as a rule, for 1 replacement of discs there are 2-3 replacements of pads. The rate at which they wear out is influenced by three factors:
- Friction lining material;
- Correct functioning of the brake system - if the brake cylinders are not working properly, or the discs are damaged, the pads will wear unevenly;
- Driving style - the more intensely the system elements are loaded, the faster they wear out.
On the instrument panel number fourteen there is a brake pad wear indicator. The fact that they need to be changed is indicated by a continuous glow of the indicator. However, you should not completely trust electronics. It is necessary to check the degree of wear of the unit regularly, every 10 thousand kilometers.
To check the wear of the brake disc and pads, you need to put the fourteenth on the handbrake and install shoes (stops) under the rear wheels. Next, loosen the nuts securing the wheels and jack up the car. We completely unscrew and remove the wheels, clean the brake system elements from dirt.
Now we take a caliper and take measurements. Below is the critical minimum thickness of the main aggregates. If measurements show that the wear of the front brake columns or discs exceeds these indicators, they must be changed urgently:
- The minimum permissible disc thickness is 10.8 mm;
- The thickness of the friction linings on the pads is 1.5 mm;
- The diameter of the rear drum brake is 201.5 mm.
Also, replacement of components is necessary if a visual inspection shows the presence of any mechanical damage to the units - cracks, potholes, chips, bends, or play in the connections.
We check wear and decide whether to replace the disc and pads
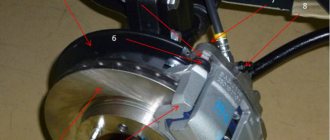
Replacing front brake discs on a VAZ 2115
The brake disc on the VAZ 2115 is subject to wear no less than the brake pads. Due to constant friction, its thickness decreases, and with it the braking efficiency. A worn brake disc is subject to deformation and even destruction, so its replacement must be timely and without unnecessary delay.
The VAZ 2115 brake disc is replaced if mechanical damage, cracks, scratches, scuffs appear on the surface of the disc, or the disc wears down to the minimum permissible thickness (10.8 mm). Sometimes you can avoid completely replacing the brake disc, for example, if the thickness allows, scratches and burrs can be removed by regrooving the disc. The procedure is performed by an experienced turner in special auto repair shops. I recommend replacing both brake discs to avoid increased wear due to uneven distribution of braking forces on the brake pads.
In order to replace a brake disc, you need to have a minimum set of tools, as well as a new VAZ 2115 brake disc. Let us recall that the previous article was about the standard tire sizes for the Lada Kalina 2. You can also see ready-made options for various wheel sizes on the car.
Tools:
jack, wrenches “13” and “17”, balloon wrench, flat-head screwdriver, WD-40 penetrating fluid (preferably). You also need to buy brake pads for the VAZ 2115.
Replacing a brake disc on a VAZ 2115 with your own hands
1. Remove the wheel, jack up the car, install wheel chocks and safety supports that will save you if the jack fails.
2. If the threaded connections have not been unscrewed for a long time and were not treated with graphite lubricant before assembly, treat them with WD-40 liquid.
3. When the wheel is removed, check the condition of the disc and pads; perhaps the problem is not in the disc or, on the contrary, you will also have to change the pads.
4. Unscrew the caliper and remove the pads from it.
5. Next, remove the brake slave cylinder.
6. Unscrew the two studs that secure the brake disc.
7. Next, using a mallet or rubber hammer, carefully knock the brake disc off the hub. The blows must be applied in a circle, as close to the center of the disk as possible.
8. Install a new brake disc and reassemble everything in reverse order.
9. Bleed the brakes if necessary and lower the jack.
Recommendation.
If you changed the brake pads along with the disc, then I recommend that you refrain from suddenly pressing the brake pedal for the first 300 kilometers, try to brake “at half strength”. This will prevent the pads from overheating and will prevent the formation of a metal film on the surface of the pads.
The cost of this repair at a car service
If you want to have your car serviced at a car service center, then in addition to the budget spent on purchasing new parts, you will also have to spend money on paying for the work of the technician. On average, technicians charge 1,000 rubles for replacing a brake disc, and 500 rubles for replacing brake pads.
This means that when a car is serviced, the cost of repairs increases by about a third. Of course, an experienced technician will be able to check all components of the brake system in the car and point out additional faults - this is definitely a plus of contacting a car service center.
When buying spare parts, you should definitely look at the reviews and check the quality of workmanship in the store. This will help detect a defect. After repairs, be sure to check that the brake system is working properly without immediately driving onto the roadway. The first presses on the pedal may be ineffective, and in any case, a little grinding in of the mechanism is required.
Replacing brake discs VAZ 2113, 2114, 2115
The brake system worked well, but still not perfect. I was especially infuriated by the beating of the pedal when I pressed the brake in the middle, and I wanted to carry out preventative measures: replace the fluid, replace the vacuum seal, bleed it.
I didn’t choose wheels for a long time, I couldn’t financially cope with the transition to R14, so the stock is from Autoreal (cost: 1200 rubles per pair)
The process of replacing discs is generally simple; all difficulties arise from stuck bolts and the discs themselves to the hub. You can change in one helmet, no assistants are required, if only to save you from boredom.
As usual, we place the wheelbarrow on the platform, do not forget to provide a reliable support for the car, so that during the work it does not fall on our heads! We remove the wheel, for easy access to the bolts we turn the caliper towards ourselves. We unscrew the two bolts securing the caliper, move it to the side, securing it or placing it on some kind of support so that it does not hang on the hose.
Then unscrew the caliper bracket from the steering knuckle and remove it, thereby freeing the brake disc.
All that remains is to unscrew the last two studs, and you can begin to knock down the brake disc. This activity is very interesting. Here, depending on your luck, it happens that the discs come off after just a couple of hits, and sometimes you have to suffer because the discs are no longer needed. I hit the work surface, naturally it was all chipped. If the disc is needed, we hit it on the inside of it, using the pointed bit. It is more convenient to perform this procedure from the pit. I cleaned the disk landing area with a metal brush. As you can see in the photo, there is paint and dirt, and WD40 was poured in generously.
Before assembly, I started painting work, I didn’t bother too much, I sanded the discs lightly, but I had to tinker with the calipers and brackets a little longer, I didn’t sand them to perfection. I didn’t want the usual color, I was already pretty tired of red and silver, and since there isn’t much choice in the village, I took the paint: Auto enamel 1K repair, alkyd, Adriatic color 425, I’ve already driven more than 5 thousand km, the paint is spot on))
In order to seat the new disk evenly, I tightened all the wheel mounting bolts and began to gradually tighten it with a cross, the disk sat smoothly, without distortions...
Everything else is in reverse order. And don’t forget to bleed the brakes, this is where you will need an assistant. There are plenty of pumping methods on the Internet and I don’t see the point in describing my own.
The color turned out to be very unusual, some people like it, while others are drawn to red.
And now, after several days of repairs, happy as an elephant, I jump behind the wheel and go to check the brakes, and at the first braking I fell into a stupor! NO BRAKES! (I didn’t brake all the way, but in a smooth, gentle mode, so as not to ruin the disks). At first it seemed to grapple, and then it swam. In shock, I check all connections for leaks - everything is normal. I touched the discs, and they were boiling water, and it was just a couple of smooth stops! I didn't expect this. Go home straight away and let the discs cool. After some time, leaving again - the same thing, but a little better. At this rate I drove 80 kilometers, and each time the brakes grabbed better and got less hot.
https://www.drive2.ru/l/7951803/
next article:
Replacing the brake hose VAZ 2113, 2114, 2115
Causes of Brake Leakage With the engine running at idle speed and the shift lever
Rating 0.00 [0 Vote(s)]
Body
The simplest tuning of the body of a VAZ 2114 car is painting the body in unusual colors or using stickers. The game of contrasts will make the car catchy and noticeable while driving
When repainting, it is important to coordinate the actions with the traffic police, because the color of the car is listed in the documentation
An interesting detail of the car modification are the air intakes. Changing the appearance of the hood and roof will not improve the driving performance of the car, but will make its appearance even more unusual.
A rarer, catchier option is “lambo doors”. Car doors that open upward will not go unnoticed. The operation is quite difficult, the main thing is not to forget about adjusting the gaps.
Optics
After repainting, tuning the headlights will help make the car look unusual, and sometimes improve driving comfort at night. You can paint the lamps yourself, install LEDs and lenses in them. For those who don’t want to bother, there are factory headlight options for the VAZ 2113-15 that differ from the standard ones.
Spoiler
The spoiler for the VAZ 2114 is not a very popular, but original tuning detail. Rarely used because a front-wheel drive car does not need improved aerodynamics. Correctly selected size, color, dimensions of the part will help improve the appearance of the car. However, tuning experts recommend abandoning the spoiler in favor of changing the appearance of the trunk or using a small, not too noticeable part.
Body kits
In addition to the spoiler, there are entire sets of body kit parts for the VAZ 2114. These include:
- front bumper;
- rear bumper;
- wing;
- wing pads.
These parts can improve air flow to the engine, increase aerodynamic properties and simply the appearance of the car. Tuned body parts are sold both individually and as whole sets. They differ in appearance, strength, weight and a number of other parameters. The disadvantage of such tuning is the high price of body parts.
Side mirrors
Side mirrors of the VAZ 2114 series are not the most convenient rear view device. They are small, provide limited visibility, and form ice in cold weather. Specialized stores sell mirrors that eliminate the shortcomings of basic devices. New mirrors will provide a better appearance of the car, improve visibility, increase comfort and driving safety.
Overlays
In addition to serious tuning, there are many small details that will make the car unusual in appearance. These include trims, wind deflectors, bumper air intake, wheel arch trims and other minor improvements. They are unable to seriously change the appearance of the car, but are inexpensive and quick to install.
Replacing the brake disc
Minimum permissible disk thickness A=10.8 mm. If the disk thickness is less, it must be replaced. The axial runout of the brake disc surface should not exceed 0.15 mm.
If there are burrs, deep scratches, etc. on the working surface of the disc that increase pad wear and reduce braking efficiency, replace the disc.
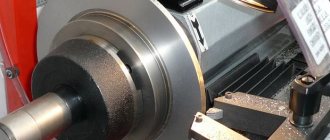
In specialized workshops, such a disk can be sharpened and ground, but after processing, the thickness of the disk must be no less than the minimum allowable. The groove is carried out on both sides of the disk to the same depth.
You will need: keys “17”, “12”, screwdriver.
1. Remove the corresponding wheel.
2. Remove the two bolts securing the shoe guide to the steering knuckle and remove the brake mechanism assembly without disconnecting the brake hose from the working cylinder.
3. Hang the brake mechanism on a rope or wire to the front suspension spring. Make sure that the brake hose does not become kinked.
4. Clean the brake disc from dirt. Apply WD-40 type fluid to the wheel-to-hub joints and the guide pins. Wait a little and let the rust dissolve.
5. Unscrew the two guide pins and remove the brake disc.
If necessary, knock down the disc with a rubber or polymer hammer.
Impacts should be applied as close to the center of the brake disc as possible.
6. Install the brake disc in reverse order. If you are installing an old disk, use a file to remove the beads formed as a result of disk wear on both sides.
Source vaz-2115i.ru
Welcome! Brake discs - they are replaced in pairs and they must be installed identically (so that the manufacturer is the same) and after installation, when braking, the car will not pull to the side and the discs will wear out equally, at the moment there are a lot of underground companies that are engaged in the manufacture of counterfeit parts, The brake system is counterfeited very often and most often these are brake pads, so when purchasing parts related to the brake system, take into account everything from the availability of the box to the place where you purchased the auto parts.
Note! To replace the brake discs, you will need: Socket wrenches and wrenches, as well as a couple of screwdrivers and be sure to stock up on WD-40 fluid or some kind of penetrating lubricant like it, and you will also need to use tools to remove the wheels, such tools include a jack and a balloon wrench!
Summary:
When should you change a brake disc? If mechanical damage appears on the disk (Mechanical damage includes chips, cracks and scuffs) or if the thickness of the disk is less than the minimum permissible thickness (And the minimum permissible thickness is 10.8 mm for a non-ventilated disk and 17 mm for a ventilated one), the thickness should be checked as in at least three places), then the disc must be replaced; if this is neglected, the disc may split in half or the pistons will be pushed out of the brake cylinders, and therefore the wheel will immediately stop braking, and if the pistons are pushed out and all the brake fluid will leak out , then the car will be left without brakes at all, so be careful and remove the wheels from time to time and check the thickness of the brake discs using a ruler.
Note! If chips, cracks and similar damage were found on the surface of the disc, but the thickness of the disc is even greater, then you can not change it, but turn it on a lathe, but only skilled people should do this, after turning, the thickness of the brake disc should not become less minimum acceptable, if this is the case, then the disk can be reused!
Signs and causes of the problem
You can feel that the brake discs are already at the limit of their professional suitability by the beating of the pedal. She will, as they say, be naughty. This is easy to determine at high speeds when braking.
Don't think that "tired" disks will be able to work for some time. Such frivolity often leads to a hospital bed. And that's the best case scenario. We don’t want to scare anyone, but brakes are still an incredibly important safety system.
There may be several reasons why the pedal does not behave naturally.
- The brake disc is deformed. This can happen due to temperature changes, sudden braking and normal wear and tear. If only one disk is damaged, the second one is replaced at the same time as the first. This is a rule that should be followed always and everywhere.
- Broken front pads. It is impossible to restore their functionality, therefore they must be replaced.
- The rear drums have failed. The VAZ 2114 has drums at the rear, although some install disc brakes. Think for yourself how justified such a decision is.
Design Features
It is better to purchase rear disc brakes as a complete set. The VAZ 2114 fits 13 or 14 inch brake discs (ventilated or non-ventilated). Try to purchase certified discs so that they do not have to be modified.
You also need a caliper, which comes in three types, so you need to select it to match the disc. The caliper comes with a hose and brake pads. The kit includes a universal clamp suitable for all calipers - a faceplate.
When to Replace Discs
It is necessary to replace the front brake discs on a VAZ 2114 if the following symptoms occur:
- The thickness turned out to be less than the permissible level. The discs were simply erased;
- The linings are oily;
- A gap has formed between the base and the overlay;
- When braking there is a squeaking noise;
- There is beating in the brake pedal;
- As for the rear drums, they sometimes stick to the pads, which leads to serious repair work and financial losses;
- The brake cylinders are stuck. This can be temporarily fixed by treating them with WD40. The measure is temporary and will allow you to get to the garage or the nearest service station.
If you are faced with one of these problems, or all of them in a heap, be sure to immediately begin replacing the brake discs on your VAZ 2114.
Which ones to choose based on price and manufacturer?
Now it’s worth saying a few words about the various manufacturers. In fact, it is difficult to find frankly low-quality brake system parts, I mean discs. Even the most inexpensive manufacturers have proven themselves quite well. And here, probably, one of the most important points is the competent selection of brake pads. It is their quality that determines the uniformity of disc wear, the appearance of vibration, grooves and other damage on the surface.
It turns out that even the most expensive discs can be ruined in a couple of thousand kilometers by installing frankly low-quality pads. What are these system parts offered on the market today:
- ALNAS — 627 rub. for one disk R13 (non-ventilated)
- ATS Russia - 570 rub. for one R13(non-vent.)
- AvtoVAZ Russia - 740 rubles. per piece R13(non-ventilated)
- LUCAS/TRW 1490 rub. per piece R13 (ventilated)
- ATS Russia - 790 rub. per piece R13 (ventilated)
- ALNAS — 945 rub. per piece R13 (ventilated)
- ALNAS 1105 rub. for one R14 (ventilated)
- AvtoVAZ - 990 rub. per piece R14 (ventilated)
If you decide to service your car yourself, then here you can read about replacing brake discs on a VAZ 2114 with your own hands.
I think that the issue of price remains clear to everyone. The larger the diameter of the disc, the more expensive it is. Also, a ventilated one, of course, will be more expensive than a regular one. Factory products from AvtoVAZ are quite good value for money. Of course, if you buy the original!
Tuning VAZ 2114 with your own hands (video)
Tuning is a visual or technical improvement of a car, by replacing parts with new, better ones, or upgrading old ones.
Almost every car owner dreams of improving it, first of all, for personal comfort, and for overall aesthetic beauty.
But not everyone has the funds for new, tuned parts, expensive workshops, etc. Therefore, many car owners do this work with their own hands.
Salon
Tuning a VAZ 2114 with your own hands is easiest to do inside the car. The first thing that lends itself easily to this procedure is the steering wheel. The standard steering wheel looks rather crude, and not everyone will like it. Therefore, many car owners change it to another, universal steering wheel.
Tuning the dashboard and interior
The next thing that can be installed on the VAZ 2114 as tuning is an on-board computer. This thing is quite expensive, but it will not only add modernity to your iron friend, but will also help you in some road situations.
A very common option for tuning is installing speakers. Usually, four pieces are installed: two on the door, and two on the rear shelf. Together with a good radio, the quality of the acoustics will be at a fairly high level.
A more painstaking interior tuning is replacing the dashboard. Today, there are special panels on sale that are suitable for the standard mounting of the VAZ 2114. The appearance, compared to the factory one, has more modern outlines, as well as smooth transitions and bends. For comparison, these types of dashboards are installed on the VAZ 2110 “Bogdan”, produced in 2012 – 2014.
Well, the last thing that can be changed inside the car is the trim. It is advisable to buy such a thing in a set so that all the parts fit together. The list of trim elements includes: door cards, seat covers, plastic covers for supporting pillars, headliner, mats, and floor covering. If all the elements are completely replaced, you simply won’t recognize your VAZ 2114.
Visual tuning
Visual tuning includes external changes to the car. For example, replacing bumpers, thresholds, mirrors, etc. The entire replacement process can easily be done with your own hands. All tuned parts have a standard fastening, and in order to install them, you just need to remove the old ones.
Nowadays, film is considered a very fashionable visual enhancement. It can have different coatings: carbon or mirror, as well as absolutely any color. The film replaces the main color of the car. To cover a car with such an element, there are special workshops, but this can also be done at home
Chip tuning
For many car owners, such a concept as: chip tuning can raise many questions: “what is it?”, “what is it done for?”, “what is the cost of such an improvement?” etc. Let's try to find the answer to all the above questions together.
Chip tuning was originally invented in order to improve the technical characteristics of a car without changing its performance. Today, this type of engine modification is very popular, especially among young people.
Since chip tuning mainly affects the electrical system of the car, installation work should be carried out very carefully and carefully. An incorrect sequence of connecting devices can cause malfunctions of some mechanisms, as well as breakdowns and additional costs.
On a VAZ 2114 car, the system is not always configured correctly, even though the car has just left the factory. Therefore, the chip not only improves settings, but also corrects basic errors. This process is somewhat reminiscent of flashing.
Before starting chip tuning, the car must be carefully prepared. This is done as follows:
- The fuel mixture in the carburetor must be such that the engine will perform best. This can be achieved by replacing the air filter;
- Since chip tuning, to some extent, makes the processes in the engine more active, it needs to be helped in this as much as possible. This is done by installing new fuel system filters. Then, gasoline will be cleaner and burn much better;
- Also, it wouldn’t hurt to change the oil and oil filter to improve its pressure.
After the preparation is completed, you can begin installing special devices. Remember that connecting them is a very precise and delicate thing. Any mistake can cause serious damage.
Therefore, if you do not have experience in working with electrical equipment, then it is better to entrust such work to specialists.
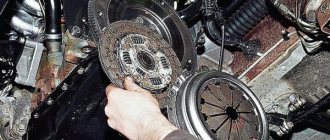
Replacing brake discs and pads
The story begins in the distant or not so distant year of 2015, the beginning of autumn. One day I went out into the countryside with friends, drove on gravel, and suddenly the brakes whistled. At first I was scared, but then knowledgeable people told me that a small pebble had gotten between the brake disc and the brake disc casing. They advised us to brake sharply. It helped. I thought that this pebble flew out, but it turned out that it remained there forever, it just stopped whistling. Later this happened two or three times, I still followed the proven method: accelerating and braking. But recently the same garbage happened again, so I decided to remove the disk and clean everything there.
So I started to disassemble the wheel, remove the caliper, take out the pads and see such beauty.
The broken block is the outer block.
Comparison of a broken and normal pad from the same caliper.
At first I was a little confused. I realized that I was now on the blocks. I asked my auto mechanic friends why there was such uneven wear on the pads. They said that this could be due to a wheel alignment, worn caliper (guides) or brake disc. Since the brake discs were in poor condition (the car shook when braking), I decided to change the brake discs as well.
So I bought discs, pads and lubricant for the guides and caliper piston, and decided to lubricate them for prevention. I did one side and moved on to the other. I disassemble everything in the same sequence and begin to unclench the caliper. But, as luck would have it, it jammed. I took the entire caliper off to disassemble it. And I see the following picture: the guides are all dry, without lubrication, and under the piston boot everything is rusty and there is not a trace of lubrication left.
I decided to buy a caliper cylinder since it was cheaper than a whole caliper, and it was not possible to repair the caliper with a repair kit (I repaired it in the parking lot in front of the hostel). The only problem was that the hex bolts could not be unscrewed, but they helped at the nearest tire shop with a gun. And finally I assembled the caliper.
Almost assembled caliper. The clean part is the caliper cylinder. I covered the disc so that grease and brake fluid would not get on it (I don’t know why, I didn’t think it would be very good if it was covered in oil and brake fluid).
I also installed the brake disc.
New brake disc and pads.
Brake pads close up.
Brake pads close up.
I bled the brakes, put the wheel on and drove off to rejoice (it sat for 2 days while it was being repaired).
Repair report:
- BELMAG brake discs =700 rub.*2=1400 rub.
- Brake pads (I don’t remember the name, but they said TYPO Japan) = 500 rubles.
- Belmag caliper cylinder = 800 rub.
- Brake fluid RosDot-4 0.455 kg (just for the garage) = 180 rub.
- Anthers for guides = 5 RUR * 4 = 20 RUR.
- Caliper grease = 80 rub. (enough for 4 guides and many more left).
Replacement of ball joint VAZ 2109, 2114
Good day. This article will discuss how to understand that the ball joint on a VAZ 2109 - 2114 is faulty, and how to replace the ball joint on a VAZ 2109 - 2114.
Signs of a faulty ball joint VAZ 2114, 2109
If, while driving over bumps or small irregularities, you hear a knocking sound in the front suspension of a VAZ 2109, 2114, then this is a reason to start looking for a fault! There are two ways to check the ball joint of a VAZ 2109 - 2114 for a malfunction.
The first method does not require an inspection hole, but a jack is required. We hang the front wheel on a jack and sharply pull it toward and away from us. If the ball joint is faulty, it will make a sound and the wheel will have play.
If you have a garage with an inspection hole or overpass, then inspect the ball joint boots for damage. If the boot is torn, this is a sign of wear on the ball joint of the VAZ 2114 and it is better to replace such a ball joint even if it does not knock yet.
Place a crowbar or pry bar between the ball and lever. Place one end on the lever and the other on the bolt or ball housing and try to move them apart. For convenience, you can turn the steering wheel towards the wheel being tested.
If there is play, the ball must be replaced.
Many people wonder: can a ball joint fly out on a VAZ 2109? Answer: Yes! Maybe! Therefore, if there are signs of a malfunction of this part, do not delay repairs. Moreover, it is not difficult. Next, I will tell you how to replace the VAZ 2109 - 2114 ball joint with your own hands.
How to replace a ball joint on a VAZ 2109, 2114
To replace the ball joint of a VAZ 2109, 2114, place the car on a jack and remove the wheel. Now unscrew one nut securing the ball joint to the lever and two bolts securing the ball joint to the hub.
If you have a puller, place it as shown in the photo and remove the ball.
How to remove a ball joint without a puller on a VAZ 2109 - 2114
If there is no puller, you will have to remove the lever completely. To do this, unscrew the bolt securing the stabilizer bar (egg), the nut securing the “saber” to the lever and the bolt securing the lever to the body. We remove the lever, take a heavier hammer and knock out the ball.
There are situations when the bolts stick to the silent blocks or you are simply too lazy to remove the lever. In such cases, you can use a backup option, but it may not always work.
In this option, the ball should not be unscrewed from the hub. Unscrew only the nut securing the ball to the lever. Use a gas torch to heat the lever where the ball pin fits into it. It should be heated for about 3 minutes.
Next, just as in the method of checking the ball for malfunction, insert a crowbar between the ball and the lever and press on the crowbar.
The longer the crowbar, the easier it is to remove the ball this way - this is important!!!
You learned how to change ball joints on a VAZ 2109 - 2114. If you have any questions, write them in the comments and I will definitely answer you!
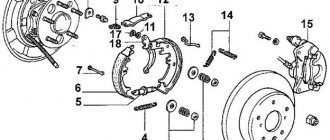
How to replace front and rear brake discs yourself
Before starting work, we carry out comprehensive diagnostics; for these purposes, we visit a service station. However, the instruction manual does not prohibit servicing the machine at home. If you have no experience, it is still better to turn to the experts.
There are frequent cases of worsening damage after unprofessional intervention. For some VAZ owners, the factory warranty is a fundamental factor. Although the design of most units is simple, and the principle of operation is intuitive.
We carry out visual diagnostics from under the bottom of the car, inspect the hub mechanism for obvious, visible defects. Next, we hang the car with a hydraulic lift; if the latter is not available, then we will use a mechanical jack.
We lift the side of the car, remove the wheel, and carry out troubleshooting. We carefully inspect the disc, pads, and anti-vibration plates. If there are signs of wear or mechanical damage, replace them with new ones.
Sequence of actions when replacing disks yourself
- We place the car within the perimeter of the repair area, block the wheels with wheel chocks, and squeeze the parking brake;
- We engage first gear to prevent arbitrary rotation of the rear wheels;
- Unscrew the bolts and remove the wheel;
- We unscrew the nuts from the back side and remove the caliper from its seat;
- Use a clamp to compress the working cylinder as far as it will go, so that it relieves the pressure on the disc and pads;
- We remove the anti-vibration springs and caliper.
The dismantling is completed, then we inspect adjacent parts and mechanisms, carry out troubleshooting, and replace the elements with new ones.
We carefully inspect the hub, bearing, rod end, and ball joint.
Appearance tuning
Improvements in the form of a muffler attachment, new mudguards, and several body kit elements are a thing of the past. High-quality styling kits produced by many modern enterprises change the car beyond recognition.
Sets of two bumpers cost up to 4,500 rubles. But they do not freshen up the car as much as extended kits with a radiator grille and thresholds, the cost of which does not exceed 8 thousand rubles.
Chrome inserts for the bumper, eyelashes for the headlights, and rear spoiler increase the cost of styling kits. The price of some of them reaches 25 thousand rubles.
For a more impressive appearance, many car enthusiasts purchase a rear wing for 4,500 rubles. Additionally, they take a decorative hood made of plastic for 7,000 rubles. Air intakes are installed on the hood at a cost of approximately 1,500 rubles.
What rear brake discs can be installed on a VAZ 2115
Original
| Article/model name | Unit price (RUB) |
| 24.0120-0187.1 | From 1800 - 1900 |
| 24.3220-1103.3 | —/— |
| 24.0120-0225.1 | —/— |
Analogs
| Art. | Cost, rub.) | Art. | Cost, rub.) |
| BOSCH 0 986 479 905 | From 1800 - 1900 | FENOX TB2108O3 | From 1750 |
| LPR L1031P | —/— | PATRON PBD1748 | —/— |
| STELLOX 6020 1206-SX | —/— | METELLI 23-0205 | —/— |
| FENOX TB210965 | —/— | FENOX TB210354 | —/— |
| —/— TB210244 | —/— | —/— TB210674 | —/— |
We change brake discs (TD) and pads with our own hands
Replacing brake discs on a VAZ 2114 is a fairly simple process that, if you have the necessary equipment and 2-3 hours of free time, you can easily do it yourself.
To replace the disks yourself, you will need the following tools:
- Jack;
- Screwdriver;
- Keys at 17, 8 and 13;
- Balloon key.
- Rubber hammer.
Rubber hammer at work
We replace disks in the following sequence:
- We place the fourteenth on a flat surface, preferably asphalt. We install wheel chocks under the wheels;
- If the car wheels have not been removed for a long time, it makes sense to treat all threaded connections with WD-40 and wait 10-15 minutes - this will greatly facilitate the removal process;
- We tear off the nuts securing the wheel from a dead point using a wheel wrench. Since this can cause the car to sway violently, this should be done before lifting the car on a jack;
- After the fastenings are loosened, install the jack in the place of the special stop and raise the car;
- We twist all the fixing nuts with a wheel wrench and remove the wheel;
- We remove the block; to do this, you need to unscrew the caliper that secures it. This is done with a 17 key. You must first remove the brake hose fasteners (with a 13 key) and drain the leaking fluid into a prepared container;
- Remove the brake cylinder. It is secured with two bolts that can be unscrewed with a 13mm wrench;
- Now we have free access to the disk. It is secured with two guide pins (pins), which we need to unscrew with an 8 key;
- After removing the clamps, use a rubber hammer to tap the back side of the disc so that it comes off the hub. To do this, you can use a regular hammer and a block of wood as a backing, but everything must be done extremely carefully;
- Once the dismantling is complete, the disk is installed. Installation of a new part is carried out according to the same algorithm as the removal of a VAZ brake disc, only in the reverse order. Before installation, the connection point with the hub must be lubricated with a special high-temperature lubricant; the so-called “copper” lubricant is well suited.
Often, along with replacing the discs, it is also necessary to replace the front brake pads on the VAZ 2114.
This is done as follows:
- After removing the wheel and cleaning the parts from dirt, remove the brake fluid supply hose from the bracket;
- Using a 17mm wrench, unscrew the upper caliper mounting bolt. To unscrew this bolt, you need to bend the counter curtain, which prevents the bolt from turning when driving; this can be done with a regular flat-head screwdriver;
- Similarly, loosen (no need to unscrew completely) the lower caliper mounting bolt;
- Move the bracket covering the brake pads up (it will be held on by the loosened bolt);
- We remove the worn out pads and install new ones in their place;
- We screw the caliper back, attach the fluid supply hose back to the bracket and install the wheel.
Knowing how to replace front brake discs and pads. You can complete all the work in 2-2.5 hours - there’s nothing complicated about it. However, if you have never done this before, then it makes sense to contact a car service and carefully monitor how everything is done, and the next time you take on the work yourself.
What are the best brake discs for VAZ?
A car's brake system, which is in good condition, is the key to the safety of both the driver and passengers of the car. It goes without saying that it is necessary to maintain this system in good condition, without skimping or skimping on the quality of components and consumables. And brake pads, in particular, need to be changed promptly.
Today there are a lot of pads from different manufacturers. And an inexperienced car owner will have difficulty making a choice. And therefore it is worth giving examples and descriptions of the pads of some companies - in particular, about how their products behaved on the VAZ 2115. Based on this experience in operating various pads, everyone will be able to make their choice and equip their VAZ 2115 with exactly those pads that will function in accordance with the requirements of the car owner. But it’s worth making a reservation - we are talking about branded spare parts, and not about fakes, which are available in abundance on store shelves.
The most suitable products for the VAZ 2115 from Russia are TIIR from Yaroslavl, VATI from Volzhsk, EZATI from Yegoryevsk, and, finally, STS from Moscow. Of the imported ones for the VAZ 2115, Rona (Hungarian), German ATE and Bosch are good; Ferodo and Lukas from England, as well as Roulunds from Denmark, are suitable.
We will compare the pads according to those properties that ensure comfortable and safe driving - wear resistance, frictional qualities, and restoration of these qualities.
The conditions under which these pads were tested on a VAZ 2115 were as follows: 1. The friction coefficient of the pad-disc system with cold brakes, where the temperature did not exceed 50 degrees; 2. The same thing, but with hot brakes, up to 250 degrees; 3. With periodic braking up to 50 times, subject to a decrease in speed from 100 mph. up to 50 km/h. 4. Checking their functionality after they have cooled down to ambient temperature.
So: 1. TIIR pads. Their friction properties leave much to be desired. Especially with regular braking. 2. VATI pads. Cold braking is also not of particular quality, but still maintains the norm. But when they warm up they work well. Interesting, but after restoration they became even better. This fact is explained by defects in manufacturing, or more precisely, in their heat treatment. After heating during operation, the material was calcined and became what it should be. 3. EZATI pads. They are perfect in every way. It is not for nothing that a large number of counterfeits are disguised as this particular manufacturer. Therefore, when purchasing such pads you need to be extremely careful. 4. STS pads. The parameters are not inferior to foreign ones. They can be restored to almost the same parameters. 5. Rona pads. These Hungarian pads are simply exceptional in their quality. Their results are amazingly consistent. 6. ATE pads. They showed the highest results in terms of friction properties. When warmed up they work worse, but still acceptable. 7. Bosch pads. The work is beyond praise, but only in a cold state. That's where all the positives end. High price and poor quality of work at high temperatures. 8. Ferodo pads. Worse than some domestic ones. 9. Lukas pads. Everything would be fine if it weren’t for their balance sheet for the VAZ 2115 – at the lowest level. 10. Roulunds. True European quality.
So, which pads should you choose for your VAZ 2115? From Russian, of course, STS . The good price-quality ratio of the products makes them the most acceptable. EZATI is also quite a suitable option. But it’s better not to mess with TIIR.
If you take imported ones, then it’s better - ATE . This is true German quality. Roulunds from Denmark are also good It is these pads that will ensure the comfort and safety of driving a VAZ 2115 at the highest level.
This is interesting: Generator Ford Mondeo 3: which one is installed, replacement
Engine chip tuning
Despite the fact that the tag engine is not bad in principle, its characteristics can be improved a little with little expense. At least adjust it to your needs. It will not become economical like a Prius or powerful like the 200th Cruiser, but chip tuning will help reprogram the settings of the engine control system.
You can reflash the ECU in any way you like, but not all options are equally good. You can adjust the control program in the direction of economy, but to the detriment of dynamics, or vice versa. There are also ready-made firmware options that will change the ignition timing to switch the engine to 92 gasoline and lower.