A cigarette lighter is an electrical device in a car designed to light cigarettes. In a modern car, the functions of the electric cigarette lighter have been significantly expanded - it is now used to connect a recorder, battery and phone chargers, a tire inflator, a car vacuum cleaner and even a video player. The device has become so important for users that today it is difficult to imagine a car without it.
And although the design of the electric cigarette lighter is not complicated, sometimes it causes a lot of trouble, and sometimes it “allows motorists to light a strong cigarette.” Disturbances in the electrical network not only lead to the failure of the cigarette lighter and the hassle of replacing it, but also, under certain conditions, to a short circuit in the electrical wiring. So there are enough reasons to discuss the topic of repairing and replacing the car cigarette lighter.
Car cigarette lighter device
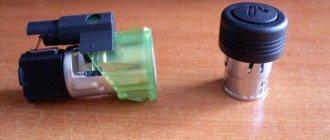
A car electric cigarette lighter consists of two parts: a socket and a socket. To light a cigarette, use a cartridge with a heating element. A bimetallic relay is mounted in the socket, which regulates the heating temperature of the coil. Thus, the electrical circuit of an electric cigarette lighter consists of a socket, a bimetallic relay, and a socket with a heating element. The device is connected to power via a fuse. The electric cigarette lighter is mounted together with a backlight lamp. Therefore, replacing at least one component will require dismantling the entire structure.
Car cigarette lighter device
Between lighting the cartridge is in the socket, the electrical circuit is open. To light a cigarette, the user pushes the cartridge into the socket, which closes the electrical circuit. After 15-20 seconds, the spiral heats up and heats the socket body. When a sufficient temperature is reached, the bimetallic plates of the relay diverge, the circuit opens, and the cartridge is pushed out of the socket. You can light a cigarette.
What does the radio have to do with it?
There are situations when the radio and cigarette lighter of the VAZ-2114 do not work at the same time. You say: what connection could there be here? That's right, it shouldn't exist. But some “electricians” or car owners themselves connect the power of the radio to the cigarette lighter contacts. This is much easier than running wires to the battery terminals. So it turns out that when the cigarette lighter fuse blows, the radio stops working. In this case, it is better to contact a qualified auto electrician to correct the situation.
Why doesn't the cigarette lighter work?
Failure of the electric cigarette lighter and other disturbances in the electrical network are associated primarily with its misuse. So, with the advent of automotive household appliances that provide comfort and maintenance, the socket began to be used as a power outlet. Connecting household appliances to the socket is made easier by the fact that they are sold together with power adapters.
Additional connection of household appliances leads to an excessive increase in the load on the network, for which it is not structurally designed. The current of the electric cigarette lighter network is limited by fuse F18 at 25 A. The consequence of exceeding the network load can be a blown fuse, failure of the electric cigarette lighter, or, worst of all, if the fuse does not work, a fire in the electrical wiring. After such an incident, it is necessary to identify and eliminate malfunctions.
Burnt out cigarette lighter
A few recommendations
- Experts strongly advise against doing any hand twisting, as they are quite often a source of car fires. Therefore, it is best to replace the wiring completely or at least carefully work with a soldering iron.
- Before purchasing a cigarette lighter, you should ask the seller to test it with a tester. This will protect you from a second visit to the store and the procedure of replacing a low-quality cigarette lighter with a new one.
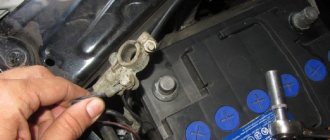
- When carrying out absolutely any work related to the electrical part of the car, it is necessary to remove the positive terminal of the battery.
Source
Tools required for work
To check the serviceability of the cigarette lighter, as well as replace it, you need a set of simple tools:
- voltmeter;
- flat screwdriver with a blade width of 3-4 mm;
- Phillips screwdriver with a shaft diameter of 5-6 mm;
- cosmetic tweezers.
Cigarette lighter replacement tools
However, if you need to make a mounting window, which will be discussed below, you will also need a hacksaw, a vice, and marking tools.
How to find a faulty cigarette lighter
Malfunctions of the cigarette lighter network may lie in all its components:
- cartridge;
- nest;
- electrical wiring with sockets and plugs;
- fuse.
There are two ways to determine the causes of a malfunction: indirect and direct. In an indirect way, the malfunction is determined by the characteristic signs of the operation of the electric cigarette lighter, as well as other devices. With the direct method, the fault is determined using a voltmeter. The use of each option is determined by the nature of the malfunction and the driver’s experience.
The indirect method cannot always determine the malfunction 100%. In this case, you will have to additionally use a voltmeter. But the indirect method can significantly narrow down the search for a fault, and in some situations it is guaranteed to be identified. The advantage of this method is that it does not require additional equipment and also speeds up the search. You just need to turn on and off the necessary devices and draw a conclusion about the malfunction. Of course, for this there must be sufficient experience and knowledge of the car.
Initially, a malfunction of the electric cigarette lighter is detected indirectly by non-working household appliances and the lack of heating of the cartridge coil. If, for example, the phone charges normally and the coil does not heat up, then the socket-socket, as well as the entire electrical cigarette lighter network, are working properly. The only defective cartridge is the one with the burnt-out coil. This is the case when the indirect method gives an accurate determination of the malfunction.
Sometimes the cause of a cigarette lighter malfunction can be determined without any additional tools.
To be completely sure, you can check the spiral for a break with a voltmeter. If the coil is working properly, the ohmmeter should show a resistance within one ohm. Higher values will indicate a break. A broken spiral requires replacing the cartridge or the entire device.
It is best to find faults using a multimeter or voltmeter
But it happens that the electric cigarette lighter does not work entirely: household appliances do not turn on, and the cartridge coil does not heat up. This does not at all mean that it is faulty and the need to begin painstaking replacement work. In this situation, the electric cigarette lighter may not work due to a blown fuse or a fault in the electrical wiring. Here you can also initially determine the cause of the malfunction of the electric cigarette lighter indirectly.
To do this, turn on the stove fan, which is also “powered” through fuse F18. If you can hear the fan running, then the fuse is good. True, there is a possibility that the fan may also be faulty, and the fuse may be good. But this is an unlikely event.
Sometimes you even have to turn on the stove to detect a cigarette lighter malfunction
It is worth noting that for models of different years of manufacture, the cigarette lighter and stove may be connected to different fuses. There is a known scheme where the electric cigarette lighter is in the same network with a portable lamp and fuse F8. And the stove and the glove box lighting lamp remained in the same circuit with fuse F18. This should be taken into account when indirectly determining the malfunction of the electric cigarette lighter. In this circuit, an indirect sign of the serviceability of the fuse will be a burning portable lamp. But to be completely sure, you should check the fuse with a voltmeter.
If it turns out that the fuse is serviceable, but the cigarette lighter still does not work, it is worth inspecting the electrical wiring and cleaning the contact blocks. If after this the cigarette lighter still does not work, you should check the integrity of the electrical wiring with a voltmeter or test lamp. If breaks are detected, replace the damaged areas, and then check the electric cigarette lighter again. If the cigarette lighter still does not work, it means it is faulty and needs to be replaced with a new one.
Private situations
General signs do not always indicate specific breakdowns. There may be exceptions. If individual devices refuse to work, it is quite possible that this is their personal problem. You'll have to parse the specific pointer. It may have a cracked gear that needs to be replaced.
Also, why doesn’t the instrument panel of the VAZ 2114 work? If the fuel gauge and tachometer are capricious (either they function, or they don’t react at all), the contacts and the mounting block are normal - you need to do a small check.
Reset is pressed and held, and the ignition is turned on at the same time. Raised arrows indicate the need for further searches. Lifeless - that microcracks have appeared in the shield itself. You will have to remove it and examine all soldering and traces under a magnifying glass. In principle, these are all the main options. If calling all the listed components and parts did not lead to the revival of the instrument panel, your case is individual, and you will have to determine the situation in the company of an experienced auto mechanic.
How to remove and replace the cigarette lighter on a VAZ
The standard procedure for removing the electric cigarette lighter is described in the instruction manual. It involves removing the floor tunnel lining and then dismantling the nest. The procedure for each VAZ brand is determined by the design features of the tunnel. In accordance with this, we will consider the procedure for replacing the electric cigarette lighter for each brand or line of cars that have a similar tunnel structure.
How to remove and replace the cigarette lighter on a VAZ 2110, 2011, 2112
Removing and installing the cigarette lighter through the tunnel
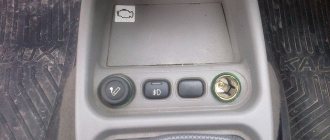
In VAZ 2110, 2111, 2112 models, the cigarette lighter is located on the right side of the console next to the gear lever. To dismantle the electric cigarette lighter with this tunnel design, you must perform the following steps:
- Disconnect the negative terminal from the battery.
- Remove the side plates of the tunnel by first unscrewing two screws on each side.
- Disconnect the power plugs for the electric cigarette lighter and the backlight from the mains on the right side of the tunnel. This is done so that nothing holds the top panel of the tunnel when removed.
- Use a flat screwdriver to pry up the trim underneath the handbrake lever and remove it.
- Remove the cover from the gear shift lever in the same way.
- Use a Phillips screwdriver to unscrew the screw under the gear shift lever housing.
- Move the front seats all the way back.
- Unscrew the two screws securing the floor tunnel, one on each side.
- Remove the top cover of the tunnel with the electric cigarette lighter by hand.
- Disconnect the backlight lamp from the cigarette lighter housing. To do this, you need to squeeze the lamp screen and slightly pull it back along the length of the groove on the body of the electric cigarette lighter.
- Inside the cylinder of the cigarette lighter socket, use a screwdriver, or better yet, tweezers, to release the hook with the light guide.
- Pull the socket out of the panel.
- Push the light guide out.
Points 1 to 9 describe dismantling the tunnel, and points 10 to 11 describe disassembling the cigarette lighter. Installation is carried out in reverse order. This is a complex procedure. As drivers say, because of such a small thing, half the car needs to be disassembled. Therefore, craftsmen are looking for other less expensive ways to dismantle the electric cigarette lighter. Their description is given below.
Replacing the cigarette lighter through the mounting window
During the first disassembly, a small mounting window is cut into the tunnel on the passenger side to make it easier to access the cigarette lighter next time without disassembling the tunnel.
Mounting window
To perform the replacement procedure through the mounting window inside the console, you must:
- Disconnect the negative terminal from the battery.
- Through the mounting window inside the tunnel, disconnect the power plugs for the electric cigarette lighter.
- Moving away from you inside the tunnel, remove the backlight.
- Having previously bent the hook (steps 10-11), push the nest out from the inside of the tunnel.
- From the interior side, remove the light guide from the hole in the panel.
After dismantling, you can replace the cigarette lighter or burnt out lamp. The installation procedure is carried out in reverse order.
Replacing the cigarette lighter through the socket
The simplest, one might even say revolutionary, method suggests making a replacement through the hole in the socket panel. To do this, use a screwdriver, or better yet, use tweezers to release the cigarette lighter from the inside of the cylinder from the hook, and then simply pull it out of the light guide along with the electrical wiring and blocks. Then, prying around the rim with a flat screwdriver, pull the light guide out of the panel along with the lamp. After this, having disconnected the blocks, you can mount a new electric cigarette lighter or a new light bulb in reverse.
The easiest way to remove the cigarette lighter from a VAZ 2110, 2111, 2112
For more information about this method of removing the cigarette lighter on a VAZ 2110-2112, watch the video:
How to remove and replace the cigarette lighter on a VAZ 2113, 2114, 2115
In subsequent models VAZ 2113, 2114 and 2115, access to the electric cigarette lighter became easier. In these models, the cigarette lighter is located on the panel on the left side. To get to it from inside the tunnel, only the driver's side panel must be removed. The design of the electric cigarette lighter and the method of connecting it to the electrical network have changed. Now the cigarette lighter connectors are placed not on a separate block, but on the end part of the socket body. So the electric cigarette lighter is directly connected to the electrical wiring socket of the power circuit. The procedure for replacing it has become extremely simple. To do this you should:
- Disconnect the negative terminal of the battery.
- Unscrew the screws on the side plate of the tunnel on the left side, and then remove it.
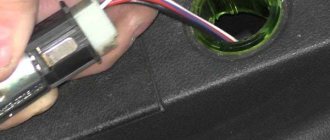
- Press the latch of the electrical socket and disconnect it from the cigarette lighter plug.
- Remove the backlight lamp with socket and electrical socket. Here, if necessary, you can replace the lamp.
- Push the cigarette lighter out from inside the tunnel.
At this point, the procedure for dismantling the electric cigarette lighter socket is completed and the next step is to install a new socket.
- To return the old cigarette lighter or install a new one, you need to push the hooks inside the socket with tweezers, and then pull it out of the filter.
- Insert the light filter into the hole in the console.
- Insert the cigarette lighter socket into the light filter. Then from the fourth point everything is in reverse order.
You can watch the video for more information about removing and replacing the cigarette lighter on a VAZ 2113-2115:
How to remove and replace the cigarette lighter on a VAZ Kalina, Priora, Granta, Largus, Niva
This is where the constructive convenience of standard cigarette lighter removal ends. In subsequent VAZ models Kalina, Largus, Priora, Granta, as well as Niva modifications, disassembling the central tunnel is as difficult as in models 2110-2112. The procedure for disassembling the tunnel is specific to each model and is poorly described. Therefore, replacing the electric cigarette lighter is carried out using the method already described here without disassembling the tunnel through the socket hole.
You can learn more about this from the video:
VAZ 2115 fuse diagram: even a child can figure it out
Much has been said about the importance of such a small component of automotive wiring as a fuse. Indeed, the smallest part made of fusible metal, which melts and breaks the circuit when the permissible values are exceeded, can protect the car from short circuits, local power surges, and even fire. And besides, even a small child can actually figure out the VAZ 2115 fuse diagram
And besides, even a small child can actually figure out the VAZ 2115 fuse diagram.
What does a car enthusiast do if his beloved “iron horse” suddenly stops responding to individual orders? The windshield wipers or power windows suddenly stop working. What to do? Change the motor, and maybe the entire element, so to speak, as a whole? In fact, the first thing you should check is the fuses. It may well be that the whole problem is a spare part, the cost of which is comparable to a ticket for a city regular bus.
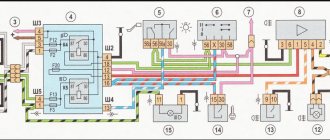
Location of relays and fuses in the mounting block: K1 – relay for turning on the headlight cleaners; K2 – relay-interrupter for direction indicators and hazard warning lights; K3 – Windshield wiper relay; K4 – lamp health monitoring relay; K5 – power window relay; K6 – relay for turning on sound signals; K7 – relay for turning on the heated rear window; K8 – headlight high beam relay; K9 – relay for low beam headlights; F1-F20 – fuses
Of course, replacing fuses only takes a professional a couple of minutes. However, you still need to get to a specialist. What if the ignition doesn't work? Order a tow truck? Expenses, expenses. But often it is enough to check the functionality of the fuses responsible for a particular block and spend the same five minutes replacing them. And your car will be like new again, and a visit to the service station can be postponed until there are really serious breakdowns.
The fuse box in the VAZ 2115 is hidden under the hood, on the driver's side. By opening the cover (it is secured with two simple latches), you get access to the fuses themselves and special tweezers, which are stored right there in the mounting block. It is very easy to decipher the designations of the relays and fuses located in the mounting block, especially if you have a diagram at hand. Relays are designated by the letter “K”, fuses by the letter “F”, the number allows you to determine the area of responsibility of a given fuse or relay; the value in “A” (amps) means the maximum voltage level for this fuse. So, next to fuse F2, which is responsible for the turn signals and the operation of the hazard warning lights, a level of 10A is indicated, that is, this is the load the fuse can withstand. Excessive voltage will damage the fuse, but will preserve the integrity of the system itself.
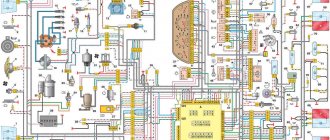
Electrical diagram of VAZ-2115-20 cars (left half): 1 – headlights; 2 – fog lights; 3 – air temperature sensor; 4 – electric motor of the engine cooling system fan; 5 – blocks connected to the wiring harness of the ignition system; 6 – engine compartment lamp switch; 7 – block for connection to a single-wire type audio signal; 8 – sound signal; 9 – washer fluid level sensor; 10 – front brake pad wear sensors; 11 – oil level sensor; 12 – generator; 13 – engine compartment lamp; 14 – coolant temperature indicator sensor; 15 – starter; 16 – battery; 17 – relay for turning on fog lights; 18 – coolant level sensor; 19 – brake fluid level sensor; 20 – reverse light switch; 21 – windshield wiper gearmotor; 22 – oil pressure warning lamp sensor; 23 – block for connecting to the rear window washer electric motor; 24 – electric motor for windshield washer; 25 – instrument cluster; 26 – mounting block. Conventional numbering of plugs in the blocks: A - block headlights; B — electric fuel pump block; C — blocks of the mounting block, ignition switch, windshield wiper gearmotor; D — interior lamp