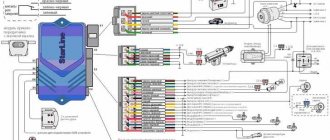
A jamming or poorly functioning hood lock, unfortunately, is never one of those breakdowns that drivers repair right away. Although adjusting this small mechanism twice a year would save many Zhiguli owners from the need to replace the hood lock on a VAZ 2114 at the most inconvenient time and urgently.
The locking mechanism fails gradually, only in 2% of cases, it breaks suddenly, the spring cracks or the safety hook flies out. In other cases, the lock gradually loosens, and the driver has to slam the lid harder and harder. How to replace and adjust the mechanism yourself, using a minimum of tools and without sufficient experience.
Removal and installation
Removing and installing the hood of a VAZ 2114 yourself, without resorting to the help of a car service, is quite simple. How to do this will be discussed further. The hood is held on hinges located on the rear edge of the front end of the body. There is a hood lock with a hook at the front that prevents it from opening while the car is moving. In the open position, the hood rests on a metal stop. The lock has a cable transmission with a handle, which is located inside the cabin under the instrument panel on the left side.
To remove the hood, you need to open it and put it on the latch. Next, you need to disconnect the windshield washer hose from the tee, and also disconnect the electrical wires from the engine compartment lamp. Now you can unscrew the four bolts that secure the hinges to the hood. It is recommended that an assistant be nearby at this time to hold the hood in place. By unscrewing these bolts, you can remove the hood of the VAZ 2114 from the body. The withdrawal operation is completed. Installation is carried out in reverse order. But in the end, before tightening the fastening bolts, you will need to adjust the gaps between the hood and the body wings.
Adjusting the hinges
This adjustment should ensure that the hood is in the correct position relative to the front fenders of the vehicle.
To perform this type of work you will need:
- Check the position of the hood relative to the top of the fenders. They must be on the same level. If this parameter is violated, the next element is executed.
- Set the hood to the open position.
- The hinges are adjusted using 2 pins per 8 key. In this case, you do not need to unscrew two pins at the same time. The adjustment will go wrong, and without experience it will be difficult to return to the original position. Therefore, you need to start by unscrewing the bolt and, rocking the hood up and down, to achieve a change in the vertical position. Then tighten the bolt and lower the hood.
If the evenness is restored and the hood of the VAZ 2114 does not close properly, it is worth proceeding with the following work.
Adjusting the gaps between the hood and wings of the VAZ 2114
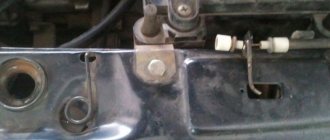
Open and put the hood on the latch. Loosen the bolts securing it to the hinges. Two on each side. We then cover the hood and position it so that the gaps between the fenders and the hood are equal on both the right and left sides. Now carefully lift the hood and tighten the mounting bolts securely.
The hood can be adjusted in height by changing the height of the adjusting pads. There are two. These bumpers must be installed so that the surfaces of the fenders and hood are level.
The height of the buffers can be adjusted by screwing or unscrewing them. After completing all these steps, you need to make sure that the hood now opens easily and is securely locked. If there is a loose closure or other locking problem, the hood latch will need to be adjusted.
Hood with gas stop VAZ 2114
Adjusting the lock
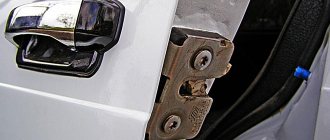
You may need to adjust the latch if the hood does not close properly or you need to use a lot of force to close it. In addition, this adjustment is necessary if there is vertical play in the hood when it is in the closed position.
In addition, this adjustment requires strong impacts when closing, as well as difficulties when opening. To complete this procedure you will need:
it is necessary to loosen the tightened locknut, holding the lock with a screwdriver so that it does not turn. Adjusting the latch height is very easy. To do this, you need to turn it on or, conversely, turn it off. To adjust the horizontal position of the latch, move it in the desired direction. After completing the adjustment, you need to make sure that the lock is working properly. If it still does not close or defects remain, the adjustment procedure will need to be repeated.
Causes of cable drive failure
A common cause of cable breakage is natural wear and tear. Over time, it stretches and frays in places where it bends. Lack of lubrication also greatly affects its service life.
If the lock and cable have not been treated with oil for a long time, then jamming occurs. The driver has to make a lot of effort to open the hood. As a result, the cable drive fails.
Regularly monitor the condition of the lock and cable. At low temperatures they freeze. When you feel that the hood is difficult to open, identify the cause and fix the problem without waiting for a breakdown. If the cable breaks, install a new one. Try to securely fix it without bending it. Finally, treat the lock with grease. After quality work done, you will forget about the problem with a broken cable for a long time.
How to ensure ease of opening and reliable fixation?
For this purpose, a special part is sold that can be installed on the car yourself. This part is called the gas stop. They replace standard racks, as a result of which the consumer properties of the car are significantly increased. Opening the hood begins as follows. It is enough to slightly lift the hood with one hand. After this, the gas shutdown is activated. He himself will raise the hood to the required height and securely fasten it to it. The standard stop will no longer be used. This shutdown requires no maintenance during operation.
Many owners of VAZ 2114 cars prefer to install a gas strut on their car, especially since the installation process does not require much effort. For this you will need:
- The stoppers themselves;
- Two keys for 13;
- Four turnkey nuts with washers for 13;
- Drill;
- Drill 8 mm;
- Some enamels and bitumen.
First of all, we lift the hood and put it on the still old stop. Next, you need to mark the places where there will be holes that you will need to drill yourself. It measures 530mm on both sides of the hood.
In this case, the internal distance between the two holes will be 310 millimeters. Holes will be drilled in the thickening of the hood, inside of which there is a void. However, the procedure should be approached with all responsibility, because if you overdo it, you can drill a hole in the hood itself. After making sure that everything is marked correctly, we proceed directly to drilling. Using a drill you need to make four holes. Two in the hood bulge and two under the hood, one on each side of the cross member. To prevent the possibility of corrosion, it is recommended to treat the resulting holes with an anti-corrosion compound and paint. After this, you can proceed directly to the installation. We take the gas clamp and install it in the holes drilled on one side. We do the same with the second stage. They will need to be screwed. For those who work without an assistant, it is better to first screw the latches on the hood, and only then on the body. If there is someone nearby who can support the hood, the sequence of actions does not really matter. Upon completion, you can test the installed stops in action. You will have to try to open and close the hood several times. It should open smoothly and smoothly and not require much force to close.
Caring for the body in general and the hood in particular
It's no secret that the body is the main and most expensive part of any car. VAZ 2114 is no exception in this regard. The body of this car is made of high-quality metal and is quite well protected from corrosion. However, the effectiveness of factory anti-corrosion treatment also depends on the care and attention of the owner, the storage conditions of the machine and operating conditions.
Some cars have scratches and dents on their hoods. This is often due to the fact that the owners removed dust, dirt and sand from the body using a dry cloth. This is absolutely impossible to do. To remove dirt from the cap, you must first wet it with water and use a soft, damp sponge. If bird droppings are found on the hood or all over the body, you need to get rid of it as soon as possible. It is very aggressive to enamel and, if left on it for a long time, can even corrode the paint and expose the metal.
If you wash your body yourself, then in the summer you need to do it in the shade. If this condition cannot be met, it is necessary to immediately dry the washed surface, since stains may form when the water dries in the scorching sun. In winter, after washing the car in a warm room before leaving, dry the body and door seals, as the remaining drops will freeze, cracks may form in the paint, and the seals may freeze on the body. It is not recommended to use soda and alkaline solutions, as well as waste water for washing cars, so that the upholstery does not fog up.
In cases where even the slightest signs of corrosion are detected, such areas should be cleaned with fine sandpaper to bare metal. Then these places should be treated with special cold phosphating, primed and painted with automotive enamel.
If you have no experience in carrying out such work, then it is better to entrust this procedure to specialists, since the operation is quite responsible. Traces of corrosion on welded joints and joints of body parts are superficial and can be removed at an early stage using polishing pastes. It's not difficult to do this yourself. If measures are not taken in a timely manner to eliminate defects in the protective and decorative coating, this will lead to the development of corrosion under the coating layer, its peeling and swelling.
During operation of the machine, the bottom is exposed to aggressive chemicals, salt and sand. The filler and primer that protect the underbody wear down over time, leaving the bare metal unable to resist corrosion. That is why it is necessary to carefully monitor the condition of the underlying coating and, if necessary, restore damaged areas.
To maintain the shine of the paint for as long as possible, it is necessary to regularly polish the body using special polishing pastes. This is especially true for cars that are stored outside the garage in the open air. Polishing pastes are capable of sealing microcracks and pores that inevitably arise during operation. This prevents rust from appearing under the paint layer. Also, do not leave the car in the scorching sun for a long time.
Sound insulation of the hood
Many VAZ 2114 owners would like less noise when driving. It must be admitted that the engine of this car is far from silent. The noise from its operation is clearly transmitted into the cabin. Soundproofing the hood will help solve this problem. But you shouldn’t limit yourself to just this. For a more noticeable effect, it is necessary to implement sound insulation of the front wings and the walls of the engine compartment.
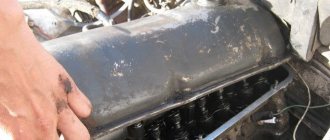
The hood is a rigid frame consisting of a welded steel profile, as well as a steel sheet, which, in fact, is the hood cover. You just need to cover the inside of the hood with sound-absorbing material.
Pieces must be cut out of vibration-absorbing material, repeating the shape of the cells between the stiffening frame. After gluing all the cells, you need to glue another material on top of them, which is called aluminum spleen. This will help significantly reduce the noise level coming from the engine compartment.
Instructions for replacing, adjusting and installing the hood lock on a VAZ
Unfortunately, a stuck or faulty hood latch is never one of those problems that drivers fix right away. Although adjusting this small mechanism twice a year would save many Zhiguli owners from the need to replace the hood lock on a VAZ 2114 at the most inopportune and urgent moment.
The locking mechanism gradually fails, only in 2% of cases does it suddenly break, the spring breaks or the safety hook comes off. In other cases, the lock gradually becomes loose, requiring the driver to slam the lid further and further. How to make a replacement, adjust the mechanism yourself, using a minimum of tools and without sufficient experience.
If you're unlucky
A less good outcome is, unfortunately, more likely. If the hood on your VAZ-2114, VAZ-2115 or VAZ-2109 does not open and you cannot feel its edge from the passenger compartment, you will have to drive onto a pit or overpass. Some dismantling work will have to be done.
Unscrew the engine protection. It is secured with several bolts, and you will need a 10mm wrench. And then reach with your hand between the engine and the radiator towards the hood. The opening mechanism must be moved towards the driver's door. Ideally, someone should help you, because in normal conditions this mechanism will be more difficult to open. If someone or something presses down on the hood, you will be able to open it much easier.
After sliding the mount, fold it back and fix it. If this is not done, it may well slam shut and you will have to crawl under the car again. As we wrote above, start repairs as soon as possible, so that you don’t have to do this procedure every time you need to check the oil due to a broken cable.
As practice shows, the hood opening cable on the VAZ-2115, VAZ-2114 and VAZ-2109 can break for a number of reasons, the main one of which is temperature changes. The steel wire used for it is very sensitive to kinks, and again it does not become stronger due to defrosting/freezing cycles.
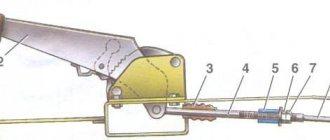
Hood lock device
Details of the hood and lock: 1 - hood loop; 2 - buffers; 3 — hood; 4 - hook; 5 — spring hook; 6 — hook axis; 7 - pin; 8 — locking spring; 9 — sleeve with a locking rod; 10 — handle axis; 11 — lock handle; 12 — thrust sleeve insert; 13 — sleeve with a locking rod; 14 — hood stop bushing
The entire VAZ line has a mechanical locking device with similar main parts. VAZ 2114, 2115 have additional plastic protection under the bumper. This is important to remember when the cover gets stuck after a cable break. Otherwise, the locking mechanism has the following parts. For example, the hood lock of a VAZ 2110.
- locking pin;
- springs - lock latches, hook;
- lock-nut;
- safety washer;
- hook - hook axis, handle;
- cups - top, bottom;
- traction mechanism - supports, bushing, gasket, casing;
- lever arm.
The lock works in all directions from the Zhiguli and is extremely simple: when the hood is slammed, the pin enters the standard hole on the frame and is held in place by a spring. When you press the thrust handle in the cabin, the latch opens, opening a small gap. When the safety hook handle is pressed, the lid opens completely.
Hood lock functions
The purpose of any locking mechanism, be it the hood lock of a VAZ 2109 or a BMW, is to tightly hold the engine compartment lid, preventing dirt and water from entering the engine compartment. The engine compartment is optimally ventilated, but air should not enter through the cover.
The “disease” of 90% of VAZ cars is that six months after use, the hood lock begins to deteriorate: the cylinder wears out, the springs lose their rigidity, the cable (traction mechanism) frays, and cracks can form on it. Therefore, the lock should be adjusted twice a year, replacing faulty parts if necessary. Otherwise, a sharp opening of the hood on the highway is guaranteed.
Additional work
The hood of the VAZ 1117 may also not unlock due to improper operation of the limit switch. This happens in hot weather when the metal of the body deforms (expands) and the limit switch button does not reach the inside of the cover, which causes an erroneous operation.
In addition, many Lada owners decide to carry out tuning - for example, the introduction of a modified gas shock absorber. The point of the modification is to replace the standard rack with a tuned version. If you have at least some technical repair skills, the operation will last only 20 minutes.
Primary problems with the hood latch
The first malfunctions of the locking mechanism are immediately noticeable. If you pay proper attention to them, a simple adjustment will help fix the lock. The hood lock cylinder on a VAZ 2109, for example, is made of industrial steel, and for it to break completely, you need to ignore the first signs of a malfunction for more than a month.
- Every time you close the hood, you have to slam the lid harder and even put pressure on the frame.
- On bumpy roads the lid rattles and rattles. And you can hear it well in the cabin.
- The lock does not close the first time.
- When loosening the cable, you need to pull the handle several times to open the lock.
- After pressing the hood handle into the interior, the lid does not rise, forming a gap, but remains in place. The gap between the frame and the cover can only be seen if you lift the cover yourself.
If these symptoms have just appeared in the car, you can adjust the lock, this will avoid the need for a complete replacement.
The adjustment process on the selected car model
The device of the hood lock VAZ 2108/2109/21099
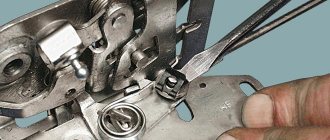
To begin, open and secure the hood. Let's pay attention to the lock and try to understand the principle of its operation.
The photo shows the main elements of the castle:
- Lock latch spring
- Lock-nut
- Latch
- Safety hook
- Safety hook handle.
From what we saw, it follows that after we pulled the opening handle in the cabin, the cable opens the latch, which releases the lock latch. Thanks to the latch spring, the hood “jumps” up, but it is still held half-open by the safety hook. And only by pressing the handle of the safety hook, we can fully open it and gain access to the engine compartment. Quite a reliable system. At first sight…
Adjustment, although not a very difficult operation, requires patience and accuracy. Sometimes you have to repeat the same jewelry movement many times until everything starts working as it should!
Vertical adjustment of the lock
If the hood does not want to close normally (you slam it, put pressure on it, but it still closes with difficulty, or does not lock in the closed position at all), or a rattling noise appears when driving on our perfectly smooth roads (sometimes it is noticeable even just when the engine), then adjustment in the vertical direction is necessary. Namely, adjusting the length of the lock latch.
To do this, use a 19 mm wrench to loosen the lock nut on the latch, holding the latch itself from turning with a flat-head screwdriver.
If the hood is poorly or not at all fixed in the closed position, then you need to slightly increase the length of the latch, which we will achieve by unscrewing it with a screwdriver.
If the hood rattles, on the contrary, you need to shorten the latch by tightening it several turns inward. The required latch length is determined experimentally.
Got rid of the problem? Then tighten the locknut (don’t forget to hold the latch with a screwdriver), check it again and rejoice!
Horizontal adjustment of the lock
If there are problems with opening, or if there is a metallic knock when closing, the lock requires horizontal adjustment.
To do this, we also loosen the lock nut and slightly move (not twist, but move) the latch in the desired direction.
When adjusted correctly, everything should close and open well. Without any effort. Ideally, the hood should slam shut completely when released from a height of 20-30 cm and snap open when pulled by the drive handle in the cabin, only being secured by a safety hook.
How to adjust the hood latch
The first malfunctions that the driver notices can be eliminated by simple inspection and screwing in or replacing some parts. Adjusting the hood latch on all VAZ cars is carried out in two main stages - horizontal and vertical.
Vertical adjustment
Vertical adjustment is a check of the optimal length of the lock latch. This must be done if the hood cannot be securely locked in the closed position. While driving, a rattling noise is heard, even with the engine running, when the car is standing still, a slight rebound of the cover is observed.
To make adjustments, use a 19mm wrench and a flat head screwdriver. Vertical adjustment phases.
- Loosen the locknut on the holder. To prevent the latch from turning, hold it with a screwdriver.
- If the hood does not close properly or does not close at all, the latch length will need to be adjusted. You just need to unscrew it (enlarge it) with a screwdriver.
- If the lid rattles and vibrates when moving, the length of the latch can be reduced by turning the latch a few turns.
- Checking the correctness of setting the latch length is carried out only experimentally.
- There are no dimensions, calculations or measurements with a centimeter tape, even in production.
- After adjusting the mechanism, the locknut must be tightened with a wrench while holding the lock latch.
Horizontal adjustment
On a VAZ 2115, it is necessary to perform horizontal adjustment if the lock jams when opening or a rattling sound is heard when moving.
Adjusting the horizontal stop is carried out in several stages:
- The locknut is loose.
- The latch stop moves in a horizontal plane so that when closed the cylinder coincides with the standard opening of the frame.
- Check the installation and tightening of the locknut.
- The adjustment helps eliminate the problem of small movements of the working mechanism under constant loads while driving.
If any part requires replacement, the lock is repaired.
If you're lucky
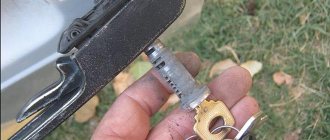
First, remember: if the cable breaks, do not try to open the hood by force. This will only make it worse, because the metal where it joins the body is not the thickest. Let's first consider an easier case. Regardless of whether it is a VAZ-2114 or a VAZ-2109, you need to open the hood, as you know, from inside the car using the handle. So, if the cable breaks right next to it, then you can untwist it and pick up its tail with pliers. Then pull it towards you and. Both on the VAZ-2115 and on older models the scheme is the same, so do not immediately rule out this option. Actually, after you have opened the hood, you can begin the repair, so that after everything you don’t have to climb for pliers again.
For repair, in fact, you only need one part. Carefully remove the broken cable from the fastenings and install a new one in them. The hood will open normally. The only detail: it is better to ask someone for help to press the spring of the mechanism while you attach the other tail to the handle. Then the cable will be tensioned better.
Repair
To repair a lock and replace parts, you will need the following tools:
- fixed key on 17 and 19;
- liquid oil for lubrication;
- Screwdriver Set;
- pliers or pliers.
Repairing a lock yourself requires a certain skill and determination, so you need to count on at least 2 hours. First you need to determine which mechanism in the lock has failed; most often it requires repair:
- springs (lock, hook, latch);
- replacement of traction.
It is unlikely that for the first time it will be possible to repair the hood lock in a few minutes.
Replacing the lock spring
The lock spring is located on the car frame. Wear, deformation and cracks in the metal prevent the hood from sealing. Using the VAZ 2114 as an example, inserting a locking spring can be done in several stages:
- Disconnection from the spring of the traction mechanism. A screwdriver is used.
- Removing the spring.
- Installing a new retaining spring.
Replacing the latch spring
If you need to replace the latch latch spring, for example on a VAZ 2114, you will need a flat-head screwdriver and a 19mm wrench. Replacing the spring is carried out in three stages:
- Kickback (loosening) of the lock nut.
- Unscrew the pin.
- When removing the locking mechanism, replace the spring with a new one and a similar unit in the reverse order.
After repairs, it is always recommended to check how the hood fits into place after replacing the part.
Replacing the hook spring
Unlike the previous two spring replacements, replacing the retaining spring will require thin pliers or tweezers. Repair is more painstaking and requires certain skills. The work is carried out according to the following principle:
- Using a screwdriver, pry up the lock washer holding the shuttle rod.
- The washer is removed from the grooves with tweezers (or pliers).
- The hook axis is removed.
- The spring has been removed.
Replacing traction
it is necessary to change the operation of the lock when the latches are activated and when the hood is opened using the handle from the passenger compartment, the lid does not open.
Traction replacement is carried out according to the following principle:
- The cable is released from the hook (the hook itself does not need to be removed).
- Key 13 is used to connect the handle axis.
- The handle is removable.
- The bent part of the cable is straightened with pliers.
- The locking sleeve slides out and the end of the cable is released.
- The ring is removed from the traction lever.
- The thrust comes from the engine side.
- The shell is removed from the supports and the part is replaced.
Assembling the new rod is carried out in the reverse order. After replacing any part, further adjustment of the mechanism is required.
Installation of sports locks
Sports hood locks can be installed instead of standard parts or as additional insurance. It is advisable not to abandon the original locking mechanism; this is an additional guarantee that the hood will not be opened by an intruder; the clamps of VAZ cars are quite strong and can withstand significant mechanical loads when they are opened.
Installing sports locks on the hood of a VAZ will require additional tools and certain skills; the whole process takes several hours.
Tools and materials you will need
- tape measure or ruler;
- round file;
- drill;
- wrench 19;
- Phillips screwdriver.
Preparing for installation
Before installing the sports lock, it is necessary to accurately measure the points where the barbell attaches to the barbell.
- Holes are drilled in the frame above the headlights and rods are installed.
- the tops of the rods are greased and the hood cover is covered so that fingerprints are left on the cover.
- the necessary holes must be drilled on the hood, following the imprinted marks of the connecting rods.
Hood drilling steps:
- The hood cover is perforated from the inside.
- Take a smaller bit and drill a hole through the solid wheel.
- The hole is enlarged with a large drill.
- Checking the holes for additional holes.
- The hole should be 1-2 mm from the rod.
The preparatory procedure before installing the sports lock is completed.
Lock installation
Installing the lock also requires using a drill to attach it to the hood. Stages of work:
- For example, the protective coating is removed from the plate on the hood lock of a VAZ 2106, the plate is applied to the hood and four holes are measured for attaching the plate.
- Use a thin drill to drill the cover for the screws.
- The plate is screwed on with self-tapping screws.
- The rods are tightened in the optimal position.
- The pins are inserted into the holes of the rods.
- Installation of safety ropes.
- Installation completed.
Of course, repairing and adjusting the lock is a simple procedure that you can easily do yourself. A well-reinforced cover means driver safety on the road; it’s hard to imagine what a hood that suddenly opened on the highway might look like.
If you find an error, highlight the text and press Ctrl + Enter.
Hospitality! Before we start replacing the hood latch, let's figure it out - what is included in the so-called hood latch? First of all, the castle includes:
• Two handles for opening the hood. (One handle is installed in the passenger compartment, the other in the engine compartment)
• The lock also includes a release cable, as well as a hood latch and safety hook. Read all instructions for replacing lock elements below.
Note! To replace the hood latch you will need a screwdriver, wrenches and needle nose pliers!
Summary:
When should you replace your hood locks? • For example, the handles used to open the hood of a car must be replaced if they break or are otherwise deformed, making it difficult or even impossible to open the hood of the car.
• The lock control cable must be replaced if it is broken or deformed, as a result of which it will also be impossible to open the car hood.
• The hood latch and lock spring must be replaced if they are also deformed because usually, if they are badly worn or tilted, the vehicle's hood may open spontaneously while driving.
What are sports locks?
What are their functions?
Many people who saw strange, symmetrically located devices on the hood of a car for the first time had a similar thought: “What can people come up with to stand out from the crowd!”
Yes, these accessories really give the car a new, sporty, aggressive look. That's all? Is it worth it to poke holes in the hood for the sake of a dubious change in appearance? In fact, sports hood locks, in addition to decorative functions, perform another important role.
Driving safety
It is not uncommon for a car to open its hood while driving. And this happens not only with “old” vehicles. It’s good if everything gets done by replacing the hood, windshield, straightening the roof, followed by paint work. All this costs a lot of money and, most importantly, nerves. How to insure yourself against similar and more serious troubles?
Additional hood locks of this type are designed precisely to prevent such situations. These were developed for racing cars, and now no sports car will be allowed to participate in a rally without them. An open hood, and even on a race track... This is where they got their name, and are now known as “sporty”.
How to replace the hood lock elements on a VAZ 2108-VAZ 21099?
Replacing the lock spring:
1) To remove the retaining spring, first disconnect the control cable from it.
2) Then use a screwdriver to pry and remove it from the housing.
Note! To install a new spring instead of the old one, perform the entire operation in reverse order!
Replacing the lock drive cable:
The lock release cable can be removed without removing the spring, to do this:
1) First remove the drive cable from the locking block.
2) Next, get into the car, then unscrew the bolt securing the hood release handle.
3) Then remove the lock handle and use pliers to straighten the end of the cable.
4) With the end of the cable straight, slide the metal sleeve upward.
Note! When moving the bushing, remove the cable ring from the lock handle!
5) Now go to the engine compartment and insert the transmission cable into the engine compartment.
Note! Installing a new lock release cable is done in the reverse order!
Replacing the hood latch:
1) First put the wrench on the lock nut and then loosen it.
Note! To prevent the lock from turning, hold it with a screwdriver!
2) Next, use a screwdriver to unscrew the lock and then remove it.
Note! To reinstall the retainer, perform the entire operation in reverse order!
Replacing the safety rope spring:
1) First pry up the lock washer with a screwdriver.
Note! After prying, remove it from the safety rope using thin pliers!
2) Then remove the axle.
3) And accordingly remove the spring.
Note! To learn how to install a new spring on a safety cable, see the short video at the end of the article!
Replacing the hood opening system
To radically solve problems with the hood, if it does not open or sticks when opening, it is necessary to replace the entire system.
- To replace the lock spring, you must disconnect the spring itself and the lock control cable. It can be removed with a screwdriver by slightly prying it off.
- If it is necessary to replace the cable itself, the spring is not removed. The cable is removed from the fastenings, the bolt is unscrewed with a 13mm wrench, which secures the handle. Using pliers, straighten one end of the cable.
- To remove the ring from the handle, you need to slide the sleeve, after which the cable is pulled through the engine compartment.
- To prevent the hood from closing accidentally, hold the latch with a screwdriver. At the same time, use a 19 mm wrench to loosen the lock nut.
- Also, using the same tool, the hood latch itself is removed.
- To replace the spring, you need to pry up the lock washer and remove it. This procedure is performed using a screwdriver. Remove the axle and then the spring itself.