Regardless of the make of the car, the door is an integral part, but the correct operation of the door mechanisms is no less important. Over time, the door and lock need to be adjusted due to the formation of wear. Otherwise, locking becomes problematic and sometimes even impossible. All work on the door element can be done in a garage with a minimum set of tools.
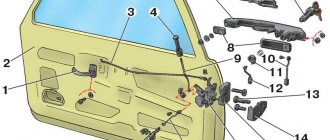
- How to remove a door
- How to adjust the door
Video: door adjustment using the example of a VAZ 2106
- Door lock VAZ 2107
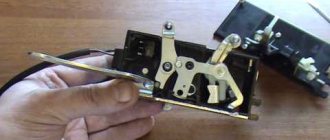
Working principle of the door lock
- Door lock adjustment
Video: adjusting door locks on a “classic”
- The door does not lock
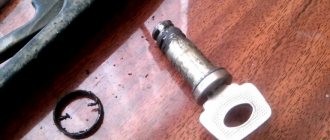
- Replacing the larva
- External door handle
Which ones can be supplied?
- How to remove the handle
- Video: installing a central lock using the example of a “six”
FakeHeader
Comments 17
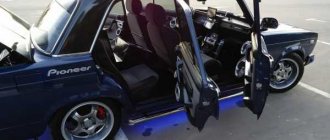
Heavy hehehehe. The corrugation is not for this car, you need to install rubber tubes that are specially designed for classics.
The actuator connector had to be cut off, twisted, ideally, soldered again... And the rods had to be wrapped with foam rubber so as not to rattle)...
PS: So I understand, the car is not yours, let the owner deal with this... For a couple of seconds. could have been done, of course, for an additional fee. fee).
The power of the actuators is not enough because the bimetal wiring is laid with a real cross-section of less than 0.7. This is called hack work. These wires are not even tinned. It's been like a year. I have already replaced the wiring for myself and my friends to 1.5 kV. The actuators fire even on a dead battery. Previously there were constant problems. Including periodic failures of actuators in different doors
I will not argue. Perhaps the wiring is bad, but this problem occurs even in cars with factory central locking (VAZ 2110 and modifications). And all problems were solved by removing the springs.
The exact definition of this action is “crutches”. By the way, I don’t have them either, since at one time I solved the problem along the path of least resistance. In the end, I had to do it for myself once and for all
It is better to install corrugations straight. These S-ki quickly dry out and crack, and they are compressed when the door is closed. Now just a classic in the works. True, I had to install two rubber bands, there are a lot of wires (activator, ESP, heated mirrors, speaker).
Basically, all rubber bands dry out and crack.
Corrugations are faster because they work in torsion all the time
It is better to install corrugations straight. These S-ki quickly dry out and crack, and they are compressed when the door is closed. Now just a classic in the works. True, I had to install two rubber bands, there are a lot of wires (activator, ESP, heated mirrors, speaker).
What exactly are these rubber bands called?
Strange ! Alarm? Are they being stolen? According to my Classic Wazen Tazen from Kopeyka to Semerka, Alarms and locks are no longer needed at all!
Well, I don’t know... for me, locks are a convenience, a way to automatically heat up and find out the temperature outside, and protection from dirty tricks.))
So the Center-Lock is separate, and the Alarm is also separate. You can install just a Center-Lock without an Alarm. I asked why the Old Lady had an alarm system.
Well, I wrote - the locks are there for convenience - so that in the cabin you don’t have to poke the flag on each door - but just press the button and all the doors are closed.))
Actuator installation
The first thing you need to do is remove the handle; you will need to unscrew the three mounting bolts.
After opening the door handle, the trim is also removed.
The second door needs to be disassembled to the same condition. Now we begin to remove the door trim.
To remove the upholstery, pry it off with a screwdriver.
To secure the actuator, drill holes and screw in self-tapping screws.
The photo shows the drilling locations. The actuator rod is secured with a clamp to the lock rod.
The process of installing the actuator on the front or rear doors is no different except for its installation location; in this case, we will consider installing the actuator using the example of the rear door. The drives are installed vertically at the bottom of the door under the locking rod. For fastening, the existing door holes and the strip included with the central lock are used.
If the hole has a large diameter, then you can use a washer or metal plate with a 7 mm hole in the center for fastening. For fastening we use M6 screws and nuts. We pull the wires of the harness through a rubber tube through which the wires pass to the red lamp at the end of the door.
Step-by-step instruction
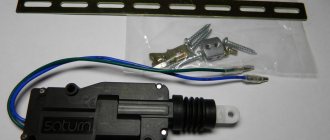
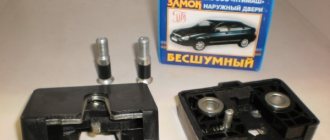
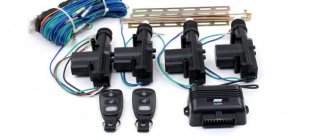
Defense System Kit
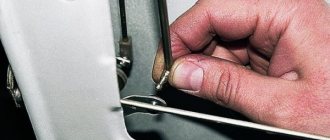
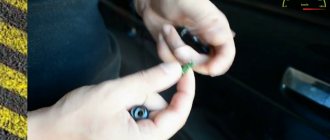
Due to the extra time spent, car owners often refuse to install activators in the rear doors of their vehicle. However, this procedure is not complicated. Initially, you will need to remove the retaining spring. You can do this in 2 ways:
- removing the lock,
- using a thin, slightly bent screwdriver without removing the lock.
Otherwise, due to the tight movement of the rod, the activator will not be able to cope with the load placed on it. The electrical wire must be installed in the area of the mechanical lock. To do this, you will need to make a hole to fix the back of this installation and 2 holes for the plate. The electric drive can be positioned in the opposite direction. In this case, installing an alarm system on a VAZ 2107 with your own hands involves the use of 2 plates.
The activator rod is fixed to the rod using bolts. As for laying the wire itself, this will require making a hole in the rear doors, the diameter of which will coincide with that of the rubber bushing. This should be done 95-100 mm lower than the lower part of the upper hinge of the rear door. You will also need to make a coaxial hole in it.
Next, install the wires under the hood. They need to be laid through a seal. To do this, a hole is made in the place where the headlight hydraulic corrector tube passes. The siren and limit switch are mounted on a slightly bent mounting plate.
The luggage compartment limit switch provides for sawing off the mounting plate and the electric drive for opening the trunk itself. When attaching the limit switch, it is not recommended to completely unscrew the nut. Otherwise, it will be difficult to lock the spring back. To install it, a slot is made in the trunk lock. The electric drive should be secured to the trunk lid. A flexible cable can be used as a connecting element.
Installation instructions
Installing a central lock in your car is done as follows:
- First you need to disconnect the battery and dismantle the car door trim and dismantle the power windows. Having done this, you need to choose a place to install the activator. This element can be installed in any position; it is important that there is plenty of space for the device to operate so that the draft can pass freely. It should also be taken into account that the rod should be connected most conveniently.
- The activator must be mounted on the most flat surface. If you allow even a slight misalignment, which can occur as a result of fixing the device on an uneven surface, this can cause difficulties in the operation of the gear shafts. When installing the device, you will need to use washers or bushings to ensure leveling of the surface. If the element gets into a hole in the metal of the door, a special plate should be included with the activator; use it.
- Since the design of the “ten” doors is unique, the rod itself must be bent correctly before installation. The bend angle itself should be minimal and preferably the most precise. If the angle is close to the arc itself or the distance from the rod to the element lock is too large, problems will arise in the operation of the central locking system. The system will not increase power to move the rod, but will give this force to overcome the bend of the arc.
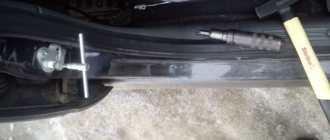
- After installing this element, wires are laid from each door to the place where the control unit will be installed. Wires should be routed at the bottom of the doors so that they are not exposed to power windows or other moving body components. The wires at the connection points must be well insulated, otherwise moisture may cause the system to short out. To lay the wiring between the doors and the body, there are special rubber corrugations - the wires need to be routed through them. When laying wires in the doors, make sure that they do not break when closing.
- The next step is to install the block. As a rule, the unit is placed either behind the center console or in the car door. It must be taken into account that the block must be located in a place that is difficult to reach for an attacker, but this place must be dry and protected from moisture. Therefore, if you decide to install the central locking unit in the door, then under no circumstances should you place it below, since moisture and dirt usually accumulate here. After some time of operation, these factors will lead to the fact that the unit will not be able to operate normally. Also, when installing the block, pay attention to the fact that its operation should not be interfered with by the window regulators, and the block itself should not interfere with them.
- After installing the unit, the wiring is connected; for this, the connection diagram for the VAZ 2110 central locking is used, which should come complete with the system. After connecting, check whether the central locking works correctly. If the solenoid does not have enough force to open the rods, you need to find the cause and get rid of the malfunction (the author of the video is the SIMPLE THINGS channel).
Causes of malfunctions
If the central locking stops working, you must first check the fuse box. Short circuits and various disturbances often occur in the central locking system, which leads to blown fuses.
Checking system fuses
The central lock does not operate when the battery is completely discharged. To check, you need to open the central locking with the key and try to start the car. If it does not start, then the reason is the battery is discharged.
The reason why the central locking system does not work may be due to a breakdown of the electronics. You can open the car without a key using the key fob. If the central locking does not open with the key fob, you should check the batteries and buttons of the key fob. They may stick and not work at the right time.
Conclusions, purchasing a central locking system with remote control and other useful information
In order to install a central lock that will close all doors when turning the key, you should purchase a separate central locking unit (small “black box”), as well as a special master activator (5 pins) for the driver’s door, or also for the front passenger door (where there is a lock cylinder and the ability to open the door with a key).
In this case, there is no need to install an alarm, and the process of installing and connecting the actuators is similar to the example above. The only differences are that you will have to lay additional wires for the driver’s door electric lock, and also “figure out” the connection diagram for the central locking control unit.
Central locking with remote control for 4 doors
You can also buy a separate remote control central locking kit . This set already includes a central locking control unit, 4 activators, wires, fasteners and 2 key fobs. A universal kit will cost about 1000 rubles.
Where can I buy? You will not find such a kit in retail stores at the price mentioned above. To do this, use sites that sell electronics and other devices directly from China. Try not to deal with intermediaries, but order directly.
We recommend Aliexpress.com, but be careful with sellers and look at customer reviews. As an example, Universal Car Central Locking System.
The site is entirely in English, so if you do not speak it well, use Google Translator or another similar one to translate into Russian.
If you have any questions about installing central locking, or would like to learn more about how to buy on this or similar sites, write to us using the “contact” form (at the bottom of the page). We will try to answer.
Installing a central lock on a VAZ 2107
Before installing the central lock on your car, you should check its operation. This will help save time on installation/disassembly of parts if they turn out to be defective. And it will be possible to return the defective item to the store only if the product is not dirty and has no signs of use. Work must begin by removing the ground terminal from the battery. Next, you need to remove the window handles and door cards from all four doors. The control unit is installed in the cabin and secured with self-tapping screws. There are only two places to place it:
- under the dashboard;
- to the left of the driver's feet on the side wall of the cabin.
The second option is simpler, as it does not require additional work to remove and install the dashboard. The actuators must be secured to the internal elements of the doors so that their rods run parallel to the lock rods and the distance corresponds to the length of the clamps. The stroke of the actuator rods should be approximately 4 mm greater than the stroke of the lock drive rods, and the central positions must be aligned. Adjustment is made using clamps that can hold the rods in any arbitrary position relative to each other. The actuators are mounted on self-tapping screws, the holes for which must be marked and drilled with a drill. Instead of self-tapping screws, you can use rivets, which provide a more reliable fixation. However, when replacing actuators, you will have to drill out the rivets and install new ones.
Important: the actuators must be installed so that they do not interfere with the operation of the power windows!
All elements of the central locking system are fixed; all that remains is to route the wires correctly.
Central locking diagram for VAZ 2107
The actuator wires are routed inside the doors and lead to the control unit. The wires must be routed out of the doors through a protective corrugated tube. The power supply of the control unit must be connected to the positive wire of the battery. You can connect the “plus” from the ignition switch or fuse block, for example, from the terminal of the fuse that powers the clock. When connecting the unit to the ignition switch, it is necessary to install an additional 10A fuse to protect the circuit from overloads. When the VAZ 2107 central locking connection is complete, all that remains is to connect the minus to the battery and check the operation of the device. If everything works fine, you can put the door trim back in place and use the car.