- 18-12-2014
- 100 256
Depending on the configuration, the layout of the Lada Kalina stove may vary. In one case, the design of the ventilation and heating system is simple and reliable, in the other, temperature control in the car interior is controlled by automation and electronics. Let's look at the operating principle of the Lada Kalina heater in different modifications.
Heater device Lada Kalina
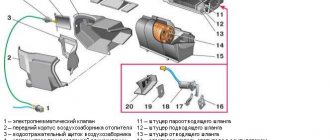
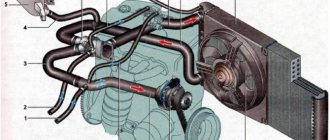
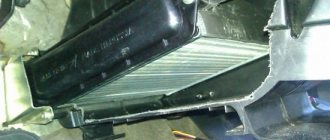
Air from the street enters the air intake through the air filter. The air is then forced into the ducts by an electric fan. The interior is heated by a heater (heater radiator), which is installed under the panel. When the engine is running, heated coolant circulates through the radiator, heating the air passing through it. The amount of air passing through the radiator and bypassing it is set by the central damper. The fan speed is adjusted, as well as the heater dampers are controlled using a control unit installed on the panel.
1 — heater fan electric motor; 2 — heater fan casing; 3 — air recirculation damper; 4— air ducts; 5 — heater casing; 6 — inlet pipe of the heater radiator; 7 — heater radiator outlet pipe.
The Lada Kalina heater dampers are controlled by a mechanical control unit. When the handles on the block are rotated, the rods are wound/unwound on a special roller inside the control unit. The rods have the following purpose:
- Recirculation flap drive rod.
- Drive rod for the heated windshield flap.
- Leg heating flap drive rod.
Thus, the Lada Kalina stove dampers are controlled mechanically without the use of automation. The only electronic part in the design is an additional resistor, which, depending on the position of the handle on the heater control unit, determines the fan rotation speed. This operating principle is very simple and reliable.
Fan replacement
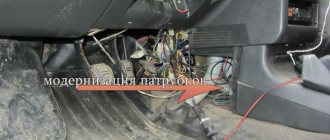
The most convenient way to get to the unit is from the passenger seat, which will have to be dismantled so that you don’t have to do acrobatics inside the cabin. The chair runners are held in place by 4 13 mm nuts; unscrewing them is not difficult. Further work on replacing the fan is carried out in the following sequence:
- Remove the cabin filter and remove dirt and dust from the opening.
- Unscrew 4 screws located on the back wall of the glove compartment, and another one under the right heater grille.
- Remove the plastic cover from the stand and unscrew the 2 screws that secure the panel and the blower unit.
- Remove the blower unit, lift the plastic panel and loosen the 2 fan mounting nuts underneath it.
- Move the dashboard as far back as possible and secure it. The turbine must be removed from below, from a lying position.
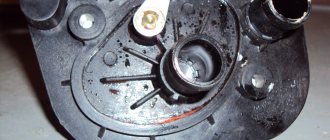
You should not rush to change the fan when it only works at speed 1 and the heater switch is at maximum. This is a sure sign that the resistor located below the glove compartment has failed. The part is a small green plastic panel with a connection connector. Replacing the heater resistor is carried out without any disassembly; you just need to disconnect the connector and unscrew the 2 screws that secure it to the body.
Basically, troubleshooting the Kalina stove is not a difficult job, but very labor-intensive. To change a small part, you need to spend time disassembling to get to it.
Climate control Lada Kalina Lux
The system design is similar to that described above, with the exception of some details. To maintain a given temperature in the cabin, two new elements are used in the design: a temperature sensor in the cabin (built into the ceiling light) and a damper micromotor reducer. Also, the mechanical control unit has been replaced with an electronic one, with degrees of air temperature in the cabin marked on it.
The operation scheme is as follows: the control unit periodically receives a signal from the temperature sensor in the cabin and compares it with the temperature set on the unit. If the difference is too large, the control unit sends a signal to the micromotor gearbox, which already controls the heater dampers (opens or closes hot air from the heater).
- Heater for Lada Granta - troubleshooting methods and instructions for replacing the device
Interior ventilation of Lada Kalina
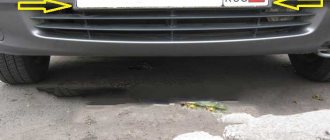
Air is extracted from the passenger compartment in all trim levels due to the vacuum generated near the rear of the body when the car is moving. Exhaust deflectors are built into the body under the rear bumper.
See also other reviews of Lada Kalina.
Keywords: Lada Kalina stove | air conditioner Lada Kalina | air ducts Lada Kalina | Lada Kalina filters
The vehicle's heating system must work properly. It is not difficult to achieve uninterrupted operation of the stove if you know the structure of the Lada Kalina stove. The heater creates a comfortable stay in the car interior, creating visibility for the driver. The stove design provides for the use of small-class machine options. The production of Kalin cars began over ten years ago. The following options are included for the base model:
- Anti-lock braking system.
- Airbags.
- Electric power steering.
New Lada Kalina models were developed, which were already equipped with additional options:
- Electric door window lifts.
- Reliable heater.
- Heated seats.
- Interior air conditioning device.
Kalina heater diagram
The Lada Kalina heater device is designed for heating and cooling the car interior. If the car does not heat up, the windows fog up, or you feel discomfort, then you need to test the performance of the heating system. Understand the functioning of the stove on Kalina.
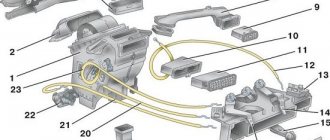
General layout of the Kalina stove
The location of the stove was designed for easy installation of an air conditioner. The system is simple, but at the same time quite reliable.
- Left side flow outlet.
- Left air duct.
- Heated side window.
- Air flow splitter.
- Stove.
- Right ventilation duct.
- Right side flow exit.
- Bottom heating duct.
- Interior heating duct.
- Central outlet of ventilation flows.
The supply and exhaust principle is used. The air masses inside the car are heated using a special liquid, which simultaneously cools the engine. The operating principle of the Kalina stove is based on the fact that the liquid warms up the radiator, where heat exchange occurs, and the heated air passes into the cabin through the air ducts.
- How to install an additional interior heater for UAZ “Patriot”
If we analyze Kalina’s heater, the operating principle and the heater circuit will differ in configuration. The first option has a simple and reliable design. And in the other - full electronic control. The air passes through the filter into the air intake, and then the fan blows further through the system. The engine is running and warmed up. Antifreeze moves through the system in which the heater radiator is involved.
The amount of air that is heated by the stove radiator is regulated by a damper. Controls the operation of the fan and dampers by a unit located on the central panel.
Heating device control unit
- Temperature regulator. We change the heating of the air flow by turning the knob. The blue zone produces cold air, the red zone produces warm air.
- Fan speed switch. By turning the knob clockwise, the intensity of the air flow is adjusted. Choose one of 4 fan speeds.
- Air flow separation selector. Distributed in specific areas:
The flows pass through the upper part of the cabin.
The air is directed downwards.
Air flows are directed onto the windshield and down.
- Reasons why the stove in Gazelle Business does not heat. Fix it yourself
Air flows are concentrated in the area of the windshield, as well as the side ones.
- The handle that controls the recirculation of cabin air. We turn on the mode when driving off-road or in a traffic jam. Used for a short time, the glass fogs up.
- Rear window heating mode switch.
We regulate the direction and saturation of air flows through aerodynamic devices. We turn the guide blades and change the position of the dampers to achieve the desired air direction.
Interior ventilation of Lada Kalina
The outlet pipes are located in the car body under the trunk. The heater is located under the dashboard. The air flow enters the car interior through an intake, which is designed in front of the windshield in the engine compartment. The air enters through the filter and is accelerated throughout the cabin under pressure created by the fan.
1.Pipes for supplying air to the rear of the cabin.
2.Side ventilation nozzles.
3.Blowing the side windows.
- Windshield blower nozzle.
5-6-7. Central deflectors for flows entering the car interior.
We direct the supply air through the deflectors by turning the handwheel. If we turn it up, the flap opens and vice versa. You already understand how the stove on Kalina works.
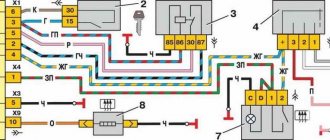
Electrical diagram of the Kalina stove
- Relay with fuse assembly.
- Mode switch.
- Resistor.
- Electric stove motor.
- Egnition lock.
A. To the power source.
Design solutions.
Replacing the heater radiator on a VAZ-2110: the difference between the new model and the old one, article numbers, where the heater radiator is located
The appearance of the Kalina corresponded to fashionable trends at that time; biodesign was very popular in the 90s, thanks to which the front of the car turned out to be “cute and smiling.” Thanks to its smooth lines and rounded shapes, the car looked quite modern and harmonious, as evidenced by the fact that it was in demand not only in Russia, but in countries such as Germany, for example.
In addition to the exterior, the designers abandoned previous interior developments, which did not at all match the appearance of the car. This is how the updated interior appeared, which was designed using the latest equipment in mathematical models. The spaciousness and ease of seating of the Kalina were many times higher than the level of previous models.
They didn’t skimp on Kalina’s interior design at all, as a result of which the interior turned out to be not only modern, but also very ergonomic.
Let's move on to specific examples. One of them is the seatback tilt adjustment mechanism. These mechanisms are manufactured by the German company Keiper, which specializes in the development of these units. This is not the only example of the participation of foreign companies in the development of the Kalina’s interior; the seats were also designed with the help of other foreign companies.
In the late 90s, the Kalina filling differed in many ways from its relatives:
- instrument panel lighting with LEDs;
- electric reverse gear lock;
- factory air conditioner, which could regulate the temperature itself;
- light switch;
- new generation headlights;
- recirculation of the heating system and ventilation system.
The design of the platform is what really did not give the designers freedom of action. The steering rack is located quite high and is attached to the engine shield. Because of this, it is problematic to balance the driving performance of the car. By experimenting with the suspension, Kalina managed to give it precision when cornering, unlike the VAZ-2110.
At first, the Kalina was equipped with an eight-valve 1.6-liter engine.
However, everything can't be perfect!
The first cars became famous for the fact that up to 50% of their power steering units were faulty, they simply failed! This significant flaw caused a lot of noise among the people, because there were cases when cars turned completely in the wrong direction.
Later, of course, this defect was corrected by the Kalina designers. The front of the production car was slightly modified, but the light and smooth steering wheel was appreciated (mostly by women). Electric power steering instead of hydraulics is the right solution for Kalina.
Thus, through experiments with the internal and external appearance of the Kalina, by 2001 it had acquired its final form. The changed appearance of the Kalina was very reminiscent of the Opel Corsa, and the sedan was similar to the Chevrolet Corsa.
Ultimately, the designers came up with a car tailored for the B-class. It could be compared to the Fiat Palio and Renault Symbol. However, Kalina turned out to be more affordable in its price category and more compact.
So, VAZ managed to create a new generation car, which was different from its predecessors in almost every way, even though the platform was not the first freshness. In Kalina-2, which is successfully used today, a fairly large number of technical solutions remain from the old version of Kalina.
Checking ventilation and stove Lada Kalina
Car owners claim that Kalina’s heater heats much better than previous VAZ models. It sometimes breaks down and requires repair. Do a full system diagnostic to ensure it's working properly.
- We start the car engine.
- Turn the left handle counterclockwise and place it in the blue zone.
- We place the fan speed switch in each of the 4 positions one by one. If the fan does not rotate in one of the positions, then check the power supply circuit of the device.
- Turn the speed controller to maximum.
- Using the right handle (damper control) we check the redirection of air flows. If we notice that there is no change, then the damper drive needs to be repaired.
- Warm up the engine to 90°C. Turn the left handle to the extreme position of the red zone.
- The air that comes out of the panels should blow warm air.
- Return the left stick to the blue zone. Cold air will come out of the nozzles again.
- If the temperature of the air flow does not change due to a change in the position of the regulator, then the control of the central damper drive is faulty.
The car owner may not immediately understand that the Kalina interior heater, the circuit of which is simple, is damaged. You constantly add antifreeze in small quantities, and the carpet in the cabin is dry and there is no smell of antifreeze. A stove leak does not appear immediately, and the main thing is that the liquid can evaporate. The radiator on Kalina does not have pipes leading into the cabin that could leak.
Signs and causes of gear motor failure
There are two signs of a gearmotor failure on a Priora. Here they are:
- when starting the heater, a loud grinding or knocking noise is heard from under the dashboard, which becomes louder as the heating fan speed increases;
- inability to adjust the oven temperature. The heater blows either only hot air or only cold air. The position of the temperature regulator on the dashboard does not matter in this case.
All of the above happens for very specific reasons. Here are the most common of them:
- one or more teeth on one of the gear motor gears has broken. The tooth fragments rotate together with the damaged gear and hit the plastic housing of the gearbox from the inside. As a result, a characteristic dull rattle or knock occurs, which is clearly audible in the cabin;
- The gear motor burned out. This usually happens due to sudden voltage surges in the on-board network. For example, when the battery in a car died and the driver tried to “light up” from another car, but at the same time mixed up the contacts;
- There were problems with the power supply to the motor. The gearbox itself and its motor may be in good working order, but electricity is simply not supplied to the gearmotor. This can happen for a variety of reasons, but the most common is a blown fuse that supplies power to the gearmotor.
Possible heater malfunctions
Your stove is not working or is not heating well. Look for the cause of the problem. The fan does not work or the heater radiator is leaking - obvious breakdowns that occur at any time.
Stove control unit:
- The engine was warmed up, but warm air did not enter the cabin.
- The damper drive cables may have come off. The only solution is to remove the console.
Dampers . Partially open or close. The rubber seal has come off in the air duct or foreign objects have gotten into it.
Antifreeze circulation . Start the engine and check the level in the expansion tank, and also check for any disturbances in the normal flow of antifreeze. Possible reasons:
- Pump. Cannot be repaired, only replaced.
- The cooling system is clogged. Clean or rinse.
Checking the thermostat . Warm up the engine to 75°C. If the upper pipe is cold, then the thermostat does not work correctly and does not allow coolant to move in a large circle. Replace the device.
Air lock . Remove the plug from the vehicle's engine cooling system.
Temperature sensor . Constantly blowing cold or hot air. If cleaning the contacts does not help, then replace the non-working temperature sensor.
Air filter . If the air flow is weak and there is no desired temperature, then replace the filter. Be sure to check the heater resistor, which controls the rotation of the fan and is located under the glove compartment.
Electric fan . The device does not turn on regardless of the selected mode. Check the fuse that controls operation. If the fan is turned on and its operation is accompanied by strange sounds, clean or replace it.
Dampers . It is difficult to determine the breakdown unless you replace the dampers themselves.
The cause of a heater malfunction may be a depressurization of the car's engine cooling system. The types of breakdowns described above cause malfunctions in the operation of the Lada Kalina car's stove. Such breakdowns do not require special knowledge; they are easy to understand and repair.
Summary
The Lada Kalina car is available with a ventilation and heating unit or with an air conditioning unit. For the first option, it is impossible to provide a cabin climate whose temperature will be lower than the ambient temperature.
The heating system in the cabin of the budget Lada Kalina model can significantly increase comfort for the driver and his passengers. It ensures that the required temperature conditions are maintained inside the car. Along with such useful options as:
- "ABS";
- airbag;
- electric power steering;
- electric front windows;
- front seat heating function,
The design of the interior heater allows the manufacturer to achieve a fairly acceptable level of equipment, which is very worthy for a small-class Lada Kalina model and makes it competitive among its rivals in this segment.
Heating system composition
The operating principle of the heater in the Lada Kalina is very simple. It is built on a supply and exhaust circuit. The heater circuit contains:
- cabin air filter;
- air ducts;
- heater radiator;
- electric fan;
- air flow and fan operating mode control module.
The design of the interior stove looks exactly like this, and is located behind the dashboard and only the system controls are present on its front surface in the Lada Kalina cabin. A running engine generates heat, which is removed from it by the cooling system. This circuit includes a heating radiator. The circulating liquid heats the honeycombs, from which the warm flow is directed into the cabin by means of a fan. Adjustment of the required temperature, strength and direction of the air stream is carried out using the handles and dampers present in the cabin. Sometimes the dampers need to be adjusted.
The air taken from the external environment initially passes through the intake element located on the hood at the bottom line of the windshield of the Lada Kalina. Next, the air rushes to the filter component and is supplied inside the cabin space by means of a fan.
The fan can operate in 4 different speed modes. The adjustment is carried out using the corresponding knob on the device, and the switching itself is possible due to the presence of a resistor block in the control module.
Lada Kalina errors on the instrument panel
Replacing rear brake pads Kalina video
Idle speed sensor Lada Kalina
Video
Tools:
- Open-end wrench 10 mm
- Open-end wrench 13 mm
- Open-end wrench 17 mm
- Medium Phillips screwdriver
Parts and consumables:
- Gasoline/kerosene
- Rags
- Sealant
- Automotive compressor
- Cylinder head cover gasket (if replacement is needed) -2108-1003270-10
Read more: KAMAZ air filter element
The crankcase ventilation system of the VAZ Lada Kalina 1118 tends to accumulate tarry deposits from crankcase gases, which make it difficult to remove these gases into the engine cylinders for combustion. Because of this, the gas pressure inside the engine increases and oil leaks through the seals appear. We recommend cleaning the crankcase ventilation system before each oil change.
1. Remove the decorative plastic engine cover.
2. Loosen the clamp and disconnect the hose of the large branch of the crankcase ventilation system from the air supply pipe.
3. Disconnect the second end of the large crankcase ventilation system hose from the fitting on the cylinder head cover and remove the hose.
4. Similarly, remove the hose of the small branch of the crankcase ventilation system by disconnecting it from the fittings of the throttle assembly and the cylinder head cover.
5. Remove the supply hose of the crankcase ventilation system by disconnecting it from the fittings of the cylinder block and the cylinder head cover.
How to diagnose a heating system in Kalina?
Before performing a diagnostic procedure, you will need to carefully study the diagram. You should only try to check while the engine is running.
- The temperature regulator, located on the control unit in the cabin, is installed in the extreme left position. We activate the fan and observe hot air entering the cabin through the deflectors. Gradually moving the handle to the right until it stops, we reach the exit of the cold air stream.
- Checking the speed should begin by setting the appropriate knob to the minimum speed position. If the fan and its control module are working properly, then the force of the air stream should increase as the handle is moved to subsequent positions (and so on until the 4th speed mode, corresponding to the maximum number of revolutions).
- We check the dampers. Here we move the temperature level regulator to the maximum to the left position. We move the fan speed switch to the position corresponding to the 4th speed. The check itself boils down to smoothly moving the damper regulator between the extreme positions. This should be done in order to feel the adjustment in the direction of flow. By moving the temperature regulator to different positions, we observe a change in the degree of heating of the incoming air.
List of faults in the heating circuit
If the owner of LADA Kalina suspects the presence of any deviations from the normal functioning of the heating system, then the diagnostic procedures below will be required.
- The first step is to make sure that there is a sufficient amount of antifreeze in the cooling circuit.
- Next, check the integrity of the fuse.
- We make sure that the fan speed regulator is working properly.
- A weak air flow through the deflectors indicates the need to check the condition of the filter component.
- If there is no warm flow into the cabin when the engine is warm, then there may be air pockets in the cooling system or the dampers in the air ducts are jammed.
- A faulty temperature sensor will cause only hot or, conversely, cold flow to enter the cabin.
- Among the common reasons is depressurization of the LADA Kalina cooling system. Sometimes this may be due to the loss of tightness of the heater radiator itself. At the same time, antifreeze will enter the cabin, giving itself away as a specific smell and wet decorative floor covering. In order to detect a leak in a timely manner, it is necessary to monitor the level in the expansion tank frequently.
Let's sum it up
The heating system is simple. Timely diagnostics can save the owner of a LADA Kalina from unexpected breakdowns; the heater circuit will also help with this. Monitor the level of antifreeze, change it according to the regulations, and the system radiator will serve its regulated life, delighting you with warmth and comfort in the cabin.
Find out the cost of repairs
Repair work?
Why do clients choose us?
Heating and Repair
We have the best prices!
These system elements are very important. Therefore, the compliance of each part of the system must be carried out deliberately. The garage heating assembly has certain parts. The heating installation includes air vents, fasteners, pipes, a connection system, manifolds, batteries, thermostats, an expansion tank, pressure-increasing boiler pumps. On this tab we can select the necessary structural components for your cottage.