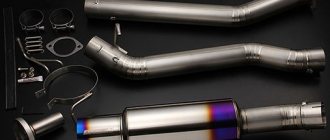
Timing belt VAZ 2109
The VAZ-2109 car was produced for many years by various factories in the Soviet Union, Russia, CIS countries and abroad from 1987 to 2011. All parts and mechanisms of the car are subject to wear and tear as they are used. This includes the timing belt on the VAZ 2109. The reason for this may be poor-quality and careless installation of the belt during timing assembly, wear of associated parts, or poor quality of the belt itself. Standards require belt replacement every 60-65 thousand km or after 4 years of operation.
It is very important to know and understand!
In conclusion, it is worth saying that a timing belt break leads to a major overhaul of the entire engine. Because this is where the valves and pistons hit, and they begin to bend. That is why you should check the part at a certain interval of time in order to immediately identify defects and malfunctions; if they exist, immediately replace the timing belt itself and all components, do not wait until something irreparable happens. And also correctly set all the marks on the VAZ 2109 timing belt, and carry out the tension correctly. In another case, it can scroll, and if it is too tight, it will easily break off, while having a strong impact on the rest of the engine. Even a novice driver can perform all the work presented; the main thing is to study everything carefully and set the marks correctly so that there is no malfunction of the gas distribution mechanism. After all, the good operation of the car engine will depend on this.
Timing belts
This important car part is produced by various companies - BOSCH, AMD, CONTITECH, DAYCO, FEBI, GATES, HEPU, INA, NTN-SNR, OPTIMAL, RUVILLE, SKF.
Both repair kits - belt and rollers, and each part separately are available for sale. Prices vary depending on the manufacturer and place of sale:
- The GATES repair kit for the VAZ-2109 costs approximately 1,100 rubles.
- Contitech - 1250 rubles.
- “BRT” (158 RU) - 1000 rubles.
The repair kit includes a belt and a tension roller. The belts have one side (top) flat, the other in the form of oval teeth. The surface of this side is figuredly corrugated. There should be no tears at the base of the teeth. You should buy only branded belts; fakes pose a hidden threat.
The original differs from a fake, first of all, in packaging. The box must be made of high-quality cardboard, neat, with clearly printed inscriptions. The original box has a transparent sticker on which is printed a list of engines for which this repair kit is suitable, a diagram of the assembled drive with all the pulleys and rollers, the number of teeth on the belt, and a QR code.
Using it, you can go to the company’s website and get all the detailed and reliable information about the product. For example, the Contitech box has the article number CT527 printed on it.
On counterfeit boxes, all information is printed directly on the cardboard of the box. On the original box it is clearly written in which European country this belt was made. The spare part in the box is packed without kinks or kinks. The tails of the cord stick out along the edge of the belt.
Originals and fakes from other companies are checked using the same criteria. GATES packages have a security hologram. Article number 5521XS-111x, which means that the belt is reinforced, 111 teeth. The company logo is printed on the belt and roller.
This table shows the original repair kits with the article number and approximate cost.
| Name | vendor code | Cost in rubles |
| Timing belt VAZ-2108-099 complete with GATES roller | K015521 | 1250 |
| Timing belt “GATES” REINFORCED VAZ 2108 / 2110 8V | 5521XS | 1500 |
| Timing belt VAZ-2108-099 BRT | 111Z | 550 |
In addition to original timing belts for the VAZ-2109, many car owners prefer to buy their analogues, which are in no way inferior in quality. The table shows analogues of belts and their approximate price.
| Name | vendor code | Cost in rubles |
| CONTITECH | 111ZCT5272108-1006040-10 | 300 |
| BOSCH | 1 987 949 139111Z | 400 |
| GATES | 111Z55212108-1006040-10 | 350 |
| OEM (Luzar LTB 0108) | 2108-1006040 | 500 |
The need to replace the timing belt
If the tension roller is installed incorrectly or the belt tension is too strong, its pin is deformed, the roller tilts slightly, and the belt slips. It may begin to cling to protruding parts of the machine. If suspicious places are found on the belt - deep scratches, abrasions, dents or tears in the teeth - the belt must be replaced immediately.
There should be no traces of oil on it. Firstly, this indicates a seal leaking somewhere, and secondly, the belt itself is in danger. If the belt breaks while the engine is running, the timing valves may collide with the pistons and bend. And on a VAZ-2109 with an 8-valve engine, if a belt break happens on the road, then this situation will not be fatal for a skilled driver. You just need to know what actions to take in this case. And, of course, it never hurts to have a spare timing belt.
Preparation
The presence of at least one of the points listed above forces the car owner to prepare for repair work. Replacing the VAZ 2109 timing belt does not require special conditions (inspection hole, overpass), complex tools, or expensive devices. It is enough to have a flat area, good lighting, the usual set of open-end and socket wrenches (including a cylinder and spark plug), a flat-head screwdriver, a jack, a spare belt, and a tension pulley. The only exception is the adjusting device for turning the eccentric around the axis and then securing it with a nut. If there is no tension unit, screws of the appropriate diameter are inserted into the holes to help keep it from turning with a screwdriver. It is more convenient to carry out the event together. The assistant can be useful for pressing the brake and clutch pedals, changing gears, and organizing convenient lighting. You should remember the differences in the designs of the VAZ 2109 car with a carburetor and injector.
Procedure
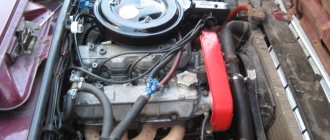
The car must be put on the brakes and engaged in fourth gear. The first step is to place a jack, lift the car and remove the front right wheel. This will provide access to the area required for maintenance. Then you should remove the boot cover from the timing drive mechanism. It is secured with three 10 mm socket bolts.
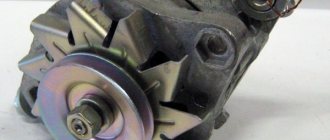
This gives access to the generator pulley. It also needs to be removed. This is not always easy, as the nut often rusts and gets stuck.
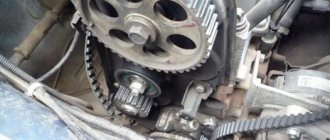
With the alternator pulley removed, access to the timing belt is available. After carrying out these operations, you should check the coincidence of the marks on the timing sprocket (the mark in the form of a bump) and the slot on the housing. If there is no match, then they must be combined. This ensures control of the engine's top dead center.
Now you can remove the old belt. After removing it, you need to set the timing marks on the gear on the crankshaft and on the car body. If it is inconvenient to turn the crankshaft, you can engage fourth gear and push the car forward a little.
After completing this operation, you can install a new belt. There is a special roller for tensioning it. It is usually sold complete with a belt. If the old roller looks worn, it must be replaced with a new one.
Due to the presence of eccentricity, turning the roller ensures belt tension. The rollers of the new design have two holes on the plane; pins are inserted into them, and a lever is installed between them, with the help of which the tension roller is turned. The rollers on the VAZ-2109 carburetor have a 36 mm nut, due to which the roller was turned using a spanner.
The normal belt tension is determined manually. With light force, the plane of the belt can be rotated 90 degrees with two fingers. After tensioning, the roller is fixed with a 17 mm lock nut.
After the timing belt is properly tensioned, the alternator pulley is installed in place and the alternator pulley is fixed; the alternator belt should be carefully pulled onto it. After this, the timing belt protection and the right wheel are installed. Then the car starts and if all the symptoms that were on the old timing belt are absent, then the job is done successfully.
Replacing a timing belt is considered a rather difficult job, but quite accessible to an averagely qualified mechanic. In the end, it must be said that in order to prevent situations of rupture or unexpected wear of the belt right on the road, it should be replaced in a timely manner and preventive maintenance of the car should be carried out.
Step-by-step replacement instructions
The VAZ 2109 car is designed in such a way that if repair work is necessary, it can be carried out by the car owner himself. The process of changing the tensioner roller is quite simple, and it will take no more than 1.5 hours.
Step-by-step instructions for carrying out technical work on the timing system:
- Park the car. It is best to use a garage with good lighting.
- Next you need to turn off the engine. Wait about 10 minutes for the engine to cool down.
- Using a ratchet wrench, unscrew the timing belt cover.
- Use a special wrench to loosen the belt tensioner.
- Then unscrew the drive pulley.
- Turn the belt half a turn, during which you carefully remove it.
- Next, using a spanner, you need to loosen the bolt that secures the position of the tensioner.
- Then release the tensioner from the pressure in the spring.
- Next, you need to replace the spacer rings and washers, if such are used in the engine of your modification.
- Replace tensioners.
- Once the rollers have been installed and their position has been adjusted, you can begin reinstalling the timing belt.
- It is necessary to align the shaft and generator gear so that the mark in the form of a strip on the gears is directed towards the clutch generator.
- Then you can put on the timing belt.
- Then adjust its tensioner. If the vehicle is equipped with a modified timing belt, the owner will have to adjust all the tensioners at the same time, tightening them half a turn clockwise. Then move counterclockwise to the next one. Continue this way until all the rollers are tightened.
- After assembly is completed, you need to start the engine.
- Then you need to observe the movement of the belt. If there is play in it, it moves with distortions, makes noise, or creaks, then additional adjustments need to be made.
- After the test start, you need to start the engine again and let it run for about 10-15 minutes. Then turn off the car engine and check the battery charge level. If its voltage is normal, then all work has been completed correctly.
hidden spring roller
roller with external spring design
If, after the work carried out, the car owner has no complaints about the operation of the engine, then the process of replacing the timing rollers in the engine is over.
Malfunctions after replacing timing rollers
In most cases, after replacing the timing belt tensioners, the car owner does not encounter any problems. However, as practice has shown, malfunctions can manifest themselves after some time.
Malfunctions and solutions:
Fault 1: The battery does not charge well; after several hours of inactivity, the car does not start. Voltage drops are also observed in the on-board electrical network.
Solution: Most likely, when installing the timing belt, the driver incorrectly adjusted the position of the shaft gears in relation to the generator gear. As a result, malfunctions in the on-board network began to appear. They arise due to the asynchronous operation of the gears described above. To eliminate this problem, you just need to debug the position of the shaft gears and the generator. After additional configuration, the problem goes away.
Malfunction 2: After replacing the rollers, the timing belt cracked or even broke.
Solution: In most cases, this problem occurs when a modified timing panel panel is installed. Such breakdowns occur due to the fact that the position of the rollers was not calibrated, as a result of which the belt was overtightened. To eliminate this problem, remove one of the rollers, then put on the belt. After this, install the removed roller back on the panel. Then adjust its position. The adjustment itself must be carried out using a special wrench, which must be used to tighten additional screws on the tensioner. When adjusting the position of the roller, you should also rotate the belt to ensure that there is no excessive pressure on it.
If any other problems occur in the engine after replacing the rollers, a simple solution would be:
- Checking the position of the drive gears. Most likely, due to inaccurate alignment of the shaft when replacing the roller, the generator gear came loose. In this case, it needs to be tightened.
- If the car owner cannot independently solve the above problems, then it is necessary to contact the official VAZ car repair service.
Despite everything, I would like to emphasize that the VAZ 2109 car, although it is the brainchild of the domestic automobile industry, can serve its owner for many years with proper care.
When replacement is required
The timing belt is responsible for the operation of the gas distribution mechanism.
Try in every possible way to avoid breaking the belt while driving, otherwise this may negatively affect the condition of the engine and the cost of its repair.
The most dangerous is the contact, the “meeting” between two main elements - the piston and the valve. In this case, the unit becomes deformed, requiring expensive restoration of the car.
There are several main criteria that indicate the need to replace the unit.
| Sign of wear | Peculiarities |
| Natural wear and tear | Each element has a certain resource, a margin of safety, above which it can “jump” only in rare exceptions. For timing belts on nines it is 50-60 thousand kilometers |
| Visual signs of wear | If you examine the condition of the strap, if there are any malfunctions, this will manifest itself in the form of defects, cracks, and peeling along the edges. All this suggests that you cannot continue to operate the car with such a strap; replacement is required. |
| Oil or coolant on the surface | Another sign that the strap is outdated and needs to be replaced. At the same time, do not forget to check for leaks in their cooling system and oil channels |
| Retighten the strap | When the service life has not yet come to an end, the strap may still become loose. To eliminate this, it is tensioned. But over time, the tension reaches its limit, the strap becomes overtightened and is no longer able to return to the desired position. For replacement and only |
| Tooth wear | If there are problems with the teeth, when moving, the belt simply begins to slip while the crankshaft rotates. Here you will have to change the gears and the belt itself |
Crack on the strap
Why did you put the belt on the marks but the engine does not develop power?
Such cases are frequent; if you make a mistake by one tooth, the engine will not develop full power. For example, we have jumped a tooth ahead, the engine starts, you give the gas and it barely spins up, but as soon as you turn the distributor towards the plus side, the engine begins to develop power. But according to normal, the distributor should be in the center according to the marks on the distributor, with a slight deviation either plus or minus; this depends on the ignition setting; if the distributor has to be moved to the very edge, then this is a sign that a mistake was made when installing the timing belt.
If you made a mistake back a tooth, the engine will start very slowly, it will feel like it is biting, and detonation will also appear when you press the gas (ringing in the engine).
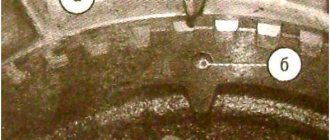
The question arises why this happens, you look at the marks, everything is correct, but the engine is not working correctly, the whole point is that the mark on the tin boot along which the camshaft gear is aligned can be slightly bent both down and up, this is why errors occur.
Photo. Distributor marks with a correctly installed timing belt.
The main thing is that when the belt is replaced and installed correctly, the ignition does not go astray, but this is understandable for carburetor engines with a distributor.
It’s simply impossible to determine this on the injector, since the computer itself adjusts the ignition, but if you feel that the engine is running worse or a malfunction has come on on the panel, try moving the belt to one tooth.
Dismantling
To correctly replace the timing belt, you first need to dismantle the element. The process can take quite a lot of time, although the work itself is not very difficult.
- Remove the casing covering the belt, pulleys, dismantle the tension roller and other elements related to the gas distribution mechanism.
- The cover is held in place by three mounting bolts, so removal should not be a problem.
- Remove the alternator belt. This will give you access to the desired object - the timing belt. To do this, lower the retaining bolt down a little and move the generator towards the engine. This will loosen the belt, making it easy to remove.
- Align the gas distribution mechanism to the marks. First you need to install the crankshaft in the required position. This is done by turning it and looking through the hatch on the clutch housing.
- Stop rotating as soon as the mark on the crankshaft flywheel aligns with the marks on the housing. This indicates that the piston of the first cylinder is at TDC - top dead center.
- Make sure that the mark on the camshaft gear is aligned with the mark on the metal housing.
- Having set the marks, you can begin the procedure of dismantling the old worn timing belt.
- Release and move the tension roller to the side. This will release the tension on the strap. As a result, it can be removed from its position.
- Next you need to remove the belt from the crankshaft gear. To do this, the pulley is first removed.
- There should be no problems with dismantling the pulley, since it is removed this way. First remove the right wheel, turn the steering wheel to the right and you will gain access to the side shield. The shield is removed, and behind it is the crankshaft pulley. Relevant for carburetors and injectors.
- If your VAZ 2109 has an injection engine, you will need to fix the crankshaft to remove the pulley. It is not difficult to do such a procedure. Insert a long screwdriver into the special hatch where the flywheel mark is located. This will lock the crankshaft in the required position, so you can easily unscrew your pulley.
- On a carburetor VAZ 2109, fixation should be performed directly on the pulley.
- Before you begin removing the timing belt, examine the condition of the water pump and tension pulley. You should also check whether the axis of the tension roller and timing gear are in good condition.
- If there is damage, defective elements must be replaced.
- Check the current condition of the camshaft and crankshaft seals.
Dismantling process
Experts agree that when replacing the timing belt, the rollers and pump should also be replaced. But this is a recommendation, not a requirement.
Motorists Council
As practice shows, many experienced VAZ 2110 drivers, who have been driving this particular model for many years now, carry an additional alternator belt with them in the trunk.
This is due to the fact that its breakdown can occur at the most inopportune moment. This node cannot be called the weakest point of the “ten”, but problems may arise with it. And it is better for you to be prepared for such a situation.
Otherwise, you will have to call a tow truck, go to the nearest service station, and pay a lot of money for the services of specialists. Although, if you have a spare alternator belt and a standard set of tools, if it breaks, you would spend literally a couple of tens of minutes and calmly continue driving with a new belt. Because the choice is always yours!
Loading …
Installation
Now directly about how to return a new timing belt to its place. There is nothing complicated here either, but we still recommend watching visual videos and studying the instructions.
- As soon as you have examined the condition of the unit and decided to change something, proceed to assembling the mechanism.
- It is easier to do the work so that all the inscriptions are turned in your direction, that is, towards the right wing of the car.
- Replace the pulley unless it needs to be replaced.
- Next, put on the belt. Moreover, it should be put on the lower gear first, and then on the upper one. Not the other way around.
- Make sure there is no sagging.
- Place the timing belt behind the water pump and tension pulley.
- Tighten the tension roller using a special wrench.
- If you do not have such a key, use a simple key and a screwdriver.
- Be sure to adjust your new strap properly. The adjustment is carried out until the moment when you can no longer turn it at an angle of more than 90 degrees. This is the best option for tightening the strap for the VAZ 2109.
- Turn the pulley several times. This will ensure that the marks on the timing gear and flywheel are in the correct position.
- If for some reason the tags do not match, we have bad news. You will have to remove the strap again and adjust the position again.
Reassembling the unit
The main difficulty in replacing a timing belt lies not in the complexity of the processes performed, but in the time that needs to be spent on repairs.
A competent approach, attentiveness and the use of a high-quality new belt will allow you to easily restore the operation of the gas distribution mechanism and save hundreds of rubles on visiting a car service center.
Installing the water pump and tension pulley
The manufacturer recommends replacing the timing belt along with the pump and tension pulley. In addition, in case of severe wear, the camshaft gear should also be replaced.
In order to replace the pump, you need to perform the following operations.
- Drain the coolant into a container.
- Unscrew the camshaft gear, holding it from turning with a screwdriver inserted into the hole of the gear and pressed against the nut securing the rear cover.
- Remove the gear.
- Unscrew the nut and 4 bolts securing the rear cover and move it to the side.
- Remove the old pump by pulling on the toothed pulley with a screwdriver.
- Install the new part along with the gasket.
- Reassemble everything in reverse order.
- Fill with antifreeze.
Eliminating the problem of timing belt slipping VAZ 2109
In this article, we will look at solutions to the problem of the VAZ 2109 timing belt slipping. As you know, all car parts tend to wear out over time, and sooner or later it becomes necessary to replace one or another worn-out part with a new one. Owners of the VAZ 2109, as well as other front-wheel drive VAZ cars equipped with a 1.5-liter 8-valve engine, often face one problem after replacing the timing belt again.
A new timing belt, installed to replace the old one, begins to be pulled from its normal location in the middle of the camshaft drive gear to its edge by an unknown force, which leads to the drive parts eating up the edge of the belt. This leads to rapid wear and thinning of the timing belt, and as a result, its rapid breakage and the need for another belt replacement. It’s good that on these engines, if the timing belt breaks, the desynchronization of the movement of the valves and pistons does not lead to their mutual collision and engine overhaul most likely does not threaten you. The belt can pull both from the engine and in the opposite direction.
The author, in the process of solving this problem (yes, it did not escape me either), changed 3 belts before solving it, having tried many methods. I will share these methods with you in this article.
Lately, the quality of spare parts leaves much to be desired, so I believe the main reason for belt slippage is low-quality spare parts, in this case the timing belt itself. It may have an uneven structure, stretch differently in different places, and be skewed if there is even a difference in the diameters of its two edges that is not noticeable to the eye. You can determine whether a newly installed belt is crooked by turning it over on the drive and checking its operation in this position. If it pulls in the other direction, the belt itself is to blame.
Also, belt slipping can be caused by play in the coolant pump shaft, commonly referred to as a pump. It is not difficult to determine the presence of play: with the timing belt removed, shake the pump gear by hand. If there is even the slightest play, the unit needs to be replaced, it won’t have long to live.
The next part of the VAZ 2109 gas distribution mechanism drive is the belt tension roller. It is a high-precision device, and even small deviations of the characteristics of its parts from the specified ones lead to deviations from its correct operation. Simply put, if the roller is curved, it will direct the belt away from straight-line movement, and thereby wear out the edge of the belt with its flange.
Some car owners note that belt slippage is eliminated when replacing the camshaft and crankshaft drive gears with new ones. But these gears can reach a similar degree of wear with mileages of 100,000 km or more, so if your mileage is less, this replacement is unlikely to lead to a positive result.
Also, some car enthusiasts point to a solution to this problem with the timing belt by installing an old-style tension pulley, which has a slightly different design compared to the new-style pulley.
1- old style roller
2 - new type of roller
I suspect that such a replacement does not solve the problem of slipping, it’s just that the old-style roller has a side of a different shape and is made of metal (the new one has a plastic side), which causes less friction at the point of contact of the side with the belt and the eating of the belt does not appear as noticeably as in case with a new type of roller.
You can try to pull the roller in the other direction, closer to the camshaft gear. True, in this case the belt will receive a greater bend in its upper part when moving from the camshaft gear to the roller. With the standard method of tensioning it, the roller is located approximately in the middle between the camshaft and pump gears, which in my opinion is more correct from the point of view of the operating conditions of the belt.
There is an excellent way to eliminate timing belt slipping by adjusting the position of the tension roller by placing a half-washer-shaped piece of aluminum beer can between the cylinder block and the roller spacer ring. A similar need arises if the spacer ring has a different thickness; it can be measured using a caliper. By selecting the position of this half-washer, you can completely eliminate the timing belt slipping.
After the operation to replace the timing belt, it is recommended to monitor its condition more often, looking under the hood, there is a chance to notice defects without waiting for it to break. In order not to remove the timing belt cover every time, I recommend modifying it. Read about modifications to the casing here.
I solved this problem for myself by installing a good timing belt kit along with a tension pulley from Gates. The belt in this set is stiffer than the previous ones, perhaps when choosing a belt you should pay attention to this fact.
Replacement features
The operation is not a complicated process, but requires care and concentration, since mistakes can lead to a major overhaul of the power unit. The car is placed on a level area. Wheel chocks should be installed under the wheels to prevent the machine from rolling away.
Replacing the timing belt on a VAZ 2108 engine is done as follows:
- It is necessary to remove the drive protection and the generator drive belt from the crankshaft pulley.
- You should unscrew the pulley bolt, remove it and return the bolt.
- It is necessary to remove the rubber plug from the clutch housing hatch. Next, rotate the crankshaft until the mark on the crankshaft flywheel aligns.
- The matching of the installation marks is checked.
- Loosen the tension roller fastenings and remove the timing belt in the following sequence:
- From the camshaft pulley.
- From the video.
- From the pump pulley.
- From the crankshaft pulley.
- The belt must be put on in reverse order.
- You should check that all marks match; to do this, turn the crankshaft a couple of turns.
- Close the crankcase hatch with a plug, install the generator pulley
Note! When the timing belt is removed, do not rotate the crankshaft, because This can lead to bent valves and costly engine repairs.