To transmit torque to the steered wheels, shafts with special hinges covered with rubber covers are used. When the casing is destroyed, the lubricant is washed out and dust gets onto the rubbing surfaces. Timely replacement of the CV joint boot reduces repair costs and extends the life of the joint.
In what cases is it necessary to change the CV joint boot?
The boot can be damaged for various reasons:
- aging of rubber and the appearance of fatigue cracks on it;
- foreign objects entering the surface of a rapidly rotating cover that break or cut through its material;
- chemical corrosion of the boot due to the use of poor-quality lubricant;
- wear and tear due to violation of installation rules;
- cutting through the material with clamps that are too tightly tightened.
In addition, sometimes it makes sense to replace the cover for preventive purposes, for example, if the drive has been removed, which is quite a difficult task. It is advisable to combine the procedure with washing the hinge and putting fresh lubricant into it. This will significantly extend the life of the parts.
Checking the condition of the anthers
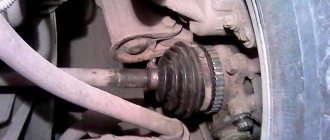
To check the condition of the rubber boot, it is necessary to inspect the surface of the part by turning the drive shaft. The search for the damaged part is carried out on a lift or with the wheel removed; a flashlight or portable lamp is used to improve visibility.
No breaks or tears are allowed on the surface; for additional checking, it is recommended to feel the surface of the cover with your hand. If there is grease on the surface of the boot, then it is necessary to understand the cause of the oiling.
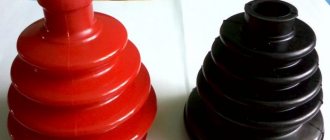
Which one is better to choose anther?
When choosing a part, you should focus on the manufacturer and the material from which the case is made.
The quality of a product is usually clearly dependent on its price, unless, of course, it has been verified by several suppliers.
Some of the best and most widespread manufacturers in the spare parts markets are the brands GKN (Loebro, Spidan), Maruichi , SKF . They are also the most expensive, which indicates the best materials used. Such boots will never suddenly break, will last a long time, are very durable, and the repair kits contain everything you need, including high-quality specialized lubricant in the right quantity.
How to inspect the case
This can be done without removing the wheel: just turn it all the way in any direction and shine a flashlight on the part for better visibility. Also feel it with your hands: you will feel the tears immediately. The best inspection option is to remove the wheel (for example, when you are repairing a tube, a tire at a tire shop, or doing a seasonal tire change). Everything will be more noticeable here. Also, for one reason or another, you probably have to put the car in the inspection hole: for example, when changing the oil, adjusting the hand brake, etc. Here, also take the opportunity and inspect the CV joint covers: this can be done more carefully than in previous cases.
You can tell that the cover needs to be replaced by the appearance of thick grease on the suspension parts and on it itself.
Procedure for replacing the outer CV joint boot
To replace the boot, the hinge will have to be removed from the drive shaft.
There are “unfastening” designs of repair covers, but they are unreliable and not very common.
- the machine is installed on a jack and a safety stand; first, for convenience, it is better to loosen the wheel and hub nuts if you do not have inertial electric or pneumatic tools;
- the wheel is removed and the hub nut is unscrewed;
- the attachment of the steering knuckle to the suspension arm is disconnected, after which the drive splines can be removed from the connection with the hub.
You can proceed further in two ways, with varying degrees of convenience and speed of execution.
With hinge removed
You can remove the complete drive from the gearbox or gearbox, place it comfortably on a workbench and continue to work more confidently. But additional operations and the ability to avoid them if you have skills or devices allow you not to do this.
If it is nevertheless decided to remove the drive, then it must be pulled out of engagement with the differential side gear, which is not always easy due to possible deformations of the retaining ring, after draining some of the oil from the box. In addition, it is strictly forbidden to pull on the shaft, this will only destroy the internal hinge.
The drive is removed by striking along the inner hinge into its outer cage. Or by placing a suitable knob in the same place, sometimes with a specially turned curly end.
The outer CV joint is removed from the removed drive, blows are applied along the shaft into its inner race. After this, all that remains is to remove the remnants of the cover, wash the parts, lubricate and install a new cover in the grooves provided for it on the CV shaft and body.
Clamp locks can have different designs; sometimes you will need special pliers to install and tighten them correctly.
Without removing the axle shaft
The operations are the same, but you have to work under the machine, which does not add convenience. The main problem may be the outer “grenade” being knocked off the splines, because in this position it is very difficult to hold the shaft so that the inner one does not jump out of the box, dousing everything around with transmission oil.
But experienced craftsmen cope, usually working together, one holds the shaft, the second strikes.
You can use devices to remove the CV joint, but its feasibility is debatable. In severe cases it does not help, but in simple CV joints it comes off with one or two blows.
Diagnostic features
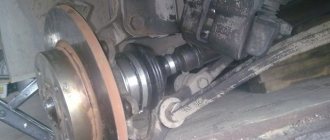
You can inspect the mechanism and identify damage to the boot yourself, using a jack and supports. First you need to lift the car and put it on special supports. To ensure stability, the car needs to be rocked slightly. The wheel is then rotated to the side to gain access to the boot, first on one side and then on the other.
Diagnostics of the CV joint boot
If there are tears or deformations, the rubber elements must be replaced. The anthers are changed, as are the brake pads, on both sides at once. It is advisable to carry out diagnostics regularly to eliminate the possibility of hinge failure.
Inspection of the CV joint boot
How to replace the inner joint cover
If there is no need to remove and disassemble the inner CV joint, then with the outer one removed, it is enough to pull the boot through the shaft and install a new one in the reverse order, so it is advisable to change both boots, no matter which one is torn.
When installing a new cover, it is necessary to control the distance at which the small clamp will be installed, otherwise the boot will be excessively compressed or stretched during operation due to the horizontal movement in the hinge.
Cost of anthers
The price range is quite wide: from approximately 150 to 1000 rubles. and higher. It all depends on the make of the car and the manufacturer of the part. Non-original spare parts are cheaper. However, it also happens that the cost is unreasonably high: for example, because of the brand. Thus, the price of covers for a Toyota Land Cruiser reaches 8,000 rubles. The same can be said about other prestigious car brands. But not all car owners are eager to pay that kind of money for essentially an ordinary rubber band, albeit of high quality. Therefore, many simply select covers from other cars that are suitable in size and cost.
Causes of boot rupture:
- constant driving through water and mud;
- high torsional load (regular sharp turns);
- careless (unprofessional) repair of suspension parts.
What to do if the boot ruptures on the road
It is absolutely unacceptable to move with a torn boot. The hinge will not tolerate even the slightest contamination. Mixed with lubricant, these abrasives will quickly wear out its precision-made and polished grooves and render the CV joint unusable. But it is not always possible or willing to use a tow truck or carry out road repairs.
Temporary protection can be provided in a variety of ways, from wrapping the remaining boot with tape to cold vulcanizing holes and cracks.
Even a simple cloth wrapped and secured around the cover will help filter out dust. The main thing is to do this reliably and control the condition of the patch to the point of repair. And when replacing the cover, be sure to disassemble the hinge, rinse it thoroughly and fill it with new grease as required.
Dust will definitely get there, even if it is not visible. During operation, the temperature of the unit changes; it literally works like a pump for dirty air under the car. It is easy to check the tightness by simply squeezing the case with your hand. You can also check the condition in doubtful cases of the presence of surface cracks, although usually the problem area is immediately noticeable by the grease protruding outward.
What to do if the boot ruptures on the road?
If the boot ruptures on the road, it is necessary to jack up the car body, and then remove the old lubricant through the hole and introduce a portion of fresh substance. The damaged area is covered with a plastic bag or wrapped with insulating tape or stationery tape. Such protection is designed for a range of up to 500 km on dry roads. If driving in wet weather, it is recommended to check the condition of the package every 30-40 km, since dirt getting into the lubricant leads to accelerated wear of the hinge.
How often should the element be changed?
Many manufacturers recommend replacing the outer grenade boot approximately every 30 thousand km. Of course, this is an average. Much depends on the intensity and operating conditions.
If the car is used irregularly, this can lead to premature deformation of the boot. It is also negatively affected by operating the machine on poor-quality road surfaces or in conditions of high humidity. All these factors negatively affect the protection properties. As a result, it has to be changed more often than specified by the manufacturer.
When is it necessary to change the CV joint, and when is the boot?
If the boot is damaged or lost, it is enough to replace only this element.
Lack of protection leads to rapid contamination of the hinge. The lubricant is knocked out, the load on the body, holder, and separator increases, which causes premature wear of metal surfaces. In such situations, it will be necessary to replace the outer CV joint, since there is a risk of its complete destruction.
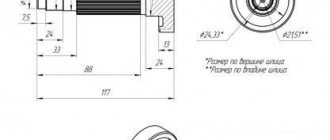
What is a CV joint
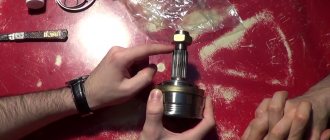
The CV joint is a very important part of the steering mechanism, the decoding of the abbreviation is simple - a joint of equal velocity angles, and the common people are better known as a “grenade”. They call it that because it looks similar in shape.
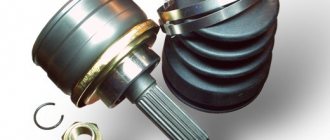
The main task of the CV joint is to transmit torque to the wheels of the car. The structure of the part is very simple and consists of six parts: the drive shaft, the boot, the retaining ring, the inner race, the housing with the outer race and the bearing.
CV joint repair
As mentioned above, the hinge cannot be repaired. Conventionally, one of the repair measures includes washing the “grenade” after driving with a damaged boot.
Washing is carried out at the same time when the damaged boot on the pomegranate is replaced. The hinge is carefully knocked off the shaft, inspected for damage and thoroughly washed to remove any dirt and grease in gasoline or kerosene.
After washing, the assembly is filled with lubricant and mounted in place, having previously installed the boot. The procedure makes sense only if there are no obvious signs of a joint malfunction.
A crunchy or knocking part definitely needs to be replaced, since wear forms on the working surfaces of the inner race, and it is no longer possible to stop the destruction. Continued operation of the vehicle may be dangerous for the driver and other road users.
Malfunctions in the ShchRUS boot
They can occur if dust or dirt gets into the frame in the smallest quantities.
If, when turning the car, a sound resembling a crunch is heard, then this will be a significant sign that just such a breakdown is taking place. This is the first “bell” indicating the need to inspect the joint and its components.
Unfortunately, some people do not pay enough attention to the rubber covers, which are called anthers. And they do it completely in vain. They must be periodically given attention and examined. But this does not require any special equipment at all. Just a visual inspection is enough to determine the presence of defects of various types.
Boot replacement and repair
The boot can be changed without removing the grenade if you have special equipment. His work is demonstrated on video. If you do not have such a device, to remove and replace it, you must perform the above procedure for removing the drive and dismantling the hinge. The procedure is necessary if there is even minor through damage on the boot.
Temporary repairs to the CV joint boot can be made without removing it from the vehicle. To do this, you need to thoroughly clean and degrease the damage, then seal it with a piece of rubber and cyanoacrylate-based glue (superglue).
An alternative repair method is to seal the holes with silicone caulk. It should be remembered that it takes a day to completely polymerize.
Note: express repair is a temporary measure. Replacing the inner joint boot may be delayed for a short time, but not completely cancelled. Typically, these types of repair methods are used to get to the point of repair.
Let's start the analysis.
To begin with, the procedure is common for both sides, installing cubes under the upper arm so that when lifted it does not fall on the frame, jacking up the wheel, installing a stop under the subframe beam.
place a cube under the upper arm to release the ball joint
Next, we remove the wheel; by the way, on the right side you can even do without removing the wheel; it is very easy to get the drive there. But I think it’s better to remove the wheel, it will be more intact.
How to change the boot?
Before changing the outer CV joint boot, you need to remove the joint itself from the drive. At the service center, technicians use a special device to cope with such work without removing the “grenade”. “Knocking down” a hinge is not at all easy - regardless of the make of the car and how long it has been in use.
The replacement procedure boils down to dismantling the clamps and old boot, removing contaminants, and installing new protection. To quickly remove a worn or damaged cover, simply cut it and knock off the fastenings. After installing the new boot, carefully check that there are no gaps in the places of fixation on the shaft.