Print this article Font size 16
The CV joint is a constant velocity joint. People simply call it a grenade. This is due to the appearance of the device. Its task is to transmit rotational motion from one axle shaft to another, and they are at a constantly changing angle in relation to one another.
This element is always under load, which is why its failure is rather a matter of time. This is even despite the fact that high-quality carbon steel is used in the production of CV joints, which can withstand severe regular loads over a long period of time.
But the grenade on the VAZ 2110 still fails. The main reasons are pollution, sand that gets inside the structure, loss of lubrication, damage to elements, torn rubber boots.
Kinds
In a VAZ 2110 car, the CV joint may need to be replaced. But which one exactly? After all, in the “ten” there are two of them - internal and external. They are necessary in order to effectively overcome all obstacles. Here one CV joint will clearly not be enough.
Internal and external
- The first grenade is internal, and it transmits torque to the shaft from the transmission.
- The second grenade is external and engages with the car's wheel hub.
Despite the fact that their operating principle is the same, they differ in design and price.
Assembly nuances
Before reassembling, we also recommend watching a video about replacing the inner CV joint on a VAZ 2110. Plus, follow a few tips.
- A plastic plug must be installed at the end of the shaft.
- Before installing a new CV joint, the element must be lubricated with special compounds.
- You need to install the retaining ring before installing the new unit - the grenade.
- Having installed the drive, it is mounted on the gear, achieving complete fixation. At this point you will need to use a hammer.
You can see for yourself that replacing a grenade does not pose any special difficulties. However, unless you have absolutely no experience repairing your car yourself, doing the work yourself is highly not recommended.
The best solution would be to find a good service station, where real professionals work. Trust them to replace grenades to guarantee high quality repairs and efficient operation of the entire chassis of your car.
Well, if this is not the first time you are repairing your “ten”, then such a procedure as replacing a CV joint will become an easily feasible task for you. Just remember to follow the recommendations from the instruction manual for your VAZ 2110.
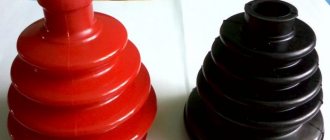
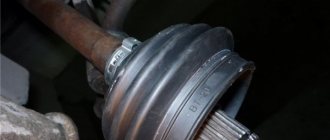
The CV boot is a special element designed to protect constant velocity joints from the effects of dirt dust and various external factors. It is made of rubber and is mounted on the outer and inner CV joints, thereby holding all the lubricant inside, which is necessary for operation.
The video shows the process of replacing the CV joint boot on front-wheel drive cars of the VAZ family.
"Grenade" defects
Before replacing CV joints on a VAZ 2110, you need to make sure that they are made with high quality and can effectively perform their job in a new place.
Alas, sometimes replacing the inner CV joint on a VAZ 2110 does not give the expected result, since product defects .
The literature indicates that CV joints are made from special high-strength alloys that practically do not wear out. But in practice everything looks a little different. Whatever one may say, there are no eternal parts, and CV joints are no exception.
Defects may be as follows:
- Low quality of alloys used in manufacturing;
- Banal fakes and defective components;
- Poor quality or complete lack of lubricant, which leads to rapid failure of even a new grenade;
- Damaged anthers, due to which all kinds of debris get into the grenade.
Regarding the replacement of CV joint boots on a VAZ 2110, we recommend watching a video that will help you cope with the problem that has arisen. This issue should be approached thoroughly.
Constant velocity joint or CV joint
VAZ 2110 grenade boot
The design of the car provides that the hinge is subject to a significant load and is made of very strong alloys. A well-maintained and good CV joint (grenade) can last longer than the car itself. To achieve this result and save money, because the procedure for replacing a hinge is expensive, you must follow some rules. One of these rules is to systematically check the condition and timely replacement of the grenade boot. The most important enemies of a car grenade are dirt, dust, water and sand that enter the working part while driving. To protect against such destructive factors, anthers are installed, which are protective rubber cones that very tightly cover the CV joint mechanism of the vase. If you find that the grenade boot is torn, it must be replaced immediately. During periodic technical inspections, you need to carefully inspect the boots and replace them if necessary.
Note. If folds, cracks, deterioration in the elasticity of the rubber and other deformations and damage are found on the anthers, replacement should not be shelved.
Functionality check
of the inner and outer CV joints should be examined separately , since the procedures and signs are somewhat different.
External grenade
The most obvious and main sign of wear of this element is the appearance of a sound similar to a crunch. It appears because the grooves have worn out and the balls do not move along them as well as before. The crunching becomes noticeable when entering turns, sharply pressing the gas pedal or passing difficult road sections.
Grenade
If you want to verify that the outer CV joint is faulty, do the following:
- When starting from a standstill, deliberately create jerks, but not strong ones;
- Try to accelerate sharply and slow down;
- Move the shaft transversely between the CV joints. If you feel any play, then the grenade is definitely worn out.
Internal grenade
It is noteworthy that the internal hinge is more durable and less subject to wear. Most often, the inner CV joint declares its malfunction when simply driving in a straight line or when passing through difficult sections. A check for play, similar to an external grenade, will allow you to verify problems.
But to understand whether an element really needs to be replaced, do this:
- Raise the drive wheels, which will allow you to bring the inner CV joint to its maximum angle;
- Start the engine;
- Turn on first speed;
- If the hinge is at the limit of wear, you will hear a characteristic crunch. This is a signal that you need to change the grenade.
Tool for the job
Before you start working, you need to prepare all the tools.
- Jack.
- Wheel chocks.
- Set of keys and socket heads.
- Collar.
- WD-40.
- Hammer.
- Mount.
The process of replacing the CV boot
Before you get started, make sure the vehicle is parked on a level surface, the handbrake is on, and wheel chocks are installed under the rear wheels.
- While the car is fixed on the ground, we tear off the wheel bolts and hubs on the side where all the work will be done.
May require a long lever, a VERY long lever!
By disconnecting the cotter pin, the bolt will easily come out of its place of fixation.
Replacement procedure
Let's say right away that it is impossible to repair the CV joint. So don't even try. The most correct and reasonable decision is to purchase a new grenade and install it in place of the failed one.
The first thing we recommend starting with is watching a video about replacing the CV joint on a VAZ 2110. This way you will clearly understand how the procedure is performed and in what sequence. Then, according to the instructions we have presented, you can get to work.
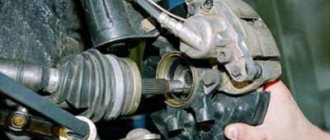
- Since the CV joint is located at the bottom of the car, you will need a lift or a pit in the garage from where you can begin replacing the element.
- Be sure to secure the car. To do this, you can engage fourth gear and tighten the handbrake all the way.
- If you have driven the car into a pit, place wedges or wooden blocks under the wheels to block the wheels.
- Remove the protective cap and unscrew the nut on the hub.
- After removing the hub nut, unscrew the wheel fasteners.
- Raise the wheel that requires CV joint replacement using a jack.
- Now unscrew each of the six bolts of the part, after which only the flange will hold it.
- Remove two bolts from the lower knuckle support.
- Turn the steering wheel all the way, which will allow the element to fall out on its own.
- Remove the boot, which is located in the grenade structure.
- Remove the retaining ring.
- Unscrew the hinge from the shaft spline to avoid damaging other components.
- Check the operation of the entire system to determine the causes of the breakdown.
- Install a new CV joint using the steps in reverse order.
Installation of CV joints at the final stage in detail
Please note the following notes:
- install a plastic plug on the end of the shaft;
- the retaining ring is installed before mounting the hinge;
- Before installing a new CV joint, the installation site is generously treated with lubricant to ensure a tight fit;
- After installing the drive, the hinge must “sit” tightly on the gear until it is completely fixed, which is done with a hammer.
Carrying out this replacement of a functional element of a VAZ shaft with your own hands does not require experience in car repair. The replacement can be carried out following the video instructions. If you are not confident in your abilities, contact a specialist to ensure that the hinge is installed reliably.
Nissan X-Trail › Logbook › Inner left front grenade - damn it)))
I don’t even know where to start)) How much time I wasted: - searching for useful information on the Internet; — visited all the investigations in the city; — called investigations in cities that are closer; — how many people have I troubled with my problem))). etc. Finally I made up my mind and ordered a low-quality substitute for Febest (0211-T30LH). By the way, it’s cheaper at www.repart.ru/.
Internal CV joint, gearbox side (0211-T30LH)
When purchasing the car, I immediately noticed the torn boot of the inner left grenade. Well, okay, I thought))).Then I’ll put on the dust cover and that’s it)))…that’s not the case. I called some stores in the city (I was looking for a boot), everywhere from 1500 rubles. and higher. I decided to wait and order through existential for 750 rubles. Febest (0215-071T)
Internal CV joint boot (0215-071T)
While I was waiting for the boot, I wrapped a bag))) with lubricant)). I noticed a slight vibration especially during acceleration. Well, it’s a small thing)))… I waited for the boot. I changed it, it took about 2 hours to replace it… Then I went for a ride)) only then I read on the Internet about the vibration during acceleration. Everyone who wrote about vibration mentioned the torn left boot! In existential terms, the cheap Febest substitute at that time cost 4,700 rubles, a couple of months later it began to cost 3,200 rubles.)) Having already driven 6-7t.km. The vibration has increased and it’s not bad))) (by the way, the boot is still intact) I was thinking about a used drive unit, but if X-trails have this problem, then it makes sense to take a used one. I read on the Internet that the left front drive fits from Nissan Cefiro (A33), from Nissan Primera (P12) and, with minor modifications. I was more inclined towards the drive from the Nissan Cefiro (A33), because... The internal grenade will be stronger)).
But nowhere in Kurgan was there a used drive (((in other cities a used one from 5-7 t.r. immediately disappears. To order through the website www.japancar.ru/ it also costs about 5 t.r. and so on will come...unknown((In the end, I made up my mind and ordered Febest (0211-T30LH) 2860 rubles, I couldn’t continue to worry myself and those around me)) Only reviews about those who installed Febest were not found as a substitute((about the fact that Febest is complete shit..., this okay)) let’s see how long it lasts and if the vibration goes away))
As soon as it arrives, I’ll change it right away))
What will you need at work?
When replacing the internal CV joint of a VAZ 2110 car, you need to select the right equipment and tools, without which the next job is impossible. Repairing the unit does not seem likely; it will only need to be replaced .
To perform the following operations, you will need a set of equipment and tools:
- A new internal grenade, which includes a clamp and lubricant, will ensure subsequent trouble-free operation of the system over a long period of time;
- A lift, or a special inspection hole with a jack, will be required to lift and secure vehicle , guaranteeing safety during the work;
- A set of standard tools used to replace the internal CV joint. Includes wrenches, screwdrivers, pliers and much more needed for repairs.
Replacing the boot of the outer CV joint of a VAZ 2110
https://www.aliprice.com/go.php?z=WQqaSf8lhhext=1 Which is cheaper? Change the CV joint boot
or change
the CV joint
?
Replacing the outer and inner CV joints of the drive on VAZ 2110, 2112, Kalina, Granta, Priora, 2109, 2114
Video
instructions for
replacing
CV joints or drive assemblies on
VAZ
. Description on the website: https://ladakalinabl.
What does a torn boot threaten the car owner with?
And if a rupture occurs, or cracks are already found on it, then one way or another moisture with elements of sand and dirt begins to seep inside. This will not have the best effect on the operation of the front-wheel drive system as a whole. Despite the fact that the elements are assembled from high-quality and durable materials, rupture can occur at any time.
Reasons for boot failure
Among all the reasons for the premature failure of the boot, the following can be distinguished:
- Low quality spare parts, possible presence of fakes or defective parts.
- The amount of lubricant inside is minimal , therefore, the material dries out over time.
- The driving style of the car is harsh, therefore, the boot breaks from strong and sharp turns of the steering wheel .
- Poor quality of the road surface negatively affects the condition of the front suspension as a whole, and in particular the constant pressure on the CV joint boot.
All of the above reasons in one way or another have a negative impact on the general condition of the CV joint boot, and below we offer you a way to replace it yourself without resorting to the help of a car service center.
Why is it necessary to replace the boot?
It is known that any part is subject to wear during operation and this is due to the appearance of various cracks and gaps on its surface. These are exactly the symptoms that are characteristic of the CV joint boot. But what is a CV joint?
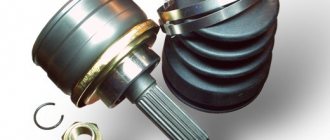
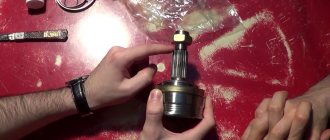
This is what the new CV joint and boot look like
CV joint (constant velocity joint - approx.) is a special joint equipped with transverse grooves and able to change the angle between the driven and driven axle shafts. In other words, thanks to this element, the car transmits torque from the gearbox directly to the wheels.
And over time, when the boot wears out, dust and dirt get inside the CV joint, thereby mixing with the lubricant, which leads to the formation of a kind of “crunch” when turning the steering wheel or sharply accelerating the car. In this case, the grenade itself will need to be replaced.
Additional factors that may indicate CV joint wear:
- When the car starts to move, or when the moment of movement changes, small jerks appear.
- There is play on the shaft between the inner or outer CV joint.
SHRUS device diagram
In order to study in more detail the structure of CV joints and their anthers, we offer a detailed diagram:
This is what the diagram looks like.
Thus, long-term driving with a torn boot, and even more so with a faulty CV joint, is highly not recommended. Can knock out a grenade.
General recommendations
Obviously, the inner joint cannot be removed without lifting the vehicle structure, since the wheel must be removed. This can only be done when the car is suspended. Some technicians recommend draining the oil before such repairs, but you should not do this. Carrying out the replacement according to the instructions will allow you to do without draining.
It is also recommended to replace the CV joint seal together with the hinge. The CV joint is changed separately without replacing the boot and oil seal only in cases where there is a functional reserve, and the wear of the CV joint is more pronounced than other structural elements. Typically, repairs are divided into two stages if it is not possible to complete a replacement in full. Don’t forget to replace the oil seal and boot afterward in order to maintain all variations to maintain the level of vehicle safety.