Author: Evgeny Zhivoglyadov. Publication date: February 20, 2022. Category: Automotive equipment.
When the vehicle is used intensively, standard seat upholstery not only gets dirty (and it is quite difficult to clean them), but also wears out. Subsequent repairs (the so-called reupholstery of the interior) are expensive, and it’s quite difficult to do it yourself. You can avoid such troubles very simply: just “dress” the chairs in covers. Today, such accessories can either be purchased (they are presented in a large assortment, both universal and designed for a specific car model); or order (they are sewn in specialized studios); or make it yourself, saving a significant amount of money. At the same time, you can be sure of the exclusivity of the manufactured products.
Making car covers with your own hands is one of the most critical stages of the manufacturing process. Not only the ease of using homemade covers in the future (install, remove, wash and install again), but also the aesthetic appearance of the car interior depends on how accurately the blanks are made.
Sequencing
So, if you decide to make car seat covers yourself, then you need to decide on the procedure.
The first thing you should start with is to determine (by experiment) what thickness and density of the material can be sewn using the sewing machine you have. The choice of material for making covers will largely depend on this. Attempts to sew through too dense material can lead to its breakage and unjustifiably expensive repairs.
Then you need to make all the necessary patterns. The number of individual elements will depend on the configuration of the chair and armrests.
And only after that we decide on the amount of material needed.
Choosing fabric
Before you begin, you need to decide on the choice of suitable fabric. Since covers wear out very quickly, the fabric must be selected carefully. There are several parameters when choosing a material:
- strength;
- stretch effect (so that the product fits perfectly on the seat);
- wear resistance;
- ease of cleaning.
The most suitable are:
- Leather. Thanks to this material, you can not only improve the appearance of the car's interior, but also increase the selling price. It is more resistant to various types of pollution, easy to clean and has always been considered a classic. But it is worth remembering that leather is very sensitive to temperature changes and, after numerous treatments, has a sliding effect, so it is not recommended for use in cars without air conditioning. It is also not a very cheap material.
- Neoprene. This material has deservedly won the attention of consumers. Although it is made of synthetic fibers, it also has a number of advantages: it is wear-resistant, protects from moisture and dust, is resistant to ultraviolet rays, and has non-flammable properties, which is very convenient for smokers.
- Velours. This material is also very often used when sewing covers. Thanks to the velor, the interior looks very impressive, it is also pleasant to the touch and at the same time very durable. The only negative is that they easily attract dust.
- Eco leather. This is one of the newest trends in the automotive industry. It has higher breathability than leather, is less susceptible to wear, easy to clean, and affordable.
Selecting material for car covers
To make your own seat covers, you can use a variety of synthetic or natural materials:
- velours;
- tapestry;
- cotton;
- neoprene;
- plush;
- leather (natural or artificial);
- various synthetic fabrics and so on.
Each of the materials has both its advantages and disadvantages. For example, the undoubted advantages of natural materials include: their environmental friendliness and “breathable” properties. Although they are less durable than synthetic materials. And leather, although it has numerous advantages (both in durability and aesthetic characteristics), is quite difficult to process. In addition, the price for such material is very high.
A combination of different materials is quite acceptable: for example, velor can be used for the main elements, and synthetic leather can be used for the armrests.
Both the comfort of the driver and passengers, as well as the convenience of subsequent operation, largely depend on the correct choice of fabric. Everyone makes the final decision, taking into account their financial capabilities and individual preferences. The main thing is that the selected material provides sufficient protection for the standard upholstery, so as not to carry out subsequent repairs.
Main varieties
As you know, demand creates supply. Today, car dealerships offer a wide selection of seat covers, which differ in appearance, size, functionality, material and manufacturing method.
T-shirt capes
The most common among drivers are seat covers. This model got its name due to its similar style to an undershirt.
The main advantages of a T-shirt cover are functionality, practicality, and ease of use. You can sew a car cape-shirt yourself.
Model
Model covers are made to order in automobile studios and special showrooms. They exactly follow the shape and dimensions of car seats. Removing a model case made of thick fabric or eco-leather will be very problematic.
Knitted
Hand-made products are highly valued by contemporaries. Knitted capes and headrests will make the car interior more comfortable and homely.
If you have crocheting or knitting skills, you can easily cope with this task. The product must be wear-resistant, durable and functional. When choosing yarn for knitting, carefully study the quality characteristics of the threads. The finished product should hold its shape well, not stretch, not curl or float.
You can choose the pattern for the cover at your discretion. However, you should not knit with openwork knitting, which over time loses its strength and density.
Massagers
Some drivers spend a lot of time behind the wheel. Prolonged sitting has a negative impact on human health. To reduce the load on the musculoskeletal system, it is necessary to install massage capes.
Massage covers are mechanical and electric.
The mechanical model is a cap frame made of interconnected wooden elements. Wooden elements cool quickly and are not suitable for use in winter.
As car dealership employees note, electric massagers, which are equipped with a special roller or vibration mechanism, have become in great demand. An electric massage cape not only protects the car interior from mechanical damage, but also helps get rid of problems with the musculoskeletal system.
Heated
Often, premium and business class cars are equipped with seats with a heating function. You can turn the heating on or off automatically or through the cigarette lighter. There are several heating modes.
Owners of economy class vehicles can buy ready-made covers with a built-in heating function in automobile stores. The seat cover equipped with a heating element is especially useful in cold and damp weather.
Making a pattern using special tape and paper
The seats of modern cars have a rather complex shape. This is explained by the fact that manufacturers try to give them the most ergonomic shape.
In order for homemade covers to not look like a “potato sack”, it is necessary to most accurately repeat the geometric shape of the vehicle seats in the pattern. It's difficult, but possible.
To create a pattern for car seat covers with your own hands, we will need:
- double-sided paper adhesive tape (very similar to regular masking tape);
- scissors;
- soft paper (it is better to use special paper for patterns, which is sold in rolls in specialized stores);
- marker.
Let's start with the driver's seat. Work execution algorithm:
- We lay out a sheet of paper on the seat, smooth it with our hands and adjust it (in size) to the main part of the driver’s seat.
- We secure this part with pieces of paper adhesive tape so that it does not reach the seams of the standard sheathing by 1-2 mm.
- We perform the same procedures with the remaining parts of the seat (side and front end).
- After all the elements of the lower part of the seat are covered with blanks, we apply the necessary marks with a marker (so that later we do not get confused in the resulting patterns).
- Carefully remove the workpieces.
- We perform the same operations with the back of the driver's seat.
- We apply the resulting blanks to a sheet of thick paper or thin cardboard, outline them with a marker and cut out patterns for marking individual parts on fabric, velor or leather.
On a note! Many modern cars have a folding armrest on the rear passenger seat. When making patterns, you need to remember this and provide an appropriate hole for it.
Next, lay out all the patterns on the material. We apply the markings, retreating from the edge of the pattern by 1-1.5 cm (seam allowance). We cut out all the elements and sew car covers.
Advantages and disadvantages
Let's take a quick look at the strengths and weaknesses that characterize fur car capes.
I’ll say right away that we are talking about natural products, not synthetic ones. There is a gulf and a significant difference between them. The advantages include:
- maintaining appearance for many years;
- creating a more luxurious and rich look for the interior;
- therapeutic effect;
- light back massage;
- property to improve blood circulation;
- allows you to travel for a long time and comfortably by car;
- The cape is suitable for hot and cold weather;
- in summer the driver sweats less;
- warms up the body in winter;
- products protect seats from wear;
- retain their shape for a long time;
- easy to attach to chairs;
- do not slip off and do not cause the driver to slide in the seat.
As you can see, the list of advantages is more than impressive. Moreover, it is difficult to argue with each of the advantages.
But for the sake of objectivity, let’s look at some of the existing shortcomings. They really exist, but they are more relevant for low-quality capes and poorly made products.
The presence of the disadvantages listed below once again indicates the importance of choosing the right quality fur car cape:
- with low quality, the product quickly loses its shape and appearance;
- synthetic furs are electrified;
- this is a dust collector that requires mandatory care;
- When cleaning, chemical agents should be used;
- cleaning the cape with your own hands is not so easy;
- additional costs for dry cleaning services;
- fur absorbs foreign odors well;
- natural pile is destroyed by moths and other insects.
With proper care and purchasing an initially high-quality natural cape, there will be objectively more advantages than disadvantages.
Polyethylene patterns
Instead of pattern paper, you can use regular greenhouse film. For this you will need:
- medium density polyethylene;
- scissors;
- marker;
- pins.
Work order:
- we cut out a blank from polyethylene that is slightly larger in size than the seat element;
- lay it out on the seat;
- carefully attach it with pins;
- using a marker, apply markings (along the stitching lines of the standard seat trim);
- remove the pins and remove the polyethylene;
- cut out the blanks according to the applied markings using scissors;
- We do the same with all elements of the chair (sidewalls, protrusions, bends);
- carefully secure all the workpieces with pins to the corresponding elements of the seat;
- using a marker we apply all the necessary notes and inscriptions;
- lay out the polyethylene elements on hard cardboard and trace them with a marker;
- Using the applied markings, we cut them out with scissors and get patterns for car covers with our own hands.
We make patterns for the rear seats and armrests in the same way.
For a car seat
Special craftswomen have learned how to crochet amazing car covers.
This kind of work will require time, perseverance and imagination, but the result is worth it. For knitting you will need the same film pattern.
Can be knitted as a whole fabric or in separate fragments.
Tie the entire seat or just the necessary part.
Cover-cape
The dirtiest and most worn parts of car seats are the base (where you sit) and the inside of the backrest. It’s quite easy to protect them by making cape covers yourself. Moreover, you can periodically replace them without a significant blow to your budget, since they have a relatively low cost.
To make them you will need:
- any natural fabric, such as a large terry towel;
- scissors;
- threads;
- needle;
- pins;
- sewing machine;
- marker or chalk.
It is not necessary to make patterns for such cases. Everything is very simple:
- remove the headrest;
- carefully lay out the fabric on the seat and back with an overlap of 10-15 cm;
- we make holes in the material (for subsequent installation of head restraints);
- install the headrests in place (to fix the upper part of the fabric);
- Once again we level (with tension) along the entire seat;
- we fold the excess fabric inward and secure it with pins or baste with a needle and thread;
- we outline places for attaching laces or elastic bands (to secure the covers on the chair);
- remove the fabric and sew capes on a machine according to the basting;
- We attach the cover-cape to the seat using sewn ropes or elastic bands.
On a note! Knitted covers on car seats look very original. If we knit them from durable natural yarn of various colors, we get products that meet the requirements both for durability and exclusivity, health safety and ease of use. In addition, knitting a cover, for example, for an armrest, is much easier than sewing it.
Types of interior lining
The entire space inside the car serves a person and is called the interior. Manufacturers are paying attention to this segment. The class representation of the car in the sales market depends on the decoration and interior lining of the car.
The total cost depends on the material. The assortment is varied: leather, vinyl, carbon fiber, carpet and upholstery fabrics, suede, flock. There are pros and cons.
Automotive leather
Wealth, luxury of the interior. The comfort of the car is captivating; the desire to sink into leather seats comes from the first minute of acquaintance with the car. However, this is the most expensive type of trim; not everyone can afford it; it is installed in high-end cars.
Artificial leather (Alcantara)
Alternative finishing. Retains many functional aspects: non-slippery, brings a pleasant feeling to the touch, looks neat from the outside. Easy to use: easy to clean with detergents, practical. It is popular because the price is significantly lower than that of leather.
Textile
Budget material (upholstery fabric) is its strong point: availability. Strength variety at a low price. Synthetics have a number of disadvantages: they have a short service life and get dirty easily. Requires chemicals for constant cleaning.
Carpet
Durable fabric, can last a long time. Density improves the acoustics in the car. Young people like it. Average cost.
Vinyl
Moisture-resistant, durable, synthetically produced resin. Made in a variety of colors. Affordable price. Vinyl is indispensable if there are children and pets in the car. The disadvantages are cracking with prolonged use, as well as excessive softening at elevated air temperatures, and a feeling of stickiness appears.
Flock
An original way to decorate the interior. Fine fibers are “sprayed” onto the seats, forming a layer of material. When touched, it resembles a velvety surface. It has a number of advantages: warmth, sound insulation, fire safety, stylish colors, does not wear out, easy to care for.
Imitation “under the skin”
Elegant finish. Popular colors: black, brown, beige. If you do not take into account the service life, then there are no disadvantages.
Car trunk covers
If you often have to transport building materials, tools, sports equipment (skis or skates) or pets (with sharp claws) in the trunk of a car, then the standard upholstery (this is usually carpet) quickly becomes unusable. Subsequent repairs cost a pretty penny. To protect the bottom, side walls and backs of the rear seats (in hatchbacks, station wagons and SUVs) from dirt and scratches, you need to install a protective cover in the trunk. Such a functional device can now be purchased at any car accessories store. But the most rational and economical way is to make it yourself. Moreover, this is much easier to do than seat covers. The main requirement for this element is practicality (durability, ease of installation/removal and cleaning).
The work order is as follows:
- using a tape measure, carefully take measurements of the luggage compartment;
- We make a sketch based on the measurements taken;
- we purchase the required amount of durable, moisture-resistant and easy-to-clean material (for example, tarpaulin, durable “raincoat” or thick dermantine);
- in accordance with the sketch, we apply markings to the material and cut out blanks;
- sew individual elements together;
- we install the cover in the car and mark places for fastening devices (hooks or ropes (in accordance with the technological holes available in the trunk);
- We fix the fasteners on the finished product.
On a note! This device will reliably protect the paintwork of the open parts of the trunk from scratches (the repair of which is very inconvenient).
The second stage is taking measurements from the chairs
After the “right” material has been selected, it is necessary to make patterns. Sewing perfectly fitting car covers requires taking measurements. After all, even a cover made of eco-leather or other fabric sewn by the skillful hands of an experienced seamstress will bulge unsightly if it is not sewn to size.
To make patterns, you need:
- take cellophane or a piece of transparent polyethylene in advance, the size of which will correspond to the dimensions of the chair;
- place the prepared polyethylene on the seat in such a way that you can trace each element separately along the seams using a dark marker;
- check the correspondence of the pattern with the actual size of the chair by attaching the cut out parts of polyethylene;
- transfer the resulting patterns onto cardboard (it is more convenient to work with denser patterns);
- transfer the blanks to the material (the details should be outlined with an additional 2–5 centimeter seam allowance).
Wheel covers
Car owners have to change tires twice a year (winter to summer and vice versa). For ease of storage and transportation, special wheel covers are provided. You can either buy such products (fortunately, there are both universal devices and ones for a specific size on sale), or you can sew covers for car wheels with your own hands.
How to sew:
- measure the diameter of the wheel;
- to the resulting value add 1-1.5 cm (per seam) plus 1.5-2 cm (so that the wheel can be inserted into the case without effort);
- draw a circle on the material;
- cut out a round blank;
- measure the circumference and width of the wheel;
- we cut out the following blank from the material, namely, a strip with the following dimensions: width - 2-2.5 more than the width of the wheel; length equal to the circumference of the wheel plus 5 cm;
- then the round blank and the strip are sewn together;
- we bend the free edge of the strip and stitch it so that a “tunnel” is formed into which the cord will subsequently be threaded;
- Place the wheel inside the product and tighten the cord.
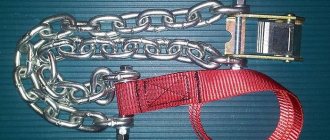
For ease of transportation, you can sew a handle made of durable synthetic tape of a suitable width on the outside of the case.
Features of steering wheel constriction
How to install a seat from a foreign car on a Niva?
Having figured out how to make a constriction, you need to immediately learn some features of self-tailoring. Before starting the pattern, the steering wheel needs to be removed to make it easier to cover it with film and cover it with masking tape.
Fur braided handlebars have a less stretchy texture, so when working with such material, you need to take into account an additional 1–2 cm for seams. Otherwise, it will be simply impossible to pull off the braid. A fur cover, just like a leather one, creates a certain aesthetics in a car dealership; its production should be as careful as possible.
Having figured out how to put the cover on the steering wheel, you need to tighten it correctly, choosing the appropriate seam for this. The problem may arise for those who, in principle, have never held a thread and a needle in their hands before. Sewing braid yourself requires enormous patience.
It’s not difficult to figure out how to sew a steering wheel cover. You need to decide what material the steering wheel will be reupholstered from, be patient and get to work. By putting a cover made with his own hands on the steering wheel, each driver can rightfully be proud of his creation, while saving a lot on a purchased model or ordering it from specialized workshops.
Restoration of a car seat cover
I believe that a car seat for a child is a necessary thing. The only downside for me is that I have to transfer it from car to car every time.
It seemed to me not entirely reasonable to buy another car seat, but the beast runs to the catcher. A friend called me and began to complain that the seat was too small for her son and she needed to switch to the category of seats from 9-36 kg. So we got another throne in our family.
The appearance of the chair made a depressing impression; I would not put a child there. Unfortunately, I didn’t find where to buy a new case, I only found summer options, which I didn’t need. So I decided to start restoring the case.
Rummaging through the closet, I found beautiful, old things. His denim jacket, leather trousers and some cheerful colored jeans. Dark denim formed the basis of the cover. It was decided to make the sides out of leather fabric so that they could be wiped clean, and I made a cover for the headrest out of thin turquoise jeans.
I would like to point out right away that I am not a good seamstress or craftswoman.
First of all, I washed the cover, and when it was dry, I began to rip it open. In order not to get confused in the details later and forget what to sew where, I connected them with pins. I also marked them on the inside so I wouldn’t forget where each fabric should be. For example, the letter K stood for SKIN.
When all the parts were cut out, I started cutting. To do this, I took the necessary part of the cover, placed it on the desired fabric, outlined it with chalk, and then cut it out and placed it on the base of the old cover. So I replaced all the fabric.
Then I laid the new fabric over the foam base and ironed it out.
The first step was to sew the fold lines, and only then start sewing the fabric to the base.
It seemed to me that it was easier to start with large and simple parts, and only then move on to more painstaking work. I made a bias tape from turquoise fabric (my mother told me this name, I don’t know such words myself).
Next, it was necessary to sew all the parts together and then try them on.
Last but not least, I started making the headrest. The principle was the same. Rip, cut and sew. I even attached the elastic bands and other Velcro and ribbons in place with a pin, this made my work easier in the future.
When all the parts were ready, I connected them together, pulled them onto the chair frame and began to admire the result. The case turned out exactly as I imagined it, even better!
To receive the best articles, subscribe to Alimero's pages on Yandex Zen, VKontakte, Odnoklassniki, Facebook and Pinterest!
Safety
Foreign cars may have end airbags. In order not to reduce the level of protection for passengers and the driver, it is necessary to ensure that the seams are sewn with weak threads at the points where aerobes exit. You can also leave neat slots for this operation.
Car covers have a nasty tendency to wear out and get dirty, so they need to be changed over time. But since car repair services are not cheap, you can always find a way out - this could be sewing car covers at home, for example.
Sewing stages
This section contains step-by-step instructions on how to sew a chair cover with your own hands. It will be useful for both beginners and experienced needlewomen. Furniture can have different configurations, so to sew a cape in each individual case, you need to take measurements of all its elements. Patterns for sewing a chair cover are also required. They are drawn by the craftswoman herself in accordance with the measurements received.
Pattern creation and cutting
It is necessary to measure all parts of the chair: the back, armrests, seat and cushion. First you need to determine where the seams will be. They can be marked directly on the rough fabric. If the cover has a design different from the shape of the furniture, then the seams need to be drawn directly on the upholstery, so that they can then be transferred to the material. At this stage, you need to take into account the inserts for contour alignment, bends, and thickness.
In order not to confuse the sizes, you can write them on the wrong side of the cut parts. When cutting, you need to take into account the darts that allow the cover to fit perfectly around the chair without any bumps. Don’t forget about tucks, folds, frills and hems.
A simple pattern for a chair cover with armrests is made so that, in addition to the seam allowances, there is still 20 cm of fabric left for adjusting the product, bends and overlaps. If some pieces of furniture have an unusual shape, then the pattern is drawn like this: a thin fabric is applied to the fragment and crimped on all sides. After the measurements have been made, you need to make patterns on graph paper. Next, the patterns are laid out on the material so that as little waste as possible remains. The patterns need to be outlined with chalk or pencil, taking into account the allowances.
Measure the chair
Make a pattern
Cut out the details on the fabric
Iron the cut pieces
Pattern option for a simple case
Fit
For the armrests you need to make 2 patterns: outer and inner. Both fragments should be sewn together. In this case, the fabric is folded in half, and seam lines and grain threads are drawn onto it with a pencil.
To fit the resulting patterns, you need to attach them to the chair and pin them with pins. In this case, all folds are tucked in, and seam lines are marked on the material. All excess fabric fragments must be eliminated and darts formed.
Since there will be tucks on the armrests, you need to wrap them on the outside under the curve. There will be a lot of excess fabric in this place that needs to be cut off. The tucks are secured with pins. The seat pattern must be placed on the chair and combined with the rest of the parts. At this stage the darts are sewn together. The cutting of the frills is done last.
Try on the details
Tack
Attach patterns for the front parts of the armrest, try on and baste
Sewing
If the pattern for the chair seat cover is ready, you can start sewing all the fragments together. The presented work consists of the following stages:
- Sewing darts and frills. The seam must be strictly along the mark, otherwise the material may warp, causing the cover to lie with folds.
- Sweeping all parts of the armrest. This work must be done on the wrong side so as not to damage the front. After this, the product must be turned out, and small cuts must be made in the corners.
- Connecting the armrests to the seat.
- Stitching the lower part of the inner part of the backrest to the far edge of the seat. At the same stage, the outer part of the product is attached.
- Basting hem details. Immediately you need to lay all the assemblies evenly.
- Installation of lightning. It is better to do this at the side seam.
After sewing all the parts, the cover needs to be turned right side out and put on the chair. In this position, the product is adjusted to the ideal. If it sits well on the furniture and there are no folds, you can sew it on a machine. The last step is to decorate the cover with ribbons or additional elements. If you have any questions, we recommend watching a video on how to sew a chair cover yourself.
Since sewing a cover for a computer chair with your own hands is not difficult, every craftswoman can easily update the interior of a room and refresh the appearance of the furniture. If the product turns out well from rough fabric, then the entire sewing process is made from expensive material. All work will take 1-2 days.
Sew the front part to the seat, trim the seam with braid
Process details with edging
Sew on a machine
Ready case
Cutting diagram for home car covers
If a car owner does not want or cannot purchase an original set of “clothes” for his seats, he can learn from the material below how to sew car covers with his own hands without spending much money. If you purchase the material you like in advance and prepare patterns, then, after cutting out the parts, you will only need to stitch the individual elements together and equip the product with fastening components (the easiest way is to make ties).
Patterning covers is not a very complicated process, however, when making them, it is worth remembering that an overlap made half a centimeter larger than the size of the seats allows you to sew loose covers that fit better than “clothes” sewn strictly according to the dimensions of the chair.