Cars with front-wheel drive have a shaft with two grenades, through which torque is transmitted from the gearbox to the wheels. The mechanism tends to wear out, and it may be necessary to replace the outer CV joint on a VAZ 2114. The repair does not require special knowledge from the car owner who decided to service the car himself, and following the instructions for replacing the outer CV joint on a VAZ 2114 with your own hands, you can do it correctly.
This video clearly shows the process of replacing the internal grenade:
Symptoms of outer CV joint failure
Signs of mechanism failure are similar to an internal grenade:
- Crunch . While driving, turning the wheels and pressing hard on the gas, you will hear a distinct crunching sound in the front axle area. A common problem with outer CV joint failure is a torn boot during operation. If there is a suspicion of a malfunction, to diagnose it, just turn the wheel out and look behind it. When the rubber band covering the moving part breaks, dust and dirt begin to get into the mechanism. Because of this, the lubricant thickens and loses its properties, while acting as an abrasive and increasing production on the balls inside the part.
- Backlash . This also happens due to the development of the mechanism. In this case, vibration will be felt on the body when the car moves. To be sure of the problem, you need to grab the drive and swing it in different directions. If play is felt, it means the part is broken.
Remember that it is extremely unsafe to continue driving in such situations. You can damage your car by increasing the cost of repairs. It’s better to go to the nearest service center or call a tow truck.
Causes and breakdowns
In reality, the resource of the CV joint turns out to be significantly less, which is caused by operating conditions, poor quality of roads, driving habits and other factors.
People usually call a CV joint a “grenade,” which is due to the external similarity of the element to this explosive device.
Here's what you should know about grenade malfunctions:
- Practice shows that the most common cause of CV joint failure is dirt, dust, and sand that enter the mechanism through a damaged boot;
- Sometimes the problem of a non-functioning grenade can be solved by replacing the boot. This is possible if the CV joint itself has not yet worn out due to exposure to contamination;
- If the damaged boot is not detected in time, the grenade will be completely worn out within literally 200 kilometers;
- If the CV joint fails, a strong crunching sound appears when cornering and accelerating. Such a symptom indicates the need to urgently replace the CV joint;
- The cost of new grenades is quite affordable; they are available at any auto parts store. But you should purchase those that meet the technical requirements of the VAZ 2109;
- If you have at least a little experience in repairing cars yourself, it is quite possible to replace a grenade with your own hands.
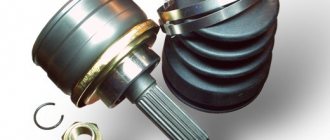
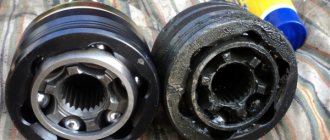
Old and new element
Necessary tool
If you decide to do the repairs yourself, you will need the following tools to disassemble the car:
- Open-end wrenches for 17, 19. But it is better to have a full set on hand;
- Set of heads and knobs;
- Wheelbrace and jack;
- Pliers;
- Screwdriver;
- Hammer;
- Rag and gloves.
Useful : How to replace the internal grenade on a VAZ 2114?
Also make sure you have a complete replacement kit: grenade, boot, CV joint grease and two clamps. For convenience, you can drive onto a pit or overpass, and for safety reasons, set the car to the parking brake and put supports under the wheels.
Location
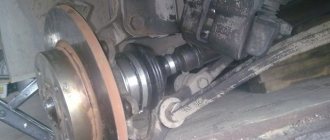
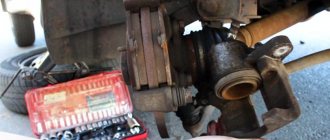
It will be impossible to replace the CV joint on a VAZ 2114 if you do not know where exactly these elements are located. Their location is easy to determine - on both sides of the front suspension at the bottom of the car. They are oblong elements and fit into the hub of each wheel.
CV joint location
That is, getting to the node is not difficult, but this will require certain conditions.
The most important thing is that the replacement procedure is not complicated, which allows you to do the work yourself. But let’s say right away that if you don’t have the time, desire, or are simply not confident in your own skills, it’s better to entrust the repair to specialists. You will spend extra money on this, but you will be sure of the result.
The process of replacing the outer CV joint
Having prepared everything you need, you can figure out how to replace the outer CV joint. This is done according to the following points:
- Remove the decorative cover (if any) from the car disk and flare the hub bearing nut.
- We take a 30mm socket, a wrench and preferably an extension to provide greater leverage. We take off the nut.
- Jack up the car and remove the front wheel.
- For convenience, unscrew the brake caliper. This is done with a 17 key. The bolts are located on the back of the hub.
- We spread the pads with a screwdriver and remove the caliper along with the bracket securing it to the hub.
- To press out the steering tip, we need to unscrew the nut with a 19mm wrench, and then apply force to knock it up.
- We unscrew the two 17mm bolts that secure the ball joint.
- Now you can completely unscrew the hub nut.
- We pull the hub towards ourselves, removing the CV joint from it.
- Many car enthusiasts carry out the replacement process without removing the drive from the car. But if you are doing this in the garage, then for convenience it is better to remove it and move it to the workbench. If you have removed the drive from the box, plug the hole with a rag to prevent excess oil from leaking out.
- If the grenade boot is not torn, then use pliers to unclench the large clamp and, prying it up with a screwdriver, remove it.
- We carry out a similar process with a small clamp and move the cover down.
- We begin to knock down the old part with a hammer. Hit on different sides to remove the CV joint evenly.
- We clean the drive splines from grease to see the retaining rings.
- We replace the old ring with a new one, which comes with the grenade.
- We fill approximately 80 cm3 of lubricant into the CV joint cavity and install it on the drive. It is better to do this through a drift made of soft metals or through a block. This will help prevent damage to the new part.
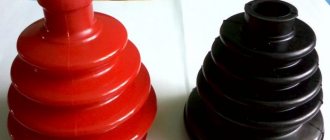
- We install a new boot and place the clamps. Replacing the grenade boot is required in all cases of repair, even if the old one has slight wear. The fastener of each should be directed against the direction of the vehicle. Then we crimp them with pliers.
At this point, the repair process is completed and the entire chassis can be assembled in the reverse order.
When replacement is required
If while driving your car you hear noise coming from the front of the car, be sure to check the condition of the boot. Quite often, replacing the outer CV joint boot of a VAZ 2114 becomes a daily task for service center employees.
To check, just turn the wheels in any direction and look under it. If cracks or complete damage are detected on the boot, the outer CV joint of the VAZ 2114 will definitely need to be replaced.
The presence of damage indicates that dirt has gotten inside the element. Much or little of it is no longer so important. Contamination leads to disruption of the functionality of the device.
In such situations, when the CV joint is damaged, it is strongly not recommended to continue driving under your own power. This is dangerous for you, your car and other road users. Ignoring this recommendation entails even more expensive repairs, since by the time you get to the garage or car service center, you will damage a number of other components and elements of the car.
Cost of outer CV joint
If you are faced with the task of choosing a new part, it is best to choose a product from the manufacturer, that is, choose a genuine spare part. Most often, they have a price slightly higher than analogue ones, but are distinguished by excellent product quality.
But check the article number, as some auto stores may sell you a Chinese part with a box that is very similar to the original. The part should go under the number 21080-2215012-86. The price of the set will be about 1400 rubles .
If you want to purchase analog parts, then after reading the reviews, you can identify three quality companies:
- HOLA – 1200 rubles;
- GKN – 1600 rubles;
- KRAFT – 1150 rubles.
Before purchasing, it is best to study the reviews of the store where you want to purchase the part. This way you will be completely sure that you are buying a quality spare part. And in this article we presented prices for internal grenades of the VAZ 2114 from 10 manufacturers.
We are starting renovations
So, the first thing you need to do is dismantle the old grenade. By the way, before changing the boot on the VAZ-2109 grenade, the same manipulations are performed. The thing is that it can only be replaced after the removal has been carried out.
Without this, installing a new boot simply won’t work. You will need to perform the following manipulations:
- On the side to be repaired, loosen the wheel fastening.
- Using a drift, you need to straighten the edges of the nut.
- Place chocks under the rear wheels to prevent the car from rolling away.
- Use a 30mm wrench to remove the nut.
- Raise the side of the car that is being repaired with a jack, remove the wheel, and place the car on a support.
- Completely unscrew the nut from the grenade. Please note that the washer is used when installing a new grenade - do not lose it!
- Drain the gearbox oil.
- Remove the two bolts that secure the ball joint to the suspension arm. Check the condition of the hinge - if it is deplorable, you will have to change it.
- You will most likely have to pull the pin out of the steering knuckle. The tip may interfere with the removal of the grenade.
- Now that everything is ready, you can pull the hub along with the strut to release the CV joint.
Cost of replacement at a car service center
If you do not want to do the repairs yourself, you can contact a car service in your city. Prices for repair work can range from 800 to 1,500 rubles, if we consider the average prices in Russia.
If you are limited in finances and want to save almost half of the repair budget, changing the external CV joint on a VAZ 2114 yourself is not so difficult. But in any case, approach the choice of spare parts carefully, since if you buy a part that is obviously not of high quality, you may again encounter the problem of a worn grenade in the near future. Try to check the condition of the anthers at least once a month, this will help extend the life of the mechanism. You will have time to replace the outer CV joint boot in time and the mechanism will not have time to become dirty. Well, if the connection is severely worn out and begins to make extraneous sounds, it is better to begin repairs immediately, otherwise you may create a threat to other road users.
How to change the CV joint on a VAZ 2114
Replacing CV joints on VAZ 2115, VAZ 2114, VAZ 2113
In front-wheel drive cars, one of the most problematic areas is the constant velocity joints. Abbreviated as CV joint or "grenade". The CV joint is a kind of ball bearing; its races have transverse grooves, which allows you to change the angle between the drive and driven axle shafts. All elements of the CV joint are made of ultra-strong alloys, the wear of which occurs extremely slowly, but, as practice shows, signs of a CV joint malfunction can appear even in a car that has recently left the assembly line of a car plant.
On cars of the VAZ family, it often becomes unusable after
55,000 km .
Causes and symptoms of CV joint failure on a VAZ 2115
The most common reasons:
- low quality CV joints, installation of fakes or defective spare parts;
- lack or poor quality of lubricants;
- damage to the boot and entry of abrasive debris or water into the mechanism;
- aggressive driving style and disgusting condition of the road surface.
One of the signs of replacing a VAZ 2114 CV joint is the appearance of a characteristic “crunch” . This sound can only be produced by balls that roll along grooves, because... have too much output. Working in close contact under constant load inevitably leads to changes in the properties of rubbing parts, their sizes, and the formation of wear.
Where there is no close contact of these elements and extraneous noise appears. The sound can appear at any time, but usually it occurs when turning, sharp acceleration, or overcoming obstacles. There are other signs indicating a hinge failure :
- slight jerks when starting the car or changing dynamics;
- play of the shaft located between the CV joints when trying to move it in different planes.