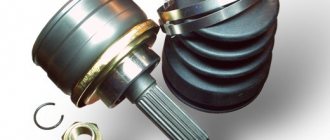
The constant velocity joint (CV joint), or, as it is popularly called, a grenade, appeared at the moment when front-wheel drive cars began to be introduced onto the market, and its main task is to transmit command from the gearbox to the drive wheel.
If you remember, in rear-wheel drive cars this function is performed by the cardan transmission. For a front-wheel drive car, such a mechanism will lead to an increase in its size, and, accordingly, the price will increase along with this. As for the VAZ-2109, this model has two CV joints: external and internal.
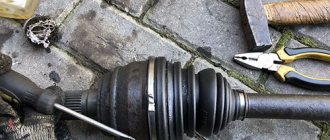
And today we will talk about how to replace the outer boot for a given car with your own hands, since it is this that most often becomes deformed and torn.
How to check the condition of the anthers yourself
This procedure is very simple and does not require special skills. A visual inspection for breaks, cracks and lubricant leaks is sufficient. To do this, you need to turn the front wheels of the car in either direction and carefully inspect the rubber dust covers.
If any damage or lubricant leakage is detected, the covers must be changed as soon as possible.
Otherwise, the drive shaft (CV joint) of the car will quickly fail.
This is interesting: How to properly charge a car battery with a charger
Which CV joint boot is better to install on VAZ 2110-2109, 2110
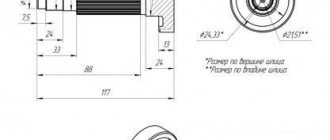
First of all, the outer boot must be suitable in size if we are not buying an original one, but an analogue. The dimensions of the VAZ boot are as follows:
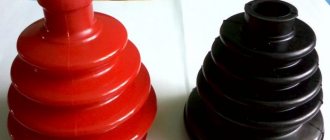
It is also important to pay attention to the material from which the boot is made. Silicone work well , they are easy to distinguish by their softness, they are often made of unpainted silicone, translucent.
Types of anthers on CV joints and their main weak points
Polyurethane anthers on VAZ are a rather controversial thing. On the one hand, polyurethane is a durable and tear-resistant material. On the other hand, in severe frost they can harden so much that there is a risk of rupture right on the move. It all depends on the composition of the polymer.
rubber boots is also ambiguous, since rubber is different from rubber. If we choose this option, it is better to start with a brand that we trust. And a little about brands.
NTN-SNR, France
Definitely recommended for purchase. Made of polyester (PEEST marking), it has an interesting design feature - fillets are made between the corrugations to remove the load from a specific corrugation and distribute it evenly over the entire surface. The catalog number is the same as that of the branded VAZ boot - 2108-2215030. The resource is more than 150 thousand km , it is not afraid of frost and high temperatures.
HORS, RF
Sold in branded packaging, made of red-painted silicone. The packaging indicates a 1-year warranty; it responds well to severe frosts, but the total resource does not exceed 8-10 thousand km , depending on operating conditions. 2108-2215036 is indicated on the case body .
TRACK, country of origin unknown
Made of transparent silicone, packaged in a blister with a sticker stating a one-year or 40 thousand km warranty. It is absolutely not afraid of frost, it will last more than 50,000 km , if it is not a fake. The specified catalog number is 2110-2215030.
BRT, RF
Made of black material, chloroprene rubber. Indifferent to frost, service life at least 40,000 km . Sold without packaging, all information is embossed on the case, catalog number 2110-2215030 .
Trialli RG 0130, Russian Federation
Made of black chloroprene rubber, packaged in a bag with a sticker, logo and factory catalog number 2108-2215030. Judging by the reviews, it has performed well, is not inclined to become dull in the cold, users estimate the average resource to be within 30-40 thousand km .
TSN 3.2.1, China
It makes no sense for replacement, since the resource under normal conditions is no more than 2,000 km. True, it is sold complete with good clamps and lubricant for the CV joint. Marked with serial number 2108-2215030.
There are also a number of domestic and Chinese anthers that correspond to the factory catalog numbers, but you can buy them at your own peril and risk if you do not trust the VAZ cover.
Tests
Anthers of all brands, one piece at a time, were placed in a freezer at a temperature of –40 ºС and kept for 24 hours. The anthers were then tested for fragility. All presented CV joint covers were able to pass this stage.
The second stage was lowering the temperature to –50 ºС and repeating the exposure of the products for one day. Then the anthers were taken out again and checked for fragility by attempting a sharp compression.
The corrugations of the Weber and ATP anthers crumbled at this temperature into small rubber fragments like glass. The Hofer and Trek cases, although they became very hard, did not receive any damage. The remaining samples passed the tests without consequences.
The second stage was checking the samples we purchased for resource.
The boots were lubricated with CV joint grease and installed on a special stand for accelerated life tests. The main parameter of the boot life is, in fact, the number of compression-extension cycles sustained. Therefore, the installation consists of two shafts rotating on bearings, one of which is driven by electric motors located at an angle of 45º relative to each other (requirement GOST R52924-2008). The rotation speed of the drive shaft is 1500 rpm, and knowing the wheel size for the VAZ 2108 (185/60R14), it is quite easy to calculate the expected speed of the car.
The linear speed of the wheel is determined by the formula:
ϑ=ωR, where ω – angular velocity,
which is determined by ω=2πν, where ν is the rotation frequency.
The wheel diameter size is easily calculated:
185/60R14=0.185x0.6x2+14x2.54/100=0.5776 m
The speed of linear motion will be equal to:
ϑ=3.14x1500x0.5776=45.34 m/s (163.2 km/h)
Thus, the warranty mileage of 50 thousand km on the boot stand is completed in 306 hours.
Only the BRT, ATR, Trek, Trialli anthers, as well as the NTN-SNR case, withstood the endurance tests without consequences. The rest exploded in the area of the upper corrugation.
The TSN dust bag lasted only 5 hours. Weber lasted a day. "Horse" - two. The Hofer ruptured after 91 hours of testing.
Shall we get started?
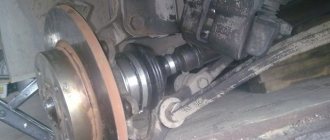
Before replacing the mechanism, you need to drain all the oil from the gearbox. Let's not touch the jack yet! You need to place a brick under the rear wheel of the car, after this procedure we take the 30 socket and, accordingly, loosen the nut. Don't be alarmed, you may need about a half meter long piece of pipe half a meter long as a lever. Remember, we only need to loosen the nut, not remove it yet!- Everything worked out? Go ahead! We lift the car with a jack, and only now completely remove the hub nut along with the washer. Now you can safely remove the wheel from the hub.
- Take the 13mm head and remove the two bolts that secure the ball to the hub. After this, we move the hub and remove the outer grenade from it. Then we attach a pry bar to the internal grenade and, using hammer blows, knock it out of the gearbox. By the way, if you still don’t have a pry bar at hand, a piece of pipe can replace it.
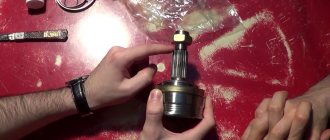
- When the grenade is removed, we clamp its shaft in a vice.
- We remove the clamps from the unusable boot. After that, we shoot down the outer grenade. Attention! In order not to damage it, you need to hit it along the edge. When this operation is completed, remove all old grease from the mechanism, wash it in gasoline or kerosene and wipe it well again, this way you can better remove traces of grease.
- Now we put a new boot on the drive shaft, and using a hammer we hammer the outer CV joint back, after thoroughly lubricating all the parts of the product. After that, we put it on and tighten it with a collar.
- Then we insert the grenade into the gearbox, driving it there. We place it in the hub and return the ball to its place. We put on the hub nut.
Attention! The hub nut does not need to be tightened with great force. After installing the wheels, tighten the bolts without applying much physical force.
- We remove the car from the jack, place a brick under the front wheel and tighten the nuts tightly.
- Well, now pour oil into the gearbox.
That's all. Congratulations! Replacing the boot on the VAZ-2109 is complete!
Replacement
If problems arise with grenades, you should determine which ones have problems. Next we will look at how to change the drive and how to remove it. Additionally, we recommend watching the repair manual video.
The procedure for replacing inner and outer CV joints differs from each other, therefore each stage should be considered separately.
Let's start with the internal.
Inner CV joint
Rubber boots are a vulnerable element of the grenade design. It is not uncommon that by replacing the boot, washing the grenade with gasoline and applying new lubricant, it is possible to solve the problem. If the wear of the CV joint is insignificant, such measures can replace a full repair.
But if you discover the breakdown late, you will have to completely replace the inner CV joints.
- Apply the handbrake and install chocks under the wheels.
- Unscrew the hub nut using a wrench and a socket. Carefully remove the punching elements from the nut with a punch. This way you will be able to preserve the carving on the garnet. The nut itself will need to be replaced with a new one during reassembly.
- The main thing here is to unscrew the nut, lowering the wheels to the ground. Otherwise, you risk breaking the differential and other gearbox components.
- Raise the car using a jack on the desired side, first loosening the wheel nuts. Remove the wheel.
- Drain the gearbox oil. This can be done earlier, at your convenience.
- Release the steering knuckle from the ball joint at the bottom. To do this, unscrew a pair of mounting bolts.
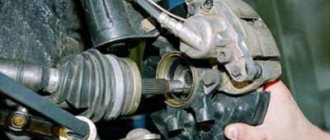
- Since you have already removed the hub nut and unscrewed the ball joint from the steering knuckle, proceed to removing the splined part of the grenade. To do this, pull the brake disc and strut assembly towards you. She has a decent ride. Just remember to turn the steering wheel all the way so that the tip of the steering wheel extends as far as possible.
- Pry the inner grenade with a pry bar, which will allow you to remove the drive.
- Having taken out the CV joint, look at the condition of the oil seal in the gearbox. If you find traces of leaks, be sure to replace the element.
The internal drive (CV joint) is designed to work with smaller angles, its boot is less susceptible to negative influences. Therefore, the internal grenade is changed quite rarely.
Drive shaft assembly process:
- take a new dust cover and put it on the shaft;
- we drive the CV joint onto the splines, after filling it with new lubricant;
- put the boot on the bearing and tighten the clamps;
- We install a plastic plug at the end of the inner CV joint shaft;
- Before mounting the drive in place, install a new retaining ring on the inside of the drive shaft;
- insert and snap the shaft into the gearbox by lightly tapping the shaft with a hammer, preferably through the spacer;
- We insert the outer side of the drive shaft into the splined joint of the hub. We put on the thrust washer;
- be sure to install a new hub nut;
- tighten the nut tightly. If you have a torque wrench, the tightening force should be 25 kg/cm;
- We tighten the nut with a chisel, jamming its edge. To prevent spontaneous unscrewing of the nut;
- reinstall the protective cap of the hub nut;
We carry out the entire procedure for replacing CV joint boots on a VAZ-2109 on the other side of the car, in the same sequence.
After installing the drives, you need to check the reliability of the connections by holding the drive with your hand and shaking it in different directions. In this case, no backlash should appear. Also, play is unacceptable in hub bearings. The wheel should rotate freely, without any difficulty.
With timely detection of defects and replacement of boots, the service life of components and drive mechanisms of your car increases.
Detailed video instructions:
Advice from experienced motorists
Experience is an invaluable thing that can be useful to you in the process of operating and repairing a car. But if you don’t have your own yet, you can use the experience and skills of experienced motorists. They have repeatedly faced situations similar to yours. Failure of a CV joint is definitely no exception.
There are some useful tips on this matter that are worth listening to.
- If you hear a characteristic crunch while driving in a straight line, it means the CV joint has failed. If this crunching noise is heard only when turning, then the problem lies in a faulty joint.
- Before installing a new CV joint, treat the grenade landing site with lubricant. This significantly extends its service life.
- To adjust the CV joint and seat it properly, use wooden attachments. If this is not done, the risk of damaging the new element is very high.
- The boot should be installed as tightly and efficiently as possible. If you don't do this, dirt and dust will soon get there. These components will quickly render it unusable, and repair work will have to be carried out again.
- The lock nut on the hub is tightened with a special torque tool. Moreover, tightening is carried out strictly with the parameters specified in the instruction manual for your VAZ 2114 modification.
- During a routine inspection of the technical condition of your car, be sure to pay attention to the condition of the clamps and rubber elements to ensure their integrity. Such seemingly insignificant components can lead to serious consequences and significant financial costs.
- The purchase of spare parts, including CV joints, should be made only from trusted sellers, certified distributors. If you buy a bad, low-quality part, just trying to save money, you will have to pay even more to eliminate the consequences that the use of such elements led to.
The CV joint is an important component of any car, and replacing it even on your own is not particularly difficult.
Types of CV joints
Before you begin repairs, you need to find out exactly how the unit is designed.
The pair of drives on the VAZ 2109 is equipped with a total of 4 CV joints.
| CV joint type | Peculiarities |
| Interior | There are 2 of them. They transmit torque to the axle shaft from the gearbox |
| Outer | There are also two of them. Installed on the ends of the axle shafts and transmit torque directly to the wheels |
External
This arrangement of grenades ensures the possibility of wheel rotation during turns and constant operation of the suspension system. To put it simply, the outer CV joints are responsible for transmitting torque when cornering, and the inner ones are responsible for the vertical movement of the wheels. These are collisions with bumps, holes, roll in turns, etc.
Interior
This is interesting: How much does 1 liter of gasoline 92 weigh?
Preparation
So, damage to the boot on the VAZ 2199 has been identified. You can replace it and wash the CV joint itself in the garage, the main thing is that there is an inspection hole.
Tools you will need:
- Set of wrenches (socket wrenches, open-end wrenches);
- Set of heads and collars;
- Metal brush;
- WD-40;
- Mount;
- Hammer;
- Jack;
- Wheel chocks;
- Wooden coasters.
You will also need a new boot, CV joint grease-4, a container for collecting oil, a container with gasoline for washing the CV joint, and rags.
It is better to do all work together with an assistant.
For convenience, we will describe the process of replacing the external boot on the left side. The replacement work on the right side is identical.
Asia-Pacific
Country of origin: Russia
The boot has a brand name and marking 2110-2215030-01. Material specified >GR CR CR TE (PEEST) 9998
CV joint on VAZ 2114: replacement without problems
Replacing the CV joint on a VAZ 2114 is done after diagnosing its malfunction. Typically, this unit reliably serves for 100 thousand kilometers. The CV joint can fail earlier if the owner of the car does not look after the integrity of its boots and does not change them in time. Then, through cracks or breaks, a lot of dirt gets into the hinge mechanism, as a result of which the unit very quickly becomes unusable. Signs of a faulty part are a knocking and crunching sound when the front wheels turn in any direction.
An operation such as replacing a CV joint on a VAZ 2110-14 does not take much time. To perform this, you need to install the car on an inspection hole or overpass. You need to place boots under the rear wheel, located at an angle from the one being removed. If there is poor lighting in the inspection ditch, then an LED flashlight, which can be attached to the head using a strap, will not hurt. This will free up both hands for work. Here is a list of other tools for performing substitution:
- a set of spanners or sockets;
- pliers;
- hammer;
- puller for pressing out the ball stud;
- vice;
- wheel wrench and jack;
- screwdriver;
- thick lubricant “CV joint-4”;
- rags.
The extractor for extrusion is an iron cup with a side groove and a threaded rod for extrusion. A fairly common device, it can be found on many car owners.