It is worth noting that the CV joint (constant velocity joint), better known among car enthusiasts under the common name “grenade,” has a fairly long service life. However, as with any other part or assembly, the resource of this element is limited. It is also important to understand that the condition of the CV joint is also greatly influenced by the individual characteristics of vehicle operation.
At some point, the driver may encounter the fact that when driving, extraneous sounds appear in the area where the grenade is installed. In fact, the CV joint crunches, making a characteristic knock when driving with the wheels turned out, etc. This phenomenon is well known to owners of front-wheel drive VAZ cars, as well as various cars of foreign brands.
In any case, if a grenade crunches on a VAZ 2114, VAZ 2115 or another car, the specified element needs to be changed. Next, we will look at how to replace a VAZ 2114 CV joint in a regular garage, as well as what you should pay attention to during this procedure. At the same time, the information below will also allow you to learn how to change the CV joint of a VAZ 2115 or other cars with a similar design.
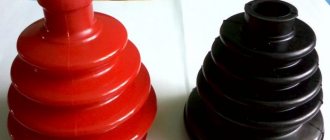
Cost of anthers
The price range is quite wide: from approximately 150 to 1000 rubles.
and higher. It all depends on the make of the car and the manufacturer of the part. Non-original spare parts are cheaper. However, it also happens that the cost is unreasonably high: for example, because of the brand. Thus, the price of covers for a Toyota Land Cruiser reaches 8,000 rubles. The same can be said about other prestigious car brands. But not all car owners are eager to pay that kind of money for essentially an ordinary rubber band, albeit of high quality. Therefore, many simply select covers from other cars that are suitable in size and cost. Causes of boot rupture:
- constant driving through water and mud;
- high torsional load (regular sharp turns);
- careless (unprofessional) repair of suspension parts.
Approximate prices
In Russia, purchasing a new CV joint for a VAZ 2114 will cost from 1,100 to 3,000 rubles .
Approximate prices depending on the type of auto parts:
- External grenade - from 1200 to 1500 rubles .
- Internal - from 1500 to 3000 rubles .
Estimated cost of a grenade depending on the brand:
- AvtoVAZ - from 1400 rubles .
- TRIALLI – from 1200 rubles .
- TORQUE – from 1200 rubles .
- LOEBRO - about 1900 rubles .
- HOLA – about 1200 rubles .
- FINWHALE – from 1100 rubles .
A used, but in good condition, grenade can be bought in Russia for 800-1200 rubles .
Fault diagnosis
The VAZ 2114 has 2 external and 2 internal CV joints. First you need to determine which one is knocking. The optimal test would be on a suspension diagnostic stand. If this is not possible, diagnosis by ear is possible.
Two signs indicate a grenade malfunction in a VAZ 2114:
- the sound resembles a crunch;
- It usually appears when turning.
The simplest and most accurate way to do a garage check is as follows:
- Place the car on a flat surface;
- Turn the wheels to one side (to the middle position or a little further);
- Drive off with medium speed. It is worth remembering that starting too smoothly may not reveal a crunch due to insufficient load on the CV joint, and starting too abruptly may lead to the drive flying out of the wheel.
- Repeat the operation by turning the steering wheel in the other direction. The appearance of a crunch indicates a malfunction of the outer CV joint on the side in which the steering wheel is turned.
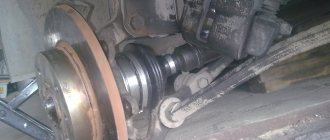
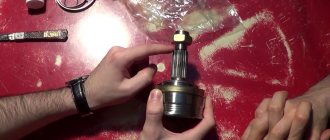
Visual detection of ruptured anthers will also be a sign of a CV joint failure. If you discover a damaged protection for any grenade, it must be immediately removed, disassembled and cleaned. If there is enough grease and there is no significant wear on the hinges yet, it is enough to replace the boot and fill it with new grease. If the wear of the balls is obvious, it is better to change the grenade.
CV joint boot VAZ 2114 with a defect
It is more difficult to diagnose a malfunction of the internal grenade on a VAZ 2114. If it malfunctions, it crunches when starting off in a straight direction, and not when turning. But the same symptoms, for example, include play in the steering rack or wear on the engine mounts.
Sometimes the problem can be diagnosed from the pit by tugging on the drive from the gearbox side: strong play or the appearance of extraneous sounds indicate that the internal CV joint should be replaced.
Installation
1. Replace the retaining ring of the splined shank of the inner joint housing with a new one.
2. Apply grease to the spline and smooth surfaces of the shank.
3. Carefully insert the shank into the oil seal, trying not to damage the working edge of the oil seal with the shaft splines. At the same time, we direct the locking ring with the gap upward.
4. We vigorously insert the drive into the gearbox and make sure that the retaining ring of the inner joint shank is securely fixed and the drive does not move out of the gearbox housing.
5. We carry out further work in the reverse order of disassembly.
Warning! During assembly, a new hub nut must be installed.
Source
Disassembling the drive and replacing the boot
Sequence of work.
The car is driven into a pit, chocks are placed under the wheels, and the car itself is left in first gear.
Before completely removing the wheel, loosen all the wheel nuts.
This is interesting: Installing the rear wing on a VAZ 2110 in the garage
The protective cap of the nut securing the drive to the hub is also removed.
To prevent the nut from unscrewing from the shaft, it is centered around the circumference, which is why it has bends that fit into a groove made in the shaft.
These bends need to be aligned, this is done with a thin screwdriver or a drift and a hammer.
After aligning the bends, using a socket and a powerful wrench, the nut is unscrewed, and the washer located under it is also removed.
Next, the car is jacked up and wooden stands are placed under its sills.
The wheel nuts are unscrewed and the wheel is removed.
Next, work is done under the car.
If there is a crankcase protection, it can be unscrewed. Then the oil from the gearbox is drained through the drain plug into the prepared container.
Next, you need to unscrew the two bolts securing the lower ball joint to the hub.
This will make it possible for the latter to move sideways. At the same time, you can check the condition of the support itself.
The steering wheel must be turned all the way to the left so that the drive is completely shifted in the inner CV joint, ensuring its minimum length.
POPULAR WITH READERS: Replacing the thermostat on a VAZ 2110 of all modifications
After this, the hub is removed from the splines of the drive shaft.
The outside of the drive will be removed.
Then you can go in two ways.
The first way.
Knock down the outer “grenade” without removing the inner CV joint.
To do this, you need to remove the boot clamps, and then cut the boot, and then wipe off the existing grease on the hinge.
Then you need to prevent the drive from moving on the internal hinge.
To do this, take a small vice or a butt wrench, clamp the shaft in them and hold it firmly in your hands.
An assistant, using a soft metal spacer and a hammer, knocks down the CV joint, striking the inner race of the hinge.
With this method, there is no need to drain the oil from the box. But there is a possibility that when striking, the inner race will jump out of the outer inner CV joint.
Also, shooting down a “grenade” in this way is not very convenient, since this work will be done in a limited space.
Second way.
Complete removal of the drive from the vehicle. To do this, a pry bar is driven between the gearbox housing and the internal joint and the shaft entering the gearbox is pulled back and forth.
After this, the drive is completely removed.
IMPORTANT: With this method, the oil must be drained.
The advantage of this method is also the ability to assess the condition and replace the gearbox seal, through which oil often leaks.
In the future we will consider work with the drive completely removed.
How to replace the outer CV joint boot without removing it
This is also possible, at least on domestic cars, but you will have to acquire (or borrow) a special device that stretches the boot. The device is a housing with movable arms attached to it and a connected hose for supplying compressed air. A rubber cover is put on them and they stretch it. All that remains is to pull the device through the grenade removed from the hub and release the levers. The process is worth watching in more detail in the video.
Replacing the inner CV joint boot
To do this, you will have to remove the drive shaft completely. But first you need to remove the outer CV joint, as described above, that is, pull it out of the hub without removing the grenade. Next, drain the oil from the box. After this, unscrew the nuts securing the inner joint (usually there are 6 of them) and insert a flat mounting between the gearbox and the CV joint - the part should come out of the socket. Clamp the part in a vice, then:
- remove the retaining ring using a flat screwdriver;
- pull out the inner CV joint housing and carefully pick out the balls located in the separator;
- remove the clip stopper and the clip itself;
- wash all parts in gasoline;
- install a new boot and, having generously treated everything with lubricant, reassemble in the reverse order;
- install the drive, tighten the drain plug and pour oil into the box.
Complete removal of the drive is also recommended if the grenade was not knocked down when trying to replace the outer CV joint boot. In this case, you can use a vice and achieve your goal. If you don’t need to knock down the grenade to replace it, just put on the cover after removing the inner CV joint, remembering to wash it first and apply new grease to the outside (the part cannot be repaired - it is not removable).
Preparation
So, damage to the boot on the VAZ 2199 has been identified. You can replace it and wash the CV joint itself in the garage, the main thing is that there is an inspection hole.
Tools you will need:
- Set of wrenches (socket wrenches, open-end wrenches);
- Set of heads and collars;
- Metal brush;
- WD-40;
- Mount;
- Hammer;
- Jack;
- Wheel chocks;
- Wooden coasters.
You will also need a new boot, CV joint grease-4, a container for collecting oil, a container with gasoline for washing the CV joint, and rags.
It is better to do all work together with an assistant.
For convenience, we will describe the process of replacing the external boot on the left side. The replacement work on the right side is identical.
Signs of failure of the outer grenade (CV joint)
There are two options here:
- signs that your grenade has already broken
- signs that the grenade will soon come out and break .
This is interesting: KIA Ceed lamps - replacing low and high beams with your own hands
How to understand that a grenade will break soon
Of course, the first sign of a malfunction of the external grenade is a crackling sound . If you hear a crackling noise while driving with the steering wheel turned, it is definitely a CV joint. The greater the angle of rotation of the wheel and the harder you press on the gas, the louder the clicks. Another sign that does not always appear is vibration on the steering wheel at speeds greater than 80 km/h. The vibration is only slightly similar to the vibration from an unbalanced wheel. It usually manifests itself as a slight twitching of the steering wheel.
How to understand that the outer CV joint is broken
If the CV joint breaks, the car will stop moving. In any gear engaged, press the gas, the speed increases, but the car does not move.
How to understand that it is the outer CV joint that has broken, and not the internal one or the clutch in general (the first signs of failure are similar to the signs of a clutch failure)? First of all, start the car and put it in any gear. Next, open the hood and look in turn at each of the shafts going from the box to the wheels (one short, the other long). If any shaft is spinning, it means that the CV joint has broken on this side.
I recommend not just visually looking at the shaft, but touching it with some long, hard object, such as a stick. The main thing is that there is nothing on it that can wrap around the shaft !!! When you touch the shaft with a stick, if it is spinning, you will feel a slight vibration. This is usually done in the dark, because it is difficult to understand whether a cylindrical object is spinning, especially in the dark.
In what cases is it necessary to replace the inner CV joint?
Replacing the internal CV joint on front-wheel drive VAZ vehicles is required if the following symptoms are present:
- Crunching and knocking noises when driving and accelerating in a straight line;
- Vibration and shock when changing gears;
- Significant play when testing by hand;
- If the “grenade” fails completely, the vehicle cannot move further.
» alt=»»> The main reason for the malfunction of the VAZ “grenade” is the entry of water and dirt through the hole in the torn boot. The second possible cause of failure is a sharp press on the gas with the wheels fully turned, although in this case you risk killing the external rather than the internal grenade.
In addition to the above, replacing the internal CV joint on VAZ-2110 and other models may be necessary if the quality of the previously installed joint is poor.
How to remove a vaz shruz
Having determined that it is the external grenade that is broken, we begin to remove it.
How to unscrew the hub nut on a VAZ?
First of all, unscrew the hub nut. To do this, take a 30mm head and a lever, the larger the better. We put bricks under the wheels to prevent the car from rolling (simply putting it in gear is not an option, the wheel will spin) and begin to unscrew the hub nut.
In this matter, the more you weigh, the better, since I very often lacked my weight and leverage of about one and a half meters. I got out of the situation in the following way: I stood completely on the lever, as close to the edge as possible, thereby giving maximum tension to the nut, and hit the lever with a hammer. Usually this method helped me unscrew even the most soured wheel nuts.
One more nuance: if the outer walls of the head come into contact with the walls of the hub, it is better to lubricate the head with mining or lithol, or, in extreme cases, with silicone grease. Thanks to this trick, the head will not bite in the hub.
How to remove a grenade?
The hub nut is unscrewed, now we remove the wheel, unscrew the two bolts that hold the ball joint, disconnect the suspension arm and the hub, move it to the side of the car while lightly tapping the grenade, remove it from the hub. At this point there are two options:
- The grenade is already broken.
- Replacing the grenade due to its crunching sound.
This is interesting: The central locking does not work: how to repair it yourself?
In the first case, you simply remove the outer part of the CV joint from the shaft, then the retaining ring from the drive shaft and knock off the cage with a hammer.
In the second case, removing the CV joint becomes more difficult. You need to deflect the grenade relative to the shaft at the maximum angle so that the bearing balls and their cage are visible.
Now use a hammer to break the jumpers of the cage between the bearing balls and take out the balls one by one. When you take out the last ball, you can remove the body of the grenade, and then its inner part sitting on the shaft, after first removing the locking ring from the shaft.
Of course, you can simply try to knock the grenade off the shaft, but due to the locking ring this will be problematic.
That's it, the CV joint is completely removed. Now let's start installing the new part.
Location
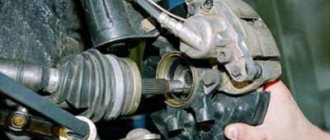
It will be impossible to replace the CV joint on a VAZ 2114 if you do not know where exactly these elements are located. Their location is easy to determine - on both sides of the front suspension at the bottom of the car. They are oblong elements and fit into the hub of each wheel.
CV joint location
That is, getting to the node is not difficult, but this will require certain conditions.
The most important thing is that the replacement procedure is not complicated, which allows you to do the work yourself. But let’s say right away that if you don’t have the time, desire, or are simply not confident in your own skills, it’s better to entrust the repair to specialists. You will spend extra money on this, but you will be sure of the result.
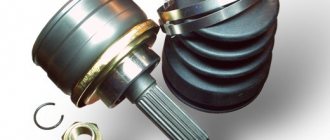
How to install a new CV joint on a VAZ
Be sure to follow this sequence for installing new parts:
- Small clamp.
- Grenade boot.
- Large clamp.
- Retaining ring.
- The CV joint itself.
First, we clean the drive shaft from dust, dirt and old grease. Most CV joints come with lubricant, a boot, two clamps and sometimes a new hub nut. If suddenly there is no lubricant in the kit, it is better to use graphite lubricant, and if it is not available, then simple lithol. First of all, we put on a small collar. Then the boot (it should go behind the limiting washer) and a large clamp. Then we put a retaining ring on the drive shaft. Now open the tube of lubricant and completely squeeze it into the grenade. Now it's time to put the CV joint on the drive. Because of the locking ring, it will be difficult to insert the drive into the grenade, so we take a hammer and lightly, trying not to damage the thread, press the grenade into place. Now you need to put the boot on the CV joint and tighten the clamps. Assembly occurs in reverse disassembly sequence, but there is one nuance! Do not overtighten the hub nut! This may cause the bearing to hum. The hub nut must be tightened with a force of 225.0–250.0 N*m. Of course, few people have a torque wrench. So, tighten the nut tightly, but not with all your might. In theory, a force of a maximum of 25 kg will need to be applied to a meter-long knob. But, the extension pipe will spring back under such force, so how can you describe it exactly? But obviously there is no need to jump with weight.
Removal
3. Drain the oil from the gearbox (see “Gearbox - oil change”).
4. Remove the hub cap and loosen the hub nut (see “Front wheel hub bearing - replacement”).
5. Loosen the wheel bolts (see “Wheel - replacement”).
6. Place the car on a reliable stand and remove the front wheel (see “Wheel - replacement”).
7. Loosen the three self-locking nuts securing the upper support of the suspension strut and unscrew the nuts a few turns (see “Front suspension strut - removal and installation”).
17 mm socket wrench
unscrew the two bolts securing the ball joint to the steering knuckle (see “Ball joint of the strut - removal and installation”).
30 mm socket wrench
finally unscrew the wheel hub nut (see “Front wheel hub bearing - replacement”).
10. Remove the shank of the outer hinge from the hub. If necessary, knock it out through a wooden block or press it out using a universal three-jaw puller (see “Front wheel hub bearing - replacement”).
Note: When removing the left drive, turn the steering wheel all the way to the right; When removing the right drive, turn the steering wheel all the way to the left.
11. Remove the brake hose from the bracket on the suspension strut. Carefully, without allowing too much tension on the brake hose, pull the lower part of the strut outward, remove the shank of the outer joint from the hub and carefully lower the drive onto the wishbone of the suspension.
12. Using the mounting blade as a lever (resting its end against the end of the internal hinge body), we move the hinge outward, overcoming the resistance of the locking ring.
13. Supporting the internal joint, carefully (being careful not to damage the drive oil seal with the splines of the joint shank) remove the joint from the gearbox and remove the drive assembly from the car.
What to do if the boot breaks on the road
The situation is not uncommon: you had to change a tire while on the road and you noticed that the boot was torn. It is highly not recommended to leave “everything as it is” and go to the nearest car service: CV joint is not a cheap part at all, especially if it is on an expensive foreign car. Options:
- Place the car on a jack (if it is not already on it), pull out the old contaminated grease through the hole and fill the boot with grease until it stops, and to prevent it from falling out when driving, wrap the problem area with a plastic bag and tighten it along the corrugation with a rope.
- Wrap the torn case with opaque tape or electrical tape. This “alternative” will last for 500 kilometers until the boot is changed.
On the road, check whether your “winding” is in place: getting dirt under it will sharply reduce the life of the CV joint.