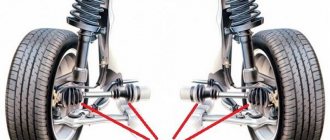
A constant velocity joint (CV joint) is a unit through which torque is transmitted from the transmission unit to the drive wheels. This device is also popularly called a “grenade”. There are both external CV joints, which directly engage the wheel hub, and an internal CV joint, which is adjacent to the gearbox. Both hinges on one side of the car are connected to each other by a metal pipe, and the entire structure is called an axle shaft. It happens that malfunctions appear, so many drivers are interested in how to change them.
The CV joint device is not particularly complicated. The unit includes a housing, a boot and a bearing, the separator of which is capable of rotating at different angles to the axle shaft, providing the ability to transmit rotation when the wheels are turned through the steering, therefore, using the tips, you can figure out on your own how to change the CV joint.
The video demonstrates the procedure for replacing the CV joint in the Lada Kalina chassis:
For models of domestic origin, including the Lada Kalina, failure of the hinge we are considering is a fairly common case. The most common factor causing the breakdown of this unit is a torn boot. This is due to the fact that dirt and moisture enter the working area of the hinge, eventually washing away the bearing lubricant, which causes wear and loss of functionality. And the outer CV joint needs to be replaced. You can do this procedure yourself.
How do you understand that the CV joint boot needs to be replaced?
- Everything is very simple, you drive into a pit and check the boot, if there is no damage on its surface and the boot is “dry” (no traces of oil), you can safely continue driving from time to time, performing this simple check procedure.
- Sometimes problems with the CV joint boot manifest themselves in a different way, for example, during a sharp start, a single crunch or knock may be heard in the area of the front wheels. For some, a crunching sound occurs when turning the wheels while driving. In such cases, you most likely won’t get away with just replacing the boot and you will have to change the entire “grenade” assembly.
Well, let’s finish this brief excursion and move on directly to the troubleshooting process, but first, prepare the tool.
You will need:
- Jack, hammer, wooden block;
- Keys to “17”, “30”;
- Mount, spray can;
- Flat-head screwdriver, special pliers for installing clamps;
- New boot + CV joint grease, graphite grease, kerosene or similar flushing fluid.
Signs of CV joint failure
The first signs of a faulty grenade are crunching sounds in the area of the front wheel on turned out wheels when starting to move. When the fault is severe, noise appears at less significant loads.
The anther begins to “repair”
In order to prevent such damage in advance, you should periodically inspect the anthers from the outside for cracks and integrity in general.
How to replace the CV joint boot on a Lada Kalina?
We will replace the boot on the removed axle shaft, this will simplify and speed up the work process.
1. Place the car on a flat surface, tighten the handbrake and place wedges or something similar under the rear wheels to prevent the car from rolling.
2. Take the “balloon” and start removing the wheel. Don't rush to jack up the car; remove the bolts while the car is standing on four points. After this, you can jack up one side on which the work will be done. It is dangerous to work on a jack, so be on the safe side and place a block or metal jack under the car.
Replacing the outer CV joint
In the process of replacing the outer CV joint
The work of replacing an outer or inner CV joint is not very difficult and can be done by any motorist who has at least once repaired a car with his own hands. And in order for the repair to be easier and faster, you need to prepare the following tools:
Step-by-step disassembly procedure
After you are convinced of the malfunction of one or another CV joint, you can begin to work.
- First of all, we tear off the mounting bolts from the wheel and the hub nut, then we set the wheel chocks under the rear wheels. (To make it easier to tear off the nuts, it is better to use an extension for the wrench - approx.).
- We put the car on a jack and hang the wheel.
- We remove the wheel and, for greater reliability, place it under the car next to the jack.
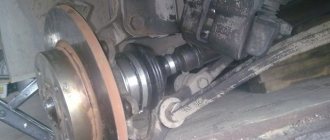
- Now that this picture appears before you, all that remains is to unscrew the 2 bolts that secure the ball joint to the steering knuckle.
Unscrew the bolts marked with a red marker on both sides.
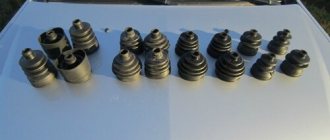
CV joint VAZ. Lada grenade. Comparison of different manufacturers
They counterfeit everything related to the AvtoVAZ assembly line. Any part purchased at a car store can be a counterfeit...
BEWARE OF FAKE! CV joint LADA Image. features
CV Joint Review
(grenades) for VAZ 2108-2115.
Without causing strong blows, the CV joint will move out of place
If the internal CV joint is supposed to be replaced, then work 1 to 6 should be performed as well, after which, using a pry bar, we remove it from the gearbox and take out the entire assembly.
We take the inner CV joint assembled with the axle shaft to a vice where we clamp it and dismantle it.
- After the “bare” axle shaft appeared before us, the work on removing the CV joint can be considered completed.
Step-by-step assembly procedure
Work on assembling all parts should be carried out in the same order as removal, however, there are some nuances in these works.
- First of all, we put the new boot on the axle shaft; this may cause some difficulties. To make the task easier, the axle shaft can be coated with lubricant.
- Then add lubricant to the CV joint.
New lubricant added to CV joint
All work on changing the CV joint, if the work is carried out correctly, will not take more than 1.5-2 hours. You can check the quality of the work performed immediately after the repair. If you start driving with the wheels turned to the side and there is no crackling, squeaking or noise, it means that the repair was carried out correctly and the car can be safely operated further.
How to determine a breakdown?
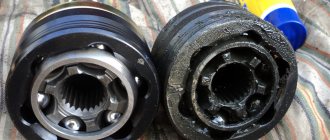
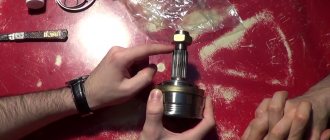
The grenade is a ball bearing, the cages of which have transverse grooves. Due to this, the angle between the driven and driven axle shaft changes. Thus, the CV joint not only transmits torque, but also changes the angle between the axle shafts. In view of this, over time, it develops. In places where the parts do not fit tightly, backlash and extraneous noise are formed. In fact, this is accompanied by a characteristic crunch. It occurs due to large wear on the balls that move along the grooves. The crunch can appear both during straight-line movement and when turning. In the latter case, most likely, the external grenade of the Kalina requires replacement. This sign should not be ignored, since the bearing may fall apart at high speed.
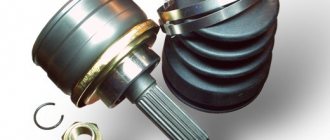
Device
In terms of their design, the inner and outer CV joints are very similar.
- Half shaft.
- Clamp and boot.
- Clip.
- Hinge housing.
- Separator.
- Ball.
- Retaining and cone ring.
- Spring washer.
Thanks to this device, the elements are capable of transmitting torque to the wheels at an angle of up to 45 degrees (not only in the horizontal, but also in the vertical plane).
Let's get to work. Dismantling the CV joint
First of all, put the car on the handbrake (or install anti-rollbacks). Then we remove the wheel bolts and hub nut. The latter may not be supplied, so we use an extension cord. Next, place the car on a jack, lift its front part and remove the wheel. Then we find two bolts that secure the grenade to the steering knuckle.
Now we twist the steering wheel to its extreme position (so that the disc looks out of the wheel arch). Pull back the steering knuckle along with the shock absorber strut. Next, remove the outer part of the hub with the external “grenade”. If it is tight, you can use a hammer. But you need to hit through a wooden block, otherwise the part will be seriously damaged.
Next (if it is an external hinge) remove the old boot and clamp. Now you need to get the “grenade” itself out of the hub. To do this, you can use a puller or hit the CV joint with a hammer. In this case, you need to rotate its axle shafts.
If it is intended to replace the internal “grenade” on the Kalina, all operations are carried out in a similar way. The only thing is that the part is removed from the box using a pry bar, without hitting it with a hammer.
Assembly procedure step by step
We carry out the entire list of assembly operations in a Lada Kalina car in strictly reverse order. During the procedure, it is necessary to take into account some nuances.
- First, we put the boot on the axle shaft. If this is difficult, then its surface can be lubricated with the grease supplied with the new hinge kit.
- Now we fill the same grease into the CV joint bearing, and the remainder into the internal cavity of the boot.
- We install the hinge on the axle shaft. We also use a hammer, applying a shock load to the body. The retaining ring should be replaced.
- When the “grenade” “sits” in its place, we push the boot, after squeezing it with our hands to remove excess air. We install clamps.
- We do the same when replacing the internal hinge.
- Now we install the axle shaft into the transmission housing until the shaft engages with the side gear. Don’t forget to fill the unit with oil afterwards.
- We insert the outer joint into the steering knuckle until it fully engages with the splined race of the hub. Screw on the central nut (do not tighten it).
- We return the ball joint to its place.
- We hang the wheel and do not tighten its fasteners too much.
- We lower the car (we do not unload the jack completely). Tighten all fasteners to the required torques. We remove the jack and stops. Replacement of the outer CV joint is complete.
The owner of LADA Kalina will spend no more than 3 hours of his time to complete the full list of replacement actions. We check the correct installation of the hinges. To do this, we start driving the car with the wheels turned out as far as possible. We observe the absence of crunching and other characteristic sounds from the axle shaft. Now you know how to change a faulty CV joint.
Lada Granta buy on credit
Installation of 16 cm speakers in the front doors of Lada Granta
Grant brake pads
Assembly
When the old element is disassembled, it's time to prepare the new one for installation. Please note that when installing the CV joint, the boot of the Kalina “grenade” is also replaced. It is strictly forbidden to use the old one, even if it is intact. The element has already undergone wear and tear, and the clamps will not provide the same tightening.
Selection of CV joints
CV joint in original packaging. Usually inside the package is a pomegranate produced by VIS
There is no consensus among car owners regarding the choice of one or another brand of constant velocity joint, but clear leaders stand out:
- VIS.
- GNK.
Original packaging of GNK CV joint
Inside the GNK CV joint package - boot, CV joint, clamps
GNK outer CV joint installed
- GLO.
How to extend the resource?
Typically, these bearings travel 250-300 thousand kilometers or more. They have a very durable construction. However, there are several factors that can significantly reduce their durability. This is the condition of the anther. It is because of this that water, dust, and sand get inside. As a result, the lubricant turns into a thick abrasive, which has a destructive effect on the bearing. How to prevent this? During operation, you should periodically check the condition of the boot on the CV joint. If it has cracks or tears, it needs to be replaced immediately.
On a note!
Constant velocity joints, which are sold in the store in sets, include grease, a boot and all the necessary clamps in their sets. Pay special attention to this fact so as not to overpay for additional spare parts and accessories.
I had to change more than one CV joint. Of course, I had to tinker with the first one for a couple of hours, since I didn’t really know all the subtleties, but I changed the subsequent ones almost with my eyes closed.
I bought a grenade for viburnum. The assembly includes the grenade itself, a finger guard and clamps. You can change it in an hour without rushing, it can be done faster. But why rush in such a matter?
Lada Kalina is a front-wheel drive car, the engine and gearbox are located across the body. The main gear drives the wheels. CV joint - a constant velocity joint (popularly called a “grenade”) provides torque. There are several such hinges in the Lada Kalina (internal and external). A common reason for repairing Kalina is replacing the CV joint boot, which quickly wears out and breaks.
Which CV joint crunches?
As already mentioned, each wheel has two grenades, internal and external. But a characteristic crunch may appear in both the first and second parts. It is the outer CV joint that fails faster, which is why many drivers often diagnose its problems, forgetting that the inner joint can also be subject to wear. The result is unnecessary costs while the problem is never resolved.
There are two ways to determine as reliably as possible which CV joint is crunching:
- With the car stationary, you should alternately pull the axles near each hinge. This needs to be done left and right. There should be no backlash. If it is observed, it means that there is a malfunction on the CV joint near which the axle is unstable.
- While driving, you need to listen carefully to sounds.
First of all, it is the outer hinge that is diagnosed. To do this, when driving on a flat surface, the steering wheel is turned as much as possible alternately left and right. When turning, the right or left joints may knock, this indicates a malfunction of one of the outer CV joints.
In order to determine a breakdown in the internal joint, you should choose the most uneven road with a large number of holes. The part will feel a crunch when entering a hole. Accordingly, the left or right CV joint will knock. In this case, you should drive into the recesses alternately with the right and left wheels.
CV joint assembly
Assembly is carried out according to the following scheme:
- installation of a separator with a cage;
- balls are driven into the cage, first two, then all the rest one by one;
- we make sure that the grooves of the inner and outer parts of the CV joint do not coincide, they must overlap, otherwise the unit will immediately jam;
- parts are rubbed with lubricant only after the balls are in the cage;
- a boot is put on the assembly;
- the structure is assembled in the reverse order.
Replacing the inner CV joint with your own hands
» alt=»»> The procedure for replacing a “grenade” is the same for the entire front-wheel drive VAZ line, starting with 2108 and ending with VAZ-2115, “Kalina”, “Priora”, “Grant”. Before removing the inner CV joint, the oil is drained from the gearbox. Then proceed according to the following algorithm:
- Unlock and unscrew the hub nut. To make the work easier, a piece of pipe about 1 meter long should be put on the key.
- The desired side of the car is hung on a jack or lift.
- Remove the wheel.
- Remove the washer located under the hub nut installation site.
- Disconnect the steering tip.
- The CV joint is removed from the hub.
- Using a pry bar, remove the drive and internal joint from the gearbox.
Note: when removing both drives at the same time, a suitable mandrel should be installed in their place.
How to change the “grenade” with the drive removed? To do this, clamp the shaft in a vice, loosen the clamps and remove the boot. After this, the hinge is knocked off the splines with hammer blows.
The new CV joint should be hammered by applying light blows to its end with a hammer. For this it is better to use a wooden mallet. The “grenade” is first filled with a special lubricant.
Before installing a new constant velocity joint, it is necessary to clean its seat from old grease and install a new boot. Assembly is carried out in reverse order.
The repair is considered complete after successful sea trials. In this case, there should be no extraneous sounds from the drive side in all modes of vehicle movement.
How to identify a malfunction?
CV joint is a design that is a complicated version of the cardan and gear drive. Just like the cardan, the grenade ensures the transmission of torque when the direction of the axes changes. And just like a gear drive, a CV joint engages between the driving and driven elements, only the role of the teeth in this case is played by balls moving in the longitudinal recesses.
Since the balls constantly move along the grooves, metal is produced there over time, which leads to the appearance of extraneous noise. If you ignore the first symptoms of a serious defect and postpone inspection of the grenades until later, one of the units may collapse during the trip.
Lada Kalina wagon 1.6 8v › Logbook › Kalina inner CV joint oil seal replacement. (Drive seal)
What is this? Is the seal leaking? He's darling!
Jacked it up and removed the front left wheel:
I drained the oil from the box into a basin:
I hung them on a rope) They shouldn’t be hanging from the brake hoses! :
Unscrewed the ball joint from the hub:
We place a thick beam under the hub so that it does not twitch.
Unscrewed the steering knuckle:
Attention! I also unscrewed the two bolts securing the strut to the hub, because I decided to replace the “leaked” strut at the same time. If the rack does not require replacement, then these bolts:
Under no circumstances should you touch it, as it will disturb the wheel alignment. To maintain the “camber” you need to unscrew 3 nuts:
This will allow us to untie the strut from the body, thereby giving the hub more freedom to move when we pick out the CV joint from the leaking oil seal.
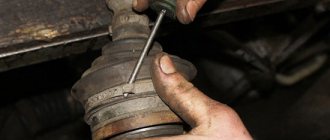
To pick out the CV joint we need a high-tech tool:
We insert the end of the nail puller into the gap between the box and the CV joint:
and begin to furiously uproot the CV joint from the oil seal. It comes out very tight! Therefore, you need to do it fiercely)
There is a retaining ring at the end of the CV joint. It must be alive!
We uproot the old oil seal:
We insert a new oil seal. I stuck it in like this: I leaned the old one against the new one and lightly hit the old one with a hammer.
Afterwards, you need to hammer the CV joint back. It should not be particularly bent relative to the shaft. The straighter you keep the CV joint on the shaft, the better.
I inserted the CV joint, supported the shaft, supported the hub and hit the hub a couple of times with a sledgehammer through a wooden board. The CV joint is in place.
CV joint repair
As mentioned above, the hinge cannot be repaired. Conventionally, one of the repair measures includes washing the “grenade” after driving with a damaged boot.
Washing is carried out at the same time when the damaged boot on the pomegranate is replaced. The hinge is carefully knocked off the shaft, inspected for damage and thoroughly washed to remove any dirt and grease in gasoline or kerosene.
After washing, the assembly is filled with lubricant and mounted in place, having previously installed the boot. The procedure makes sense only if there are no obvious signs of a joint malfunction.
A crunchy or knocking part definitely needs to be replaced, since wear forms on the working surfaces of the inner race, and it is no longer possible to stop the destruction. Continued operation of the vehicle may be dangerous for the driver and other road users.
The main reason for the malfunction of CV joints (constant velocity joint) on Kalina is the depressurization of the CV joint boots. Initially, incorrectly installed anthers, or rather loosely tightened clamps and leaky or worn out anthers, do not provide a normal seal to the assembly. Water and dirt begin to get under them. Gradually, the lubricant turns into a rusty mess and ceases to perform its functions. The first sign of a faulty CV joint is a crunching sound in the area of the front wheel when the wheels are turned out when starting to move. In more advanced cases, such a crunch appears with less pronounced loads on the wheel.
Replacing the outer CV joint on a viburnum
Replacing the outer CV joint on a Lada Kalina car is not a serious problem. A person who has at least a minimal understanding of car repairs with their own hands can cope with this operation.
To replace the outer CV joint on the Lada Kalina we will need:
1. Ratchet or wrench 2. Extension for extending the wrench or ratchet (a piece of pipe of suitable diameter will do) 3. Socket 17 4. Socket 30 5. Hammer 6. Jack
Replacing the inner CV joint on a viburnum
First you need to hang the wheel. Before putting the car on a jack, you need to remove the wheel bolts and the wheel nut. Using a wrench and a 30mm socket, we tear off the hub nut. To do this, it is better to extend the knob (for example, with a metal pipe of a suitable diameter). We unscrew the wheel bolts with a spray bottle. After we remove the wheel and nut, the following picture appears before us:
Now you need to unscrew the 2 bolts securing the lower ball joint to the steering knuckle. They are unscrewed using a ratchet or a wrench and a 17mm socket.
Along with the CV joint replacement procedure, we replaced the brake pads.
After we unscrew the ball from the steering knuckle, we have access to the CV joint. Now, by carefully hitting the CV joint (in the place where the hub nut was located) through the lining, so as not to damage the thread, carefully knock the CV joint out of the hub. For convenience, you can turn the wheels out.
How to change the inner CV joint on Kalina, Priora, Nexia
The inner CV joint is one of the most important mechanisms in the transmission system. Its purpose is to transmit torque from the transmission directly to the front wheels. Most modern front-wheel drive cars are equipped with this part, and each drive is equipped with two CV joints: internal and front.
Failure of this small part if not corrected in a timely manner can lead to wear and damage to other important parts of the transmission. To prevent such an unpleasant situation, the car owner must know:
- signs of CV joint failure;
- basic diagnostic methods.
And also be able, if necessary, to replace a damaged mechanism with a new one. This does not require extensive experience in car repair, therefore, if desired, almost anyone who confidently holds a wrench in their hands can cope with the task. Next, the features of replacing the internal CV joint will be described.