The purpose of power steering is to provide more convenient steering wheel control. Today, the power steering system is installed on Gazelle and many modern cars. You can learn more about the device, malfunctions and repair of the unit at home from this material.
Device
Both the electric power steering on the Gazelle and the power steering are designed for more comfortable steering. First, let's analyze the power steering device on the Gazelle. We are talking about both the Gazelle Business with the 405 engine and other models in this line.
So, what is the system device:
- Power steering pump. This circuit element ensures optimal circulation of consumables in the system, as well as pressure.
- Steering gearbox with distribution element. This device allows you to provide the air flow necessary to direct the oil into the desired cylinder cavity or back into the tank.
- Another component of the system is the cylinder. With its help, the pressure of the consumable material is converted into the movement of the piston, as well as the rod.
- The consumable material itself, that is, oil. The fluid transmits force from the power steering pump to the cylinder. In addition, the oil provides lubrication of all rubbing elements of the device.
GAZ Gazelle Improvizator › Logbook › Installing power steering 3110 on Gazelle
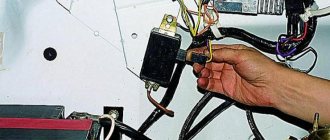
It so happened that until you try it yourself, the thought will not disappear from your head ((( Since the donor was bought almost a year ago in the form of a Volga 3110 with power steering and a 406 engine, the engine was successfully installed. But the power steering still lay there and did not give me peace head(((Searching for information on who has already installed this power steering on the Gazelle, I couldn’t find it(((And it lies there and eats the brain— “Put me in Ivanushka, and the steering wheel will be easier, with one finger!” Even though I’m not Ivanushka, I’ll get rid of this thought not easy, I decided to BET!
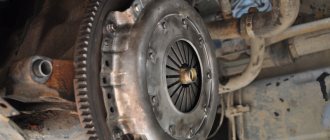
And so there is the whole set from the Volga - this is +! What immediately catches your eye is that the steering gears operate in different planes! But this does not confuse or scare us in terms of installation! I took off the old machine (gearbox) and figured out how to install a new one. It is necessary to make a spacer from the frame about 5 cm, since the design does not allow it any other way (((but it doesn’t matter. We go to the Garage, profile pipes of different sections, an angle grinder, welding... and everything that is needed. We make an adapter - a spacer, drill holes for fastenings into the standard holes in the frame and for fastening the gearbox, we weld them in, and where it is not possible, we tightly insert spacers from a round pipe, so that when we mount all this, the profile does not press through and there is a rigid structure!, etc. we mount the machine, the pump on its place, the tank, fill it with oil, and yes, we also make a steering rod.
So what do we have? I started it, ran out the oil, turned the steering wheel and didn’t feel any effort at all(((the steering wheel is very light(((it really turns with one finger - this is of course a plus when maneuvering in difficult alleys or gardens, where the roads are narrow and it is difficult to enter the territory - but at speed you can control the car will be difficult without feeling the steering wheel. I don’t even know whether to put a plus or a minus here - let everyone decide for themselves!
Typical faults and solutions
Like any component, power steering can fail from time to time.
The main malfunctions and methods for eliminating them are given below:
- The system's drive belt is worn or poorly tensioned. In this case, the belt is either changed or its position is adjusted.
- The steering wheel does not turn well, this can be due to wear on the strap, a low oil level in the system, a reduced engine speed, or a clogged filter. In addition, the problem may be low pump pressure or an air lock in the lines. Depending on the problem, the solution may involve adding consumables, adjusting the idle speed, replacing the filter, or repairing the pump. It would be a good idea to check the tightness of the connections.
- There is a mechanical failure in the operation of the steering system; it needs to be diagnosed.
- If the pump does not work, you need to either repair it using a repair kit or change the seals.
- Wear of steering elements or violation of drive geometry. Failed parts should be replaced.
- If hydraulic fluid is escaping from the relief valve, you need to locate the leak and fix the problem. The reason may lie in the inoperability of the pump; its operating pressure should be checked.
- If the tires are damaged or worn out, it is necessary to identify the faulty elements and replace or repair them.
Repair instructions for power steering pump
As you might have guessed from the previous paragraph, if the power steering on a Gazelle does not work, then this is due to the pump. To repair this element in a car with your own hands, you will need to purchase a repair kit in advance. You can buy it at any themed store. The main difficulty in repair is that the pump is not dismountable.
The repair procedure is carried out as follows:
- Remove the pump and disassemble it according to the instructions included in the kit.
- Clean the device from dirt; there may be signs of the cause of failure on the case. Usually the problem lies in the wear of the oil seal, then it will need to be replaced. When installing a new oil seal, the shaft must be modified.
- The oil seal can be installed in several ways. You can build a special recess on the outer part of the element, drill a corresponding threaded hole in the wall of the device, and then secure the oil seal with screws. You can also fix this part in the middle of the pump using specially curved ends of the housing.
- When the replacement of the element is completed, it will be necessary to reassemble the system in the reverse order. Please note that after the repair is completed, you may hear uncharacteristic noise when the power steering is operating. This is the grinding in of the new oil seal, so there is no need to worry about this. When the repair is completed, it is necessary to change the oil in the system.
7.1.4. Steering mechanism with hydraulic booster.
Removing the power steering mechanism
It is more convenient to work together. Drain the oil from the power steering system (see section “7.1.3. Maintenance of the hydraulic steering system”).
Remove the universal joint fork from the steering shaft. If necessary, move the steering column up (see section “7.1.1. Checking the technical condition of the steering and steering column”). We disconnect the longitudinal link from the bipod (see section “7.1.2. Steering shaft universal joints, steering rods and pendulum arms”). Disconnect the thin hose from the power steering reservoir (see section “7.1.3. Maintenance of the hydraulic steering system”).
Using a 19mm head we loosen...
...and using a wrench of the same size, unscrew the three bolts securing the steering mechanism to the bracket. At the same time, the assistant holds...
...and removes the steering gear. We clamp the mechanism in a vice...
...with a 22mm wrench we unscrew the bolt fitting...
...and remove the drain hose. We install the mechanism in reverse order.
Adjusting the power steering mechanism
Adjustment involves two operations: adjusting the propeller thrust bearings and adjusting the gearing. Adjusting the thrust bearings of the screw We work on the inspection hole. In order to determine the need for adjustment, set the steering wheel to the middle position. We disconnect the longitudinal steering rod from the bipod (see section “7.1.2. Steering shaft universal joints, steering rods and pendulum arms”).
Holding the propeller fork of the input shaft of the steering mechanism, we swing the bipod with the other hand. If the input shaft has noticeable play, adjust the bearings. To do this, remove the steering mechanism (see above “Removing the power steering mechanism”) and secure it in a vice.
We straighten the beaded collar of the adjusting nut.
Use a special wrench to turn the nut clockwise...
...while constantly shaking the bipod, we control the play until it is completely eliminated.
We lock the adjusting nut with a bead, placing sections of its flange into the grooves of the crankcase.
Gear adjustment
The gearing is adjusted only after the play in the screw bearings has been eliminated. On a mechanism mounted in a vice,…
...holding the input shaft with a 16 key,...
...we shake the bipod. The play should not be felt by hand (exceed 0.3 mm at the end of the bipod). Otherwise, remove the bipod from the sector shaft. We treat the connection with penetrating liquid.
We mark with a center punch the relative position of the bipod and the sector shaft.
Using a 32mm wrench, unscrew the bipod nut and remove its spring washer. We install the puller on the bipod and shaft.
By tightening the puller screw and applying sharp blows to the side of the bipod,...
...let's take it off. Done on the shaft.
...four double grooves,...
...and in the bipod hole there are four double slots.
Remove the plastic covers from the slotted...
...and the opposite end of the sector shaft.
Using a 13mm wrench, loosen the locknuts and using a 12mm wrench, unscrew the two locking bolts.
Using a thin beard with a blunt end, we straighten the holes on the covers of the outer rings of the sector shaft.
Using a special wrench, we turn the outer eccentric rings of the bearings in the crankcase holes clockwise from the side of the splined end of the sector shaft. At the same time, we wiggle the input shaft with a “16” wrench to determine the moment at which the resistance to its rotation increases, at which we stop adjusting. When adjusting, it is necessary to exclude the possibility of skew of the sector shaft, for which we turn both bearings alternately at a small angle until the gaps in the mesh are eliminated. Having placed the bipod on the splines of the sector shaft, we finally check that there is no play.
We fix the eccentric rings from turning by bending their collars in the crankcase holes with a bead.
We remove the rubber seal of the input shaft, clean it, fill it with any lubricant, and install it in place. We assemble and install the mechanism by applying CV joint-4 or ShRB-4 lubricant to the spline joint of the bipod.
Replacing power steering hoses
Drain the oil from the power steering system, remove the hoses from the reservoir pipes (see section “7.1.3. Maintenance of the hydraulic steering system”). We remove the engine splash guard (see section “9.1.1. Removing and replacing external body parts”).
Using a 22mm wrench, unscrew the bolt fitting from the power steering and remove the drain hose (see above, “Removing the power steering mechanism”).
Using a 17mm wrench, unscrew the fitting of the injection hose. For clarity, all subsequent operations are shown on the removed power steering pump (see section “7.1.5. Power steering pump”). We install new hoses in the reverse order, then fill in the oil and bleed the hydraulic system (see section “7.1.3. Maintenance of the hydraulic steering system”).
Basic information about the hydraulic booster
Power steering or, as it is abbreviated as power steering, is a vehicle’s hydraulic system, part of the steering mechanism, which is designed to facilitate the direction of movement of the vehicle while maintaining the necessary feedback, as well as ensuring stability of operation and unambiguity of the specified trajectory. In addition, the power steering is designed in such a way that if it fails, the steering wheel will function, but in this case the steering wheel will turn a little harder. Power steering is one of the most important steering components of any vehicle. The main purpose of power steering is to create lateral forces when turning the steering wheel due to the presence of an electric drive. Almost all modern vehicles are equipped with power steering.
Experienced motorists highlight several main advantages of power steering on Gazelle cars, such as:
- High level of reliability;
- High information content;
- Low fuel costs;
- Convenience of adjusting the technical characteristics of the manual.
The main disadvantages of power steering for Gazelle cars include:
- High cost;
- Difficulty in establishing;
- Significant changes to the steering system of the vehicle;
- Needs regular maintenance.
How does power steering work for Gazelle cars?
- Pump. Thanks to this device, circulation of working fluid and pressure is ensured.
- Steering gearbox with distributor. With its help, an air flow is provided that directs the oil into the required cavity of the cylinder or back into the tank.
- Cylinder. With the help of a cylinder, fluid pressure is converted into movement of the piston and rod.
- Oil that transmits force from the pump to the cylinder and also lubricates all friction pairs.
How is power steering fluid replaced?
Power steering oil needs to be changed periodically, and the frequency of change depends on the condition of the steering wheel, the characteristics of the fluid, and the brand of the steering wheel. That is, when the steering wheel is difficult to turn or noise is heard when turning, you need to add a little or completely replace the power steering fluid. It is necessary to replace the fluid in the power steering almost every sixty thousand kilometers; this is, so to speak, a partial repair of the power steering. So, how to replace the fluid in the power steering on a Gazelle car?
- Place the car on a jack or inspection hole;
- Hang up the front car wheels;
- Disconnect the return hose;
- Drain the power steering fluid from the power steering reservoir;
- Remove and wash the tank containing the working fluid;
- Install the tank but do not attach the return hose;
- Start the engine and turn the steering wheel all the way to idle speed;
- Completely drain the system;
- Turn off the engine;
- Fill the tank with suitable liquid;
- Start the engine and increase the speed to a thousand revolutions per minute;
- After fluid begins to flow from the return hose, turn off the car engine;
- Repeat the previous steps a couple of times until all air has been removed from the amplifier system;
- Connect the return hose to the tank;
- Add fluid to the required level;
- Start the car engine and at a speed of approximately one thousand revolutions per minute, turn the steering wheel until it stops several times;
- Check the foaming liquid for foaming. If the liquid foams, continue pumping.
- Stop the engine and check the fluid level in relation to the functioning amplifier;
- Set the fluid level in the amplifier to the appropriate level;
- After some time, check the air amplifier, as well as the fluid level;
- The fluid replacement is complete, all that remains is to put everything back together in reverse order.
The procedure for adjusting the steering gear of a Gazelle car
The steering gearbox on Gazelle cars is installed regardless of the presence of a hydraulic booster. It increases traffic reliability, driver and passenger safety. Let's look at the signs of malfunctions and ways to adjust the Gazelle steering gear.
Signs of trouble
Control units wear out first because they are constantly under heavy load. The steering gearbox in this regard is the most risky unit. After a certain period of use, signs of wear appear:
- The occurrence of an extraneous knock or vibration felt by the driver through the steering wheel.
- Significant effort is required when turning the steering wheel.
- The presence of play is more than 20° for passenger vehicles or 25° for trucks.
- Oil leakage from the gearbox. To some extent, oil is always present on the body, but noticeable discharge is a sign of failure of the seals.
The presence of these signs indicates that the Gazelle's steering gear requires adjustment. You should not delay this procedure, as some malfunctions inevitably create the basis for even more serious problems.
Design and procedure for dismantling the control unit of a Gazelle car
Composition of the Gazelle control unit:
- A wheel mounted on a shaft and located inside a column that can be adjusted in height and tilt.
- Rotation mechanism.
- Drive unit.
Repair of the Gazelle steering wheel is carried out as needed, mainly when the first signs of a malfunction appear.
The gearbox mechanism is compact and quite simple. The work does not require high qualifications, but it should not be the first step in setting up.
The fact is that in order to remove the problem node, you will need:
- Loosen the front wheel mounts
- Raise the front axle and place a support.
- Knock out the traction.
- Remove the gearbox along with the bipod.
Since these actions are quite difficult, the process of adjusting the steering gear must begin after some preparatory operations:
- Checking the rod ends.
- Wheel alignment adjustment.
- Adjusting the position of the column and driver's seat.
Steering gear repair procedure
Adjusting the steering on a Gazelle begins with adjusting the play. The plastic casing is removed, the 4 mounting bolts are unscrewed with a 13mm head and the metal protection is removed. Under it there are adjusting shims, with the help of which the slack is eliminated.
One gasket is removed, the assembly is assembled, and the presence of play is checked. If it does not disappear, the procedure is repeated until the slack is completely eliminated. It should be checked with the steering wheel in the middle position, when it is at its minimum. The adjustment is made until maximum ease of rotation of the shaft with minimal backlash is achieved.
After eliminating the play, the repair of the Gazelle steering wheel continues. The gap between the ball nut and the shaft sector is adjusted. To do this, you need to put the bipod on the shaft, turn the steering wheel shaft 2.5 turns in any direction, and check for free play. If there is one, you will have to adjust the position of the bearings. They use angular contact bearings, so the gaps should be minimal (ideally, absent).
A noteworthy circumstance is that the ball nut and screw cannot be dismantled, which in the first years of operation of the Gazelle car was a significant drawback due to the lack of spare parts. Today this issue has been completely resolved, the market has a sufficient number of parts, which allows repairs or adjustments to be made at the first symptoms of a malfunction.
Related video: Gazelle steering column repair
Disassembling the power steering pump
And so, first of all, we remove the pump, you need to drain all the liquid from it (I think everyone can figure out how to remove it and drain the liquid), and on the back cover of the power steering you need to unscrew the four bolts with a 14mm head.
After that, we begin to carefully remove the cover, try not to damage the gasket (this gasket has an internal rubber seal), in the power steering housing we leave the outer part of the “working ellipse cylinder” (hereinafter simply the cylinder). There is no need to be scared when the cover comes away from the body, it may seem that it is coming away due to the action of the spring, when reassembling it will seem to you that it does not fit into place, just continue to carefully and alternately tighten the bolts diagonally, then everything will fall into place .
GAZ Gazelle Improvizator › Logbook › Installing power steering 3110 on Gazelle
It so happened that until you try it yourself, the thought will not disappear from your head ((( Since the donor was bought almost a year ago in the form of a Volga 3110 with power steering and a 406 engine, the engine was successfully installed. But the power steering still lay there and did not give me peace head(((Searching for information on who has already installed this power steering on the Gazelle, I couldn’t find it(((And it lies there and eats the brain— “Put me in Ivanushka, and the steering wheel will be easier, with one finger!” Even though I’m not Ivanushka, I’ll get rid of this thought not easy, I decided to BET!
And so there is the whole set from the Volga - this is +! What immediately catches your eye is that the steering gears operate in different planes! But this does not confuse or scare us in terms of installation! I took off the old machine (gearbox) and figured out how to install a new one. It is necessary to make a spacer from the frame about 5 cm, since the design does not allow it any other way (((but it doesn’t matter. We go to the Garage, profile pipes of different sections, an angle grinder, welding... and everything that is needed. We make an adapter - a spacer, drill holes for fastenings into the standard holes in the frame and for fastening the gearbox, we weld them in, and where it is not possible, we tightly insert spacers from a round pipe, so that when we mount all this, the profile does not press through and there is a rigid structure!, etc. we mount the machine, the pump on its place, the tank, fill it with oil, and yes, we also make a steering rod.
So what do we have? I started it, ran out the oil, turned the steering wheel and didn’t feel any effort at all(((the steering wheel is very light(((it really turns with one finger - this is of course a plus when maneuvering in difficult alleys or gardens, where the roads are narrow and it is difficult to enter the territory - but at speed you can control the car will be difficult without feeling the steering wheel. I don’t even know whether to put a plus or a minus here - let everyone decide for themselves!
Inspection and identification of defects
Carefully inspect the contents and remember (you can take a photo) what was placed where and how (more attention should be paid to the position of the cylinder). You can twist the power steering pulley and carefully use tweezers to check how the blades move in the grooves of the shaft.
All parts should be pulled out without effort, since they do not have any fixations, but the central axis is firmly fixed and cannot be removed.
We inspect the shaft from the reverse side, parts (power steering housing and cover wall) touching them, for burrs or grooves, everything is perfect for me.
Now we remove the entire internal economy onto “clean” rags and begin to study it.
We carefully examine the shaft; all its grooves have very sharp edges on all sides. One of the end sides of each groove has a pronounced sharpness inward, which, when moving the blade inside the groove with a constant slope towards this side, will greatly complicate its movement (this may be the first component of poor power steering performance). The side parts of the shaft grooves are also “sharpened”; this can be felt if you run your finger in different directions along the end (outer circumference), as well as along the side parts of the shaft in different directions. Otherwise the shaft is perfect, has no flaws or nicks.
Elimination of power steering pump defects
The faults have been found, now we begin to eliminate them.
We will need rags, white alcohol, sandpaper with grit P1000/P1500/P2000, a triangular needle file, a drill bit of Ø12mm (or more) and an electric drill. With the shaft everything is much simpler, you will need P1500 sandpaper and with it we begin to clean all the edges of the grooves on the shaft (we clean the outer and side ones on both sides) in all possible ways. We work without fanaticism, the main task is to remove only sharp burrs.
For one thing, you can immediately polish both sides of the shaft a little on a flat surface, it is advisable to use P2000 sandpaper.
Next, we need to check the result of our work, we check visually and by touch, everything is perfectly smooth and does not cling.
The most difficult thing will be with the surface of the cylinder; personally, I couldn’t figure out anything simpler than how to make a spherical grinder from sandpaper, a drill and a thick drill (F12). To begin with, we take the P1000 sandpaper and a drill bit that can be inserted into the drill.
Next, you need to tightly screw the skin against the rotation of the drill, two or three turns, there should be no gaps.
Holding the tightly twisted structure, it needs to be inserted into the drill (the skin should also be clamped).
Afterwards, using the most convenient methods for you, we carefully begin to grind the cylinder, you need to grind evenly, press the cylinder tightly and move it relative to the axis of rotation (at maximum speed). As we eat the skins, we change them, eventually we reach the smallest skin P2000.
The desired result is obtained,
Now everything needs to be thoroughly wiped with a trail of white alcohol. The shaft itself with the blades can be rinsed in it.
After we begin the assembly, everything is put in the reverse order of removal.