Hello, dear subscribers and not!
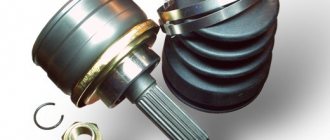
Recently I decided to carry out a routine inspection of the chassis, and during this, cracks were discovered on the boot of the outer CV joint. And as everyone knows, after cracks, dust and dirt get into the CV joint housing, and this is a direct path to replacing the joint assembly, which is expensive and not justified. Therefore, in order to avoid this circumstance, I decided to quickly change it.
I’ll say right away that the material was taken from the Internet, because I simply don’t have the strength to describe everything myself (you’ll find out why later). I just edited it a little.
To perform this operation you will need the following tools:
17 mm wrench, 30 mm wrench, pry bar and wheel wrench.
Description of the work performed:
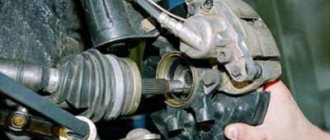
❶ Installed wheel chocks under the rear wheels and pulled out the parking brake lever. Having torn off the wheel mounting bolts, I jacked up the required side and placed a special support stand under the car. Finally unscrew the mounting bolts and remove the wheel. ❷ Use a screwdriver to pry it off and remove the protective cap.
That's it, the simplicity of the work ends here. My dad and I did this in 30 minutes. Next, it was necessary to remove the grenade from the drive shaft without removing the shaft from the gearbox. What happened next was just hell, I advise you to finish reading.
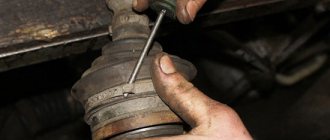
❻ Using a screwdriver, loosen the clamps securing the anthers. After removing the clamps, we cut the anthers, because they are no longer needed.
Now the most interesting thing is, we killed 4-5 hours of time!
❼ Using a special guide made of soft metal (for example, bronze) and a hammer (or a hammer with a bronze hammer), knock the outer and inner CV joints off the drive shaft.
We hammered for 4 hours, bitch, with a fucking hammer! 4! Then they both freaked out, went and bought a puller for 200 rubles. With a puller, they took it off in literally a minute or two.
❽ Then we washed the hinges using gasoline and diesel fuel. We checked the technical condition of the hinge elements. New boots were installed. We filled the CV joint housing with a special lubricant. We installed it on the drive shaft and, using a hammer, hammer the joint until the already replaced locking ring is fixed. Using a special tool, clamp the boot clamp on the drive shaft. Having placed the boot on the CV joint housing, pry it up with a screwdriver and squeeze it to release the air. Only after this do we install and tighten the fastening clamp. ❾ Next, install the drive shaft into the wheel hub and repeat all the operations described during removal in reverse order. After tightening the nut securing the drive shaft to the wheel hub, do not forget to lock it.
The main reason for the malfunction of CV joints (constant velocity joint) on Kalina is the depressurization of the CV joint boots. Initially, incorrectly installed anthers, or rather loosely tightened clamps and leaky or worn out anthers, do not provide a normal seal to the assembly. Water and dirt begin to get under them. Gradually, the lubricant turns into a rusty mess and ceases to perform its functions. The first sign of a faulty CV joint is a crunching sound in the area of the front wheel when the wheels are turned out when starting to move. In more advanced cases, such a crunch appears with less pronounced loads on the wheel.
Replacing the outer CV joint on a viburnum
Replacing the outer CV joint on a Lada Kalina car is not a serious problem. A person who has at least a minimal understanding of car repairs with their own hands can cope with this operation.
To replace the outer CV joint on the Lada Kalina we will need:
- Ratchet or crank
- Extension for extending a wrench or ratchet (a piece of pipe of suitable diameter will do)
- Head 17
- Head 30
- Hammer
- Jack
- Replacing the inner CV joint on a viburnum
Replacing the CV joint on Kalina
First you need to hang the wheel. Before putting the car on a jack, you need to remove the wheel bolts and the wheel nut. Using a wrench and a 30mm socket, we tear off the hub nut. To do this, it is better to extend the knob (for example, with a metal pipe of a suitable diameter). We unscrew the wheel bolts with a spray bottle. After we remove the wheel and nut, the following picture appears before us:
Now you need to unscrew the 2 bolts securing the lower ball joint to the steering knuckle. They are unscrewed using a ratchet or a wrench and a 17mm socket.
After we unscrew the ball from the steering knuckle, we have access to the CV joint. Now, by carefully hitting the CV joint (in the place where the hub nut was located) through the lining, so as not to damage the thread, carefully knock the CV joint out of the hub. For convenience, you can turn the wheels out.
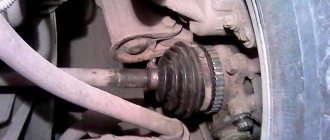
Next, remove the boot. To do this, you need to remove the clamps and move the boot to the gearbox.
After this, you need to remove the CV joint itself. If you have a puller, use it. If there is no puller, then knock the grenade off the axle shaft with gentle blows of a hammer. We didn't have a puller and we knocked down the CV joint with a hammer. If the CV joint is “stuck” tightly and does not budge, then the seperator will need to be broken. With gentle blows of a hammer, preferably placing a rag on the separator (it is easily chipped and fragments can scatter throughout the garage or get into your eyes), apply blows while rotating the CV joint (For those who do not understand where to apply blows, they must be applied in the place where the the “balls” of the hinge themselves, we need to break this very hinge). The inside of the cage will remain on the axle shaft. To remove it, you must first remove the retaining ring:
Assembly
The new boot is placed on the axle shaft. The places where the parts come into contact should first be well treated with lubricant. The grease must also be pressed into the grenade itself. Then:
- install the bearing on the axle shaft using a hammer and a wooden block;
- remove excess air from the boot and tighten the clamp;
- put on the steering knuckle;
- tighten the hub nut using a torque wrench.
Now all that remains is to tighten all the wheel nuts and lower the car from the jack.
With a new bearing you can safely drive 250-300 thousand kilometers. However, the condition of the boot can significantly reduce this distance. Due to the fact that dirt, sand and water get inside, the lubricant becomes like an abrasive, which slowly but surely destroys the bearing.
Now you know how to replace the boot on Kalina. This can easily be done by one person in one and a half to two hours using ordinary tools. But to guarantee quality repairs, we advise you to contact specialists.
Basic information about LADA Kalina
LADA Kalina has been produced since 2004; production of the popular second-generation car began in 2013. Kalina-1 is available in three body types: hatchback (model 1119), sedan (model 1118), station wagon (model 1117). There are cars available with petrol engines of three modifications: a 1.4-liter 16-valve engine with a power of 89 hp. s., 1.6-liter 8-valve engine producing 81 hp. s., 1.6-liter 16-valve engine producing 98 hp. With. The LADA Kalina-1 has only a manual transmission with five gears. The front axle has a classic MacPherson suspension, the rear axle has a beam with stabilizer, springs, and shock absorbers.
Typical faults of LADA Kalina-1
Significant malfunctions with Kalina rarely occur, but there are a lot of various undesirable trifles. The car’s clutch is not very reliable and has an impressive service life, regardless of the type of engine, so it can malfunction after 40-50 thousand kilometers. The main source of malfunction is a broken clutch disc.
You need to constantly monitor the oil level in the engine - sometimes it leaks through the gaskets or burns through the piston rings. On the instrument panel there is only an oil pressure warning light, but there is no dial indicator. If the indicator lights up all the time, there is a possibility that the crankshaft is knocking.
A common malfunction of VAZ gearboxes is increased noise. It is difficult to get rid of the humming of the gearbox; sometimes neither replacing the bearings nor refilling with first-class transmission oil comes to the rescue. The transmission is noisy even in new cars, because of this the Volzhsky Automobile Plant has repeatedly completed the transmission.
A problematic element since the days of the VAZ 2108 and VAZ 2109 has been the thermostat in the engine, moreover, the valve in the thermostat was capable of jamming in any position. It's annoying when the engine doesn't heat up to the required operating temperature, but if the engine overheats, it's more problematic.
Electrical problems on LADA Kalina appear mainly of three types:
- the ignition module is often damaged;
- very soon the bearings and diode bridge “die”;
- The window lift cable on the driver's door breaks.
When the ignition coil sparks, the first and fourth cylinders or the second and third cylinders stop functioning. The ESP cable breaks when it falls off the guides.
The main source of cracking noise in outer CV joints is insufficient lubrication; At the factory, in order to save money, they put it in sparingly. The consequence of this is severe wear of the hinges, and as a result, the “grenade” needs to be replaced.
A broken timing belt is a very annoying problem. And if on the 8-valve engine 21114 it is possible to change the belt drive and move on, then on engines 11194 or 21126 the valves bend from the oncoming push from the pistons, repairs will be quite expensive. In addition, a break can occur through a jammed water pump, because of this, if the pump begins to make noise, it must be replaced immediately.
Do-it-yourself car repairs
“Kalina” is a simple car, so the driver can repair most of the damage himself. For example, you can fix the following problems on your own:
- change the engine air filter;
- remove air from the cooling system;
- change the water pump;
- eliminate the rattling of the gear knob;
- change the ignition module;
- replace the generator diode bridge;
- install a brand new outer CV joint to replace the crackling old one.
Repairing the LADA Kalina car yourself must be carried out in accordance with the instructions, using only good car mechanic tools, if you need to use special equipment and pullers for repairs.
How to change a constant velocity joint?
You can replace the outer CV joint in a Lada Kalina car without using a lift or pit, but you will need to place the car on a flat surface. Replace in this way:
- first you need to loosen the hub nut and unscrew it, because after removing the wheel it will become difficult to move the nut;
- loosen the wheel nuts, then use a jack to remove the wheel. In order to prevent the car from rolling, it is necessary to place stops under the rear wheels, and in front near the jack, for the purpose of reinsurance, place a support under the threshold (you can use a wooden block);
- unscrew the ball joint bolts at the bottom (two bolts);
- pull the steering knuckle towards you, release the wheel drive;
- remove the clamps from the boot;
- move the boot towards the gearbox, knock out the outer CV joint through a bronze or copper drift;
- put the new device in place, fill the joint with grease, fix the boot on the CV joint with new clamps;
- complete installation of all parts.
Would you like to know the sizes of the CV joint boots on the vase?
Dimensions of Lada CV joint boots...
Hello dear readers of the auto blog RtiIvaz.ru. Today's article will focus on the sizes of CV joint boots on VAZ cars. In a modern car, all critical connections and assemblies are protected either by oil seals from oil leakage, or by various rubbers that protect the connections from the effects of the external environment.
Rubber products are also used in hydraulic systems: brake system; hydraulic clutch system; power steering. These are, for example: cuffs of hydraulic cylinders, as well as external and internal CV joint boots of cars of various sizes and designs.
To carry out repairs to hydraulic drive cylinders, there are VAZ repair kits of various sizes, which are equipped with a full set of everything necessary for replacement.
As a rule, rubber products of VAZs have a low cost compared to the cost of the parts they protect, so the quality of rubber production is important for every motorist.
For example, wear of cuffs in hydraulic cylinders of car drives is mainly caused by the fact that the brake fluid used for their operation is hygroscopic and attracts moisture, and with it dust. All this gradually accumulates in hydraulic cylinders, and such a mixture begins to act as an abrasive, wearing out both the sealing collars and the mirror of the cylinder itself.
Therefore, it is so important not to delay repairing the brake system cylinders or clutch drive. Replace worn rubber cuffs immediately when the first signs of unsatisfactory operation of the hydraulic cylinders or their leakage appear.
Did you know, car enthusiast, that old dirty brake fluid needs to be changed first. And only then install the rebuilt cylinder and bleed the system from the air that has entered it.
Before replacing worn boots and cuffs of a hydraulic cylinder, you must make sure that its mirror has no signs of wear, otherwise replacement will only save you for a short period of time. If the hydraulic cylinder mirror wears out, it must be replaced entirely.
As you know, most faults in moving joints are associated with the appearance of cracks or tears on the surface of the rubber protection. These are boots on the drives of axle shafts, ball joints, steering linkage joints, steering rack corrugations, also front and rear pillars, etc.
A torn rubber boot on a CV joint begins to let water and road dirt into the joint, which significantly reduces the service life of the vehicle unit. In addition to this, the connections have a decent cost, therefore: the condition of the external and internal anthers of the “grenade” must be given special attention.
It is worth immediately inspecting the condition of the anthers, for example CV joints, when driving through a suspicious obstacle, when you heard a scraping sound from below the car.
If, upon inspection, you see that the rubber of the “grenade” was caught by something and it was torn, then you can get to the garage by wrapping a plastic bag or a couple of bags on top of the “grenade”. Next, you need to secure the ends with electrical tape or tape or any available material. This way you will save the CV joint “grenade” from dirt. Otherwise, everything will end either with its removal, disassembly and washing, or even with an expensive replacement of the unit.
If your car's CV joint boot is torn, you need to select a new boot that fits the size and then replace it.
It is always necessary to take into account the “original” dimensions, which correspond to both the diameter of the axle shaft and the outer diameter of the CV joint. If you install a similar rubber protection on a “grenade”, then if the diameters do not match, the clamps will not be able to reliably clamp the boot at the junction. As a result, dust will be sucked in, as well as water will enter the hinges of the “grenade”.
Next, the car enthusiast looks at photos of “pomegranate” covers and their sizes...
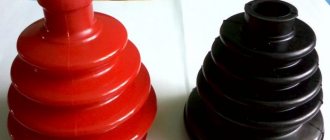
Photos and sizes of CV joint boots on VAZ cars:
On the left is the inner boot of the grenade, on the right is the outer boot
Photo of joint covers for internal and external VAZ-2018 vehicles; 2109; 2113; 2114; 2115; 2110; 2111; 2112 have design numbers:
- internal hinge cover 2108-2215068; size 2x8x7.5 cm
- outer hinge cover 2108-2215030; size 2x8.6x8 cm
On the left is the inner boot of the CV joint, on the right is the outer one.
Photo of the joint covers, internal and external, of the VAZ-1111 Oka car, design numbers:
- cover of the internal hinge 1111-2215068; size 1.7x8.5x6.5 cm
- outer hinge cover 1111-2215030; size 1.7x9x6.5 cm
On the left is the outer CV joint boot, on the right is the inner one.
Photo of joint covers for external and internal VAZ 2121 cars; 21213; 21214; 2131; 2123 Niva, they have design numbers:
- outer hinge cover 2121-2215030-01; size 2.1x12x8.5 cm
- internal hinge cover 2121-2215068-01; size 2x8.5x8.5
On the left is the outer CV joint boot, on the right is the inner one.
Photo of joint covers for external and internal VAZ 1118 Kalina cars, design numbers:
- cover of the internal hinge 1118-2215068Р; size 2.2x9.2x7.5 cm
- cover of the outer hinge 1118-2215030Р; size 2.2x9.2x7.8 cm
I measured the dimensions of the covers with a simple school ruler, besides, the rubber expands and contracts depending on the temperature, so the measurement error is + plus or minus 2 mm. Also pay attention to the photo: I measured the seats of the covers according to the inner diameter.
To replace rubber products, purchase repair kits for vases and tires from well-known suppliers, thereby saving money on quality products.
All repair kits for vases from the production structure of the RTI plant are made of high-quality rubber with a set of additives in strict accordance with technology.
YouTube video:
Please, for those who want to change the CV joint boots, here is a link for selection in three sizes.
Good luck to you and see you soon on the pages of the RtiIvaz.ru blog!
You may also be interested to know:
Replacing pillows from VAZ 2109 engines
Various seal sizes
Boot on CV joint
Gearbox lever rattling
For LADA Kalina, a typical malfunction is rattling in the area of the gearshift lever, which mainly becomes noticeable when the engine is running at speeds of about 3000. The source of the side sound is the bushing, which is made a little thicker than necessary, and because of this, a gap appears in the mount. To resolve this problem you need to do the following:
- remove the handle cover, which is attached with latches;
- using two 13mm wrenches, unscrew the nut and bolt;
- remove washers and bushings;
- to eliminate rattling, the bushing in the middle needs to be slightly sharpened in width or the mount should be lubricated with sealant;
- Having done this, mount everything back. The sealant does not help out every time, but if you sharpen the bushing by 0.3 mm, the result is guaranteed.
It’s safe to say that repairing a Lada Kalina car yourself is not so scary. Every car enthusiast has the opportunity to eliminate minor malfunctions of this car. You just need to believe in yourself, follow our advice and everything will work out!
Front suspension CV joint design
The Lada Kalina car has front-wheel drive, which receives torque using a gearbox regardless of the angle of rotation. Front suspension drives (left and right) - consist of two working joints of equal angular velocities and a connecting shaft that provides connection between them. The left short shaft is made of a special steel bar, and the right long shaft is made of durable steel pipe. The shank of the inner joint housing is connected via a spline to the differential side gear. Torque is transmitted from the hinge to the drive shaft at the required angles. A feature of the design of the internal CV joint of the Lada Kalina is that, in addition to transmitting torque at several angles, it allows movement along the axis of the hinge body and the drive shaft of the suspension when moving.
With proper operation and timely maintenance of the vehicle, the joints can last up to 100 thousand km. According to statistics, external hinges are prone to failure more often than internal ones, which is primarily due to external factors.
What is CV joint
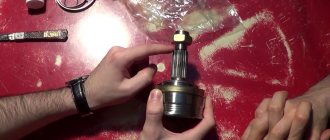
The abbreviation CV joint stands for constant velocity joint, which ensures the transmission of torque from the gearbox to the wheels. People call the CV joint a grenade because of its purely visual similarity.
Thanks to its design, the CV joint allows the wheels to rotate at different angles up to 70 degrees. The CV joint itself is protected by a boot. If the machine is used for a long time, for example, several years, the rubber boot of the CV joint becomes unusable, tears and cracks appear, the lubricant gradually leaks out and mixes with dirt. To prevent the CV joint itself from breaking, which simply cannot tolerate sand and dirt, it is necessary to check the condition of the boot from time to time, and, if damage is detected, replace it in time. Otherwise, this may lead to breakdown of the CV joint itself, and its replacement will be more expensive. For those who are going to replace the CV joint boot for the first time, I advise you to watch this video:
Diagnosis of the condition of anthers
To check the serviceability of the car's boots, an external inspection is carried out and the condition of the front suspension components is diagnosed.
If there is no damage to the upper shell, there will be no traces of lubricant leaks on the surface of the boot and the car can continue to be operated in the same mode. It is advisable to carry out diagnostics regularly, which allows timely prevention of premature failure of CV joint mechanisms. When the vehicle accelerates rapidly, extraneous noise may occur in the front wheel sector, which may indicate an internal malfunction in the suspension components and require urgent diagnosis and repair with replacement of faulty parts.
Some of the main reasons for the failure of CV joint elements are:
- poor-quality lubrication or lack thereof due to boot failure;
- the presence of defective parts in the CV joint mechanism, as a result of which the seal of the boot is compromised;
- potholes and pits that form on the roadway, which leads to damage to the protection of the mechanisms and suspension elements of the car;
- energetic driving style, which leads to increased load and premature failure of units;
- destruction or violation of the tightness of the anthers during vehicle operation.
Video about replacing a grenade boot:
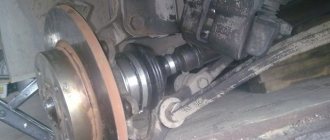
Checking the visual condition of the boot
Visual inspection of the outer grenade boot - everything should be clean. No traces of grease, dirt or cuts.
Damaged boot in grease. This needs to be changed urgently. Otherwise, the CV joint (grenade) will need to be replaced.
Carrying out work to replace the boot
To perform the work of replacing the boot, you need tools and spare parts:
- new boot, graphite lubricant, liquid to remove contaminants;
- spoiler key;
- mount;
- keys for x 30, and for x 17;
- jack for lifting a car;
- hammer, screwdriver;
- special pliers designed for installing and replacing clamps.
We place the car on a level surface, fix its position using wheel stands and a hand brake. Next, we perform a set of operations, following a certain sequence:
- Using a wheel wrench, unscrew the wheel nuts (not completely). Using a jack, lift the car, unscrew the nuts completely and remove the wheel. When carrying out repairs in compliance with safety regulations, we install a metal stop for this purpose, which protects against injury in the event of a breakdown or failure of the jack.
- Using a screwdriver, remove the protective tip from the front axle.
- Drain the oil from the gearbox. To do this, place a container to collect liquid under the drain hole and unscrew the plug. We wait some time until the oil is completely removed from the gearbox.
- We unscrew the two bolts securing the ball joint to the steering cam.
- To do this, unscrew the hub fixing nut, depress the brake pedal and perform the operation (to press the brake pedal, the help of a partner is required).
- We remove the thrust washer and use the steering wheel to set the wheel to its extreme position to ensure full access to the components, remove the outer CV joint from the hub, having previously secured the drive shaft using additional fasteners.
- Using a pry bar, we remove the inner CV joint from the gearbox.
- Next, fix the drive shaft using a clamp (in a vice or using clamps) and carefully remove the fixing clamps using a screwdriver.
- Carefully, so as not to damage, knock the inner and outer CV joints off the drive shaft.
- We clean the “grenade” from dirt and dust, wash it in kerosene, and diagnose the condition of the mechanisms. If all the mechanisms of the “grenade” are in full working order, we carry out operations to completely assemble the unit.
- Carefully install the new boot, introduce a special lubricant (graphite grease) into the outer CV joint housing and mount the drive shaft, moving it forward until it stops with full fixation (a click should sound). It should be noted that the volume of lubricant for the outer CV joint must be at least 40 cc.
- We remove the clamp from the outer boot, crimp it to remove the “air cushion” and tighten the clamps on both sides.
- We lubricate the CV joint with graphite grease first, replacing the inner CV joint ring and carefully placing it in the gearbox.
- We install the shaft into the semi-axial gear and carefully, using a wooden block, move it along the axis until it is completely fixed.
- We assemble the entire assembly by replacing the retaining rings and performing the operations in reverse order.
The process of replacing anthers on a Lada Kalina requires a number of complex operations and knowledge of work technology, so the best option is to decide to seek help from a service center to replace the CV joint protection. Qualified craftsmen will carry out the entire range of repair work in a shorter period of time in compliance with the manufacturer’s regulations. A correctly installed boot should be used for 2 years or provide a mileage of 40 thousand km.
How do you understand that the CV joint boot needs to be replaced?
Well, let’s finish this brief excursion and move on directly to the troubleshooting process, but first, prepare the tool.
You will need:
- Jack, hammer, wooden block;
- Keys to “17”, “30”;
- Mount, spray can;
- Flat-head screwdriver, special pliers for installing clamps;
- New boot + CV joint grease, graphite grease, kerosene or similar flushing fluid.