Replacing the front
To perform this procedure on your VAZ 2114 car, you will need a minimum set of tools, which includes:
- 10mm socket;
- 10mm wrench;
- Mandrel;
- Screwdriver.
We pry it off with a screwdriver.
The replacement work is performed in the following sequence.
- The oil pump is removed from the car. It is not difficult to do this, and it is quite possible to do it yourself.
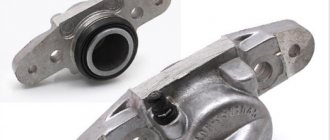
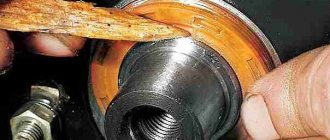
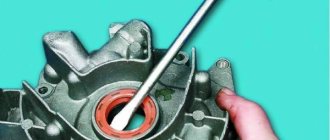
- Next, the oil seal is removed from the cover of this same oil pump. Here you will need a thin screwdriver, which can be used to pry the device and thereby remove it.
- The new element is pressed in using a mandrel, the outer diameter of which should be about 41 millimeters. In this case, the working edge should be directed inward.
- The oil pump is returned to its place.
Replacing the rear
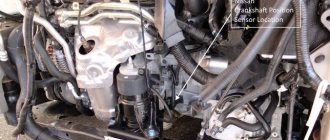
It should be noted that the clutch discs may become oily due to a leak through the gearbox input shaft oil seal, or due to the rear crankshaft oil seal.
The smells of oil from the engine and transmission are different, so many experienced specialists can use the smell to determine which element is causing problems.
Changing the rear oil seal is actually somewhat more difficult than changing the front oil seal. But this does not take away the fact that it is still more than possible to do the work with your own hands.
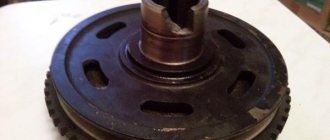
Disassembled
Following the instructions step by step, replacing the crankshaft oil seal on a VAZ 2114 will become a fairly simple task for you, which will add to your experience in repairing a car yourself.
- Disconnect the negative terminal from the battery of your VAZ 2114.
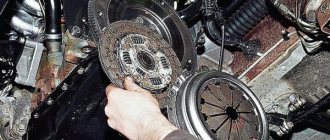
- Make notes on the location of the flywheel relative to the crankshaft, and then remove it.
- Next, the rear shield of the clutch housing is removed from the guide bushings.
- The next step is to remove the eight bolts that are responsible for securing the oil seal.
- This will allow you to remove the holder.
- The oil seal is pressed out of its holder.
- The new element is installed in place of the old one until it stops. Here you will need a mandrel again. Its outer diameter is 99 millimeters. Press in the element so that its working edge points inward.
- To make pressing easier, a chamfer is made on the seating edge of the element using a needle file. An alternative tool for bevelling is a small sanding wheel.
- Now we change the gasket, which is probably torn on the holder. Even if the old gasket looks fine, we strongly recommend replacing it with a new one.
- The gasket is glued with a special thick lubricant. This will ensure the strength of its retention, as well as additional tightness of the connection.
- The working edge of the pressed-in oil seal is treated with regular engine oil, as is the case with the front one.
- The crankshaft flange is subjected to similar processing.
- The fasteners of the engine oil sump to the cylinder block will need to be loosened slightly. To do this, it is enough to make 2-3 turns on each of the 14 bolts that hold the crankcase.
- When installing the holder, the working edge of the new oil seal is carefully tucked onto the crankshaft flange. Arm yourself with a wooden stick for this purpose, but do not use metal objects.
- Retighten the holder bolts.
- Screw back the engine crankcase mounting bolts.
- Place the clutch housing rear shield back onto the guide bushings.
- According to the previously marked places, mount the flywheel, gearbox and clutch in their place. To ensure that the flywheel mounting bolts have high quality adhesion and reliability, first apply sealant to their threaded part.
Obviously, it is quite possible to replace the crankshaft oil seals on a VAZ 2114 car with your own hands. The procedure requires accuracy and consistency of actions. Plus, do not forget to use new high-quality auto parts, so that after a short period of time you do not have to carry out the entire procedure again.
Source: luxvaz.ru
Replacement process
If you have some auto mechanic skills, you can replace the front oil seal yourself.
- remove the protective crankcase and timing covers;
- align the ignition marks so as not to disrupt the operation of the gas distribution mechanism;
- remove the timing belt;
- dismantle the pulley and remove the generator belt;
- remove the crankshaft pulley (you will need a puller, do not forget to purchase it);
- remove the oil pump (drain the oil first);
- assess the condition of the oil seal (it may be “oaky” from time to time or, conversely, softened by oil);
- Press in a new oil seal with a socket of the appropriate size.
Pressing in the front crankshaft oil seal
Replacing the rear oil seal is an extremely labor-intensive process, which is accompanied by checking the condition of important vehicle components - the crankshaft and clutch parts.
We strongly recommend changing the rear crankshaft oil seal on a VAZ 2114 at a normal car service center.
The process for replacing the crankshaft rear oil seal is as follows:
- separate the engine and gearbox;
- remove the clutch and flywheel;
- pull out the old oil seal and press in a new one.
At the same time, we check the shaft for play, examine the condition of the clutch, and after assembling the engine, you should also make sure that the breather is open.
After replacement, observe the car at idle and make sure there are no leaks. For a while, try not to over-spin the engine. It takes time for the seals to “get used” to the temperature conditions. Due to high oil pressure in the system, they can be squeezed out again.
Replacing the front crankshaft oil seal.
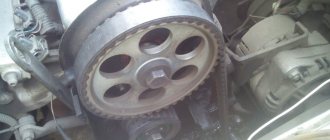
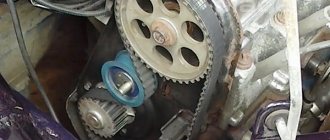
Dirt has appeared on the timing mechanism. Clear signs of oil seal leakage.
I bought a front oil seal 2108-1005034 110 rubles. Dimensions: 28.0 x 42.0 x 7.0 mm.
Replacing the front crankshaft oil seal. VAZ 2108, 2109, 21099, 2113, 2114, 2115
We hang up the right front wheel and remove it. Drain the oil from the engine crankcase.
| Using a 10mm wrench, unscrew the four bolts securing the front protective timing cover. | . and remove it. |
| Using an “8” wrench, unscrew the six bolts securing the right half of the lower engine protective casing and remove it. | Using a 17mm wrench, loosen the nut securing the generator to the tension bar and, moving the generator, remove the drive belt. |
| We engage first gear and use a 19mm wrench to unscrew the bolt securing the pulley to the crankshaft. | Remove the pulley from the crankshaft. |
| Before removing the timing belt, align the timing marks on the camshaft pulley and the rear protective cover by rotating one suspended front wheel with 5th gear engaged.
| Use a 17mm wrench to loosen the bolt securing the tension roller. |
| . and remove the timing belt. | Using a 10mm wrench, unscrew the four bolts securing the lower clutch housing cover and remove it. |
| Using a 10mm socket, unscrew the 16 bolts securing the oil pan to the cylinder block. | . and remove the crankcase along with the gasket. |
| Using a 10mm wrench, unscrew the bolts securing the oil receiver to the pump housing and the cover of the second main bearing; remove the oil receiver. | Use two screwdrivers to move and remove the toothed pulley from the crankshaft. |
| Use a screwdriver to pry up the key and remove it from the crankshaft groove. In this case, we act carefully, the key is small and quite insidious - it is easily lost. | Using a 10mm wrench, unscrew the six bolts securing the oil pump to the cylinder block. |
Step-by-step dismantling
Let's look at how to change the engine oil seal of a VAZ 2114 with an 8-valve engine.
- Place the car on a level surface, support the rear wheel with stops. Set the gearshift lever to the neutral position, remove the front right wheel and engine protection. You can remove part of the fender liner for easy access to the front engine cover.
- Under the hood, unscrew the bolts securing the timing belt protective cover. Loosen the generator and remove the generator drive belt.
- Set the valve timing marks on the camshaft and crankshaft. To do this, rotate the crankshaft with a socket wrench until the arrows on the pulleys align with the special ebbs on the body. This corresponds to the position of the first piston at TDC.
- Before removing the timing belt, loosen the tension roller and unscrew the bolts securing the upper and lower sprocket. Inspect the belt for damage and traces of oil. Change if necessary.
- Drain the oil from the engine and unscrew the pan. It is secured with 16 10mm wrench bolts. Remove the clogged oil receiver and clean thoroughly.
- Using a 24mm socket, unscrew the pulley mounting nut, to do this, secure the crankshaft itself. Under the pulley there is an oil pump, into the cover of which the front engine oil seal is pressed. It is secured with six 10mm bolts.
- Remove the oil seal from the seat using a flat screwdriver or carefully press it out with a socket of a suitable size.
Crankshaft oil seal
Today we will talk in more detail about the crankshaft oil seal, a spare part that is designed to seal (seal - approx.) connections in this moving part of the engine, as well as prevent engine oil from leaking . Below, we will describe in detail how to replace this element as quickly as possible.
Signs of crankshaft oil seal failure
The very first and main sign of failure of the crankshaft oil seal is considered to be the loss of its tightness.
Oil leak due to leaky crankshaft oil seal
And if in the case of oil seals on other engine elements it doesn’t look so bad, then if there is a malfunction on the crankshaft, oil can leak from the system in liters per 1000 kilometers.
Main causes of wear
- Wear and tear due to natural reasons due to expiration of service life.
- Incorrect installation of the oil seal in advance can cause cracks on its surface.
- Mechanical damage.
- The material is not original, made in violation of production technologies.
Please note that with an increase in oil consumption, due to leaks of the crankshaft oil seal, traces of oil will certainly be observed under the car; they are clearly visible and will not leave any owner unnoticed.
Also think about the presence of oil seal leaks and slight slipping of the clutch. This effect can be observed due to oil getting on the clutch disc and basket located near the gearbox.
Oil seals
What is an oil seal? This page showed oil seals by size for VAZ cars and catalog numbers, role and purpose...
Greetings to all readers on the RtiIvaz.ru blog. The page shows photographs of crankshaft oil seals as a set for the gearbox of a family of classic rear-wheel drive cars, as well as gearboxes of front-wheel drive eights and a dozen VAZs. The cuff of the rear gearbox, also called the rear axle, is installed in rear-wheel drive “Classic” cars.
Step-by-step process for removing the front oil seal
- Before starting work, you need to prepare a set of tools and wrenches.
- Make sure that the car is installed on a level surface and that wheel chocks are installed under the wheels.
- First of all, open the hood and remove the timing belt protection.
We remove the timing case
We combine according to the marks as in the picture
Here we also combine
Removing the timing belt
This work should be carried out very carefully.
Place the old oil seal aside.
Step-by-step installation process
- When installing a new spare part, first lubricate it with oil and, using an old ring or pipe of the same diameter, press it into place.
A socket head is suitable for fixing.
Step-by-step process for removing the rear oil seal
If no special experience is required when replacing the front oil seal, then to work with the rear oil seal, an assistant and a more thorough study of the technical component of the car may be required.
- When carrying out such work, it is necessary to do all the above points from 1-12.
- Next, you need to move on to dismantling the gearbox and clutch.
- When the clutch is removed, unscrew the four bolts that secure the flywheel, and then remove it.
- Then, when access to the oil seal is open, you can dismantle the housing in which it is located, or replace it directly in it.
- We remove the sealing ring from the place where it is fixed.
We install the new part and perform the entire assembly in the reverse order.
Upon completion of assembly, start the engine and pay attention to the presence of oil leaks at the places where they are installed.
How to replace the gearbox rod seal of a VAZ 2108-2109 - step-by-step instructions.
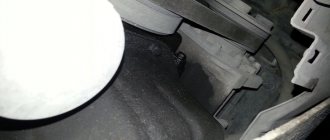
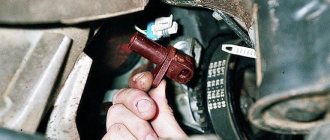
Get to the box stem; it is covered with a rubber boot. If the oil seal is faulty, then it will be very easy to find it by the characteristic oil stain, see photo.
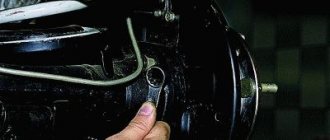
Bend the wide part of the boot; underneath it there is a cardan attached to the rod.
To gain access to the oil seal, you need to disconnect this universal joint from the rod and gear shift lever. To do this, use the key at “13”.
READ What kind of oil should be poured into an Alpha moped
Unscrew the nut completely, this will loosen the connection between the cardan and the lever.
Remove the lever from the cardan, thereby engaging 1st or 3rd gear.
Disconnect the cardan from the rod using a key set to “10”; to do this, move the lever to the side.
Next, remove the rubber boot, after which you will see the very reason for the repair - seal . The oil seal is located in the recess - this is where the rod enters the box. It is impossible to remove the box seal without using a special tool, so take an awl and get to work. As an option, you can use a self-tapping screw, the principle is simple - you need to screw in the self-tapping screw and “uncork” seal as if with a corkscrew.
Once the old stem seal is removed, you can begin replacement.
Before replacing the VAZ 2108-2109 oil seal, you need to thoroughly clean the seat from oil, sand and other dirt.
If everything is ready, press the new box seal into the seat.
Replacing the VAZ 2108 gearbox seal is easier using a plastic bottle cap. This is done as follows: the inner part of the plug is cut out and a new oil seal . I, for example, managed without her; in short, it was the boss’s business.
Replacing the front crankshaft oil seal on a VAZ 2113, VAZ 2114, VAZ 2115
The car has two crankshaft oil seals located at opposite ends. It's easier to remove the front oil seal, but with the rear one you'll have to tinker a little more - remove the flywheel, then the oil seal holder, and only then knock it out and replace it with a new one. Few people decide to replace the rear oil seal - the process is quite labor-intensive and requires certain skills. In our article today we will talk about the front, where there are no particular difficulties, the main thing is to remove the crankshaft pulley and remove the oil seal from the oil pump cover.
Self-diagnosis.
Signs indicating the need to replace the gearbox seal are most often oil traces that remain on the asphalt after the car has been parked for a long time. Before replacing the gearbox seal, you should make sure that this is the problem, since oil leaks are often caused by a poorly tightened oil filter. The danger of untimely detection of a problem associated with the oil seal and oil leakage is fraught with serious problems; if the oil leaves the box, and you do not detect this in time, then instead of replacing the box seal, you will have to change the box. To prevent this, it is necessary to regularly check the oil and constantly monitor its level both in the gearbox and in the engine. A faulty oil seal can make itself known by a characteristic crunching noise that occurs when switching certain speeds.
Replacing the front oil seal on a VAZ 2113-VAZ 2115
Note! Before replacing the oil seal, make sure that the problem is there and not caused by the crankcase ventilation system. It’s just that this system becomes dirty over time and oil begins to be squeezed out through the seals. We recommend that you read more about this topic in the article: “Cleaning the crankcase gas system on a VAZ 2114.”
Removal
First, you need to remove the timing belt from the pulleys (for instructions, see the publication: “Replacing the timing belt on VAZ vehicles”). Then, using two small screwdrivers, carefully pry off the crankshaft toothed pulley (photo 1). Behind you will find an oil seal; just pry it out with a screwdriver and remove it from its seat (photo 3). However, there is a metal key on the crankshaft (photo 2, indicated by the arrow). It is advisable to carefully pry it with a screwdriver and remove it, or make sure that it does not fall and get lost. The key keeps the pulley from turning; the part is important, so if you lose it, go to the auto store for a new part.)
Installation
The main thing is to lubricate the oil seal with the engine oil currently poured into the car engine. It is not the entire oil seal that needs to be lubricated, but only the working edge - the place where the oil seal sits on the shaft. Then take a small piece of pipe or a union head of a suitable diameter and, with their help, the oil seal is pressed inside (photo 4). After installation, thread the oil seal with a thin, but not too sharp, pencil. Check whether the part is installed well.
Note! During installation, do not make the wrong side, otherwise the seal will leak. The oil seal has a front one with a spring, indicated by the letter B, and a rear one. The front one should be tucked inward, and the rear one should be directed outward.
2. After the work has been done, put the pulleys in place, the keys, and also install the timing belt. Adjust the belt tension using the tension pulley and start the car. First of all, pay attention to the place where you installed the oil seal - there should be no leaks. Add oil to the car engine up to the MAX mark, drive for a while, and see if the oil goes away quite quickly. No? This means the oil seal is installed correctly and nothing is leaking through it.
Note! If after replacing the oil seal the leak does not stop, then either it was installed incorrectly or there is a problem in the lubrication system, because there is more pressure in it.
Additional video
We have attached video material on the topic of today's publication, we recommend that you read:
Source: vaz-russia.com
Instructions for replacing the camshaft oil seal VAZ 2109
1) Remove the cover (casing) of the timing belt.
2) We set the top dead center so that we can then be sure that when unscrewing and tightening the camshaft gear we did not displace it.
3) We loosen the tension roller; it has an eccentric, so there is no need to unscrew it completely.
4) Now remove the timing belt; if there are cracks on it, it must be replaced.
5) Unscrew and remove the camshaft gear, while being careful not to lose the key, it is located on the shaft and can fly out.
6) Take a screwdriver or something sharp and carefully remove the oil seal from the seat.
7) We thoroughly wipe everything and press in a new oil seal, having previously lubricated it with oil.
It is best to press in with a special mandrel or some object such as a tube that matches the diameter of the oil seal. Do not press it with sharp objects under any circumstances as you may damage it.
Now we do everything in reverse order
- We insert the key into the camshaft and put on the gear, tighten it.
- We put on the belt, while making sure that the mark on the gears coincides with the antennae on the back cover of the drive belt.
- Tension the belt, tighten the tension roller
- We turn the engine a couple of revolutions, check the belt tension, and tighten it if necessary.
- We put the timing cover back in its original place.
That's all, replacing the VAZ 2109 camshaft oil seal is completed, as you can see, there is nothing complicated here, everyone can do it themselves, at home, while saving some money.
Replacement of crankshaft and camshaft seals of the front part of VAZ 2108,09,099,14,15. Part 1
Replacing the timing belt, crankshaft oil seal and its pulley on a VAZ 2108-VAZ 21099
Replacing the rear crankshaft oil seal of a VAZ 2115 (part 1). Repair in garage conditions.
replacing the camshaft oil seal VAZ 2115
How to replace the crankshaft oil seal on a VAZ. Do it yourself!
Now you can weld an amplifier to the threshold purchased in our shop. The brake mechanism is assembled, the replacement front crankshaft oil seal of the VAZ 2115 is screwed into place, and the car is lowered to the ground. Most modern cars are equipped with complex door unlocking mechanisms. I was driving away from work and noticed the charging light came on. It looks like the third cylinder injector is leaking. At the rear there is a receiver with a throttle assembly, a fuel rail with injectors, an intake pipe and catalytic collector, an oil filter, an oil pressure sensor.
To determine that without oil, the life of the engine is destined for a difficult and short life. This is not turning the crankshaft relative to the camshaft. This can be attributed to indirect signs of incorrect setting of the lead angle. The central locking functions can be controlled centrally or decentralized. To tune the interior, you will need to reupholster the velor seats with more wear-resistant materials. Right front side light. After setting the required gap on the fork, you need to perform lubrication work. I haven’t tried it from a tugboat, it’s a day off, but my hands are itching like...
Replacing the rear and front crankshaft oil seals of a VAZ 2114 8/16 with a valve
Each vehicle has 2 crankshaft seals, which are located at different ends of the vehicle. The easiest thing will be to remove the front oil seal, but the rear one will be a little more difficult. Initially, it is necessary to remove the flywheel, then knock out the oil seal holder and replace it with a new one. Very rarely, car owners are ready to change the rear oil seal themselves. This procedure is complex and requires professional skills.
What is needed to replace the crankshaft oil seal
Oil leakage from the front of the crankcase of an internal combustion engine does not yet indicate that the problem is located directly in the oil seal. First, any vehicle owner needs to make sure that the ventilation system is in full working order. But if contamination of the crankcase itself or the hoses is detected, it is still too early to change the crankshaft seal of the VAZ 2114. But if the ventilation system is fully working, and oil continues to leak, then the problem is clearly in the oil seal and it certainly needs to be replaced in the near future.
VAZ 2114 gearbox adjustment
Over time, almost everywhere possible, backlash begins to appear on cars produced by AvtoVAZ. The gearbox is no exception. It is not surprising that replacing the rocker on a VAZ 2114 has become a routine procedure familiar to all owners of this model.
Determining the malfunction is quite easy:
- Gear shifts with problems, indistinctly;
- The gearbox is loose.
If such a malfunction occurs, a complete replacement of the element may be required. Moreover, many are switching to a short-throw rocker, which gives the car a more sporty character. This technology was borrowed from motorsports. By the way, a simple adjustment can turn it into a short-stroke one.
Some masters argue that it is not always wise to completely change. It is more profitable from a financial point of view to purchase a repair kit. But in fact, such repairs do not give the desired result, and after a while the link will still have to be changed.
How to replace the front crankshaft oil seal on a VAZ 2114 8/16 valves
Determining the oil leakage of the front oil seal is a very labor-intensive procedure. To identify it, you must inspect the car with your hands in the area where the oil seal is located. In the future, you need to start the car, take a flashlight and see where the leaks form. Basically, during operation of the internal combustion engine, you can quickly see oil leakage, which proves that the oil seal is very worn.
Step-by-step process for completing the work of replacing the crankshaft oil seal on a VAZ 2114:
- To do this, the vehicle is placed in a pit and wheel chocks are placed under the rear wheels. Subsequently, it is necessary to lift the front right wheel and twist it using socket wrenches. Next, the protection from the internal combustion engine is removed.
- Then remove the cover from the timing belt. After this, it becomes possible to get to the crankshaft pulley, camshaft and timing belt.
- Before further actions, it is necessary to place one cylinder of the internal combustion engine at the top point. Therefore, the rotation of the camshaft and crankshaft will be in motion until the marks on the pulleys close with the markings on the timing case cover itself.
- Next, you need to loosen the timing belt to avoid subsequent damage and remove it. How to do this: initially remove the right fender liner from the vehicle using key number 10. And now access to the alternator belt and pulley is open. Then loosen the timing belt pulley and remove it without any problems.
- Then you should remove the crankshaft pulley, twist the cap and drain the old oil into a container. As a result, remove the engine pan; it is secured with sixteen bolts.
- Next, remove the oil pickup. It must be carefully examined to identify existing blockages and large amounts of contamination. If they are detected as a result, then it must be blown out with compressed air.
- Then you need to unscrew six screws and remove the oil pump.
- As often happens, a worn gasket under an oil pump greatly loses its original capabilities after a certain time. It can be removed using a regular flathead screwdriver.
- Then the crankshaft oil seal must be pulled out of its socket. If you can’t do it by hand, then it’s quite possible to use 2 flat slotted screwdrivers to pick it up from the opposite side along the edges.
- Then the socket for the new oil seal is carefully wiped. The purchased oil seal often does not fit into place the first time. For mandrel, it is best to use a thirty-two socket head. You need to hit it several times with a hammer.
- Ultimately, all the components are assembled in the reverse order, and oil is poured into the engine.
Important points!
Sometimes, after replacing the gearbox seal or similar work related to fastening the cardan and gearshift lever, the rocker in the cabin moves greatly, which in some cases makes it impossible to switch some speeds. The problem lies in the mounting screw at “13”, it connects the cardan and the gearshift lever. Few people know that this screw is not only a fastening screw, but also an adjustment screw, so upon completion of work, check the position of the lever and, if necessary, adjust its position. Only after this can you safely collect all the tools and go wash your hands.
READ Why there is no spark on VAZ 2109 Injector
After assembly, check the oil level, top up if necessary, then you can check the operation. Do a few laps and make sure nothing is leaking anywhere. That's all for today, I hope the article was useful to you. As you can see, replacing seal is not difficult at all, so there is simply no point in overpaying for a service station.
How to replace the rear crankshaft oil seal on a VAZ 2114 8 valve
In turn, changing the rear oil seal is much more difficult to perform than changing the front one. But if you carry out the work following the step-by-step instructions, all subsequent steps will become easy to complete and at the same time complement your personal experience in car repair.
- First, you need to disconnect the negative terminal from the car battery.
- It is imperative to make a note of the correct location of the flywheel in relation to the crankshaft. And then dismantle it.
- Then remove the rear shield of the clutch housing.
- Then you need to unscrew 8 bolts. They fix the oil seal itself. Having done this with ease, remove the holder.
- Then the oil seal is removed from its normal position (holder).
- In the future, you definitely need to install a new part instead of the worn one, until it stops. To perform this procedure correctly, you must use a frame. It should be pressed in so that the working edge is directed inward.
- The next step is to replace the gasket, which most likely became deformed during operation of the machine. But if at first glance it looks quite normal, then it is still worth replacing.
- A special lubricant, which has a thick consistency, is applied to it and glued. This will achieve a more airtight connection with the holder.
- The edge of the oil seal retainer should be treated with oil.
- The crankshaft flange is subjected to the same treatment.
- Next, you need to loosen the oil sump fasteners going to the cylinder block. To do this, make two to three turns on fourteen bolts. They hold the crankcase.
- During installation work, the oil seal working edge retainer is carefully and very carefully inserted onto the crankshaft flange.
- Then it is imperative to screw the fastener screws back.
- The next step is to tighten the mounting bolts of the internal combustion engine crankcase.
- The rear shield of the clutch housing is reinstalled.
- Then you should return the gearbox, flywheel and clutch. To improve the grip of the mounting bolts, apply a small amount of sealant to their threads and tighten them.
How to change the crankshaft oil seal on a VAZ 2114 video: