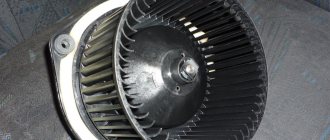
Shock absorption struts for the VAZ-2110 are designed to dampen harshness and give a soft ride to the car, move the body, and ensure an excellent level of wheel grip on the road.
Of course, the front struts wear out over time; it is difficult to determine how long the spare parts will last, it all depends on the mileage traveled. Basically, manufacturers declare the service life of the front struts to be 30-40 thousand km.
Front strut replacement tool
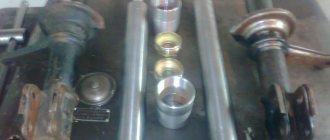
In order for the work to be completed successfully and quickly, you need to prepare some tools:
- A set of keys or socket heads with a diameter from “10” to “27”.
- Collar.
- Jack.
- Wheel chocks.
- WD-40 lubricant.
Preparatory work
Before you begin directly to work, you need to prepare your workplace and car.
- First of all, place the car on a flat surface.
- For maximum reliability, we place wheel chocks under the rear wheels.
- We tear off all the bolts securing the front wheels.
Step-by-step process for replacing front struts
We have already written in more detail about replacing rear shock absorber struts.
If you only have one rack out of order, you will still have to change a couple anyway, so the order in which the work is performed does not matter.
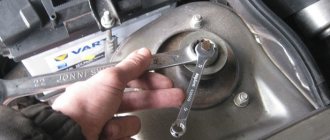
- First of all, we lift the hood and, using a special device for fixing the rod and key at “19”, engage the nut securing the support to the rack and turn it. When the fastening becomes loose, do not unscrew it completely.
- Using a key set to “13”, unscrew the 3 bolts that are located on the upper glass.
- Next, we use a jack to hang the wheel and fix it in this position.
- We remove the brake hose, which is attached to the strut knuckle itself, from the place of fixation and remove it in any direction.
- We inspect all connections, including the steering tip, steering knuckle and the rack itself for signs of corrosion; it is best to treat these places with lubricant. This is done so that all soured parts can be easily torn off.
- After a short amount of time until the lubricant penetrates into all deep places, you can continue working.
- Having disconnected the cotter pin and unscrewed the nut from the steering end using a pry bar and a hammer, we remove it from the place of fixation.
- Using the heads at “17” and “19” we begin to unscrew the two bolts that secure the strut to the steering knuckle.
- When the nuts are unscrewed, problems may arise with further dismantling of the main bolts. Since they stick strongly, they may need to be exposed to excessive amounts of lubricant or liquid wrench. In order to knock them out of their seats, you can use a bolt with a smaller diameter.
- If all fastening elements are unscrewed, all that remains is to completely unscrew all three bolts located on the upper cup.
- Until the strut is disconnected from the steering knuckle, do not completely unscrew one of the three bolts on the cup. And we turn it completely only when the stand is in the hands and completely under control.
- The racks should be disassembled first, starting with the ties. The springs should be tightened carefully, eliminating the possibility of their breaking.
- If the stand no longer rests against the support, this will mean that it is already under sufficient tension.
- Now you can dismantle the support fastening nut and, accordingly, the support itself.
- When the support is dismantled, remove the spring itself.
- Now all that remains is to remove the boot and bump stop from the strut rod. (Although you don’t have to do this if all the spare parts are new).
At this stage, work on dismantling the front pillar of the VAZ-2112 can be considered complete.
Assembly procedure
First of all, we install the boot and bumper on the new rack.
If you plan to install sound insulators, we will install them.
We put on the spring
Please note that its main part must fit exactly into a special recess located on the rack cartridge.
Using a new support and support bearing, you need to fix it on the rod itself using a nut.
Make sure that the part of the spring on top is always in place where it is fixed and that there are no distortions or bevels.
When everything has been diagnosed, you can remove all the ties and begin installing it on the car.
Next, we carry out all the work in exactly the reverse order, starting with the cup nuts in the engine compartment.
When fixing the strut to the steering knuckle, it is best to use new bolts of the same diameter with completely new nuts. Please note that after carrying out this work, you must definitely visit a car service center to carry out wheel alignment work on the car.
Please note that after carrying out this work, it is necessary to visit a car service center to carry out wheel alignment work on the car.
Stories from our readers
“Fucking basin. "
Hi all! My name is Mikhail, now I’ll tell you a story about how I managed to exchange my two-wheeler for a 2010 Camry. It all started with the fact that I began to be wildly irritated by the breakdowns of the two-wheeler, it seemed like nothing serious was broken, but damn it, there were so many little things that really started to irritate me. This is where the idea arose that it was time to change the car to a foreign car. The choice fell on the melting Camry of the tenth years.
Yes, I had matured morally, but financially I just couldn’t handle it. I’ll say right away that I am against loans and taking a car, especially not a new one, on credit is unreasonable. My salary is 24k a month, so collecting 600-700 thousand is almost impossible for me. I started looking for different ways to make money on the Internet. You can’t imagine how many scams there are, what I haven’t tried: sports betting, network marketing, and even the volcano casino, where I successfully lost about 10 thousand ((The only direction in which it seemed to me that I could make money was currency trading on the stock exchange, they call it Forex. But when I started delving into it, I realized that it was very difficult for me. I continued to dig further and came across binary options. The essence is the same as in Forex, but it’s much easier to understand. I started reading forums, studying trading strategies. I tried it on a demo account, then opened a real account. To be honest, I didn’t manage to start earning money right away, until I understood all the mechanics of options, I lost about 3,000 rubles, but as it turned out, it was a precious experience. Now I earn 5-7 thousand rubles a day. I managed to get the car buy after half a year, but in my opinion this is a good result, and it’s not about the car, my life has changed, I naturally quit my job, I have more free time for myself and my family. You’ll laugh, but I work directly on the phone)) If If you want to change your life like me, then here’s what I advise you to do right now: 1. Register on the site 2. Practice on a Demo account (it’s free). 3. As soon as you get something on the Demo account, top up your REAL ACCOUNT and go to REAL MONEY! I also advise you to download the application to your phone, it’s much more convenient to work from your phone. Download here.
- We move the steering knuckle away from the rack, trying not to pull on the brake hose.
- Unscrew the nuts securing the upper support using a 13mm wrench.
- Remove the shock absorber strut.
Replacement
Having decided on the choice of racks, collect a set of tools that will be useful to you when replacing them:
- Slotted screwdrivers;
- Key for holding the shock absorber rod;
- Open-end and ring wrenches sizes 6-22;
- Heads for 12-22;
- Tie rod end ball pin remover;
- Device for compressing springs on the front struts;
- The almighty solvent WD40.
We begin the replacement process itself.
- Unscrew the nut that secures the upper shock absorber mounts to the body cup (in the engine compartment).
- Release the upper supports.
- Remove the outer tie rod ends. This is where your special puller will come in handy.
- Remove the bolts that secure the lower part of the strut from the steering knuckle.
- Remove the stand.
- Disassemble and reassemble it.
- Perform the reassembly process.
We should talk about disassembly and assembly in more detail:
- Start by removing the top stem nut. This can only be done with a specialized key for 6;
- Armed with another device to hold the strut spring, release the rod of your shock absorber;
- Next, the upper support is released, which is held on by three nuts on top of the body cup;
- Be sure to disconnect the outer tie rod end from your strut before working on the lower mount;
- It’s not uncommon for a ball pin to become stuck, so be sure to use a remover or a product for all occasions - WD40;
- Once the stand is free, remove it. Replace with a new one and perform the process of reassembling the element. Be careful with the front pillar boot of your VAZ 2110. Try not to damage the component. If it is in poor condition, it is recommended to replace it immediately;
- There should also be no problems with the front strut brace of the VAZ 2110;
- Be sure to adjust the wheel alignment after you have made certain adjustments to the suspension design.
It is noteworthy that replacing the rear struts does not have any effect on the wheel alignment, but when changing the front shock absorbers, significant changes can occur.
The work is fraught with certain difficulties, but doing it even with your own hands without the help of specialists is not as difficult as it seems at first glance. Try to be careful, follow the sequence of steps and choose only high-quality replacement parts. The better the quality of the new front strut, the longer you can drive your “ten”, forgetting about this problem.
https://youtube.com/watch?v=S4mHSyZI8fo
Disassembly
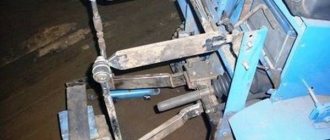
2. Clamp the front pillar in a vice, as shown in the photo.
Warning. Be careful! A compressed spring has great force and when the tie breaks, it straightens out and can cause injury.
3. Install the tie springs on opposite sides and tighten the front strut spring evenly, without distortions, until the load is removed from the upper spring cup.
4. Using a slotted screwdriver, remove the rubber plug from the hole in the housing of the upper support of the front pillar.
5. Install the device on the nut and shock absorber rod.
6. While holding the shock absorber rod from turning with a 17 mm wrench, use a 27 mm wrench to unscrew its nut.
7. Remove the nut and washer from the shock absorber rod.
8. Remove the upper support from the rack.
9. Remove the upper support of the front strut spring.
10. Remove the suspension spring (without removing the tie from it).
11. Remove the compression bumper and the front shock absorber boot.
Knocking in the racks
If the VAZ-2112 has already traveled 30,000 thousand kilometers, you are probably faced with the problem of some knocking in the rear pillars. There can be a lot of reasons for this, and no one can accurately determine which of them was a consequence of the sounds in your car.
- If you hear a characteristic knocking sound in the rear pillar while driving over uneven roads, the shock absorbers are most likely due to deterioration and should be replaced as soon as possible.
- Wear on the rear suspension struts is also the main cause of problems with the car's rear strut.
- A sagging spring is also a cause and requires replacement.
- Severe wear of the bushings that were mounted in the lugs.
- Problems with the compression stroke of the car's rear strut.
- Problems with axis coaxiality due to possible deformation.
In a VAZ-2112 car, replacing rear struts without spring tensioners cannot be properly adjusted. To better identify the problem, empty the trunk of any cargo. If you nevertheless decide to replace the rear struts, the price that you will see on the car markets will pleasantly please you, since it is much cheaper than the prices for a new generation foreign car.
Preliminary diagnosis
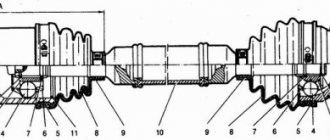
Rear suspension device for VAZ-2110.
Before you start replacing the rear shock absorbers, you need to make sure that the problem is related to them. To do this, it is not necessary to go to a service station; it is enough to conduct a visual inspection. It is possible that the strut itself is not damaged, and only the spring needs to be replaced .
When inspecting, you need to pay attention to the following elements:
- If the rubber bushings that are located on the levers are very worn, then they need to be changed first. It is possible that the racks themselves have not yet exhausted their service life.
- It happens that a spring breaks or sag . In this case, it can also be replaced separately.
- The appearance of characteristic knocking noises in the rear suspension may be due to loosening of the strut mounts at the top or bottom.
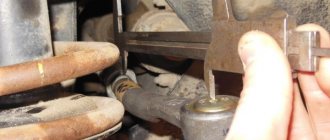
- You need to carefully inspect the silent block on the lower eye .
- Also, the bumpers that are installed on the rods can be broken.
In addition to all these points, all connections should be carefully tightened. Often knocks in the rear suspension are associated with this.
Selection of new parts
Before changing the racks on the VAZ “tenth” model, you must first purchase new elements. It can be quite difficult to choose them from a wide range of products from different manufacturers offered by car dealerships. You are unlikely to find inexpensive parts of good quality; what is offered for sale under the VAZ brand will last half as long as factory shock absorbers. Hence the recommendation: consider options from famous brands, provided that they are not fake:
- Monroe;
- Kayaba;
- Sachs;
- Bilstein.
Among the Russian manufacturers, the products of the Samara SS 20 plant have performed well; reviews from car enthusiasts about them are generally positive. When you plan to replace front shock absorbers, in addition to choosing a manufacturer, you need to think about the type of struts. There are traditional oil and gas-oil models, and the latter are significantly more expensive and a little tougher. But they behave confidently on the road and last longer. Oil models run smoother and are more suitable for those who like a comfortable ride.
The role of the front pillar in the VAZ 2112 car
The main suspension component of any car is the shock absorber struts. Their main purpose is to dampen car body vibrations and ensure sufficient traction of the wheels with the road surface when driving. The manufacturer offers a service life for each machine component. The instructions recommend replacing the front shock absorber strut after an average of 30 - 40 thousand kilometers. What indicates the need to replace the front struts:
- From the side of the damaged rack, the vibration of the body on the “comb” increases.
- Steering wheel wobble appears.
- The car is moving away from straightness.
- When turning, the car inexplicably skids.
- The braking distance increases.
- Abnormal operation of the shock absorber strut valves is indicated by a knocking sound.
- Oil may leak out and its characteristic smudges may appear.
All these faults must be eliminated; further operation of the suspension is not advisable. This can lead to negative consequences:
- Failure of the front support bearing struts.
- Increased uneven tire wear. The wheels “jump” when the car moves, which breaks the hub bearings, the price of which is quite high.
- An increase in braking distance, which is associated with the safety of using a car, when a split second decides a person’s fate.
- Reduced service life of brake pads, which affects vehicle safety and increases the cost of frequent replacement of parts.
Tip: The driver needs to regularly listen to how the suspension works. The appearance of a knock indicates that the car has a fault in the front pillar, which requires urgent replacement or repair.
Types of shock absorber struts
The type of road surface and its quality determines the use of different racks. The style with which the car is driven also plays a role. So:
Comfortable movement in the city and beyond is ensured by hydraulic or oil front struts of the VAZ 2112 - the cheapest and with small dimensions. Although they have sufficient advantages, they have a number of disadvantages:
The presence of an air mixture in the chambers for compensation: if the level is low, the shock absorber efficiency is zero. Creates unreliability of devices and excess air; Frequent and sudden movement of the piston when the car is moving on a dirt road can provoke the formation of cavitation bubbles, which leads to foaming of the oil; Poor heat dissipation.
- Gas front struts have greater rigidity when driving at high speeds and under increased load. But, the increased shock load reduces the comfort of movement for the driver and passengers. For the VAZ 2112, the front gas strut differs and has an increased cost.
- Double-pipe gas-filled struts are a compromise between gas and oil devices. They have sufficient softness and perform well when driving over rough terrain at high speed. With low pressure, the gas pressure prevents oil from boiling and effectively dampens vibrations. This type is the most reliable and durable device.
We determine that the element has failed
There are several signs by which a malfunction can be identified:
- The body vibrates intensely on the comb on the side of the damaged shock absorber;
- There is a beating sensation in the steering wheel;
- The braking distance becomes longer;
- When turning, the car skids;
- Traces of oil leaks;
- When driving in a straight line, the car drifts to the side;
- There are knocks and extraneous noises in the rack.
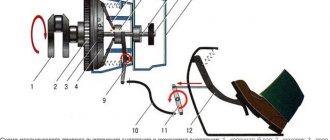
Device diagram
If you do not repair the front struts in a timely manner at a service station or with your own hands, this can lead to dire consequences:
- The support bearings will be destroyed;
- Tires will wear unevenly, jump, and form bumps on the rubber surface;
- The wheel bearings will fail;
- The braking distance will become longer, which is dangerous on any section of the road;
- The brake pads will malfunction and their service life will be significantly reduced.
There are two main ways to check elements for malfunction. One is professional, the other is artisanal, but also quite effective.
- Special vibration stand. A car is driven onto it, and the computer calculates the efficiency of the shock absorbers. It should be noted that new racks may show a result of about 75%, but this is quite normal. If the percentage is less than 50, then it’s time to change the part.
- Manual rocking. You need to grab the front of the car, its wing, and start swinging. Try to achieve the maximum amplitude that your body weight allows. If anything, ask a friend to help. The point is to suddenly remove your hands after swinging and look at the car. If it immediately returns to its original position and does not fluctuate anymore, then everything is fine. If even a slight vibration is detected, you can assume that it is advisable to replace the racks in the near future.
Work order
Before deciding how to change the front shock absorbers, you need to thoroughly prepare. An inspection ditch is not required here; in good weather, everything can be done outside, on a flat concrete platform. Replacement of racks is carried out using the following tools:
- standard set of open-end wrenches and sockets with sizes from 6 to 22 mm;
- plumbing tools - hammer, screwdriver, pliers;
- jack complete with wheel wrench;
- puller for squeezing out ball joints and pins;
- a pair of pin-shaped clamps with grips for compressing springs;
- rags and cloth gloves.
The specified set of tools and the algorithm for performing the work are suitable for all models of the “tenth” Zhiguli family, including the VAZ 2112. To change the struts on the VAZ 2110, you should park the car on the site, fix its wheels and lift it with a jack from the required side. Then remove the front wheel, open the hood and follow this algorithm:
- Disassembly begins in the engine compartment. The shock absorber rod must be freed from the protective cap (if there is one) and the 3 nuts must be loosened with a 14 mm wrench.
- There is a round rod with a groove or a tetrahedral one measuring 6 mm. In the first case, a powerful slotted screwdriver is inserted into the groove; in the second, the rod must be held with a key. Loosen and unscrew the 19 mm fastening nut.
- For further disassembly you need to move under the wheel arch. There, you need to remove the brake fluid hose from the groove in the strut, and then unscrew the 2 nuts securing it to the steering knuckle. The remaining bolts should be knocked out of the holes by hitting them with a hammer through a soft metal guide.
- Remove the cotter pin from the nut holding the steering rod ball pin, having first straightened its ends. Unscrew the nut and use a puller to press the pin out of the seat in the rack bracket.
- Finally unscrew the 3 nuts located under the hood and holding the assembly suspended. Now the shock absorber along with the spring can be removed from the car.
It is recommended to treat stuck threaded connections with WD-40 aerosol lubricant before unscrewing. It is more convenient to do the remaining work in a vice with copper or aluminum pads, but you can do without them. Further replacement of the front struts of a VAZ (“tens”) consists of compressing the springs with clamps and final disassembly of the unit in order to remove the faulty shock absorber. To do this, you will have to remove the cup, support, boot and compression stroke buffer.
When disassembling, pay attention to the condition of the support bearing and replace it if necessary. After this, you can install the new stand on the machine in reverse order.
If the parts were changed after an impact on the suspension, then the procedure is mandatory.
Product delivery options
Note! Below are the shipping methods available specifically for this product. Payment options may vary depending on the shipping method. Detailed information can be found on the “Delivery and Payment” page.
Parcel by Russian Post
Available payment methods:
- Cash on delivery (payment upon receipt)
- Using cards Sberbank, VTB, Post Bank, Tinkoff
- Yandex money
- QIWI
- ROBOKASSA
Shipping throughout Russia. Delivery time is from 5 to 12 days.
Choosing which ones to buy
It is impossible to say unequivocally which front struts are best to choose for the VAZ 2110. Some choose factory ones because they are not rigid enough for them, others prefer analogues for their softer and more comfortable behavior.
Some people even want to install a sports version of the struts on their “top ten”, since they are the stiffest and the springs are the thickest.
Sports
Focus on what you want to get out of driving. But from the point of view of manufacturers, Samara CC20 devices have proven themselves to be excellent. If necessary, you can figure out how to pump up such racks.
The choice is between oil and gas (gas-oil, actually). The former are more affordable from a financial point of view, but they do not have such a wide temperature range, which is why the shock absorbers become stiffer in winter.
Gas analogues have a more complex design, a high price, but an excellent “tenacity” indicator.
Among the manufacturers, in addition to CC20, the following manufacturing companies can be distinguished:
- KONI
- Sachs
- Kayaba
- Monroe
- Brillstein.
All of them have approximately the same devices, so there should be no problems with selecting suitable parts.
Step-by-step replacement of rear shock absorber struts on a VAZ 2110
To replace the rear shock absorber struts on a VAZ 2110, you should use the instructions below.
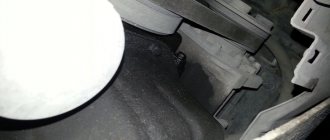
Remove the plug from the stand glass. Behind it is the rod fastening nut.
- Liberally coat the work area with penetrating lubricant.
- Unscrew the nut. In this case, you should avoid turning the rod by holding it with a special key.
- Remove the nut.
- Remove the rubber pad.
- Switch on any gear.
- Place wheel chocks under the front wheels.
- Jack up the rear of the car.
- Unscrew the wheel mount and remove it. It is prohibited to carry out work on a machine suspended only on a jack. If the car owner does not have any support, then the removed wheel should be supported.
- Unscrew the nut of the lower shock absorber strut mounting.
Shock absorber strut lower mounting bolt.
Press the stand out of its seat.
Disassemble the dismantled unit
- Carry out troubleshooting.
- Replace the failed elements and assemble the module.
- Reinstall everything in reverse order.
Check wheel alignment and camber and adjust if necessary.
- www.vazzz.ru
- autorn.ru
- luxvaz.ru
- zapchasti.expert
Video of replacing front struts, springs, supports and bearings on a VAZ 2110-2112
To watch the video in high quality, click on the gear icon in the bottom right, and select HD 1080.
This review was made using the example of the 2110, which I once had for analysis. I think that everything is shown clearly. As for installing new suspension elements, I personally recommend installing original factory spare parts produced by AvtoVAZ. And this only applies to the VAZ 2110, since the factory suspension has proven itself quite well.
I do not support any underestimations and other experiments, although I do not particularly criticize them: as they say, “it depends on the taste and color...”. But personal experience has shown that underestimation is a loss of comfort during city driving, and all road irregularities will constantly fall on the fifth point. It is also worth noting that many manufacturers of shortened suspension elements highly recommend installing short springs only in pairs with equally short struts. That is, you should not install shortened springs on factory-length racks, even if the length is only 30 or 50 mm shorter.
In this case, the spring will be in a constantly relaxed state, which will negatively affect the efficiency of the suspension and will also lead to unwanted sounds from the front struts.
Also, a significant role should be given to the tightening torques of threaded connections when installing new elements. For example, the nuts securing the upper strut support to the car body should be tightened with a force of no more than 19.6–24.2 N*m.
The photo above shows an example of Kalina, but the meaning is not lost in any way.
The same should be said about the other connections. The mounting of the strut to the steering knuckle is 77.5–96.1 N*m. And the nut securing the tip to the stand is tightened with a torque of 27.05–33.42 N*m.
As for the symptoms of malfunction of supports, bearings and springs, they can be different. For example, when you turn the steering wheel, you hear a grinding or even crunching sound, and this is pronounced even when the car is parked - most likely this indicates a failure of the support bearings. Also, if they are worn out enough, a knock may appear from the top of the rack - more precisely from the support.
Over time, springs may lose their properties and sag during prolonged or overly loaded use. This leads to a loss of suspension efficiency, sagging of the car, and there is a high probability that the wheels, when driving on uneven roads, will begin to catch on the fender liners, which even happened on one of my cars.
Symptoms of breakdowns
Since the strut is a suspension element, if it malfunctions, you will immediately notice problems with its operation. So, the main symptom is an increased knocking sound in the front of the car. It can occur at different speeds. If you hear a crunch (and not a dull thud), it means that the front strut bearing on the VAZ-2110 has become unusable. The support element may wear out faster than the shock absorber itself. The reason for this is the constant shock of the suspension when driving on uneven roads. The support bearing does not have any damper, and all loads that the rack could not absorb are fully transferred to it. Note that the crunching noise initially occurs only when turning the steering wheel.
Rear pillar replacement instructions
If you take a closer look at the structure of the front and rear struts, you will see that this is a nodal mount - a kind of device for the interaction of springs and shock absorbers in a bilateral form. Replacing the rear struts on a VAZ-2112 with your own hands is not a very complicated process, but you must carry out a number of steps, as well as have special keys and everything necessary for the work.
Manipulations for removing the rear pillar:
- In the area of the stern fastening arches, dismantle the spare parts.
- Prepare the car seat located at the rear for removal, remove all fasteners and belts.
- Use a special key to unscrew the rod fasteners.
- Raise the car on a lift.
- Remove the lower mount.
- Remove the stand from the mounting socket.
When you have finished removing the necessary elements and removed the desired part, proceed to the next replacement step. Now you need to generate a stroke compression buffer system, remove the protective cover, bushing, support washer, spring and shock absorbers.
Choosing the best front strut
The best front struts for the VAZ 2112 are produced by the Japanese company Kayaba. By installing Kayaba front struts on a VAZ 2112, the car enthusiast provides himself with maximum comfort and low vehicle noise when driving at low speeds. Even at high speeds, optimal shock absorption and a high level of safety are ensured. The best front struts for the VAZ 2112 do not create any problems when replacing parts. The strut can be changed easily and quickly, which reduces the time required to repair the shock absorber. Very often, the quality of shock absorbers can be improved if a stretcher is installed on the front struts on the VAZ 2112. In this case:
- Increases accuracy when driving a car when cornering.
- The machine's stability increases when moving in a straight line.
- Deformation of the body is reduced when the car is driven on dirt roads and on turns, which leads to a reduction in the appearance of cracks on the body.
If you do all the work efficiently and without haste, then you won’t have to redo it for a long time. Also on our resource you can find out how to replace the rear struts.
Don't ignore the problem
Do not hesitate to replace the front struts on the VAZ-2110. If the shock absorber fails, the load on other elements increases:
- Ball joints.
- Silent blocks of levers.
- Support and wheel bearings.
The braking distance also increases and controllability deteriorates. At speeds above 60 kilometers per hour, the car begins to “scour” along the road. And, of course, all this is accompanied by a roar in the cabin, which you and your passengers are unlikely to like.
Selection of parts and necessary tools
Before you start directly replacing silent blocks, it is important to properly prepare for it. There are few recommendations specifically for choosing new parts.
The auto parts market is simply filled with silent blocks from different manufacturers, mostly they are all quite good. The only thing you can do to make a better choice of new parts is to consult with auto mechanics in your area. The main thing is that the new vibration isolators fit completely.
For repair work you will need the following things:
- new silent blocks;
- a set of spanners and socket wrenches (required sizes 17, 19, 24);
- a hammer, a vice or a special puller (also known as a “press presser”) for vibration isolators;
- any lubricant, WD-40 is most convenient;
- inspection hole (lift);
- jack.
Important! Despite the complexity of replacing silent blocks, it is necessary to have at least basic repair skills. Therefore, objectively weigh your strengths before replacing and decide whether you can do it.
Replacing suspension silent blocks with your own hands
The suspension silent blocks on the VAZ-2112 are located in the arms of both the rear beam and the front one. It is advisable to replace them comprehensively. The replacement process is approximately the same on both the rear and front parts of the suspension. Below are instructions for both cases.
Front control arms
Replacing front control arm silent blocks on a VAZ-2112 is the following process:
- First of all, the car must be placed above the inspection hole or use a lift. Then remove the engine compartment protection represented by the casing.
- After this, the nuts securing the front arms are unscrewed, then the stabilizers, all this is done with a 17 wrench.
- After loosening the nuts securing the required wheel, you need to jack up the car and remove it completely.
- Use a 24mm wrench to unscrew the nut on the extension. Then unscrew the fastening bolts of the ball joint and dismantle it.
- Next, the suspension arm is completely released.
- It is necessary to remove the old silent blocks from the removed lever with a hammer or puller. After this, clean the seat from rust and dirt, lubricating the surface with a thin layer of lubricant. You can make your own puller. It will be especially useful when you want to replace the silent block without removing the lever.
- Having pressed the new silent blocks into the mounting groove with a vice or a puller, you need to assemble everything in the reverse order.
- Ready.
Important! Many car enthusiasts do not press out silent blocks, but burn them out, which is extremely wrong. During heat treatment, the quality of the metal from which the lever is made seriously changes for the worse.
Replacing silent blocks in the rear beam
Replacing the rear silent blocks is done as follows:
- Again, the car must be driven into a viewing hole or raised on a lift.
- Then, taking a 19mm wrench, you need to disconnect the rear beam from the bracket by unscrewing the nuts securing it.
- After this, the bolt freed from the nut should be removed, and a wooden beam the size of a brick should be inserted between the beam and the body.
- Then the silent block is knocked out with a hammer or puller, and the freed groove is cleaned and lubricated.
- Next, a new silent block is pressed into the mounting groove.
- The last step is to assemble the entire structure back.
Important! After carrying out measures to replace silent blocks (both front and rear), it is very important to do a wheel alignment.