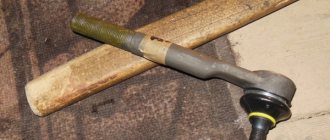
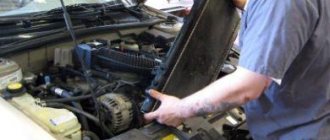
Quite often it is necessary to replace steering tips on VAZ 2114 and 2115. The frequency of this procedure is affected by poor quality roads, as well as the unreliable design of this unit. Therefore, all owners are familiar firsthand with the need to urgently carry out such repairs. On these models, you can change the tips right in the garage. This does not require great qualifications.
If everything is done correctly, you won’t even have to set the wheel alignment angles. If you have the necessary tools, you can make the replacement without any problems. But even with an ordinary set of devices it is quite possible to cope with this repair.
Analogs
Articles of cheap replacement steering tips on Exist
In addition to original spare parts, there are a number of analogues that are recommended for installation and are fully certified. So, in the table below there is a list indicating the names of manufacturers, catalog numbers and prices for steering tips that can be installed on the VAZ-2114.
Manufacturer's name Catalog number Cost in rubles per piece
| Manufacturer's name | Catalog number | Cost in rubles per piece |
| Kager | 43-0283 | 240 |
| Mapco | 19090 | 330 |
| SCT | TS 587 | 400 |
| Weber | SS 2108-4057 | 400 |
| Ocap | 0190737 | 450 |
| Lemforder | 15458 01 | 450 |
| Quinton Hazell | QR 2275 S | 450 |
| Fenox | SP31083C2 | 450 |
| Teknorot | L-302 | 450 |
| Bzak | BA08-3414057 | 480 |
| Master-sport | 154570-PR-PCS-MS | 500 |
| As Metal | 17LD1550 | 500 |
| Lex | L-0302 | 550 |
| N.K. | 5032335 | 550 |
| Starmann | ST-2442 | 550 |
| Delphi | TA1519 | 600 |
| Pekar | 2108-3414057 | 600 |
| Ruville | 917211 | 600 |
| Pilenga | TS-P 1144 | 600 |
| Finwhale | FJ-483 | 600 |
| Hola | S122 | 650 |
| ABS | 230188 | 700 |
| LYNXauto | C4049L | 750 |
| Patron | PS1197L | 750 |
| TRACK | TR70-103 | 850 |
| Moog | LA-ES-0061 | 850 |
| TRW | JTE 232 | 900 |
| EGT | 302046EGT | 900 |
Repair procedure
The replacement algorithm includes several points:
- Jack up one side, remove the wheel, turn the steering wheel so that the tip is in a position convenient for replacement.
- Spray the connections with penetrating liquid.
- Unscrew the fastening nut.
- Pull the tip out of the hole in the steering knuckle.
We measure the distance with a caliper
- Check the condition of the steering rods and replace them if necessary.
- Replace the part.
- Reassemble in reverse order, repeat operations for the other wheel.
Service technicians are interested in what measures can be taken to protect threaded connections from dirt and moisture. The main thing is to thoroughly lubricate the threads with graphite lubricant or lithol. Some additionally put a tube of a suitable size at the junction of the rod and the tip or use heat shrink.
After replacing the VAZ 2114, it is best to adjust the wheel alignment. There is a way to avoid this though.
When removing the old tip, count the number of turns, and then tighten the new one by the same number. Then, when driving at low speed, make sure that the car does not drift sideways when the steering wheel is straight.
Consequences of untimely replacement
Now that all the main processes have been considered, it is also necessary to talk about the issue of the consequences of untimely replacement of the steering tip, as well as the consequences that this can lead to:
- The worst consequence is a traffic accident. As a result, damage can be caused not only to the car, but also to human life and health. This can happen due to the tip pin breaking off. In this case, the car will be uncontrollable. And this is precisely what will lead to a collision with another vehicle, or driving into a ditch.
- Increased wear. In this case, not only the tires will wear out, but also the shock absorber will require replacement. And the most annoying thing is that wear will also affect the second, opposite tip, since the load will not be distributed evenly. This may result in additional costs.
Working method
You need to do the following:
1. Hang up the car and remove the wheel, not forgetting to install a reliable safety stand.
2. Clean the parts with a wire brush and spray the joints with a penetrating fluid such as WD-40 or equivalent. These are mixtures of white spirit with anti-corrosion and lubricating additives.
3. Loosen the nut securing the pin and the locking connection of the toe adjustment unit. One turn is enough. It is better to go through the thread of the pin nut several times until it rotates freely.
4. Install the puller onto the ball joint. Pullers come in different designs; it is most convenient to use a device in the form of a wedge fork; a couple of strong blows to its end are enough. The screw puller does not always cope on its own; it needs help with a sharp blow of a hammer on the bipod of the steering knuckle.
5. In the absence of a puller, you can create tension in the connection using the same pry bar, and then apply sharp blows to the edge of the bipod. The finger will detach with a characteristic click. All that remains is to unscrew the threaded end of the rod and install a new one.
The disadvantage of such a simple replacement is the need to immediately carry out operations to adjust the wheel alignment angles, as they say, wheel alignment. We must remember that replacing the tip does not affect the camber in any way, only the toe-in of the wheels changes.
If you approach the work carefully, have a sufficiently large caliper or tape measure, and understand the principles of toe adjustment, then additional costs can be avoided.
To do this, you need to perform the following operations with the highest possible accuracy:
1. Before starting to loosen the nuts, make two marks. The first should be located exactly in the center of the circle of the back of the ball joint. There are usually ring stampings or rolling. Their center must be calculated, at least using a caliper. In the found center, it is advisable to make a small depression with a light blow of a sharp core. Carefully check to see if there is any slight shift of the mark from the center. Repeat the procedure on a new tip.
2. On the steering rod, from the inside of the threaded connection, apply an annular mark lying exactly in a plane perpendicular to the axis of the rod. Smooth and neat.
3. Using a caliper or tape measure, measure and record the distance between the applied marks.
After installing the new tip, rotate the adjusting connection to achieve the same result. Lock the threads.
Despite the possibility of preserving the previously existing toe angles in this way, it will still be safer and calmer to visit the stand. The toe-in angle is quite accessible for measuring in a garage yourself; you can find various techniques in numerous tips from home craftsmen for repairing their own cars.
conclusions
Replacing the steering tips on a VAZ-2114 car is quite simple, but the process itself can take a lot of time and effort, since the fixing nut will not always be unscrewed easily. If the described process seems complicated to the motorist, then you need to contact a car service center, where they will always help with replacement. Separately, it is worth noting that the chassis parts must be changed on time to avoid the tragic consequences described in the article.
Didn't find the information you are looking for? on our forum.
Symptoms of a problem
The first enemy of VAZ 2114 tips is dirt.
They are a hinged element, so breaking the integrity of the boot causes solid particles to enter the mechanism. Due to friction, increased wear of the part and destruction of moving elements occurs. The second “killer” is bad roads. Constant impacts from driving over bumps have an extremely bad effect on the condition of the part: the hinge wears out and vertical play occurs.
Faulty tie rod end
Defective parts must be replaced immediately.
People often ask what signs indicate that a tip needs to be changed. It is easy to check their condition. Turn the wheel all the way in one direction and carefully remove dirt from the boot. If breaks are visible or the rubber is cracked over time, the part needs to be replaced. Repeat the operation for the second wheel.
Even if there are no visible integrity problems, insert a pry bar between the rod and the steering knuckle and try to move them relative to each other. There should be no vertical play. If it is present, the part needs to be replaced.
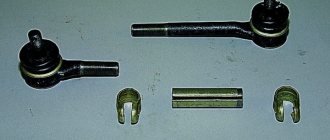
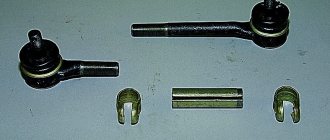
VAZ 2115 Replacing the tie rod end
8.4.1. Replacing the tie rod end
| GENERAL INFORMATION |
| 1 – universal joint fork; 2 – coupling bolt; 3 – nut; 4 – rotary lever; 5 – tie rod end assembly with ball joint; 6 – lock nut; | 7 – front suspension beam mounting bolts; 8 – steering gear mounting bolts; 9 – bolts for securing the rear support of the power unit; 10 – rear support of the power unit; 11 – front suspension beam; 12 – steering mechanism |
| 1 – tip; 2 – puller; 3 – nut; 4 – rotary lever; 5 – traction; 6 – lock nut |
| 1 – tip; 2 – lock nut; 3 – traction |
| 1 – left tip; 2 – right tip |
| EXECUTION ORDER |
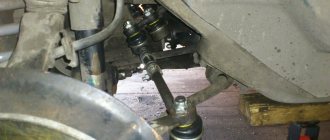
| 1. If the free play (play) of the steering wheel increases or the force required to turn it increases significantly, check the axial and radial clearances in the ball joints of the tie rod ends. |
| 2. If, when rocking the rod with your hand in different directions, you feel play in the joint or corrosion appears on the ball pin, replace the ball joint assembly with the tip (check with the front wheels hanging). |
| 3. Be sure to replace the torn protective cover of the ball joint, otherwise dirt and water that gets into the joint will quickly damage it. |
| Warning The ball joint pin nuts are self-locking, so they must be replaced with new ones after each loosening. |
Replacement
EXECUTION ORDER
1. Remove the corresponding wheel. 2. Clean locknut 6 (see Fig. Mounting the steering gear on a car (without power steering)) of the tie rod end and nut 3 of the ball joint pins. 3. Loosen the locknut 6 of the tip, holding the hexagon rod from turning with the second wrench. 4. Unscrew the nut 3 of the ball joint pins. 5. Install puller 2 (see Fig. Pressing out the tie rod end ball joint pin) and press the ball joint pin out of the swing arm. 6. If for some reason the rod is disconnected from the swing arm without replacing tip 1, then, depending on the design of the puller, leave fastening nut 3 screwed several turns onto the hinge pin so as not to damage its thread. 7. Disconnect the steering rod 5 from the rotary lever 4. 8. Unscrew the tip 1 (see Fig. Steering rod assembly), holding the rod 3 by the hexagon from turning it
At the same time, count the number of revolutions of the tip - this will help when installing the tip to approximately maintain wheel alignment.
Warning When installing, please note that the left tip is marked with the letter D, and the right – C (see fig.
Marking of tie rod ends).
9. Screw tip 1 (see Fig. Steering rod assembly) onto steering rod 3 by the previously calculated number of revolutions. 10. Press the hinge pin into the rotary lever 4 (see Fig. Mounting the steering mechanism on a car (without power steering)), screwing in a new nut 3 securing it with the appropriate torque (if necessary, the pin can be kept from turning using a hexagon). 11. After this, fix the tip 5 on the steering rod with locknut 6, holding the steering rod from turning by the hexagon. 12. Install the wheel. 13. Check and, if necessary, adjust the wheel alignment angles.
Tightening torques, Nm
| Ball joint pin nut | 20, then turn it 90° |
| Tip locknut | 50 |
| Wheel bolts | 120 |
Replacement instructions
Replacing the steering linkage is done in an inspection hole or overpass. The task is to repair the steering rack on a VAZ 2110, replace the steering rack and steering rack - video. The disassembly order is as follows.
- Loosen and unscrew the ball pin mounting nut. On some machines you can still find control rods
with pinned nuts. Replacing the Kalina steering rack boot - photo report on how to remove and install the protective cover for the steering mechanism of VAZ 1117, 1118 and 1119. In this case, you will have to remove the cotter pins first, bending their antennae with pliers. - From the side of the rounded end of the steering
bipod, insert the puller in such a way that its support area is under the bipod lever. - Rotate the bolt at the top of the puller with a wrench and press it out of the socket.
- Repeat the operation on all other tips.
From time to time, when unscrewing the nut, due to contamination of the ball thread, the pin begins to rotate together with the nut, turning at the seating location. Then, to unscrew the nut, you need to block it with a mounting blade. Small feature: left and right last pulls
VAZ
2106
are different from each other, so it is better to mark them after removal.
Steering elements
: 1 - lateral thrust;
2 - bipod; 3 - medium thrust; 4 — pendulum lever; 5 - adjusting coupling; 6 — lower ball joint of the front suspension; 7 — right steering knuckle; 8 — upper ball joint of the front suspension; 9 — right steering knuckle lever; 10 — bracket for the pendulum arm; 11 — right side member of the body; 12 — oil filler plug; 13 — steering gear housing; 14 — steering
;
15 — facing casing of the steering shaft; 16 — steering wheel; 17 — pipe of the upper support of the steering shaft
; 18 — steering shaft bracket; 19 — left side member of the body; 20 — turnbuckles of the adjusting coupling; 21 - left steering knuckle
After all 3 pulls
removed, you need to adjust the new parts to the length of the old ones. Holding the rod near the tip with one hand, replacing the VAZ 2106 steering rod. This applies to the two outer steering rods. Using the threads for fastening the tips on them, the toe angle of the front wheels is adjusted. To prevent the wheels from initially pointing in different directions, twist or unscrew the tips on the new parts to adjust their length to the size of the removed elements.
The next stage is the installation of new rods, the ball pins of which are inserted into the seats, after which the nut is screwed on top. Changing the oil in the gearbox and rear axle of a VAZ 2106 Changing the oil in the gearbox in the box etc. It must be tightened with good force. If there is a hole for a cotter pin, then insert the latter and straighten the antennae.
Most often, the tips located at the edges, near the wheels, fail. Self-replacement of the VAZ tie rod end. Then they can be changed one by one. Disassembly can be done according to the same instructions, but press out only one end of the rod
. Then you need to unscrew the clamp, which fixes the rotation of the part along the thread. Replacing tie rod ends involves unscrewing the old part, and then screwing in the new one to the same length and tightening the clamp. Then you can insert your finger into the socket and tighten the nut.
All steering rods of VAZ 01-07 models are identical, so when purchasing, do not worry about reading the numbers 2101 on the packaging
The only thing worth paying attention to is the mobility of the ball pin in the rod end. Replacing the tie rod end of a UAZ Patriot: Replacing the transverse rod of silent blocks
Replacement of the steering rack bootPriceReplacement of the steering rack boot of the VAZ Kalina steering rack. In the new product, it should be difficult to turn in the socket due to manual effort. After successfully replacing even just one tip, you cannot drive right away; you must definitely adjust the toe angles of the front wheels at the nearest service station.
Recommendations for car owners
To check the serviceability of the tip, you need to ask an assistant to turn the steering wheel in different directions. At this time, you need to listen to the outgoing knocks. You can use a pry bar to check for play. If during the test you hear a knock and there is play, you must immediately take measures to eliminate the malfunction.
Experienced car owners who have encountered this situation more than once advise:
- store the car in a dry room, because with constant humidity, parts are subject to destruction;
- avoid driving off-road and on roads with poor surfaces;
- upon completion of the repair, especially if it was carried out by another person, check the tightness of the wheel bolts and the parts being replaced;
- buy original and high-quality spare parts from reliable suppliers;
- After all work related to the chassis of the car, adjust the wheel alignment.
Operating a vehicle with a faulty steering system can be dangerous for the driver, passengers and other road users. Therefore, you need to repair your vehicle in a timely manner and listen to the advice of experienced motorists.
Checking status
To make sure that all the signs mentioned are caused by the tips, this fact should be checked.
Many rush to conclusions, blaming the rod ends. In fact, the same signs of breakdown may indicate a faulty steering rack. Sometimes, after tightening or repairing it, everything returns to its place, and the tips are still in quite usable condition.
So, let's check if the tips are really to blame. For this:
- Drive the car onto an overpass or place it in a viewing hole;
- Apply the handbrake and install chocks under the wheels. Security measures have not yet been canceled;
- Go under the car and grab the steering rod with your hands. It needs to be pulled up and down with quite impressive force;
- If the element is really worn out, this can be determined with the naked eye, since the play in the hinge will be significant;
- Do not forget to carry out the same operation with the second steering rod end.
When changing rod ends, purchase a pair at once. Leaving one new and one old element in the work is a big mistake that can lead to the most unpredictable consequences.
Nuts - they're everywhere
Replacing steering tips for VAZ
How can you seal a gas tankImportant for a motorist to know
1. Place the car on the handbrake and support the rear wheels. Turn the front wheels all the way to the right if you are changing the left tie rod, and if you remove the right link, then all the way to the left. The work can be done on a jack, but for insurance, place the removed wheel under the threshold of the car. 2. Remove the locking cotter pin from the tie rod ball joint nut to the swing arm. (Some hinges do not have a hole for a cotter pin. Buy a new hinge with a hole for a cotter pin, it is more reliable)
3. Using a “19” wrench, unscrew the nut securing the steering rod ball joint.
4. Using a puller, press out the steering rod ball joint pin.
If there is no puller, unscrew the nut not completely, then install the mounting blade in the spacer between the steering rod and the strut arm and hit the end with a hammer!!! rack lever. (This may require a lot of effort and time. The finger may be pressed very tightly into the strut lever (it took about 15 - 20 minutes of fiddling)) Then unscrew the nut completely
5. Use a screwdriver to bend the ends of the plate securing the steering rods to the steering mechanism
6. Loosen both bolts and completely unscrew the bolt securing the steering rod being removed.
7. Place the plate in such a position that you can remove the rod.
8. Take out the steering rod.
9. Clamp the tie rod in a vice using the hexagon on the coupling. Loosen the tip locknut.
10. Unscrew the tip (the tip turns away from the rod clockwise!!!) while counting the number of revolutions. Remember the number of revolutions. Screw in the new tip this number of turns. This is necessary so as not to greatly disturb the wheel alignment angles.
11. To replace the boot, lubricate its contact area with sealant and install a new boot.
12. Install the steering rod in the reverse order. Tighten the tie rod mounting bolts to the required torque (70 – 86 Nm (7.8 – 8.6 kgf·m)). After this, bending the edges of the plate, lock the bolts. Replacement of ball joints (steering ends) can be done without removing the steering rods. To do this, you need to hold the coupling with a 24 key, and unscrew the nut clockwise with a 27 key.
After the work has been done, it is necessary to do a wheel alignment.