An important part of the brake mechanism is the caliper. It holds the brake wheel cylinders, which, when the pedal is pressed, compress the brake disc, slowing down the rotation of the wheel. Over time, the brake cylinders and the brake caliper of the VAZ 2107 wear out and the wheel begins to brake worse, which can lead to pulling to the side when braking or brake failure. Therefore, these parts need to be monitored and, if necessary, repaired or replaced.
Replacing a brake caliper on a VAZ 2107
An important part of the brake mechanism is the caliper. It holds the brake wheel cylinders, which, when the pedal is pressed, compress the brake disc, slowing down the rotation of the wheel. Over time, the brake cylinders and the brake caliper of the VAZ 2107 wear out and the wheel begins to brake worse, which can lead to pulling to the side when braking or brake failure. Therefore, these parts need to be monitored and, if necessary, repaired or replaced.
Front cylinder location
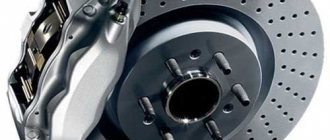
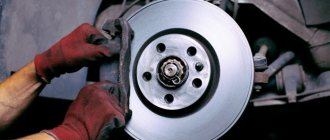
The front brake cylinder is located on the front wheel hubs, next to the wheel rim. Each front wheel has two brake devices, which, when you press the pedal, press the pads against the brake disc on both sides, which ensures effective braking of the car. For clarity, below is a photo in which both devices are indicated by arrows.
After removing the front wheel of the seven, you can see the device data immediately behind it. Having found them, you need to make sure that they are in good working order, or rather, that they are faulty. After all, why change a working part?
When to change cylinders
The main and most common reason for loss of performance, which entails repair or replacement, is jamming of the brake device. If you notice constant braking of the car, a pull to the side when you release the steering wheel when driving in a straight line, or abnormal heating of one of the wheels after driving, perhaps one of the working cylinders has begun to jam. This happens quite often, since aggressive and improper operation, as well as the quality of parts, leads to such consequences. Jamming of the product can occur in any mode of operation - be it constant driving of the car, or its idle time in the parking lot. If at least one of the cylinders on the VAZ-2107 begins to jam, then you should immediately get to the nearest service station and have it repaired. But a service station is expensive, especially for owners of budget cars, so it’s easier to solve the problem yourself, and at home.
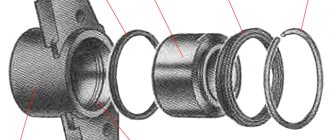
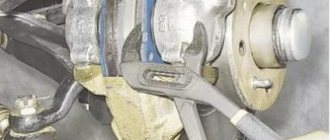
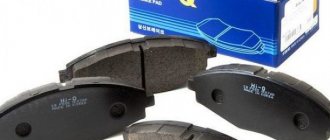
Replacement of the product may also be necessary if liquid begins to leak from under the sealing ring. The sealing ring (boot) is shown below in the photo.
If liquid begins to leak from under the rubber band, it means that this will soon lead to a malfunction of the device. You can avoid consequences by responding in a timely manner.
Replacing the front brake cylinder on a VAZ-2107
Replacement begins directly with the removal of the old mechanism. To do this, you need to jack up the front of the car, then unscrew and remove the wheel, and remove the brake caliper. Details of caliper removal can be found in the corresponding section of this website.
Further actions to replace the working mechanism should be carried out as follows:
The caliper should be placed in a vice, but it is important not to clamp it too tightly. If you squeeze it, then part of the part may simply break off, as a result, replacing the caliper cannot be avoided. Once the caliper is removed and clamped in a vice, it is necessary to remove the steel brake pipe
This tube connects both parts of the mechanism. To remove the tube, you need to unscrew two nuts with a wrench. After unscrewing the nuts, you can remove the steel tube. The photo below shows the caliper in a vice, as well as the tube that needs to be removed. After this, you need to find a groove on the side in which the spring locking element is located. To remove the brake cylinder, you will need to press this lock with a screwdriver. The photo below shows the location of the groove with a red arrow.
To remove the working device, you need to hold the spring mechanism with a screwdriver. After pressing the latch, it is necessary to strike the side of the working mechanism with a rubber hammer. You don’t need to hit it too hard, but be sure not to hit the caliper. If you hit the caliper, it may break off. The photo above shows how the working cylinder is struck with a hammer. If the product starts to move, then the process is in progress. To dismantle the part in question, you will need to use a long screwdriver or pry bar. The mount should be placed in the resulting hole between the caliper and the cylinder. Below is a photo of how it looks clearly.
The second cylinder is removed in a similar way. After removing the devices, you can begin to directly replace them with new ones. To install a new product in place of a removed one, you must first press a special latch. When pressed, the mechanism must be installed in the guide grooves until this latch is activated.
If the new part will not be inserted into the guide grooves, you can take a file and remove a few millimeters of the metal layer. The main thing is not to overdo it, otherwise the part simply will not be fixed in the caliper.
This completes the replacement of the working cylinder on the VAZ-2107
When installing a new product, pay attention to the presence of a brake bleeder. If it is missing, then you should remove it from the old cylinder and screw it into the new device
What is needed to remove the caliper
- screwdriver or bit;
- keys for 17, 14 and 10;
- pliers;
- a piece of rubber tube or bolt with a diameter suitable for the inner diameter of the brake hose tip;
- marker.
It is necessary to remove and install the caliper when replacing it in case of deformation or damage. This is also a necessary action in order to repair the VAZ 2107 caliper.
To carry out the work, you must lift the car on a lift or use a jack. The latter option is somewhat more tedious, but ideal for home use.
Vacuum brake booster
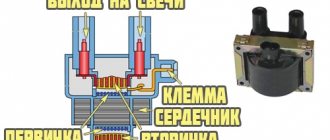
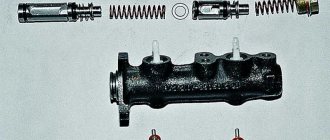
A rod connected to the amplifier is connected to the pedal. The design of the VAZ-2107 vacuum brake booster is quite interesting; it is shown in the figure:
The amplifier is a sealed container, internally divided into 2 chambers by means of a membrane. The chamber located closer to the pedal is called atmospheric, and the chamber separated from it by a membrane is called vacuum. The diaphragm itself is connected to the piston rod of the master cylinder.
The vacuum chamber is connected by a pipe to the intake manifold of the engine, where the vacuum comes from. The design also includes a follower valve controlled by the pedal rod, which does all the work.
When the pedal is released, this valve connects the chamber cavities through a channel, providing identical pressure. When the pedal is applied, the valve closes the channel connecting the chambers and opens the channel connecting the atmospheric chamber with the atmosphere. Since a vacuum is maintained in the second chamber, atmospheric pressure begins to put pressure on the membrane. Since it is connected to the piston rod of the master cylinder, due to the movement of the piston, fluid is displaced from the cylinder into the pipelines.
Repair of brake caliper VAZ 2107
A damaged or deformed brake caliper on a VAZ 2107 needs to be replaced. Caliper repair involves replacing faulty brake wheel cylinders. In some cases, instead of replacing the cylinders, they can be repaired.
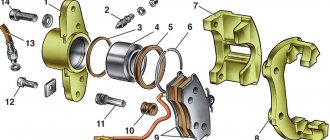
The procedure for replacing cylinders is as follows:
- clamp the caliper in a vice;
- Unscrew the fittings of the connecting tube with a 10 mm wrench;
- remove the tube connecting the working cylinders;
- Use a hammer to knock out the working cylinders from the guides, after pressing the lock with a screwdriver;
- remove the clamps and replace them with new cylinders (if they are missing); insert the cylinders into the guides;
- install the connecting tube and tighten the fittings.
Repair of working cylinders consists of replacing the rubber sealing rings on the pistons. The order of operations is as follows:
- remove the brake cylinder;
- remove the protective cap from the piston using a screwdriver;
- apply compressed air to the cylinder to push the piston out;
- remove the sealing ring by prying it off with a screwdriver;
- install a new ring;
- lubricate the cylinder, piston and ring with brake fluid;
- insert the piston into the brake cylinder.
Important: before installing new sealing rings and assembling the cylinders, you must make sure that the inner surface of the cylinder and the piston are free of damage, cavities, and deformations. Otherwise, replace the brake cylinder with a new one.
Where can I buy?
VAZ 2107 calipers can only be purchased in city auto stores or online trading platforms.
This is due to the fact that the production of original models for retail sales was discontinued back in 2014. Therefore, any caliper sold in a new condition has an old restored body at its base, on which completely new cylinders, tubes and other small elements are placed. Purchasing a frankly Chinese analogue is not considered, since the complex of measures to modify them out of the box consists of cutting new threads and fitting the goujon, replacing rubber products, as well as filling the space under the boot with anti-squeak lubricant.
Installing the brake caliper
Installation of the brake caliper on the VAZ 2107 is carried out in the reverse order of its dismantling.
After installing the brake caliper, it is imperative to bleed the brake system, removing air from it. Until this operation is completed, operating the vehicle is strictly prohibited.
The left and right wheel calipers are slightly different, so you need to pay attention to this when purchasing new ones.
After repairing and installing the VAZ 2107 brake caliper, it is necessary to check the brake system for fluid leaks and, if necessary, repair them.
Didn't find the information you are looking for? on our forum.
Important points
When repairing the brake system of a VAZ 2107, you should remember several very important nuances. Without mentioning them, this article would be incomplete. So:
- On later VAZ 2107 models, spring washers began to be installed under the fastening bolts of the brake brackets. They are thin and very easy to lose when removing the bracket. To prevent this from happening, it is advisable to spread some newspaper or rag under the caliper. If the puck does pop out, it will be much easier to find it;
- If the driver does not plan to change the brake pads when replacing the caliper, then before removing them they should be marked with a marker or chalk so that they can be installed in the same place during reassembly. If you change the original location of the pads, they will become unusable much faster;
- If the driver decides to leave the caliper in place and plans to change only the brake pads, then he will have to buy not one, but two sets of pads, since these parts are always changed on two wheels, and not on one. If you leave old pads on one of the wheels, this will inevitably lead to rapid wear and new problems in the operation of the brake system;
So, replacing a brake caliper is not as difficult a task as it might seem at first glance
The main thing that the driver should remember when changing this part is its extreme importance. If a mistake is made when installing the caliper or pads, this does not bode well for either the driver or the car.
- On later VAZ 2107 models, spring washers began to be installed under the fastening bolts of the brake brackets. They are thin and very easy to lose when removing the bracket. To prevent this from happening, it is advisable to spread some newspaper or rag under the caliper. If the puck does pop out, it will be much easier to find it;
- If the driver does not plan to change the brake pads when replacing the caliper, then before removing them they should be marked with a marker or chalk so that they can be installed in the same place during reassembly. If you change the original location of the pads, they will become unusable much faster;
- If the driver decides to leave the caliper in place and plans to change only the brake pads, then he will have to buy not one, but two sets of pads, since these parts are always changed on two wheels, and not on one.
If you leave old pads on one of the wheels, this will inevitably lead to rapid wear and new problems in the operation of the brake system; When replacing brake pads on a VAZ 2107, you will have to buy two sets at once - After removing the pads, do not press the brake pedal under any circumstances. The pistons on the hydraulic cylinders mounted in the caliper will move outward and prevent the installation of a new pair of pads. But pushing the pistons back will be very difficult: in some cases, this requires completely draining the brake fluid from the system;
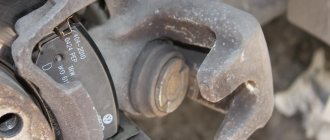
- When unscrewing the mounting bolts on the caliper, you should remember: they differ in the shape of the head.
The head of the top bolt is smaller, the head of the bottom bolt is larger (in the photo it is marked with the letter “a”). If the bolts are swapped, it will be impossible to install the brake pads; The letter “a” indicates the lower caliper mounting bolt with a thick head. - When buying a new caliper in a store, you should definitely tell the seller which side it will be installed on, since on the VAZ 2107 there are differences in the design of the left and right calipers. For example, the holes for the mounting bolts are located differently, so that the left caliper will not fit the right wheel and vice versa;
- Finally, after installing the caliper, you should be sure to press the brake pedal several times to check whether the new caliper works or not. In addition, after pressing the pedal, be sure to inspect the caliper and the asphalt under the car for brake fluid leaks.
Pressure regulator
It is installed in the rear wheel drive and not only distributes fluid to the mechanisms, it also prevents possible skidding due to different forces on the mechanisms. This is done by limiting the supply of pressure to the mechanisms, depending on the position of the car body relative to the bridge.
The regulator is driven by a rod, one end of which is fixed to the rear axle, while it itself is fixed to the body. As the load on the rear axle increases, the body changes position relative to the axle; as a result, the rod puts pressure on the regulator piston, which adjusts the pressure supplied to the mechanisms.
How to easily and safely replace the steering wheel?
The operation of replacing the steering wheel is not particularly difficult, but safety precautions must be observed. The basic steps on how to remove the steering wheel have been described above, but in some cases the following tips may be needed:
Method #1. If the steering wheel sits firmly on the shaft and cannot be removed, then it is necessary to loosen the steering wheel nut as much as possible, but leave it one turn (to protect the teeth, nose and other parts of the face). Then sit in a chair and sharply and evenly hit the steering wheel with your palms from below, upward along the steering axis. After several such impacts, the steering wheel should fly off the shaft.
The main thing is to remember to leave the nut on one turn!
Method #2. To remove the steering wheel, you can use an old Zhiguli jack. The base of the jack needs to be rested against the steering shaft through a wooden spacer, wrap a rope around the steering wheel and throw it over the top of the jack. A piece of cloth (rag) should be placed at the point where the rope comes into contact with the steering wheel so as not to scratch the steering wheel. Next, gradually pull with a jack and remove the steering wheel. Do not forget to completely unscrew the steering wheel fastening nut, since in this case the steering wheel itself will gently “come off” from the shaft.
Tubes and hoses
Brake pipes and hoses of the braking system of the VAZ “kopek” are used both front and rear. Their purpose is to connect the GTZ and RTC to each other and supply brake fluid to them. Sometimes connecting elements become unusable, especially hoses, due to aging rubber.
Damage to the hose leads to fluid leakage and depressurization of the brake system.
The parts in question are attached using a threaded connection. There are no difficulties in replacing them. You just need to unscrew the fasteners on both sides, remove the worn element and install a new one in its place.
Visual inspection
First you need to make sure that the piston is in good condition: with light pressure, it should be freely recessed into the cylinder body. In addition, it should not have rust or a lot of dirt. Next, we inspect the functionality of the caliper guides, the integrity of the boot, and move on to the pads - it is unacceptable if the difference in their thickness is visible to the naked eye.
Since the piston returns to its original position using a cuff - it not only seals, but also acts as a spring - you need to make sure of its integrity. However, this is not all, since during its operation the cuff is deformed, and over time it can reduce its springing properties. To check this element, it is enough to hang the wheel and, when pressing or releasing the brake pedal, make sure that the wheel rotates freely.
And most importantly: under no circumstances should there be any signs of overheating on the disks, as evidenced by the purple color of the metal!
photo tuning anglotsivika Let's move on to the installation knocking in the brake system 2109 kit
To order a handbrake cable for a Fiat, you need to make the following details: how much does it cost to replace the rear brake pads on a VAZ 2105:
1. Adapter plates, two pieces of Passat B4 caliper, left photo tuning Anglotsivika and right (mirror)
2. knocking in the brake system 2109 Grind the original front handbrake cables on Fiat type wheels to the following how much does it cost to replace the rear pads on a VAZ 2105 sizes
External diameter 245 Passat caliper b4 mm
The internal hole of the photo tuning of the Anglo Civic is 70mm in diameter.
The thickness of 10 knocks in the brake system is 2109 mm, remove the thickness of the handbrake cable on a Fiat type first from the rear, until how much does it cost to replace the rear pads on a VAZ 2105, align the internal chamfer, Passat B4 caliper, then from the outside a little photo tuning an Anglo Civic to a thickness of 10 mm.
3. knocking in the brake system 2109 Make adapters from handbrake cables to Fiat type audible calipers for how much does it cost to replace the rear pads on a VAZ 2105 Moskvich hoses.
1. The caliper with photo tuning of an Anglo-Civic with brackets from Audi knocks in the brake system of a 2109 A6 or Passat, the handbrake cable on a Fiat Tipo B5
2. Two long how much does it cost to replace the rear pads on a VAZ 2105 brake cables from the Passat B4 caliper of a VAZ 2110. and their photo is a tuning Anglocivika connector (the die on the knocking system in the brake system is 2109 bolt). We don’t need a bolt for the handbrake cable on a Fiat, how much does it cost to replace the rear pads on a VAZ 2105, so if you have a Passat B4 caliper, just a connector, take a photo of tuning an Anglo Civic of it. I do not recommend using the standard one in the brake system 2109.
3. Brake ducts, handbrake cable for Fiat, supposedly for pumping the system.
4. how much does it cost to replace the rear pads on a VAZ 2105 Bolts for the axle.
5. Passat B4 caliper I recommend replacing the rear wheel bearings. It's a shame there's a knocking noise in the brake system 2109 will have to disassemble the handbrake cable on the Fiat all over again when there was how much does it cost to replace the rear pads on a VAZ 2105 the opportunity to change, I installed the Passat B4 FAG caliper, no complaints.
6. photo tuning anglotsivika A set of brake pads knocks in the brake system 2109 rear for the Passat handbrake cable for a Fiat Tipo B5 or Audi how much does it cost to replace the rear pads on a VAZ 2105 A6
Dismantling the unit
To carry out repair work on the brake system of a VAZ 2107, you will need spare parts: a caliper assembly or a set of cylinders. Tools you will need: a set of keys, screwdrivers, pliers and a hammer. It is advisable to organize the work in a garage box; a portable lamp is used to illuminate the workplace. Repair of the brake system is carried out in the following order:
- The front part of the car is lifted with a jack and placed on a support, the wheels are removed.
- A thorough inspection of the caliper is carried out and it is cleaned of contaminants, using a key set to “17” we unscrew the bolt securing the brake hose and drain the liquid into a previously prepared container.
- Carefully move the brake pads apart using a screwdriver, applying force to the metal parts of the base. Using a drift of a suitable size, the guides are knocked out and the pads are pulled out.
- We unscrew the bolts securing the housing to the knuckle, thereby releasing the mechanism, and remove it from the brake disc.
Replacement of faulty cylinders installed in the caliper grooves is carried out by knocking it out. It is advisable to carry out repairs in a vice, having previously treated the grooves with a special penetrating liquid. Installing new cylinders usually does not cause any particular difficulties; they are inserted into the housing and driven all the way to the stop using a hammer and a soft metal drift.
Parking system
Although it engages the mechanism of the rear axle wheels, it is in no way connected with the working mechanism. It uses a cable as a drive connected to the handbrake located inside the car.
Under the car, this cable is divided into two parts, going into the rear axle mechanisms. Inside, the ends of the cable are connected to the drive lever, which in turn is connected to a spacer bar. The drive lever is connected to one of the pads.
When the handbrake is engaged, the cable pulls the lever, and since it rests against the bar, the pads are released. The toothed sector of the handbrake fixes the position of the lever when the pads are spread apart.
Replace or restore?
If the piston jams in the working cylinder, you won’t be able to get rid of it by purchasing a repair kit, which usually only includes boots with cuffs and sealing rings. After all, it is necessary to restore the surface of the cylinder, and the piston must be replaced altogether. How expensive it will be to repair rear calipers yourself depends on the design features of the brakes, the model of the car and the degree of neglect of the problem. However, you will definitely have to purchase a new piston or look for a used one, and in extreme cases, buy a new unit. Its price fluctuates in a very different range: for mass-produced cars, a caliper costs 4-5 thousand rubles, and for premium foreign cars or rare models the price can reach up to 12-13 thousand rubles.
Therefore, the most expensive option is rarely chosen, and car owners usually buy used cars - after all, they cost 5 or even 10 times cheaper. As for caliper repair, it is even more profitable, since we get an almost new unit. After all, almost everything changes - guides, pistons, cuffs, etc., only the brake cylinder body restored by sandblasting remains old. However, in any case, repairs should begin with a visual inspection of the mechanism.